| KIT #: | 35301 |
| PRICE: | $28.00 MSRP |
| DECALS: | Five options |
| REVIEWER: | Scott Van Aken |
| NOTES: |
| HISTORY |
Allow me to paraphrase some of this
from the kit instructions. Just makes things easy as I know zilch about the
actual history of the car. Anyway, today, front wheel drive and
'frame-less' monocoque bodies are the norm when it comes to automobiles.
However, in the 1930s, this was something of a ground breaking design.
Citroen of France was one of the major producers of
 cars such as this and
offered these 'traction avant' or 'traction' (basically 'front wheel
drive') cars, which were quite popular. The 11 CV was produced starting in
1934 and there were 7 CV and 15 CV cars as well. These designations were
based on the taxable horsepower of the automobile (something that still
continues in some parts of the US if you look at your car's registration).
cars such as this and
offered these 'traction avant' or 'traction' (basically 'front wheel
drive') cars, which were quite popular. The 11 CV was produced starting in
1934 and there were 7 CV and 15 CV cars as well. These designations were
based on the taxable horsepower of the automobile (something that still
continues in some parts of the US if you look at your car's registration).
The 11 CV was powered by an in-line four cylinder engine of 1900cc that was installed longitudinally. With no need for a drive shaft, the car could be lower to the ground, which improved cornering performance and cut on wind drag. Adding a torsion bar suspension provided a smooth and comfortable ride.
The Traction was a very popular vehicle thanks to the additional speed and fuel efficiency over other cars of the time. Naturally, the military saw that these would be good to have as staff cars so the French Army bought a number of them. With the fall of France, it was normal that these would be used by the Germans as well and saw service on all fronts. Even with the end of the war, the CV 11 was kept in production until 1957. It was one of the finalists in the Car of the Century judging of 1999 (which chose the Ford Model T as the winner).
| THE KIT |
This is the third 11CV kit to go through my hands in the last several years. Previously I had built the 1/48 version of this and when I saw the 1/35 variant on the store shelves, it headed straight into my hands.
Like their 1/48 kit, this one is a curbside without a
full engine. The doors are separate on this one so you can build it with the
front doors open. As one expects from Tamiya, the builder will not be faced with
a plethora of small parts. Tamiya's way of doing things
 is to incorporate a lot
of small 'fiddly bits' into a single casting. It is this that probably makes
Tamiya so popular. One can build a Tamiya kit of subject X much faster than one
from another company that has more detail parts. But I digress.
is to incorporate a lot
of small 'fiddly bits' into a single casting. It is this that probably makes
Tamiya so popular. One can build a Tamiya kit of subject X much faster than one
from another company that has more detail parts. But I digress.
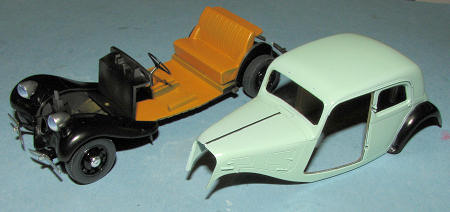
The kit has a one-piece body. The front fenders are separate and one attaches the firewall to this assembly before gluing to the chassis. The axle stubs and bumper mounts are molded on the chassis. In fact, the only underside bit you add is the exhaust pipe and muffler piece. All of the glass pieces are separate and Tamiya is nice enough to provide a paper template for these so you can use them to cut masks. As these were used for staff cars, a German driver is provided to sit behind the wheel. Frankly, a fetching French maiden would have been my personal choice, but alas, one is not included.
The car has five options. One is a German staff car in overall Panzer Grey. Next is a French staff car in overall olive green. An all black civilian version is next with the last version also being civilian. This one is light blue with black fenders and can be built as one that has been commandeered with German plates. The decal sheet is nicely done and includes the white fender edge markings for the German staff car.
| CONSTRUCTION |
 Now, this appears to be a pretty simple kit and I guess that for most of the
options, it is. If you are doing a military vehicle, then just about everything
aside from some interior bits is going to be painted in a green or a grey.
However, I decided to do the civilian car and this necessitated a great deal
more work in terms of painting the model than the simple scheme of a military
car.
Now, this appears to be a pretty simple kit and I guess that for most of the
options, it is. If you are doing a military vehicle, then just about everything
aside from some interior bits is going to be painted in a green or a grey.
However, I decided to do the civilian car and this necessitated a great deal
more work in terms of painting the model than the simple scheme of a military
car.
The first part was pretty easy. Basically the front axle and shocks are glued to the frame. Care needs to be taken with the shocks as they are not easy to get into place. As noted in the instructions, the entire underside is in semi-gloss black but in the case of the civilian car, the bumber supports are silver. This really means chrome and so I used gloss black lacquer for the underside and then sprayed on some Alclad II Chrome for the bumper supports.
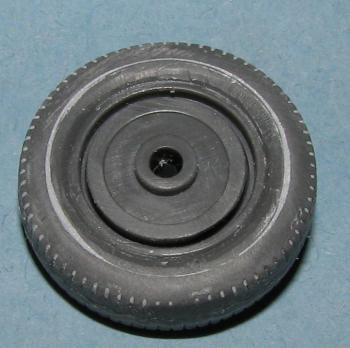
Wheels are next. These are black with chrome hub caps. Now Tamiya wants us all to have nice treads on our tires, though after sanding away the mold seam some of that is lost. So the inner portion of the tire fits about halfway through the tire itself. This not only leaves a seam you won't see from the outside (as planned), but if you want to get rid of the seam by filling, it is now much, much harder to fill and sand. A motor tool and a sharp square tipped knife blade are most helpful in getting out any filler than has gone down against the wheel rim. The brake cover traps a polycap so one can simply press the wheels onto the plastic axles. I should mention at this point that I used Bare Metal Foil Chrome foil when it came time to do the hubcaps as it is much easier than trying to mask around them for painting.
| COLORS & MARKINGS |
 From here I started hopping around in the construction sequence to pre-paint
areas of the car before assembling things. For instance, the headlight bezels
are Chrome as are the bumpers and the grille. This means gloss black followed by
Alclad II. The surround to the clear bits was given the same treatment. Tamiya
provides paper masks that one uses to cut out masking tape. I found it easier to
use the Tamiya tape on the windows and then cut along the lines while holding
the clear bit up to the light.
From here I started hopping around in the construction sequence to pre-paint
areas of the car before assembling things. For instance, the headlight bezels
are Chrome as are the bumpers and the grille. This means gloss black followed by
Alclad II. The surround to the clear bits was given the same treatment. Tamiya
provides paper masks that one uses to cut out masking tape. I found it easier to
use the Tamiya tape on the windows and then cut along the lines while holding
the clear bit up to the light.
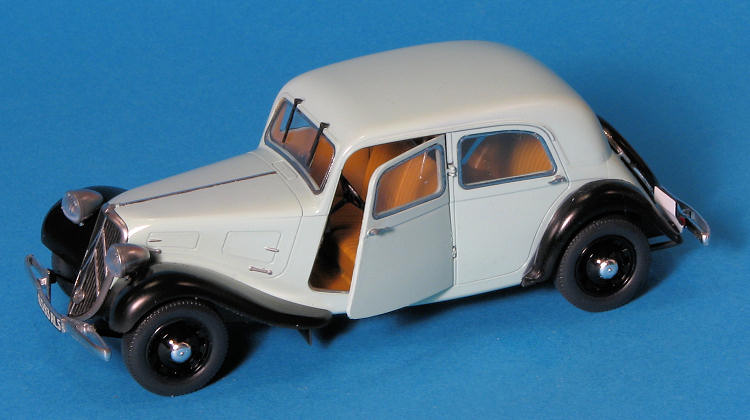
 The instructions show the civilian car as having gloss black fenders and
spare tire holder with the rest of the car in a light blue. The interior is some
sort of brown shade. I used a light brown for the interior, picking a shade from
the many bottles of Badger Flex acrylic paint that I have. For the light blue, I
chose Mr. Color Lacquer to handle this deal. As I'd
already
painted the inside of the body with the brown (right or not), I simply taped the
doors to the body and used the tape to cover all the window openings. I had
already painted the front fender piece and the rear fenders with Mr.Color Gloss
Black Lacquer. This stuff was dry enough to handle, and handle a lot, in less
than 10 minutes. One key to spraying lacquers like this is to be sure it is
properly thinned. If too thick it will provide 'cobwebs'. It seems it cannot be
too thin, though coverage takes more passes if like that. Anyway, with the
fenders on the body masked off, the light blue was painted on.
The instructions show the civilian car as having gloss black fenders and
spare tire holder with the rest of the car in a light blue. The interior is some
sort of brown shade. I used a light brown for the interior, picking a shade from
the many bottles of Badger Flex acrylic paint that I have. For the light blue, I
chose Mr. Color Lacquer to handle this deal. As I'd
already
painted the inside of the body with the brown (right or not), I simply taped the
doors to the body and used the tape to cover all the window openings. I had
already painted the front fender piece and the rear fenders with Mr.Color Gloss
Black Lacquer. This stuff was dry enough to handle, and handle a lot, in less
than 10 minutes. One key to spraying lacquers like this is to be sure it is
properly thinned. If too thick it will provide 'cobwebs'. It seems it cannot be
too thin, though coverage takes more passes if like that. Anyway, with the
fenders on the body masked off, the light blue was painted on.
| FINAL CONSTRUCTION |
 More bits
were glued onto the front fender piece, including the steering wheel and shaft
as well as the forward bulkhead and mud flaps. There is a decal for the
instrument panel. Headlight bezels were glued in place as was the rear seat. I
then pressed on all the wheels, which had been painted. The tires were painted
weathered black to contrast with the gloss black wheels. I used Bare Metal
Foil's Chrome for the center hood trim piece. Grabbing a brush, I painted black
the small overspray areas behind the bumper mount brackets.
More bits
were glued onto the front fender piece, including the steering wheel and shaft
as well as the forward bulkhead and mud flaps. There is a decal for the
instrument panel. Headlight bezels were glued in place as was the rear seat. I
then pressed on all the wheels, which had been painted. The tires were painted
weathered black to contrast with the gloss black wheels. I used Bare Metal
Foil's Chrome for the center hood trim piece. Grabbing a brush, I painted black
the small overspray areas behind the bumper mount brackets.
Some test fitting was done to be sure the parts would fit well. You really
cannot install the grille piece until after the body has been mounted as you'll
not get the body in place if you do so. During this time I installed the
windows. These are quite thin and prone to cracking (ask me how I know). While I
had little trouble with the side windows, the front and back one were not as easy. For whatever reason, I just
couldn't seem to get the lower part of the window to fit in as snugly as I'd
liked. Having already cracked one window from pushing too hard, I just did as
far as I could and stopped there.
windows, the front and back one were not as easy. For whatever reason, I just
couldn't seem to get the lower part of the window to fit in as snugly as I'd
liked. Having already cracked one window from pushing too hard, I just did as
far as I could and stopped there.
After installing the front seats, the body was glued in place, followed by the grille section. Tamiya provides prominent pins on the chassis section to be sure you get things properly aligned. Then went on the bumpers. Fit here is fairly good, but not perfect. On the underside, I glued on the exhaust system. This left only some fiddly bits. This included the door handles, trunk handles, license plate holder and the windscreen wipers. The instructions show them straight up and down, which is how I installed mine, but they perhaps should be over to one side. I'd move mine, but got some glue under one so that pretty well takes care of that situation. The tail lights were painted white than red. Gas cap glued in place and I glued one door shut by putting a bit on the hinge so that I could change my mind if I wanted. The driver's door was left open. I didn't use the driver. A bit of paint touchup and I was done.
| CONCLUSIONS |
 Well, I had
thought that this would be a week or two at most and it was twice that long.
Much of that due to the more complex painting and masking required for the
civilian car over the monotone military versions. The car also has some rather
fiddly bits (separate handles) that took a while to paint, clean up and attach.
I'm not at all thrilled with Tamiya's method of molding tires/wheels as it does
leave a difficult to fill/sand seam on each one. However, the end result is
quite pleasing, at least to my eye. As I mentioned earlier, I have always liked
this car and am glad to see it produced. This one will spend some quality time
in the parking area of my slot car track.
Well, I had
thought that this would be a week or two at most and it was twice that long.
Much of that due to the more complex painting and masking required for the
civilian car over the monotone military versions. The car also has some rather
fiddly bits (separate handles) that took a while to paint, clean up and attach.
I'm not at all thrilled with Tamiya's method of molding tires/wheels as it does
leave a difficult to fill/sand seam on each one. However, the end result is
quite pleasing, at least to my eye. As I mentioned earlier, I have always liked
this car and am glad to see it produced. This one will spend some quality time
in the parking area of my slot car track.
| REFERENCES |
Kit instructions
December 2009 If you would like your product reviewed fairly and quickly, please
contact
me or see other details in the
Note to
Contributors.