Monogram 1/24 Steve Kinser Sprint Car
| KIT #: | 2753 |
| PRICE: | $5.00 - bought 'used' without a driver figure |
| DECALS: | One option |
| REVIEWER: | Scott Van Aken |
| NOTES: | 1987 'World of Outlaws' boxing |
| HISTORY |
 Sprint cars
are high-powered race cars designed primarily for the purpose of running on
short oval or circular dirt or paved tracks. Sprint car racing is popular in the
United States, Canada, Australia, New Zealand and South Africa.
Sprint cars
are high-powered race cars designed primarily for the purpose of running on
short oval or circular dirt or paved tracks. Sprint car racing is popular in the
United States, Canada, Australia, New Zealand and South Africa.
Sprint cars have a high power-to-weight ratio, making speeds in excess of 140 miles per hour (230 km/h) possible on some tracks. 630 horsepower (470 kW) is commonplace for these machines. The safety record of sprint car racing in recent years has been greatly improved by the use of roll cages to protect the drivers. Many IndyCar Series and NASCAR drivers used sprint car racing as an intermediate stepping stone on their way to more high profile divisions, including Jeff Gordon, Kasey Kahne, Tony Stewart, J. J. Yeley, P. J. Chesson, Sarah Fisher, and Ed Carpenter.
The National Sprint Car Hall of Fame & Museum located in Knoxville, Iowa, USA features exhibits to highlight the history of both winged and non-wing sprint cars.
| THE KIT |
Twenty years ago, when these kits were new, Monogram did very well with them, producing over a dozen different liveries, all pretty much based on the same 'Gambler' chassis. Just about all of them are sought by aficionados of sprint cars and those who want a fairly easy, nice looking and interesting car.
 Monogram has always had nicely engineered kits and
this one is no real exception. The highlight to me is that the two main chassis
frames are already made in a single molding, so no need to worry about
alignment. Of course, that doesn't mean that we don't have to spend time sanding
away at mold seams on them, but it takes away one more problem. The kit had
several large chrome sprues, and these are mostly for the wings and supports. In
reality, these wings were aluminum and not chrome, so most of us will strip the
chrome and paint them aluminum. The up side is that we can treat the sprue
attachment nubs and mold seams while doing this.
Monogram has always had nicely engineered kits and
this one is no real exception. The highlight to me is that the two main chassis
frames are already made in a single molding, so no need to worry about
alignment. Of course, that doesn't mean that we don't have to spend time sanding
away at mold seams on them, but it takes away one more problem. The kit had
several large chrome sprues, and these are mostly for the wings and supports. In
reality, these wings were aluminum and not chrome, so most of us will strip the
chrome and paint them aluminum. The up side is that we can treat the sprue
attachment nubs and mold seams while doing this.
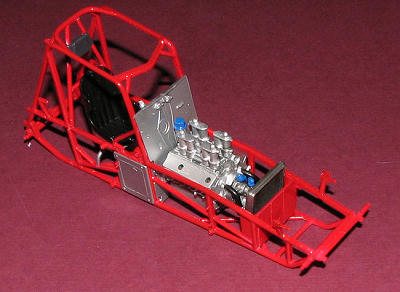
The car comes with a complete suspension and very nicely done vinyl tires. Typical of the genre, the two rear tires are different widths, with the outside one being wider for better grip. The circumferential tread on the front is also well duplicated as this helps the car steer through the dirt. When running on paved tracks, the tire treads would be different. Monogram has also put effort into molding the engine and it is quite well done, though it will, for the most part, be hidden under the front body panel. The kit includes a driver, though mine, being bought 'used' was missing this rather important feature. That is the blank area on the sprues. I say important as all the belts are molded on the driver figure and so the builder will have to hit the aftermarket folks for replacements.
 Instructions
are typical of Monogram of the time with well drawn construction steps and
generic color references. I like it that Monogram actually names the parts,
something rarely done anymore. The decals are also from 20 plus years back and
are the rather thick ones that look sort of 'plasticy'. I'm not sure how viable
they really are, and I'm thinking that aftermarket may be available if one
doesn't want to try to make their own. Having said all that, there have been
times I've used these old decals and they have come through OK, though they
don't like setting solutions. The markings are for Steve Kinser's car as he ran
in the World Of Outlaws during the late 1980s. Steve is still racing these cars
having finished 3rd in 2008 with 7 wins. In 1987 he won 46 features, including
12 in a row, and 24 of the last 26 events. Steve has been described by the
media, fans. and competitors as the best sprint car driver the sport has ever
had.
Instructions
are typical of Monogram of the time with well drawn construction steps and
generic color references. I like it that Monogram actually names the parts,
something rarely done anymore. The decals are also from 20 plus years back and
are the rather thick ones that look sort of 'plasticy'. I'm not sure how viable
they really are, and I'm thinking that aftermarket may be available if one
doesn't want to try to make their own. Having said all that, there have been
times I've used these old decals and they have come through OK, though they
don't like setting solutions. The markings are for Steve Kinser's car as he ran
in the World Of Outlaws during the late 1980s. Steve is still racing these cars
having finished 3rd in 2008 with 7 wins. In 1987 he won 46 features, including
12 in a row, and 24 of the last 26 events. Steve has been described by the
media, fans. and competitors as the best sprint car driver the sport has ever
had.
| CONSTRUCTION |
Lately, I've shied away from car kits like this. Don't get me wrong, I love racing cars, but I hate to scrape seams and racing cars, like this and NASCAR models are absolutely full of roll cages, with lots of seams to scrape on the bars.
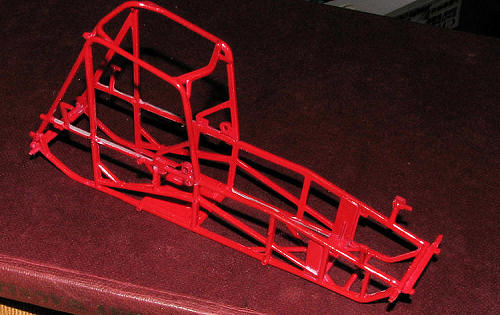 However,
I've never built a Sprint Car, though I've raced them in slot car form many
times. So, scalpel in hand, I started on this one. Step one was to scrape seams
on the two major roll cage/chassis sections. This was, well, tedious. Once done,
these were painted white then red using Tamiya TS-8 in a rattle can. Then I
glued them together. For some unfathomable reason, Monogram uses a longitudinal
chassis frame as the join surface, molding one half of the bar on one piece and
the other half on the other. It is fiddly to the max and needs clamped. It also
later needed filler on the joins and of course, repainting. Once dry, I noticed
that the for and aft torsion bars are not lined up. Not sure if I should heat
the assembly to return it to normal or used adding other bracing to do it.
Probably go with the latter as my luck I'll melt something.
However,
I've never built a Sprint Car, though I've raced them in slot car form many
times. So, scalpel in hand, I started on this one. Step one was to scrape seams
on the two major roll cage/chassis sections. This was, well, tedious. Once done,
these were painted white then red using Tamiya TS-8 in a rattle can. Then I
glued them together. For some unfathomable reason, Monogram uses a longitudinal
chassis frame as the join surface, molding one half of the bar on one piece and
the other half on the other. It is fiddly to the max and needs clamped. It also
later needed filler on the joins and of course, repainting. Once dry, I noticed
that the for and aft torsion bars are not lined up. Not sure if I should heat
the assembly to return it to normal or used adding other bracing to do it.
Probably go with the latter as my luck I'll melt something.
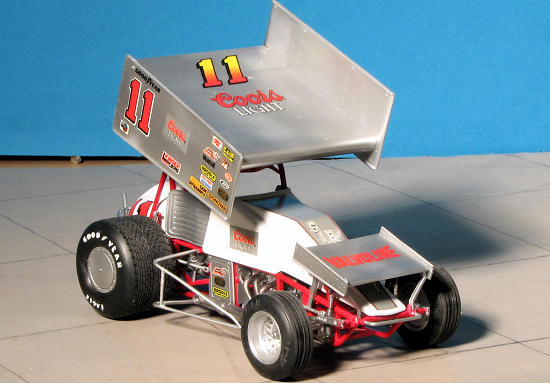
Meanwhile, there are lots of nice subassemblies to put together, including
the engine,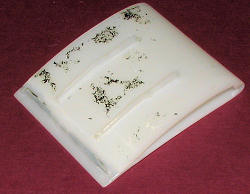 steering box, wings and other bits. Each of these was painted as a
unit and I soaked the chrome in bleach to remove the plating. Interestingly, the
bleach soaked off the chrome bits from the smaller parts overnight, but repeated
soakings in fresh bleach left bits on the larger sections unaffected (see the
wing image). On advise of counsel, I soaked these recalcitrant parts in
Blech-wite and in a couple of days, the rest had disappeared. Few parts on a
sprint car are chrome, but lots of them are aluminum. This includes the
differential section, on which I painted the drive shaft steel just to provide a
bit of change from all that aluminum.
steering box, wings and other bits. Each of these was painted as a
unit and I soaked the chrome in bleach to remove the plating. Interestingly, the
bleach soaked off the chrome bits from the smaller parts overnight, but repeated
soakings in fresh bleach left bits on the larger sections unaffected (see the
wing image). On advise of counsel, I soaked these recalcitrant parts in
Blech-wite and in a couple of days, the rest had disappeared. Few parts on a
sprint car are chrome, but lots of them are aluminum. This includes the
differential section, on which I painted the drive shaft steel just to provide a
bit of change from all that aluminum.
Meanwhile, back at the chassis, I had taken care of the frame repairs/filler
and so glued in the
 head rest piece, followed by the steering mechanism and the
firewall. Then it was a rather slow process of adding a piece or two each day,
letting it dry thoroughly while test fitting the next piece to be added. You'll
not be surprised that despite my care, parts didn't seem to fit exactly as
planned so dry fitting each new part is a must.
head rest piece, followed by the steering mechanism and the
firewall. Then it was a rather slow process of adding a piece or two each day,
letting it dry thoroughly while test fitting the next piece to be added. You'll
not be surprised that despite my care, parts didn't seem to fit exactly as
planned so dry fitting each new part is a must.
I particularly had trouble getting the engine mounted oil filter/oil lines piece to cooperate until I realized that the assembly actually fit further forward that the instructions imply. This wasn't discovered until I'd broken the lines, unfortunately. I also found that the small breathers on the left side valve cover need to stick straight up when the engine is installed or you'll never get the engine cover to fit. Speaking of which, by the time all the wings are installed, you won't be able to remove the engine cover anyway to show the upper portion of the engine. The engine was then glued to the firewall minus the valve covers and the air filters.
 I paid
particular attention to the front suspension bits. You do have to install the
axle and steering arm (which I broke removing from the sprue) prior to the
front suspension bits or you'll never get it in place. This is true of the rear
axle assembly as well. I was surprised that there is only one brake disc on the
entire car and this is on the rear. I guess braking for the corners isn't
something these guys do.
I paid
particular attention to the front suspension bits. You do have to install the
axle and steering arm (which I broke removing from the sprue) prior to the
front suspension bits or you'll never get it in place. This is true of the rear
axle assembly as well. I was surprised that there is only one brake disc on the
entire car and this is on the rear. I guess braking for the corners isn't
something these guys do.
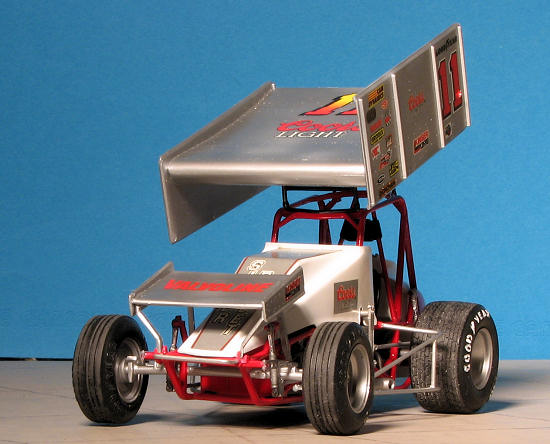
Other parts that were difficult to place were the mud
guard on the right of the driver's side and the wings. The big wing was
particularly troublesome, so be sure to use super glue and accelerator on it to
get this piece to fit properly. Once together, it is good and strong. Strong
enough so you can pick up the model by the main wing. Both wings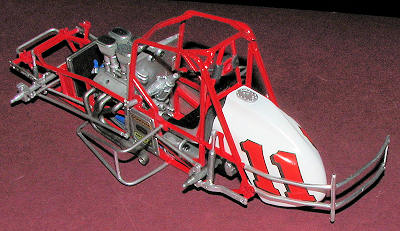 had large seams and sink areas that needed to be filled prior to painting. Not
surprisingly, the front wing was particularly prone to having the built in wing
mounts flex too much and breakage was an issue. These were the last pieces I
glued on before the tires were pressed into place.
had large seams and sink areas that needed to be filled prior to painting. Not
surprisingly, the front wing was particularly prone to having the built in wing
mounts flex too much and breakage was an issue. These were the last pieces I
glued on before the tires were pressed into place.
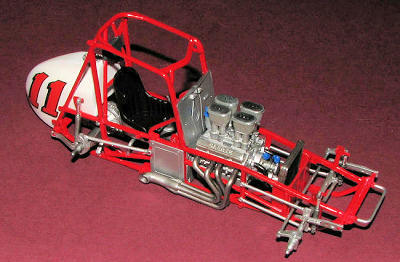
As mentioned, my kit came missing the steering wheel. Thankfully, Mark Hiott came to my rescue and while the wheel isn't the same design, it worked beautifully once I cut off the steering column from it and hollowed out the back to accept the kit's steering shaft. The kit wheels and tires are a bit of work to get properly assembled, as they must be done correctly to produce the bead needed to keep the tires fully on the wheels. I used thinned white paint to letter the outside of the two rear tires. These tires are not only different widths but different diameters as well. I'm surprised that rear end problems are not an issue with these cars as this has to put a lot of strain on the differential's spider gears.
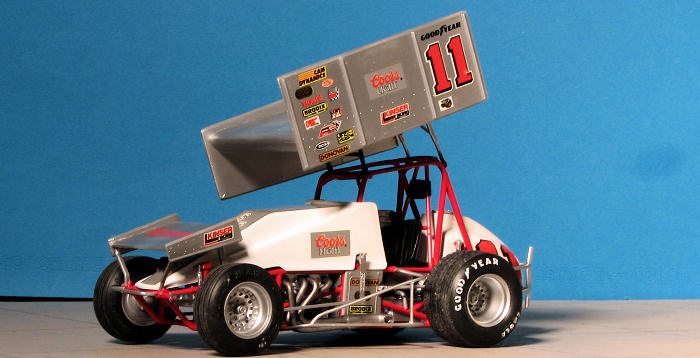
| COLORS & MARKINGS |
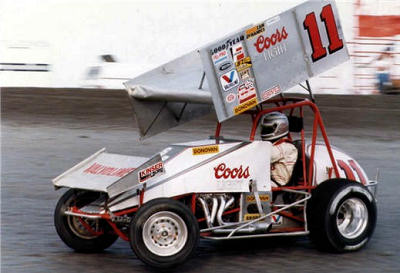 The
box art intimates that this car is painted silver. Well, digging through the
internet for images showed very few of the Coors Silver Bullet variant, most
homing in on the Quaker State car. However, it did show one that is white and
pretty close to what is provided in the kit in terms of decals. I did notice
that Monogram did not supply the additional braces for the side plates, so
perhaps on another Sprint Car build (yeah....). This meant that I painted the
fuel tank and engine hood white, which to me looks better than all that silver.
I had also initially painted the exhaust headers a 'manifold' color from Alclad
II, but misted aluminum over it after seeing the accompanying photograph. Always
better to find a photo of the car you are modeling when it comes to racing cars
as they seem to change from race to race. I should also point out that all the
metallics you see on the model are various shades of Alclad II. They seem to
have changed their formula as the smell is much more benign than the earlier
compositions. It is also not as finicky to apply.
The
box art intimates that this car is painted silver. Well, digging through the
internet for images showed very few of the Coors Silver Bullet variant, most
homing in on the Quaker State car. However, it did show one that is white and
pretty close to what is provided in the kit in terms of decals. I did notice
that Monogram did not supply the additional braces for the side plates, so
perhaps on another Sprint Car build (yeah....). This meant that I painted the
fuel tank and engine hood white, which to me looks better than all that silver.
I had also initially painted the exhaust headers a 'manifold' color from Alclad
II, but misted aluminum over it after seeing the accompanying photograph. Always
better to find a photo of the car you are modeling when it comes to racing cars
as they seem to change from race to race. I should also point out that all the
metallics you see on the model are various shades of Alclad II. They seem to
have changed their formula as the smell is much more benign than the earlier
compositions. It is also not as finicky to apply.
| FINAL CONSTRUCTION |
Other areas that gave me some issues were the side
nerf bars, again, breaking them while removing them from the sprue. I was able
to repair them and cover the break enough so things were not too noticeable. I
was also surprised at the method of attaching the rear bars. These are molded
very wide and one 'simply' glues one side and when dry, bends the plastic to fit
the other side. Natura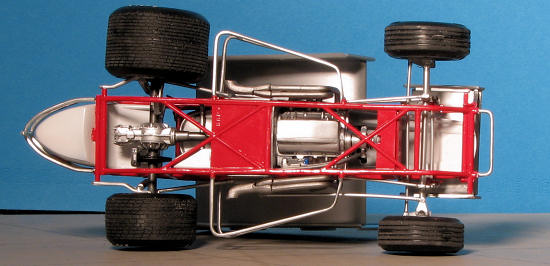 lly,
much trimming is needed to get these bits to slot in place, but it worked just
fine.
lly,
much trimming is needed to get these bits to slot in place, but it worked just
fine.
I should talk a bit about the decals. Monogram decals of this period were well printed, thick and somewhat 'plasticy' in appearance. However, despite the glue turning a milky shade once the decals were wet, they went on without any problem and even reacted well to Microsol setting solution. I was so fearful that they'd end up being junk, but that was not the case at all. Not bad for kit decals produced in 1987 and bodes well for other racing car kits of similar vintage in my stash. As you might imagine, many of these markings had to be applied during the build in order to get clear access to where they had to go.
The last things put on were the wheels. These are supposed to click-lock into place on the axles. The big one on the right rear did and tends to flop around a bit as a consequence; the others were simply press fit on until they wouldn't fall off when the car was picked up. Things sit fairly level considering the difference in rear tire diameter. I also filed the tread on the tires to remove the molding seam and sprue attachment pip prior to installation.
| CONCLUSIONS |
 This is
the sort of kit that I like to build. It isn't an über difficult kit if one goes
slowly and methodically, and yet produces enough areas where one has to do some
thinking during construction to overcome some fit issues. I have to say that I
could have done without the seemingly endless seam scraping that is required of
a race car that has all that tubing and other framework. This more than anything
else is why I've not built a NASCAR kit in nearly 20 years. I was particularly
pleased at how well the decals had survived the time and the overall model does
make all that work worth the effort.
This is
the sort of kit that I like to build. It isn't an über difficult kit if one goes
slowly and methodically, and yet produces enough areas where one has to do some
thinking during construction to overcome some fit issues. I have to say that I
could have done without the seemingly endless seam scraping that is required of
a race car that has all that tubing and other framework. This more than anything
else is why I've not built a NASCAR kit in nearly 20 years. I was particularly
pleased at how well the decals had survived the time and the overall model does
make all that work worth the effort.
While I would not recommend this one to a beginner, I can't see why anyone of intermediate skills couldn't build this one. These kits are not exactly rare and while not on the shelf of every hobby shop, can be found with a little bit of searching.
| REFERENCES |
http://en.wikipedia.org/wiki/Steve_Kinser
Nights spent on the benches at Tri-City Speedway
June 2011 Thanks to
me for this one. It was fun and a nice change from the norm. If you would like your product reviewed fairly and quickly, please
contact
me or see other details in the Note to
Contributors.