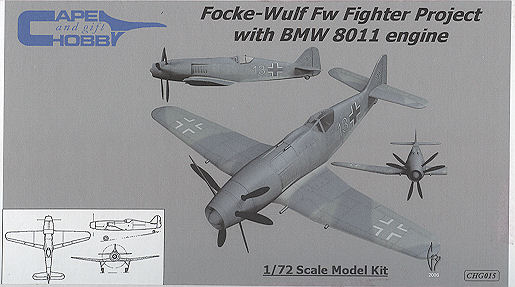
| KIT: | Cape Hobby 1/72 FW fighter (BMW 8011engine) |
| KIT #: | CHG 015 |
| PRICE: | $41.95 direct from Cape Hobby |
| DECALS: | Generic insignia |
| REVIEWER: | Scott Van Aken |
| NOTES: | Resin kit with vac canopy |
| HISTORY |
My usual sources failed me on this one so I'll have to paraphrase from the instructions. "In August 1941, Dipl-Ing Mittelhuber did a study on the design and performance of single seat fighters with power plants still under development. This was based on the FW-190 design, which was just entering service. One such project was powered by the BMW 802 18 cylinder engine with a three speed, single stage supercharger, rated at 2600 HP for take-off and 1600 HP at altitude. Thanks to being over engineered, the 802 was never able to pass the 50 hour reliability tests and was later abandon for a more conservative design.
Another option for the aircraft was to use the BMW P.8011. This was rated at 2800 HP take-off. It was basically an 802 with two exhaust turbines enclosed in an aerodynamic cowling and driving a contra-rotating prop. Probably due to the lack of reliability of the base BMW 802 engine, this project was never realized, however, Focke-Wulf did go on to produce the superlative Ta-152 which would have performed the same missions.".
As a final aside, I find it interesting that there were really no successful wartime aircraft which were driven by a contra-rotating propeller. In fact the only aircraft that come readily to mind with such a set-up are the Tu-95 family, the Shackleton, and the Gannet.
| THE KIT |
 This
is another Anigrand molded kit. Packaging is the same, overall
feel of the kit is the same, and the clear bits, which are well molded and
nicely done, do not have pronounced framework, typical of an Anigrand kit. The overall look of the kit parts are nicely done.
What is even better is that there are two vac canopies provided. YAY! There are some molding glitches as you'll find that in most of these resin garage
kits. Each spinner section has an air pocket to fill and there is one on the
trailing edge of the rudder. The tailplanes are devoid of them which is nice.
This
is another Anigrand molded kit. Packaging is the same, overall
feel of the kit is the same, and the clear bits, which are well molded and
nicely done, do not have pronounced framework, typical of an Anigrand kit. The overall look of the kit parts are nicely done.
What is even better is that there are two vac canopies provided. YAY! There are some molding glitches as you'll find that in most of these resin garage
kits. Each spinner section has an air pocket to fill and there is one on the
trailing edge of the rudder. The tailplanes are devoid of them which is nice.
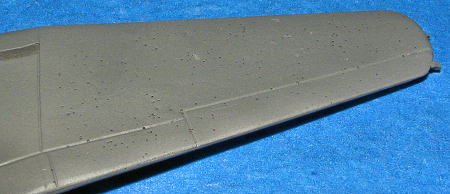 On both the upper and lower
surfaces are a myriad of small indentations
and pin holes. Things like this don't happen very often, but when they do they
cause additional work. The trick is to fill these tiny indentations without
opening up new ones. Though difficult to photograph, I applied a couple of coats
of primer to the wing to make them more visible. When you click on the thumbnail
to the right, you can see these tiny pinholes and 'dents' in the wing.
On both the upper and lower
surfaces are a myriad of small indentations
and pin holes. Things like this don't happen very often, but when they do they
cause additional work. The trick is to fill these tiny indentations without
opening up new ones. Though difficult to photograph, I applied a couple of coats
of primer to the wing to make them more visible. When you click on the thumbnail
to the right, you can see these tiny pinholes and 'dents' in the wing.
The best way to handle the pinhole situation is to use some thin undercoating (could be just regular primer or Mr. Surfacer) and spray on a coat. It needs to be thin to get into the tiny pinholes. May take more than one coat. Then when dry, very gently sand with some 600 grit paper to level things out. If one is lucky, this coat of filler and light sanding will take care of things or it may take several applications. Always try to fix what you have. If not, one may well have to ask for new parts. I ran into this with the Anigrand XFV-12 and after four total coatings and sandings, things had just gotten worse. Fortunately, Anigrand sent me another wing after I sent them in a picture of what the original looked like after those four attempts. The delay was about a month or so which is why I suggest trying to cure the problem first. I'm sure that if things go that far, Coast Hobbies will also supply replacements if needed. Just as a note, I'm working on this kit and two coatings of primer/Mr.Surfacer took care of the pinhole situation. More in the full build review later.
Didn't mean to go on about that, but every once in a while, even from a bigger company, one has things like this pop up and one should be ready to deal with it when it does. I should mention, while on the wings, that these are designed with an interlocking feature that helps to keep things properly aligned while building. A nice engineering feature that I wish more would have. Since this is a FW-190 derivative, one could also use a photo etch set on it to spruce up the interior. Though little can be seen in the small cockpit anyway, a nice etched instrument panel and some belts will really help. Might even want to consider cannibalizing an old Italeri 1/72 FW-190 kit for bits. Since this seems to have the same landing gear as the 190, plastic ones will not be prone to warp over time as resin ones will do. It is a good investment next time you are at a show and can pick one up for a few dollars.
 Instructions consist of several pieces of inkjet
printed paper. One is a short history and the others are images of the kit
during several stages of construction. This works out quite well for assembly,
but please note that the photos of the landing gear show them installed
backwards. The main strut is at the outer edges of the wheel well and not in the
center of the well as the image shows. Use the three-view on the box top when it
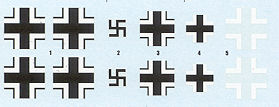
comes time to installing gear. A generic insignia decal sheet is provided if you
wish to use it. Superscale did a 1/72 FW-190 insignia sheet a year or so back
that would be perfect for this kit.
Instructions consist of several pieces of inkjet
printed paper. One is a short history and the others are images of the kit
during several stages of construction. This works out quite well for assembly,
but please note that the photos of the landing gear show them installed
backwards. The main strut is at the outer edges of the wheel well and not in the
center of the well as the image shows. Use the three-view on the box top when it
comes time to installing gear. A generic insignia decal sheet is provided if you
wish to use it. Superscale did a 1/72 FW-190 insignia sheet a year or so back
that would be perfect for this kit.
| CONCLUSIONS |
This is a great kit to start off a collection of resin kits. Though it will exercise those modeling skills, especially if you are used to a steady diet of Tamiya kits, you'll be able to build something rather unique and will have a model you'll be pleased to have finished. I know I always get a much greater feeling of accomplishment from doing something like this and I think you will as well.
October 2006 My thanks to Cape Hobby &
Gift for providing the preview kit. You can only get this kit direct. If you would like your product reviewed fairly and quickly by a
site that has over 325,000 visitors a month, please
contact
me or see other details in the
Note to
Contributors.