
Airmodel 1/72 Messerschmitt Me-109TL
| KIT #: | AM2075 |
| PRICE: | $30.00 |
| DECALS: | None included |
| REVIEWER: | Scott Van Aken |
| NOTES: | Resin kit with metal and |
| HISTORY |
Back in early 1943 when the Me-262 was being tested and getting ready for production, the Luftwaffe wasn't really sure if it would work, so wanted a back up plan. It had to be something that would be able to get built relatively quickly in case of some unforeseen problem. Messerschmitt came up with what is known as the 109TL. This basically took the fuselage and wings of the Me-155 high altitude fighter that was under construction, the landing gear of the Me-309 and mated two Junkers Jumo OO4s to them.
Fortunately for the Luftwaffe, the 262 seemed to be doing well, so the project was dropped a few months after it was proposed. No metal was cut for the prototype, no mockup was built. The aircraft was a pure paper project that, though interesting, never was needed.
Now for a break from reality.
 So here it is, early 1944. The Luftwaffe
has developed two twin-jet fighters, the Bf-109TL and the sleeker Me-262A. Both
are being built with the 109 variant being slower because of its straighter
wings, but able to reach altitude quicker as it is a lighter airframe. As an
experiment, the Spanish staffel of JG 51 was chosen to be the first
volunteer unit to fly jets and they were quickly trained on the new jet. It was
decided to send these men to Northern Italy where Allied bombers were flying a
lot of missions into the Adriatic area. Since being pushed back to Northern
Africa from the shambles that was the Sicily operation, they had been building
up for another go. The Russian front was a stalemate since the failed attempt to
take Stalingrad from the Wehrmacht and the assassination of Stalin had thrown
the Soviet Union into turmoil.
So here it is, early 1944. The Luftwaffe
has developed two twin-jet fighters, the Bf-109TL and the sleeker Me-262A. Both
are being built with the 109 variant being slower because of its straighter
wings, but able to reach altitude quicker as it is a lighter airframe. As an
experiment, the Spanish staffel of JG 51 was chosen to be the first
volunteer unit to fly jets and they were quickly trained on the new jet. It was
decided to send these men to Northern Italy where Allied bombers were flying a
lot of missions into the Adriatic area. Since being pushed back to Northern
Africa from the shambles that was the Sicily operation, they had been building
up for another go. The Russian front was a stalemate since the failed attempt to
take Stalingrad from the Wehrmacht and the assassination of Stalin had thrown
the Soviet Union into turmoil.
Arriving at their assigned base of Aviano near Venice, Rudolfo de Santieri and the rest of his comrades were anxious to put this new plane to the test. The transition to the new type was pretty brief, but those who did not kill or injure themselves learning the quirks of this new type, were very confident of their abilities. Training reduced their numbers by four with the previous commander being the only fatality. Most of the ground crew were Luftwaffe, but most of the pilots were from Spain and proud to help the Germans against their enemies. Secretly, most of the men wished they were fighting communists in Russia, but they were currently needed here and the Luftwaffe moved units where they were needed. Besides, much nicer here in Northern Italy that freezing one's butt off in Russia during the winter.
Allied bombers had been hitting the refineries in Romania rather frequently and often flew near here on the way in. It was for this very reason that the 109TLs were being stationed here. The 262s stayed in Western Europe to handle the situation there and it was hoped the TLs would be the ticket for this area. It was said that only a couple of strikes with the potent 30mm Mk 108 nose cannon were enough to bring down a bomber and the TL had four of them. Thanks to the size of the shell, not many rounds per gun could be fitted, so most of the planes had switches in the cockpit allowing guns to be turned on or off as needed.
 So far, Rudolfo had been scrambled three
times, but each time his group was unable to find the bombers thanks to cloud
cover. Off went the alarm and the ready crew hopped into their waiting machines.
The engines whined into life and after what seemed like an eternity to get
engines up to temperature, the four aircraft bounced along the uneven turf to
the runway. Slowly spooling up the engines, the planes skidded forward on the
brakes until they were released and the aircraft slowly climbed into the air.
The turbojets provided impressive speed, but had very poor throttle response and
took a long time to build up power. It was recommended that no dog-fighting be
done if fighters were encountered. These jets were hit and run aircraft with
impressive straight line speed but bled it off quickly in turns and besides, the
turns were very broad.
So far, Rudolfo had been scrambled three
times, but each time his group was unable to find the bombers thanks to cloud
cover. Off went the alarm and the ready crew hopped into their waiting machines.
The engines whined into life and after what seemed like an eternity to get
engines up to temperature, the four aircraft bounced along the uneven turf to
the runway. Slowly spooling up the engines, the planes skidded forward on the
brakes until they were released and the aircraft slowly climbed into the air.
The turbojets provided impressive speed, but had very poor throttle response and
took a long time to build up power. It was recommended that no dog-fighting be
done if fighters were encountered. These jets were hit and run aircraft with
impressive straight line speed but bled it off quickly in turns and besides, the
turns were very broad.
Hoping not to miss out on action once again, he saw a glint from above and spotted the bomber stream. It looked like about 200 B-24s. But wait, some of those were decidedly smaller. It looks like a P-38 escort. Well, this should be no problem as though the P-38 had range, it was not as quick as the TL. Simply blast through the fighter escort and start pumping rounds into the bombers.
And that is what he did. Selecting two
guns, he fired a couple of rounds into the escort as he and his men went through
them. Lining up some targets, rounds were put into the wing roots of the nearest
Liberator. The wing buckled and the plane went down. Rudolfo zoomed up for
altitude and swung around for another pass. The airframe shuddered from the
blast of his guns and another plane plummeted down. Deciding to go for another
pass, he and his wingman climbed again. Lining up another victim, the trigger
was pulled and a strike was seen but the guns went silent. His wingman finished
it off. Muttering under his breath, Rudolfo switched on the other two gun and
then headed back to the stream for another pass. Again, success as the brown
B-24s fell from the sky. Despite all the excitement, Rudolfo saw that he was
running low on fuel so called to the
 rest of the planes, who were having equal
success, that it was time to head back.
rest of the planes, who were having equal
success, that it was time to head back.
Thanks to the thirsty turbojets, the average mission was only about 40-45 minutes, though if one did not mind gliding home, that could be extended. Through all of this the P-38s tried in vain to knock down a TL, but only rarely were they able to get off a shot at all. Rudolfo was thrilled with his success. Three bombers down and the rest of the unit accounted for seven more, plus several damaged and forced to drop their load in the Adriatic and head back for the 'normal' fighters to finish off.
When they got back, the whole unit exalted at their success with much laughter, stories and wine. It isn't often that one has such superiority and it felt good. No one in the staffel knew how long this would last, but all hoped it would be a very long time.
| THE KIT |
My only experience with Airmodel has been with their vacuforms
and vac conversion bits. They worked, but were not exactly what I would call
cutting edge. I have always had a fascination with Luftwaffe paper projects (the
infamous Luft '46 disease!). When I saw this kit recently, it drew me in. There
were two strong incentives to buy this kit. One because it was a 109 variant,
and two, because it was 75% off retail price. The fact that the box stated that
there were no decals is not a hindrance to a true Luft '46 builder!
The instructions consist of an exploded view
of the parts. There is a very nice three view drawing and another than shows a
camo scheme of RLM 81/82 over 76 along with where to place the insignia, which
will have to come from the spare decals pile. Paint numbers are given for
Aeromaster and two ranges of Humbrol paints. No interior colors are given.
There
is some detail on the inside of the fuselage, which is nice. There is also
plenty of room in the nose for weight, which will be needed as this plane has
lots of resin aft of the main gear. What is missing is a separate floor to the
cockpit. Getting the seam out of that area will prove to be interesting.
Especially as it is a very tight fit and it looks as if you'll have to install
the cockpit components prior to gluing the fuselage halves together.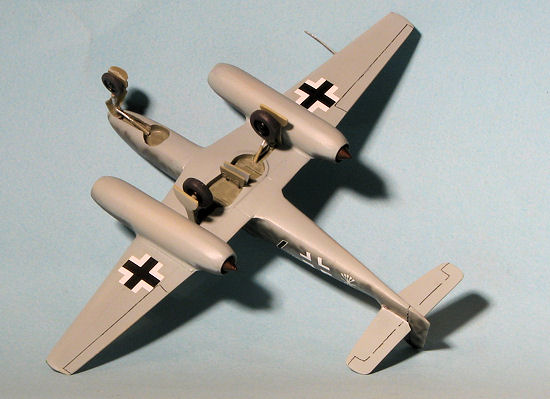 Upon opening the box, I was greeted
by a plastic bag full of smaller plastic bags and a two sheet instruction
sheet. As you can see, Airmodel has a true multimedia kit on their hands.
Most of the components are made of a nice tan resin. You may also notice that
there are no resin plugs on any of the parts! Very unusual and most welcome.
Even a number of the smaller bits are not on a resin wafer, though some are. The
landing gear, wheels and engine inlet and exhaust 'spikes' are made of metal and
very well done. Two vacuform canopies are provided. These are probably the
weakest part of the kit as the frames are very large. Perhaps a replacement from
Squadron would fit.
Upon opening the box, I was greeted
by a plastic bag full of smaller plastic bags and a two sheet instruction
sheet. As you can see, Airmodel has a true multimedia kit on their hands.
Most of the components are made of a nice tan resin. You may also notice that
there are no resin plugs on any of the parts! Very unusual and most welcome.
Even a number of the smaller bits are not on a resin wafer, though some are. The
landing gear, wheels and engine inlet and exhaust 'spikes' are made of metal and
very well done. Two vacuform canopies are provided. These are probably the
weakest part of the kit as the frames are very large. Perhaps a replacement from
Squadron would fit.
| CONSTRUCTION |
IHave you ever had a kit that was close to being started many, many times, yet something always prevented it from being done (usually another kit)? Such is the case with this one. Despite having had it for well over 10 years and really liking the airplane, it never got started. So long was it in the wings, that the vac canopies have yellowed!
Well, that time is now over. I removed the bits from their individual sealed
bags and started test fitting parts. Airmodel provides pin and receptacle
alignment lugs, but most of the pins have a lot of stuff around them and many of
the receptacles were filled with resin so that sort of puts that in a 'nice
idea, but not practical' category. I noticed when test fitting that, typical of
what sometimes
 happens to resin, some of the parts were larger or smaller than
their adjacent mating surfaces. I also found a few air pockets that will need to
be taken care of.
happens to resin, some of the parts were larger or smaller than
their adjacent mating surfaces. I also found a few air pockets that will need to
be taken care of.
First things I did was to assemble the engine pods. I would recommend gluing in the metal intake and exhaust bits at this time. I did not and had issues getting them in place. Specifically, the inside bulkheads did not line up and the holes were too small. However, doing this will make it more difficult to fill in the areas around the opening, so I guess neither is really a great option. The engine pods are handed so be sure you glue the proper halves to each other.
I then put a bunch of weight in the nose and then painted all of the interior bits with RLM 66, save the seat which I painted RLM 02 just to be different. Thanks to the thick, yellowed canopies, not much detail will be seen here. I then cemented the fuselage halves together. Be sure to sand down the mating surfaces as they are uneven. These halves were also a bit warped so I glued it in stages. When done, the instrument panel and control stick were glued in. I left the seat out until all the filler work was done as every seam on the kit needs it.
The fin/rudder along with the tailplane piece (the two tailplanes are a single bit) were then attached. Much trimming was needed to get the tailplanes in place and, of course, the fin is thinner than the mating surface on the fuselage halves. I found the tailplane section to be warped as it is so thin, but I poured some boiling water over these and straightened them out.
Next step was to install the lower wing center section. This was followed by the outer wing pieces. I had considered installing the engines first as there are large gaps, but I did not and glued those in later. Did I mention that there are large gaps that need filler?
With the engines in place and all the filling and
sanding pretty much done (and this part of the build is actually about 50% of
the time it takes to build the kit), I then struggled quite a bit to get the
intake and exhaust bullets in place. This was due to the rather major
misalignment of the mounting areas from one engine half to the other. Super glue
and patience will prevail. The rear engine bullets stick out WAY farther than
they should so if you find and build this kit, you may want to trim back the
farthest forward
 mounting area on the inner nacelles before gluing the halves
together.
mounting area on the inner nacelles before gluing the halves
together.
Once all the major airframe bits were together. I took a break to work on something simple for a while.
When I returned, I cleaned up the metal gear and wheels and made sure those would fit. The main gear attachment holes were filled with resin so those had to be drilled out. The metal wheels are not badly done, though the axle holes are too small and needed drilled out. I also trimmed back the axles themselves as they are far too long.
The last feat before painting, was to make tape seatbelts and install the seat. The vac canopy was then cut and masked and glued in place with clear gloss paint. I have to say that I am no fan of vac canopies and generally botch every one I do. This one is no exception. Despite having two, I failed to get a clean installation. Masking was no treat either as the frames are somewhat indistinct once the Tamiya tape covers it.
| COLORS & MARKINGS |
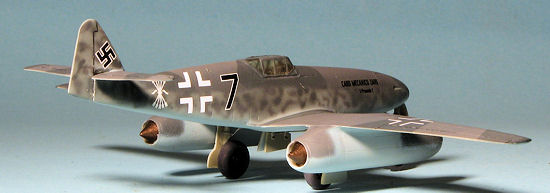
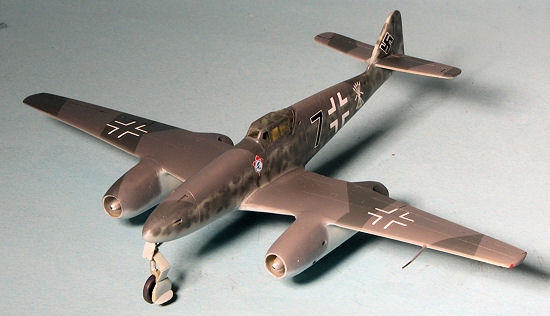
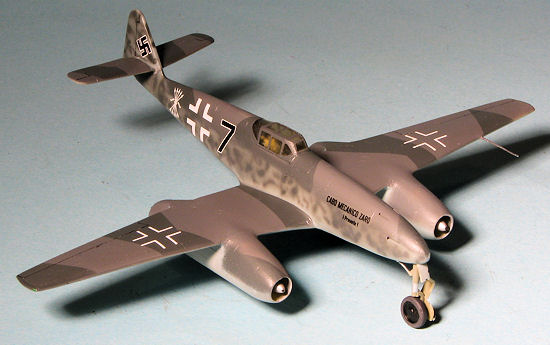
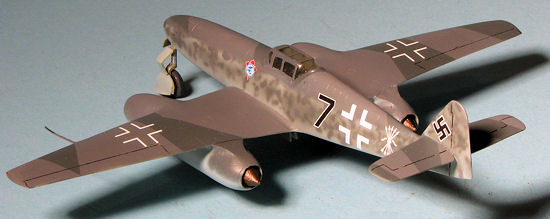
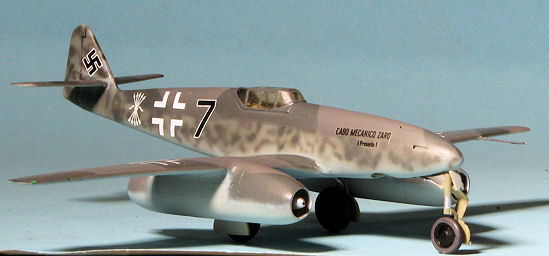 At this stage, it was time to come up with a paint
scheme. I did not get very inventive on this one and decided on RLM 74/75/76
with heavy fuselage mottling. I used Model Master enamels for all the colors and
followed my usual procedures by doing the underside first, masking underside of
tail planes, painting it overall RLM 74, then masking the splinter scheme and
painting RLM 75. Then all the upper surfaces were masked over and RLM 76 was
painted to cover the overspray. The next step was the mottling in RLM 74 and RLM
75. I then lightly misted all of the fuselage side with the darker of the two
greys. Turned out rather well if you ask me.
At this stage, it was time to come up with a paint
scheme. I did not get very inventive on this one and decided on RLM 74/75/76
with heavy fuselage mottling. I used Model Master enamels for all the colors and
followed my usual procedures by doing the underside first, masking underside of
tail planes, painting it overall RLM 74, then masking the splinter scheme and
painting RLM 75. Then all the upper surfaces were masked over and RLM 76 was
painted to cover the overspray. The next step was the mottling in RLM 74 and RLM
75. I then lightly misted all of the fuselage side with the darker of the two
greys. Turned out rather well if you ask me.
I then sprayed Future (which is an acrylic gloss clear for those who are not familiar with it) over the airframe.
| FINAL CONSTRUCTION |
Returning to the work bench, I then painted the wheel wells and inside of the gear covers with RLM 02. When that dried, the previously cleaned up and painted metal gear struts were glued in place. This was followed by the fine resin retraction struts. Those were then painted and the wheels were glued on. This was followed by the resin gear doors. These are only a fair fit.
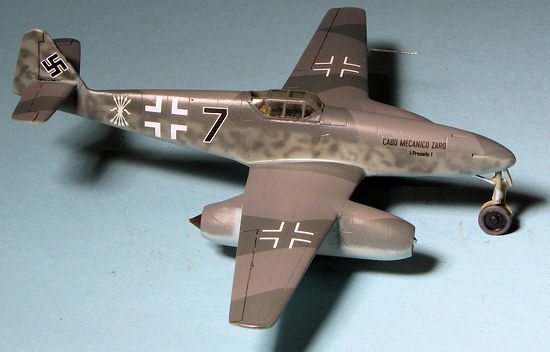
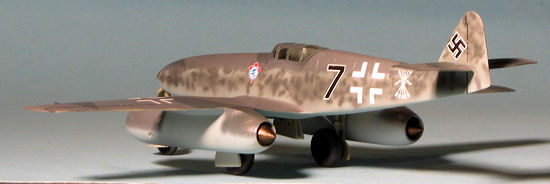 It was then time for markings. Well, I was feeling
lazy so I chose one of the markings options from the new Zvezda 1/72 Bf-109F-2
kit, specifically those from 15 (Spanish)/JG 51. I thought they looked a bit
different from the norm. The insignia came from Superscale 72-834 which is for
1/72 Bf-109s and FW-190s. The Zvezda markings are actually very well done. Nice
an opaque and succumbed to Microsol without any fuss. I had forgotten to attach
the resin pitot tube, curved and all, so that was done.
It was then time for markings. Well, I was feeling
lazy so I chose one of the markings options from the new Zvezda 1/72 Bf-109F-2
kit, specifically those from 15 (Spanish)/JG 51. I thought they looked a bit
different from the norm. The insignia came from Superscale 72-834 which is for
1/72 Bf-109s and FW-190s. The Zvezda markings are actually very well done. Nice
an opaque and succumbed to Microsol without any fuss. I had forgotten to attach
the resin pitot tube, curved and all, so that was done.
As is the norm with me, there was a goodly bit of late construction touch up painting to be done. That was completed and the kit given an overall matte coat. I had considered leaving it somewhat gloss as fighters were frequently waxed for more speed, but since this is a model, I did it more matte as it is easier to photograph.
| CONCLUSIONS |
Not the easiest resin kit I have ever built, but then not the most difficult either. The most difficult part might be finding one. If you do and you like paper project kits, then you should really consider adding this to your collection.
| REFERENCES |
The instruction sheet, which happens to have been copied pretty much verbatim onto Wiki.
November 2012
Thanks to me for grabbing this one.
If you would like your product reviewed fairly and fairly quickly, please contact the editor or see other details in the Note to Contributors.