Tamiya 1/48 Me-262A w' Kettenkrad
|
KIT # |
61082 |
|
PRICE: |
$45.00 MSRP |
|
DECALS: |
Three KG-51 aircraft |
|
REVIEWER: |
|
|
NOTES: |
|
BACKGROUND |
For a brief history on this aircraft and a look at the parts in the box, please visit the preview.

|
CONSTRUCTION |
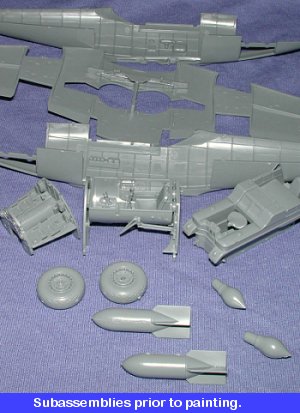 For many of us,
the instructions are just a general guide. Sometimes it gets us in trouble to
ignore it, but usually it doesn't. What I have done for years, especially in
aircraft kits, a genre that I have much experience, is that I look for
subassemblies. Those are items that can be glued together at any time and those
items that will eventually be painted the same color. For this kit, that turned
out to be much of the cockpit, gun bay, wheel wells, wheels, bombs, side panel
stuff, exhaust 'onions' and the main chassis of the kettenkrad. You can see by
the image to the right that these are all in bare plastic and have yet to
be scraped, sanded or had any filler added that may be needed. Prior to painting
them, those that need these steps done to them will.
For many of us,
the instructions are just a general guide. Sometimes it gets us in trouble to
ignore it, but usually it doesn't. What I have done for years, especially in
aircraft kits, a genre that I have much experience, is that I look for
subassemblies. Those are items that can be glued together at any time and those
items that will eventually be painted the same color. For this kit, that turned
out to be much of the cockpit, gun bay, wheel wells, wheels, bombs, side panel
stuff, exhaust 'onions' and the main chassis of the kettenkrad. You can see by
the image to the right that these are all in bare plastic and have yet to
be scraped, sanded or had any filler added that may be needed. Prior to painting
them, those that need these steps done to them will.
Next order of business was to do some detail painting in the cockpit and to start adding parts. I used the kit decals for the instrument panel and the fit was superb. Just a touch of Champ setting solution got them to snuggle right down. The instrument faces on the plastic panel are otherwise blank. With the cockpit properly painted, it was glued into the right fuselage half.
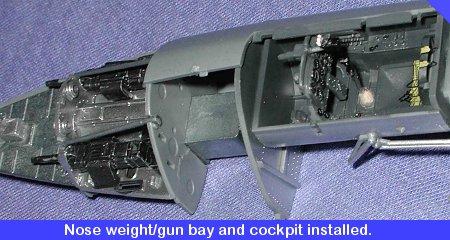
I turned my attention to the nose wheel well section. This is
basically the weight and since this area is to be in aluminum, I just left it
unpainted. To the front of this weight a forward bulkhead and alignment pin is
superglued. This bit also holds the nose gear strut, but I left it off until
after painting is done to ease things a bit in this area. However, I had to
install the nose gear retraction strut. The gun ban was then superglued to the
top section and this holds the retraction strut in place. The gun bay had detail
painting done to it and it was time to install the two cannon. I
 (unnecessarily) drilled out the gun
barrels and glued the shell feeds to the sides of the guns. When dry, I then
installed them in the gun bay. It was VERY difficult to do and in this case, I
should have followed the instructions and glued them in before attaching the
forward bulkhead. Finally, the gun bay braces were glued in. After some touch up
painting, the area was washed and dry-brushed. It was then glued into the right
fuselage half. A bit later I was reading the instructions where is says not to
glue in this assembly. Well, too late!
(unnecessarily) drilled out the gun
barrels and glued the shell feeds to the sides of the guns. When dry, I then
installed them in the gun bay. It was VERY difficult to do and in this case, I
should have followed the instructions and glued them in before attaching the
forward bulkhead. Finally, the gun bay braces were glued in. After some touch up
painting, the area was washed and dry-brushed. It was then glued into the right
fuselage half. A bit later I was reading the instructions where is says not to
glue in this assembly. Well, too late!
Meanwhile, I had assembled the wings. In addition to the usual upper and lower sections, there are some wheel well bulkheads that get glued in place. Then the engines were assembled. The intake parts were painted aluminum and the exhaust parts with burnt iron from the Testors Metallizer line. The engines were then glued to the wings. I must say that fit on all the parts is really superb. Tamiya engineering is just first rate and there are all sorts of tabs and alignment guides to prevent you from really messing things up.
Back at the fuselage, the fuselage
halves were glued together as were the lower nose parts. These lower parts have
to have a hole opened up for the bomb racks. Probably because of my gluing in
the nose weight, the very forward part of the nose did not close up as much as I
wanted. While this kit wasn't totally filler free, it was so much so that I only
used Mr.Surfacer 500 for what small gaps were there. while this was drying, the
engines were glued onto the wings. Fit was quite good, but not perfect. The back
attachment was spot on, but the forward sides didn't fit as well as I'd hoped
and will need some very minor filling.
With the fuselage and wings together, they were joined. There is
a tab on the back of the wings to help alignment. Wing root fit is superb as is
most of the rest of the wing. The biggest gap was at the back section and a tiny
bit of filler was used to take care of that. Moving to the back of the kit, the
tail planes were installed. These have the small trim tab actuating arms that
will need to be glued in place. The rudder just slots into place. You should be
aware that the rudder on this kit is only for the early production Me-262s with
the large clear section for the rear position light. Later versions had this
area covered and a small bulb at the back. The Monogram kit has this later
rudder. I assume that an optional rudder will be available for the later fighter
version when it is released.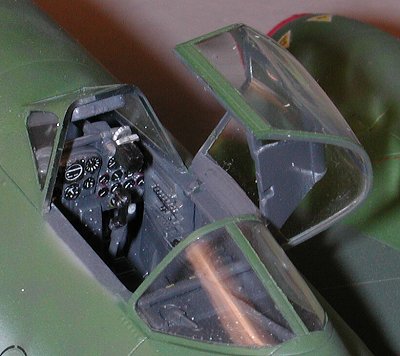
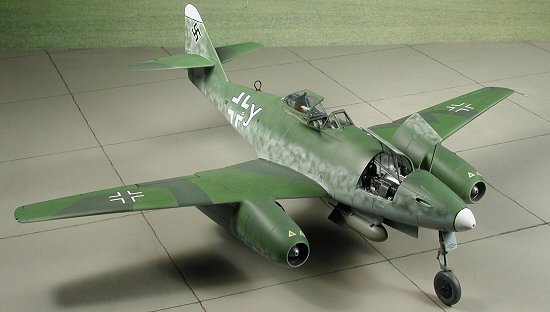
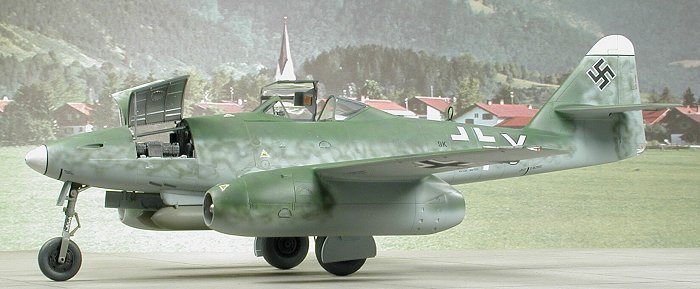
With that completed, I returned to the nose area. There is a cover over the gun barrels that needs to be installed. Fit on this part was not that good, especially on the front and some filler was used there. I also test fit the gun bay cover and found it not to be a perfect fit. Not bad, just not as good as the rest of the kit.
After painting the armored glass part, it was glued to the windscreen section. Now this is the way that they should all be. The windscreen is part of the forward panel and the fit of this part is superb. It also eliminates any of the usual filling needed for most windscreens. I hope this catches on. The aft section of the cockpit and the aft canopy were then glued in place and the clear bits masked. At this time, all the various openings were stuffed with tissue and the first round of painting was started.
|
CAMOUFLAGE |
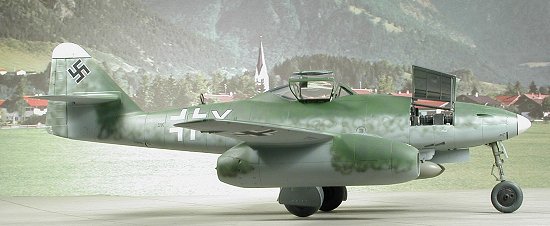
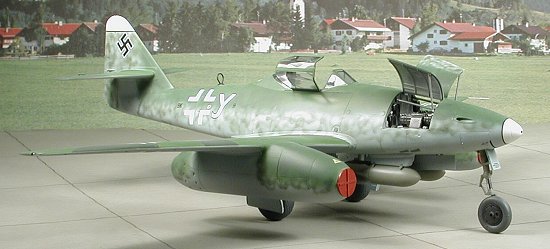
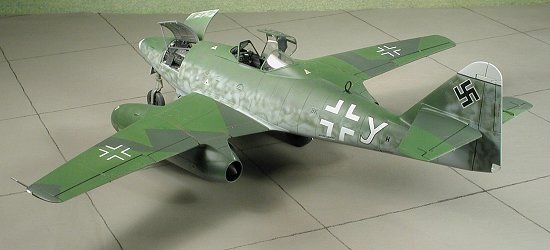
Like so many kits, I was really undecided about the camo scheme until it was time to start painting. Searching through the many aftermarket decal sheets that I have for the 262 (actually about three of them), none seemed to offer anything for the early Jabo 262 except for one and it was a rather boring scheme. This left the kit markings. Well, all of them will have RLM 76 undersides so I painted the underside of the kit with my dwindling supply of Aeromaster enamels. After masking the tail planes, I decided to do White Y, the third scheme in the kit. This has RLM 82/83 upper surfaces with the fuselage and engines covered in a dense squiggle of RLM 82, the darker of the two colors.
 I first painted on the white for the nose and the tail tip with Floquil Reefer
White. When dry they were masked and I painted the entire upper surface
RLM 83 (light green) using some of my Aeromaster enamels. When it had dried, I
masked off the wing and tailplanes in the splinter pattern shown in the
instructions. I then went searching for RLM 82 and found that I didn't have any.
I was working on a deadline so went to a nearby hobby shop and got some Testors
Acryl II. This was then sprayed on. It is the first time I've used this paint
and it sprays well, drying to a semi-gloss in a very short time.
I first painted on the white for the nose and the tail tip with Floquil Reefer
White. When dry they were masked and I painted the entire upper surface
RLM 83 (light green) using some of my Aeromaster enamels. When it had dried, I
masked off the wing and tailplanes in the splinter pattern shown in the
instructions. I then went searching for RLM 82 and found that I didn't have any.
I was working on a deadline so went to a nearby hobby shop and got some Testors
Acryl II. This was then sprayed on. It is the first time I've used this paint
and it sprays well, drying to a semi-gloss in a very short time.
All but the fuselage was then masked and I started on my favorite part, the squiggles. This enjoyment soon turned into drudgery. As I had feared, and the reason I don't like using acrylics for this, the paint quickly dried on the tip of my airbrush during the fine work. In the end it was paint for ten seconds, stop, disassemble and clean the tip, go for another ten seconds, stop, disassemble and clean the tip....... It took forever to finish this step in the painting. Next trip to my fave hobby shop, I'm going to stock up on enamels so that I don't have to use these acrylics again for detail work! Once all the colors were on and dried, I gave it a coat of clear acrylic gloss (Future) in preparation for the decals.
 A couple of notes. I'm building my kit with the gun bay doors open (mainly
because the fit of the closed doors is poor). I used the closed doors to keep
paint out of the gun bay and had to paint the open doors separately. I also
painted all the landing gear doors RLM 76 on both the inside and the outside as
recommended by the instructions. Second note is that if you have the superb
Classic Publications series on the Me-262, you will find all three kit schemes
in that book so you can use them for reference should you so desire. What is
nice is that there are photos of the planes as well. Tamiya did their homework
on these schemes and got all the right bits to match each other just fine.
A couple of notes. I'm building my kit with the gun bay doors open (mainly
because the fit of the closed doors is poor). I used the closed doors to keep
paint out of the gun bay and had to paint the open doors separately. I also
painted all the landing gear doors RLM 76 on both the inside and the outside as
recommended by the instructions. Second note is that if you have the superb
Classic Publications series on the Me-262, you will find all three kit schemes
in that book so you can use them for reference should you so desire. What is
nice is that there are photos of the planes as well. Tamiya did their homework
on these schemes and got all the right bits to match each other just fine.
As I often don't, there is no pre-shading or post-shading that so many folks do. As has been mentioned, you either do it or you don't. I've worked around real military aircraft for more than two decades and can tell you that panel lines are not painfully obvious until you get quite close. I have nothing against it and will, from time to time, do it myself, but overall, it is just an artistic affectation and isn't that prototypical.
|
ADDING MORE BITS |
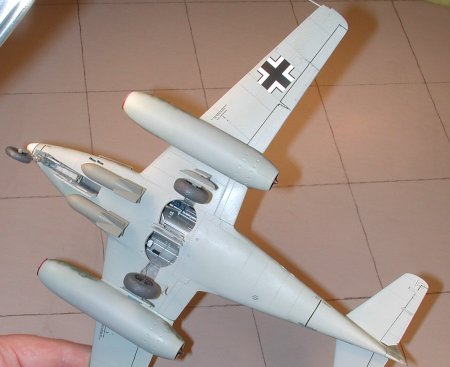
With the airframe now painted and given its clear gloss, it was time to add some more bits. These were mainly the landing gear. I removed the tissue from the wheel wells and started with the nose gear. This part simply plugged into the slot in the well and had the retraction strut glued to it. The nose wheel was then glued in place. All of the wheels are keyed and though they are not flattened, look just great. Next was the main gear. This takes a bit of work to get properly installed. The retraction strut has to be threaded through a small hole in the gear well framework, just like on the real plane. Easy it is not and it took a few tries to get it right. Be sure to have it properly aligned or you'll be asking for trouble. The main gear then slotted in place and was glued to the well and retraction strut. Then the wheels were glued on (again, they were keyed) and it was left to dry.
 When able to stand on its gear, the gear doors were then glued on. (BTW,
installing the doors does not completely hide the ejector pin marks on them or
the gear so you may want to consider filling them) The kit instructions would
have you glue the doors to the landing gear before installing the gear, but this
is not necessary and prevents you from knocking off the doors in the process.
You will need some good tweezers and a precision glue applicator to be able to
reach all the glue areas, though. The center gear doors are particularly
ingenious. They glue together and then slot down onto some mounting posts.
No muss, no fuss. Throughout this build, I've been absolutely delighted by the
engineering on this kit. All of this left but a few bits to go and they will be
left until after decaling.
When able to stand on its gear, the gear doors were then glued on. (BTW,
installing the doors does not completely hide the ejector pin marks on them or
the gear so you may want to consider filling them) The kit instructions would
have you glue the doors to the landing gear before installing the gear, but this
is not necessary and prevents you from knocking off the doors in the process.
You will need some good tweezers and a precision glue applicator to be able to
reach all the glue areas, though. The center gear doors are particularly
ingenious. They glue together and then slot down onto some mounting posts.
No muss, no fuss. Throughout this build, I've been absolutely delighted by the
engineering on this kit. All of this left but a few bits to go and they will be
left until after decaling.
|
DECALS |
Searching through my aftermarket sheets, I only found one scheme that I could use on this kit and it was a later plane with a different rudder. This basically left the kit markings. I had very good luck with the decals on the 1/72 George recently reviewed, so hoped these would be the same. Actually they are a touch thick, but went on quite well and I had no problems using Champ setting solution on them. I only lost one decal to the Champ and it was a little one! Now if only Hasegawa will follow suite, then I can use some of the kit markings that come in these boxes.
 The Tamiya decals actually offer more items than is called for in the
instructions. There is a section of the decal placement guide that is for just
the common data, while the unique markings are part of the paint guild. You are
even given the small black or white bands that separate the unit colors. Warning
markings are given in both red and black so you can choose the ones that you
like. These items are difficult to see in black and white photos so could be
either one, just don't mix them! As a later note, this particular plane had most
of the data markings over-painted. Unfortunately, I didn't realize that until
after the decals had been applied and were truly stuck on! Once all the decals were on and had dried
overnight, they entire model was wiped down with fresh water to remove any decal
or setting solution residue. It was then taken back to the paint shop and a
clear matte coat was applied to the airframe.
The Tamiya decals actually offer more items than is called for in the
instructions. There is a section of the decal placement guide that is for just
the common data, while the unique markings are part of the paint guild. You are
even given the small black or white bands that separate the unit colors. Warning
markings are given in both red and black so you can choose the ones that you
like. These items are difficult to see in black and white photos so could be
either one, just don't mix them! As a later note, this particular plane had most
of the data markings over-painted. Unfortunately, I didn't realize that until
after the decals had been applied and were truly stuck on! Once all the decals were on and had dried
overnight, they entire model was wiped down with fresh water to remove any decal
or setting solution residue. It was then taken back to the paint shop and a
clear matte coat was applied to the airframe.
|
THE ABSOLUTE FINAL PARTS |
I now had a pretty complete aircraft. However, there were still some bits and
pieces rolling around in the bottom of the box that had not been added. After
removing the masking from the clear bits, the first to be attended to was the
clear wing lights and tail light. The wing ones had tiny dabs of clear red or
green added to them and then all of them were attached using superglue. The
lower antenna, wing tip pitot tube and upper fuselage DF loop were glued in
place and then touched up with the appropriate colors. The bomb racks were then
glued in place. I had to open up the fuselage holes more than
 originally done to get the
alignment pin to fit, but it fit quite well. Then the bomb was glued in place
via the aft mount. The method for attaching the bombs worked very well and gave
good alignment.
originally done to get the
alignment pin to fit, but it fit quite well. Then the bomb was glued in place
via the aft mount. The method for attaching the bombs worked very well and gave
good alignment.
The canopy was then glued in the open position. It didn't fit quite the way it shows in the instructions as the mounting lugs are not 90 degrees to the plane of the canopy sill, but it did fit. Finally, the gun bay door was glued in place. It needed some trimming of the attachment lugs to get it to properly fit. I'll blame my construction for that problem. The support arms were then glued on. Any touch-up painting was then done and the kit was finished. I didn't attach the radio long wire as I was going against time to get the kit done and didn't want to screw things up by rushing the antenna installation. The kit was then photographed before I managed to break something!
|
CONCLUSIONS |
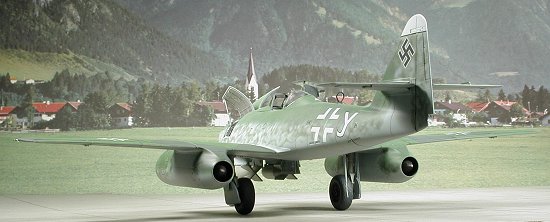
This kit gets my vote as 'model of the year'. If you have trouble making a very nice model out of this one, they you should stick with snap-tites. The engineering makes it almost impossible to screw up and the fit is just superb. Tamiya will undoubtedly sell all they can produce of this one. I expect to see many Dragon 262s being stored away or pawned off on eBay.
I didn't have time to finish the kettenkrad, but it is a neat little diorama piece that is worth the additional cost.
April 2002
|
REFERENCES |
Classic Publications 'Me-262 part 2'
Copyright ModelingMadness.com. All rights reserved. No reproduction in part or in whole without express permission from the editor.
If you would like your product reviewed fairly and fairly quickly, please contact the editor or see other details in the Note to Contributors.
Back to Reviews Page 2023