| KIT #: | 8415 |
| PRICE: | $10.25 MSRP |
| DECALS: | One option |
| REVIEWER: | Scott Van Aken |
| NOTES: | Snap kit |
| HISTORY |
Without a doubt, the most successful turbine powered aircraft of the Second World War was the German Me-262. As with all revolutionary vice evolutionary designs, the 262 had its share of delays and problem. Most of these were due to the engines as the airframe was not only relatively conventional, but ready months before any flight ready engines were available.
Originally designed for the BMW 003 axial-flow turbojet engine, massive problems with the BMW design (mostly due to problems associated with metallurgy in the hot section), had the designers switch to the larger, but closer to ready Junkers Jumo 004.
 Once the aircraft and engines were mated and somewhat reliable
enough to do test flights, the improvement in performance was remarkable. An
often quoted comment by Adoph Galland after he flew the plane was that it
was"...like angels were pushing." The speed advantage of the 262 was often at
least 100mph above what a piston engined aircraft was able to reach.
Once the aircraft and engines were mated and somewhat reliable
enough to do test flights, the improvement in performance was remarkable. An
often quoted comment by Adoph Galland after he flew the plane was that it
was"...like angels were pushing." The speed advantage of the 262 was often at
least 100mph above what a piston engined aircraft was able to reach.
However, there were disadvantages. One was that there was no real throttle response. The pilot had to be very careful increasing or decreasing throttle settings or the engines would lose power and flame out, or quit. While the 262 could fly on one engine and glide well if both were inoperable, it had lost its speed advantage. Most 262s were shot down during landing, takeoff or during single engine operation after one had been damaged. The majority of 262 losses were in various accidents not directly related to combat. It wasn't a plane where one could hop out of a 109 or 190 and go right into flying the 262.
The engines also had very short life; initially 10 hours or
less, though by the end of the war that had crept up to 25-30 operating hours.
Other problems beset the 262 as well as other aircraft from lack of quality
materials, rushed production, and a host of other ills as a result of the lack
of centralized production. New pilots got very little training thanks to
constant Allied air attacks and the
 general paucity of fuel. Though the 262
burned low grade kerosene, even that was in short supply in the last months of
the war.
general paucity of fuel. Though the 262
burned low grade kerosene, even that was in short supply in the last months of
the war.
However it was a milestone aircraft in the annals of aviation. Just the threat of the aircraft was enough for the Allies to expend excess time, materiel and energy to try to blunt. Fortunately for us, there are over a dozen complete airframes in various museums around the world where we can see this famous and ground-breaking aircraft. Those wishing to know more about this aircraft only need to enter 'Me-262' into any of the various search engines. There will be a staggering number of websites listed that are devoted in one way or another to the 262.
| THE KIT |
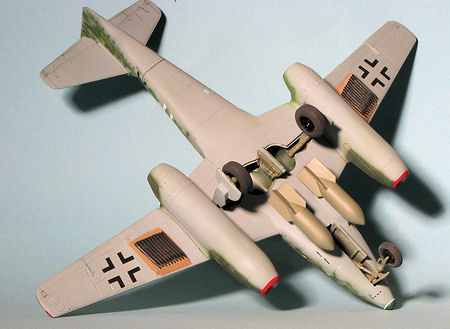
Let me preface the kit description by stating that this is a snap kit, designed for new modelers and as such, the parts are not fiddly and are rather robust. This also means that there are not things like separate gear doors, separate gear legs and sometimes wheels are molded on the gear/door piece. These are, for lack of a description, designed to actually be played with, therefore the robust construction.
 Having said that, the kit is very nicely molded. The engraved
and raised detail is quite good though the former is a bit heavy (sort of like a
Matchbox kit). The kit includes a nose weight to keep it from tail sitting.
There is a very basic interior that has no control stick and only has a slot in
instrument panel. There is a somewhat thick, one-piece canopy that snaps into
place. There are separate gear doors for those who want to build the model gear
up. This will provide enhanced play realism as no 262 flew
missions with
the gear down. Under the wings there are R4M rockets. The mounts are molded in
place so if you are doing a plane that didn't fly in the last month or so of the
war, you have a lot of sanding to do. The mass of rockets are separate. For
those wondering, you can see the underside of the cockpit tub through the main
wheel wells, but there is no detail.
Having said that, the kit is very nicely molded. The engraved
and raised detail is quite good though the former is a bit heavy (sort of like a
Matchbox kit). The kit includes a nose weight to keep it from tail sitting.
There is a very basic interior that has no control stick and only has a slot in
instrument panel. There is a somewhat thick, one-piece canopy that snaps into
place. There are separate gear doors for those who want to build the model gear
up. This will provide enhanced play realism as no 262 flew
missions with
the gear down. Under the wings there are R4M rockets. The mounts are molded in
place so if you are doing a plane that didn't fly in the last month or so of the
war, you have a lot of sanding to do. The mass of rockets are separate. For
those wondering, you can see the underside of the cockpit tub through the main
wheel wells, but there is no detail.
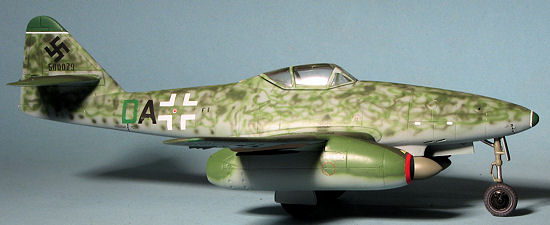
Instructions are very well drawn and clearly show where all the bits go. There is no painting information in the construction process. Markings are provided as both standard water slide decals and as stickers. They are for Heinz Bar's plane and instructions would have you paint it RLM 81/83 on the upper surfaces with RLM 78 on the underside. Clearly this last is a glitch and it should be RLM 76. The decals are well printed and, of course, are lacking a swastika. A note suggests painting the interior RLM 02 (it should be RLM 66) and the instrument panel flat black (it should also be RLM 66).
| CONSTRUCTION |
I had this one sitting on the shelf for a long time and after reading the Osprey book on bomber and recce Me-262 units, had a desire to grab this one and build it as a bomber. Of course, the kit is not so equipped, so I put out a request for bits and Jim Claugh was kind enough to send me the racks and bombs from a Monogram kit that were spare to his needs.
I started by assembling what little there was of the interior.
Basically an instrument panel as the kit has no control stick or rudder pedals.
There is also no area behind the cockpit so when the canopy gets installed,
there will be a large hole through whi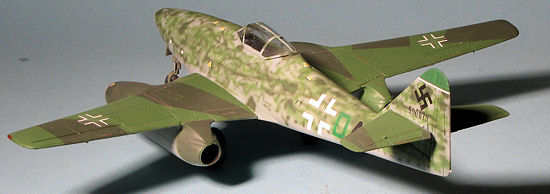 ch you can see the inside of the fuselage.
The cockpit was slotted into the fuselage after painting with RLM 66 and some
dry brushing. The nose gear well was also installed and at this time the
fuselage halves glued together. I also inserted a bit of extra weight at this
time, just in case. The seam work was filled with either super glue or Tamiya
fine white putty. When sanding on it, the plastic gave off an odd odor. I think
this is PVC and not styrene so it may be that your cement will not be effective.
Tamiya liquid cement works on PVC just as well as styrene so I had no issues
there.
ch you can see the inside of the fuselage.
The cockpit was slotted into the fuselage after painting with RLM 66 and some
dry brushing. The nose gear well was also installed and at this time the
fuselage halves glued together. I also inserted a bit of extra weight at this
time, just in case. The seam work was filled with either super glue or Tamiya
fine white putty. When sanding on it, the plastic gave off an odd odor. I think
this is PVC and not styrene so it may be that your cement will not be effective.
Tamiya liquid cement works on PVC just as well as styrene so I had no issues
there.
The wings were then cemented together. These needed to be taped together to allow the cement to dry before the large gap at the join was filled. I also filled gaps on the leading and trailing edge. Snap it may be, but tight snap it is not always. When the wing assembly was finally attached to the fuselage, there were rather large gaps at the rear wing to fuselage join that needed extra attention. When the tailplanes were installed, there were no issues. Installing the engine pods produced the same issue with gaps, again, some quite large. The nose weight and gun access panel was then glued on and the usual filler used.
I then installed the bomb racks. Since they are not designed for this kit, figuring out where they were supposed to go was a bit of a task, but thanks to google, I was able to find some photos that helped out. Once those were glued in place and the area around them where I wiggled them about for a proper fit was cleaned up, I masked and installed the canopy in preparation for painting.
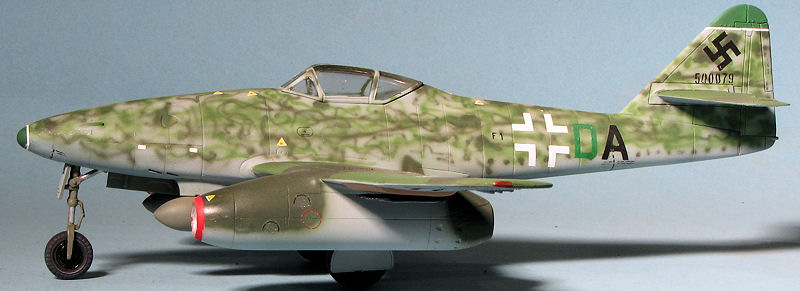
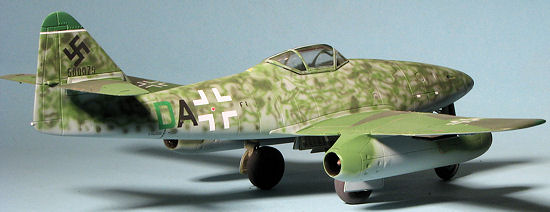
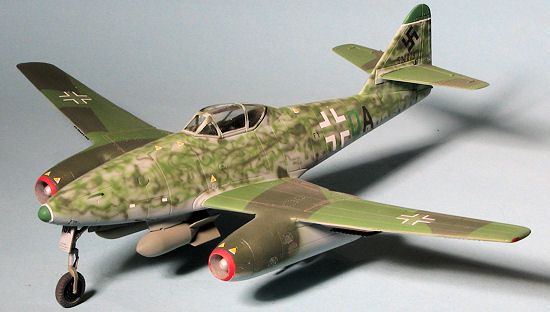
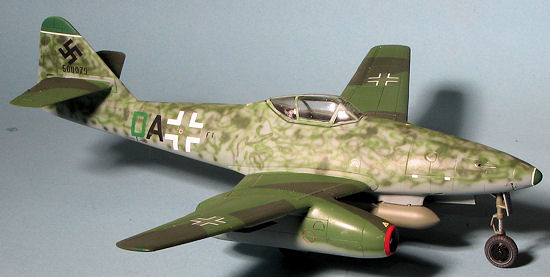
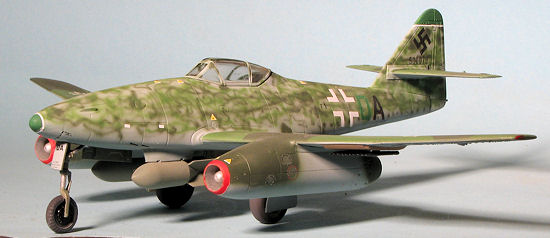
| COLORS AND MARKINGS |
 I chose an older Superscale sheet, 48-780 as it had a nice fighter-bomber
scheme in it from Stab./KG 76 from May of 1945. This one was in RLM 82/83/76.
There was no real indication of what the upper surface was like so I did the
wings and tailplanes in a standard splinter scheme. The fuselage, however, got a
random pattern in RLM 82/83 in a medium density. The fin tip and nose were
painte RLM 25 green which is surprisingly close to RLM 83. The forward engine
cowlings were painted red. It was not an easy task to mask the latter as there
is no easy panel line so I winged it. I confess that it took me quite a while to
finish painting. I got sidetracked so it was several weeks before the paint was
done.
I chose an older Superscale sheet, 48-780 as it had a nice fighter-bomber
scheme in it from Stab./KG 76 from May of 1945. This one was in RLM 82/83/76.
There was no real indication of what the upper surface was like so I did the
wings and tailplanes in a standard splinter scheme. The fuselage, however, got a
random pattern in RLM 82/83 in a medium density. The fin tip and nose were
painte RLM 25 green which is surprisingly close to RLM 83. The forward engine
cowlings were painted red. It was not an easy task to mask the latter as there
is no easy panel line so I winged it. I confess that it took me quite a while to
finish painting. I got sidetracked so it was several weeks before the paint was
done.
| FINAL BITS |
 With that done, I turned to the decals. Despite being 10 years old, the
decals performed superbly, reacting well to setting solutions. Since the kit
offers only stickers, I used both the unique and most of the data markings
from the sheet. Though some of the red ones are near invisible, they do help
to flesh things out a bit. Adding the data decals added nearly a week to the
build as I am pretty glacial about all that.
With that done, I turned to the decals. Despite being 10 years old, the
decals performed superbly, reacting well to setting solutions. Since the kit
offers only stickers, I used both the unique and most of the data markings
from the sheet. Though some of the red ones are near invisible, they do help
to flesh things out a bit. Adding the data decals added nearly a week to the
build as I am pretty glacial about all that. | CONCLUSIONS |
 Thanks to my less than lightning fast building,
this one took probably as long to build as would have been a Tamiya or Monogram
262 (I have not built the Hobby Boss or Dragon version), much of that additional
time spent masking and painting. Those who consider
themselves enthusiasts will not like this one for the lack of things like
pitot tubes, the area behind the cockpit, and pretty bare wheel
wells, not to mention the beefy parts. However, it is a great kit for the
beginner or those who just want an inexpensive kit. I think it turned out very
well for what it is and would not hesitate to recommend it.
Thanks to my less than lightning fast building,
this one took probably as long to build as would have been a Tamiya or Monogram
262 (I have not built the Hobby Boss or Dragon version), much of that additional
time spent masking and painting. Those who consider
themselves enthusiasts will not like this one for the lack of things like
pitot tubes, the area behind the cockpit, and pretty bare wheel
wells, not to mention the beefy parts. However, it is a great kit for the
beginner or those who just want an inexpensive kit. I think it turned out very
well for what it is and would not hesitate to recommend it.
October 2012
If you would like your product reviewed fairly and fairly quickly, please contact the editor or see other details in the Note to Contributors.