
Fine Molds 1/72 Me-410A-1
Kit Number FP 11
Price: $25.00 SRP
Decals: One version, ZG 26
Date of Review: 2 Feb, 1997
The Me-410 is a modification of the Me-210, an aircraft that was soundly disliked by nearly all who flew it. The 210 was to replace the Bf-110, but its ill handling resulted in a refinement of the aircraft, basically lengthening the fuselage, doing some work on the wing, and adding larger engines, that was to be the Me-410. Since this was a mid-late war aircraft, the Luftwaffe had generally lost control of the air in the west and the 410 was an aircraft that needed some help. Although it achieved some success as a bomber destroyer as it could carry a large variety of heavy weapons, the Me-410 did not become the success of its older brother, the Bf-110.
Fine Molds kits have generally been extremely expensive so out of my range. When I saw this one advertised at under $20.00, I bought it. When you open the box, the kit screams 'Hasegawa'. I understand that the kits are molded by another concern and Hasegawa provides the factory to produce them. Having said that, it still looks like a Hasegawa kit.
My example was plagued by flash on two of the sprues that contained the propellers and radiators. I also had a few fit problems, but more on that later. The kit comes with all the goodies to build kit FP 12 except the decals. An additional sheet for FP 11 shows what parts are not to be used and the late war camo scheme for this particular aircraft. The parts also have a large number of ejector marks on them, most but not all of which are either easily hidden or cleaned up.
Generally, the kit fit well. The interior is very well done with proper seats, control stick and separate instrument panels. The rear seat comes with armor plating and the unusual aiming/firing device for the side mounted machine guns. Although the guns were not used on this kit, I left the mechanism in the aft cockpit as per instructions. The fuselage fit OK, but was not a perfect fit requiring some putty. The wings were a very good fit on the top, and had to be as there are a number of access panels that simply cannot be puttied around. It is on the bottom where I ran into trouble.
First off the wings are just a bit thinner than the wing root area. I put in a piece of 10 thou plastic to adjust the height. This made the wings too short, so I adjusted to the rear and puttied the front several times until it was smooth. Next problem was the engine cowlings. They just did not fit the tabs on the wings. I removed the tabs and that helped, but the engines needed to be clamped into place for a decent fit as they were more oval than the mounts. It all turned out OK, but required extraordinary building practices. The horizontal stabilizers were too short for their mounts so I adjusted for the front and left the back with a gap. Final fit problem was the nose canopy. It was not a good fit and required much test fitting and filing to achieve a decent fit. I still had to putty it to fill gaps.
 The canopy was a great fit and in three separate pieces to give the particular
bug-eye look of the 410. Final fit was the landing gear which required
some dexterity as it fits into a very small area.
The canopy was a great fit and in three separate pieces to give the particular
bug-eye look of the 410. Final fit was the landing gear which required
some dexterity as it fits into a very small area.
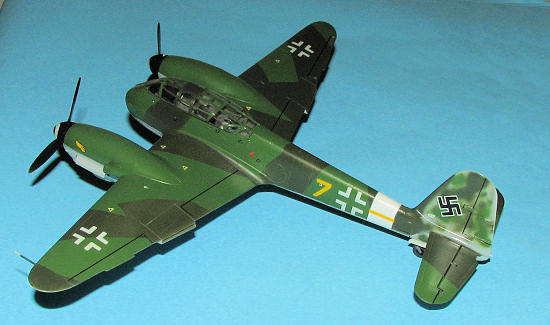
For more on the gory details, see below. The aircraft was painted in late war colors of RLM 82 and RLM 83 uppers with RLM 76 undersides and mottle on the tail. I used Extracolor paints and they worked just superbly as usual. One note is that 82 and 83 are identified in reverse of the colors stated on the Xtracolor tins. I just went with light and dark green descriptions and had no other trouble.
Other than the fit problems stated (which I have been told are not the norm with this kit), it makes into a lovely model. I would not hesitate to recommend this to intermediate builders and I would buy another.
The Build
28 Dec '96
Just got this kit in the mail today and couldn't wait to get it started. I built a Revell Me-410 many years ago and loved the look of the aircraft, despite the crudeness of the kit. Well, what do you get for your $15.00 (from the Supply Depot)? When the box is opened, there are three bags holding parts. Two of them filled with light grey plastic, the third with the clear bits and the decals. Everything about this kit screams Hasegawa, but I have been assured that Hasegawa only provides the machines and the molds are done by Fine Molds. The decal sheet comes in three parts; a generic Me-410 section (the biggest one), a smaller sheet with the subject of the kit (and there is only one, in this case ZG 26), and a smaller one with swastikas in white and black. There is also an instruction sheet of very heavy paper designed for kit FP12. A single errata sheet in included for the FP 11 kit.
The first thing I noticed is that there
are parts with flash on them. Very unusual. The flash in on the propeller
blades and underwing radiators and the exhaust shrouds and most of the parts on
this particular tree. There are also sink marks on the exhaust shrouds. The
seats have holes in them; part A6 in the bottom aft and part A7 in the
bottom middle. Why, I do not know.
 There is also a hole in the lower
left wing where the radiator fits. It looks like it will be covered up
when the kit is complete, but the rest of the mount there is very thin.
There is also a hole in the lower
left wing where the radiator fits. It looks like it will be covered up
when the kit is complete, but the rest of the mount there is very thin.
An interesting anomaly is that this kit has what seems to be all the parts that are in kit FP 12, the first Fine Molds Me-410. Yet this kit is $7.50 cheaper via the Supply Depot. The only difference seems to be decals, as kit FP 12 is for a bomber version from KG 51. The ZG 26 kit will have many spare parts including the bombs, bomb racks, the side machine guns, and all the antennas. According to the instructions, ZG 26 flew stripped down versions on bomber interception missions, so did not need all the stuff for the bomber version. This version is also in late war colors of RLM 82/83 upper and 76 lower whereas the other kit is 70/71 upper over 65 lower or (if building the first prototype) 74/75 over 76.
Initial impressions are very good and I have started gluing a few of the bits together. Looks like it will be a very nice kit when finished.
4 Jan, '97
Initial impressions aside, the kit is a
bit of a quandary. All the small pieces fit each other quite well, it is
the larger assemblies that are giving me fits. The interior went together
quite well and fit into the fuselage halves with no problem. The fuselage
caused some concern. First, you need to sand the inside of the tail to get
a nice flat fit. When the fuselage was glued together, I found that all of it
fit well except just aft of the canopy. On the inside, the area did not
match up. On the outside, I had similar problems that required several coats of
putty to smooth out. On to the engines. They fit together well, but
did not fit the required area on the wing. The engines were too wide and
too short for the nacelles. The only way to help that was to squeeze the
engines with clamps to match up with the nacelles while the glue dried. I
was about 80% successful. Don't forget to remove the mounting
 posts as they will
only get in your way. Once that dried, it was time for the supercharger
intake rings. Most of the supercharger inlet is part of the wing/engine nacelle,
but requires the very front intake ring. Frankly, there must be a better
way to engineer this as the ring is too big and you need lots of putty to smooth
things out. All this in an area that gives little room to work. After that
was over, I drilled out the intakes with no problem.
posts as they will
only get in your way. Once that dried, it was time for the supercharger
intake rings. Most of the supercharger inlet is part of the wing/engine nacelle,
but requires the very front intake ring. Frankly, there must be a better
way to engineer this as the ring is too big and you need lots of putty to smooth
things out. All this in an area that gives little room to work. After that
was over, I drilled out the intakes with no problem.
The final hassle of the week is with the wing/fuselage fit. It is not good. The wing is too shallow for the root. I shimmed the wing to take care of the shallowness problem with the result that it now is shorter than the root area in the front. AARGH! I don't know if it is the only way out, but I have applied putty in the front and will attempt to smooth it out. It is not advisable to mess with the top of the wing/fuselage join as there are numerous inspection hatches that stand proud of the wing there and any attempt to putty there will only ruin it. There is also a problem with the mounting of the horizontal stabilizers. The stabilizers are about an eighth of an inch shorter than the mounting spot. It is a relatively simple fix, all you have to do is carve away this amount from the rear portion of the mount to get the leading edge of the horizontal stabilizer to match with the front of its mount. Unfortunately, this leaves an equivalent spot on the back that is normally flush with the elevators, but the glitch is much less noticeable at the rear. Throughout this, I am getting the feeling that the people working on the different parts of the kit did not talk to each other or compare measurement. It is too bad as it could have been a superb kit to build. But that is what makes modeling fun.
The putty is now drying and I'm working on some of the smaller bits. More in next week's adventures!
11 Jan '97
Meanwhile, back at the bench..... This
last week has seen slow but steady progress. The wing/fuselage joint was
eventually made to look pretty without damaging the wing detail. The propellers
were painted RLM 70 and installed in the spinners which were painted Flat Black.
The interior is now complete with the addition of armor and the gun aiming
mechanism. Since this is supposed to be a stripped down version and has no side
guns, I wondered about keeping the aiming mechanism, however since it would
leave a huge hole and the one photograph I saw of this aircraft in the M-210/410
In Action book appeared to have it, I left it
 in. The under engine
radiators were installed after shaving off the flash and they fit beautifully.
Next is the addition of the canopy parts. There are four of them;
a nose piece an upper canopy and windscreen; and two side sections. The
nose bit was the first tackled. No surprise here, it doesn't fit too well.
First of all, the bomb bay doors need to be trimmed in the front and the
machine gun ports in the clear nose must be drilled out. The instructions
tell you to drill out a total of four holes in the nose. I would hold up
on the upper holes as the box top description does not show these and I would
think that those light machine guns would have been removed on an aircraft that
was supposed to bring down B-17's. Be very careful drilling out the holes
as there is a lot of plastic to drill through and it is easy to drill the holes
crookedly as you start from the inside of the nosepiece. You could start
from the outside, but the plastic is curved and there is no positive starting
hole as there is in the inside. Anyway, once that is done, you will notice
that you also need to sand away on the piece of the main floor that sticks into
the nose piece. Just keep sanding until you get a good fit. It took
me quite a while. Then you'll see that the nosepiece is wider than the
fuselage. I did the old 'squeeze with a clamp while the glue dries'
routine and took care of much of it. I still had to use filler and sanding
to get a relatively smooth transition.
in. The under engine
radiators were installed after shaving off the flash and they fit beautifully.
Next is the addition of the canopy parts. There are four of them;
a nose piece an upper canopy and windscreen; and two side sections. The
nose bit was the first tackled. No surprise here, it doesn't fit too well.
First of all, the bomb bay doors need to be trimmed in the front and the
machine gun ports in the clear nose must be drilled out. The instructions
tell you to drill out a total of four holes in the nose. I would hold up
on the upper holes as the box top description does not show these and I would
think that those light machine guns would have been removed on an aircraft that
was supposed to bring down B-17's. Be very careful drilling out the holes
as there is a lot of plastic to drill through and it is easy to drill the holes
crookedly as you start from the inside of the nosepiece. You could start
from the outside, but the plastic is curved and there is no positive starting
hole as there is in the inside. Anyway, once that is done, you will notice
that you also need to sand away on the piece of the main floor that sticks into
the nose piece. Just keep sanding until you get a good fit. It took
me quite a while. Then you'll see that the nosepiece is wider than the
fuselage. I did the old 'squeeze with a clamp while the glue dries'
routine and took care of much of it. I still had to use filler and sanding
to get a relatively smooth transition.
That is where I am at the moment. I should finish the canopy this week. I have not yet installed the engine exhausts and I'm glad as they would have only gotten in the way of all the putty/sanding work done on the nose and the wing roots. With any luck this thing should be done in a few weeks. These kits are the reason I do several at once. When the going gets frustrating, the frustrated work on another kit!!
19 Jan, '97
The rest of the canopy was assembled without a hitch and fits very well (thank God). Then on to several days of time consuming masking of a myriad of windows with Scotch Transparent tape. The aileron balances were put on and the underside of the aircraft and tail painted Xtracolor's RLM 76. This is great paint and highly recommended. I then masked off the RLM 76 parts I wanted to keep that color and sprayed Xtracolor's RLM 82 Dark Green. That is drying and the final masking/painting of RLM 83 will be this week. Meanwhile, all the rest of the parts have been painted and await final assembly. One warning about Xtracolor. It does not take kindly to most glues used by modelers, including superglue. These things just eat it up and usually require sanding and then repainting the area. Hopefully this kit should be pretty much complete by next week.
26 Jan '97
 The kit is just about complete. I
noticed in the instructions that the RLM numbers for 82 and 83 are reversed from
what it says on the paint tins. Just go by the light and dark green and
everything will be fine. Final painting went well and I went over the kit
several times (like I always do) to take care of overspray and to paint the
mottle on the tail. Once that dried, final assembly took place (except the
wheels and propellers) with no difficulties at all. As a warning, make
sure you attach the gear doors PRIOR to installing the landing gear. It
will make things a lot easier for you. I have applied the decals and they
went on like a dream. The whites are slightly translucent, but not a
problem. I used Microscale's setting solution and the decals snuggled
right down. The last phase will be cleaning the excess setting
solution and final semi-gloss overcoat. This will occur this coming week
as I just applied the decals last night.
The kit is just about complete. I
noticed in the instructions that the RLM numbers for 82 and 83 are reversed from
what it says on the paint tins. Just go by the light and dark green and
everything will be fine. Final painting went well and I went over the kit
several times (like I always do) to take care of overspray and to paint the
mottle on the tail. Once that dried, final assembly took place (except the
wheels and propellers) with no difficulties at all. As a warning, make
sure you attach the gear doors PRIOR to installing the landing gear. It
will make things a lot easier for you. I have applied the decals and they
went on like a dream. The whites are slightly translucent, but not a
problem. I used Microscale's setting solution and the decals snuggled
right down. The last phase will be cleaning the excess setting
solution and final semi-gloss overcoat. This will occur this coming week
as I just applied the decals last night.
29 Jan, '97
This has turned into a very long review/experience. The decals fit extremely well and are on a par with anything that is available from the aftermarket makers. The one caveat is that the white is not as opaque as one would like, but is not a problem unless you use the tail band, which I did not. The final semi-gloss was applied and once that was dry, the tape was removed from the myriad windows that are a trademark of many WWII aircraft. Last was to attach the main wheels and propellers. The final result looks superb sitting next to my FW-187 and has given me ideas of building other Luftwaffe twins such as the Bf-110. Overall, I would recommend this kit and will buy another.
Copyright ModelingMadness.com. All rights reserved. No reproduction in part or whole without express permission from the editor.
Back to Main Page
Back to Reviews Page 2016