Tamiya 1/48 Bf-109E-3
| KIT #: | 61063 |
| PRICE: | $32.00 SRP at the moment |
| DECALS: | Three options |
| REVIEWER: | Scott Van Aken |
| NOTES: |
| HISTORY |
When one thinks about famous fighters of World War 2, one of the first ones
that pops into mind is the Messerschmitt Bf-109. First flown in the mid 1930s
and thoroughly tested in Spain during 1937/38, it was the most successful German
fighter of the war. In addition, it wa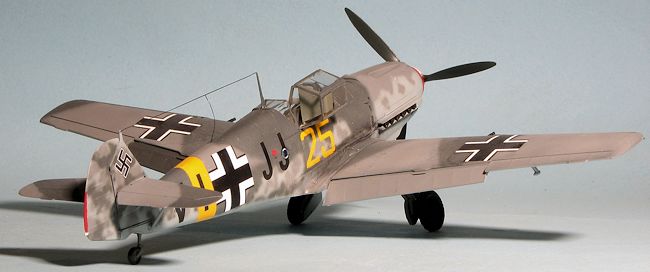 s in action from the first to the last day
of the war.
s in action from the first to the last day
of the war.
Where the 109 became truly well known was during the Battle of Britain, where it was pitted against the Hurricanes and Spitfires of the RAF. Here the short range of the 109 was to prove a deficit to those 109 pilots whose job it was to protect German bombers. It was also here that the 109E version was truly blooded, having missed out in most of the action during the Spanish Civil War. The range situation was taken care of very late in the Battle of Britain with the introduction of the 109E-7 version. This was plumbed to carry a drop tank, something that would have been a lot more useful earlier in the year. This equipment was later retrofitted to many earlier versions.
| THE KIT |
First released in 1998, Tamiya's kit of the Bf-109E was heralded by many to be the best 'Emil' on the
market. The early production Bf-109E-3 kits have a flaw in the nose
section. The angle of the nose from the upper intakes forward is too shallow.
With the kit standing by itself, this is not at all noticed, but when compared
to the other current crop of E's from Hasegawa and Hobbycraft, it is noticeable.
It is to
 Tamiya's credit that they redid the nose section at a higher angle. It
should also be pointed out that this modification and the one they did on the
Meteor were done by removing material from the mold. Would the correction
have needed the addition of material to the mold, I seriously doubt if it
would have been done.
Tamiya's credit that they redid the nose section at a higher angle. It
should also be pointed out that this modification and the one they did on the
Meteor were done by removing material from the mold. Would the correction
have needed the addition of material to the mold, I seriously doubt if it
would have been done.
Anyway, the kit is just what one would expect from Tamiya in that the detailing is superb and the engineering top-notch. Detailing seems a bit heavy compared to the Hasegawa and Hobbycraft kits, but I don't think it detracts at all. The parts are all flash free and devoid of any ejector pin marks where they will show. On the down side, there are a number of sink marks, most notably on the trailing edge of the upper wing and on the fuselage side opposite the cockpit detail. The cockpit is quite complete and there is nice detail on the inside of the fuselage.
You get positionable flaps, slats, and rudder, as well as the ability to display the canopy open. This kit provides the later, more heavily framed canopy and windscreen used by these later versions. This was retrofitted to some of the E-1/3 versions. There are also three spinners, one open and two bullet-shaped ones, one with a greater point than the other. Also included is a drop tank and mount, which was applicable to the E-7 and many E-4s so check your references if using aftermarket decals. Another nice touch is that the outer wheel centers are separate from the wheels, making it that much easier to paint. It is interesting to compare the Tamiya and Hasegawa kits. Both produce fine kits and each has a slightly different way of engineering its kits to achieve this result.
 he decal sheet includes
markings for three aircraft. first is the yellow nose box art aircraft from
7./JG 26 in RLM 74/75/76. The aircraft has a white fuselage band (supplied as a
decal). Next is the tropical version in RLM 78/79/80 with a white fuselage band
and a red/white spinner. This desert scheme plane has been heavily photographed
during the war and I'm sure you have seen images of it flying low over the
scrub. The last one is Hemut Wick's plane with JG2. It is in RLM 7/02/65
with a yellow nose and lower rudder.
he decal sheet includes
markings for three aircraft. first is the yellow nose box art aircraft from
7./JG 26 in RLM 74/75/76. The aircraft has a white fuselage band (supplied as a
decal). Next is the tropical version in RLM 78/79/80 with a white fuselage band
and a red/white spinner. This desert scheme plane has been heavily photographed
during the war and I'm sure you have seen images of it flying low over the
scrub. The last one is Hemut Wick's plane with JG2. It is in RLM 7/02/65
with a yellow nose and lower rudder.
Instruction sheet is typical of Tamiya in that it is very complete and offers all paint references in Tamiya paint colors, which means that some pretty common shades will need to be mixed. There is also an additional sheet that just includes the basic paint scheme, a feature that is much appreciated. Decals are well done and should provide no issues.
| CONSTRUCTION |
It has been many years since I last built a Tamiya 1/48 Bf-109E kit. In fact, this is only my second foray in this scale from this company. The kit itself was purchased from a reader who was selling off a few kits (thanks, Joe), so I figured it was time to get one done. Though it is not an E-4/7 version, that is the kit I used for this model.
First step was to prepaint a bunch of parts, including the interior. All of
the interior bits, wheel wells and inner gear doors were painted RLM 02 with the
instrument panel being done in RLM 66. Joe included a
 nice resin seat so that
was used, otherwise the interior was as provided by the kit. Tamiya does give
you a decal to put over the raised instrument panel detail and so it was used
and fit very well. With the interior done, I turned by efforts to assembling the
fuselage and the wings.
nice resin seat so that
was used, otherwise the interior was as provided by the kit. Tamiya does give
you a decal to put over the raised instrument panel detail and so it was used
and fit very well. With the interior done, I turned by efforts to assembling the
fuselage and the wings.
The wing halves were cemented together as were the fuselage halves. The guns were installed and the upper cowling cemented into place. I installed all the radiator bits, having painted them black and dry brushed them with some aluminum. For the lower cowling, I did not install the splitter piece as this aircraft was to be one that had been around for a while and that part was often removed. Since this was to be an upgraded E-3, I also left off the fuel tank rack so did not open the holes in the bottom of the wing for this piece. The lower cowling and wings were glued in place as was the supercharger intake.
I then filled in the seams I found with super glue and sanded that down. I know that Tamiya kits have a reputation for being 'shake and bake', but you still have to fill seams and even some sink areas. This kit has several on the upper wings near the flap area, but I left those unfilled as this will simply be a shelf model and not something done for contests.
Time to mask the clear bits. Tamiya has well defined frame lines so masking was actually pretty straight-forward. I then attached the windscreen and the backlight before masking off the rest of the interior and heading to the paint shop.
| COLORS & MARKINGS |
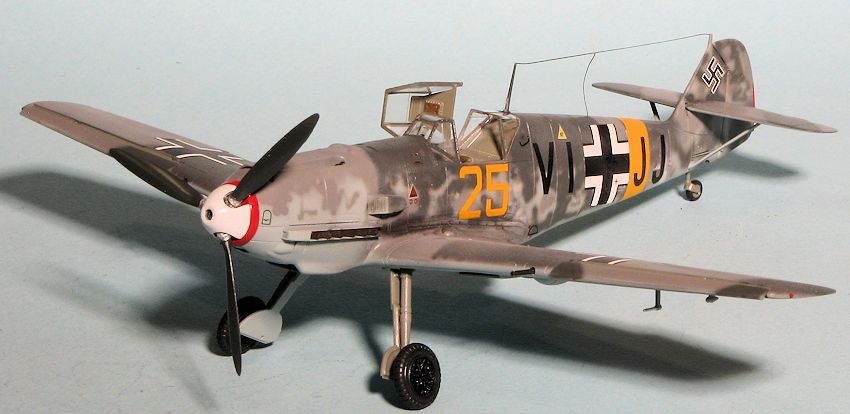
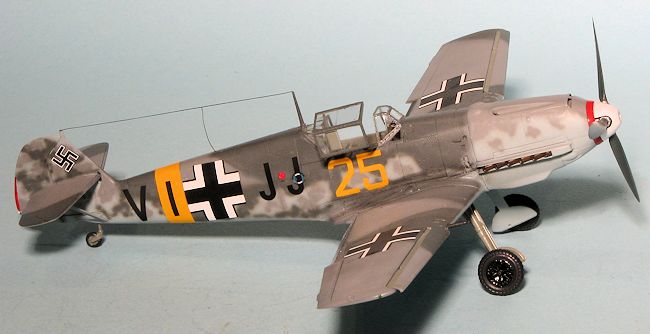
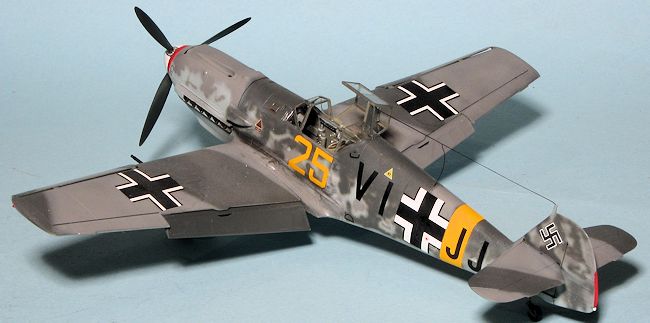
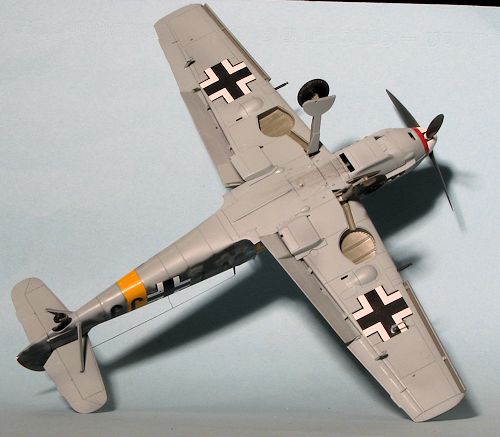
This particular aircraft is to be painted in RLM 74/75/76, a
rather different scheme for an early 109E, but it was not uncommon for these
older planes to be given new camouflage late in life, especially before being
issued to advanced flying schools as was this one. I picked a scheme from a
sheet I used earlier, Aeromaster 48-685, that dealt with aircraft of JG 1. In
this case, it was a Bf-109E-3 that was with Jagdfliegerschule 1 based in Norway
during early 1942 before JG 1 became a fighter unit. This aircraft was part of a
unit called Kommando Losigkeit that used Jagdfliegerschule 1s aircraft to
provide air defense for coastal convoys. As such, it is marked with a large
training number and still carries its radio call sign on the fuselage. Like many
109Es, it was retrofitted wit h the E-4 canopy and windscreen, though not with
the windscreen armor plating.
h the E-4 canopy and windscreen, though not with
the windscreen armor plating.
As usual, I painted the underside RLM 76 first before masking off the tail planes and painting the RLM 74/75 camo. I chose not to mask these colors as often the colors were applied rather quickly so would not look as crisply done as the pre-war and early war factory paint schemes. Then all the side mottling was done. This is heavier than what is normally seen and like all mottling, was fun to paint.
I then glued in the landing gear and when dry, went back and gloss coated the airframe. Time for decal application. The decals are made in Mexico and I found that they were pretty much impervious to setting solutions. This means that the yellow fuselage band did not conform in terms of the solution softening the decal enough to remove wrinkles. I did not have the major issue I found with my P-47 sheet in terms of silvering, but even the strongest solutions (Champ, Solvaset, Mr Mark Softer) did very little to the decal. It has certainly colored my opinion of Mexican decals in a negative way. As mentioned with the 109G-6 article done recently, I had to go to the kit decals for all the various data markings. When those were on a dry, I sprayed on a clear matte to seal everything in place.
| FINAL CONSTRUCTION |
With that done, I attached the remaining bits. I used
Quickboost 48085 exhaust and after removing them from the pour block and
painting them, simply pushed them into place. The masks were removed from the
clear bits and I was surprised to see that glue or something got on the inside
of the windscreen
 piece. Nothing to do about it now so I left it. The pitot tube
and aileron balances were then installed as were the tailplane braces. Tamiya
provides large and positive locators for all these bits, which is greatly
appreciated, especially the aileron balances which are often little more than a
butt fit and easily lost. The landing gear doors were attached and then the
radio mast. I painted the gun barrels and installed those. I put on the canopy
in the open position and pressed the prop in place. A bit of pastel work for the
exhaust, some EZ line for the antenna and that was it.
piece. Nothing to do about it now so I left it. The pitot tube
and aileron balances were then installed as were the tailplane braces. Tamiya
provides large and positive locators for all these bits, which is greatly
appreciated, especially the aileron balances which are often little more than a
butt fit and easily lost. The landing gear doors were attached and then the
radio mast. I painted the gun barrels and installed those. I put on the canopy
in the open position and pressed the prop in place. A bit of pastel work for the
exhaust, some EZ line for the antenna and that was it.
| CONCLUSIONS |
 Whenever I build a Tamiya kit, I wonder why I've not
built more. They go together well and while not perfect, they are a pleasure to
build. So it is with this one. Despite this only being the second 1/48 Tamiya
109E I've done, I see more in my future.
Whenever I build a Tamiya kit, I wonder why I've not
built more. They go together well and while not perfect, they are a pleasure to
build. So it is with this one. Despite this only being the second 1/48 Tamiya
109E I've done, I see more in my future.
November 2013
Thanks to an MM Sales page buy for the review kit.
If you would like your product reviewed fairly and fairly quickly, please contact the editor or see other details in the Note to Contributors.