|
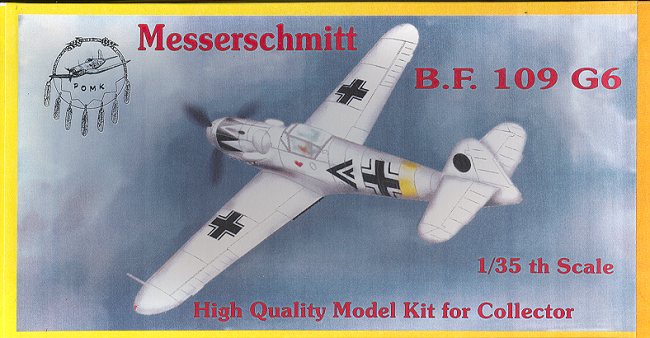
KIT: |
Pend Oreille 1/35 Bf-109G-6 |
|
KIT # |
3501 |
|
PRICE: |
$95.00 |
|
DECALS: |
Two aircraft, see review |
|
REVIEW & |
|
|
NOTES: |
Resin kit |
|
HISTORY |
The most numerous German aircraft of WWII was the Messerschmitt Bf-109, especially the Bf-109G series of aircraft. It is also undoubtedly one of the five most kitted aircraft along with the P-51, Spitfire and Zero. The Bf-109G-6 was the variant that was the most widely produced, and many of those aircraft were further remanufactured into the Bf-109G-10. The G-6 was exported to all of the European Axis powers as well as to Switzerland. There were so many modifications and improvements to the G-6, such as more powerful engines, modified engine cowling, a wooden tail, and Erla Haube canopy that a late production G-6 could easily be mistaken for a G-14!
The G-6 was used right until the last days of the war and was used by most of the the top scoring Luftwaffe aces at some time during their careers. Interestingly, not many survived the war. Many of the Bf-109s currently in museums are either earlier or later versions of this famous fighter.
|
THE KIT |

There are a LOT of Bf-109 kits in various scales from 1/700 up to 1/24. The 109G has been kitted in all the popular scales except 1/24. A scale that has generally been overlooked by aircraft kit makers is the standard armor scale of 1/35. With the exception of a V-2 from Dragon and various helicopter kits from MRC and Dragon, armor diorama fans who want to include flying thingies have had to make do with various 1/32 kits and hope that the difference in scale won't be too noticeable.
With this kit from Pend Oreille, that is about to change. I would never have thought that anyone would do a WW 2 aircraft in 1/35, but it really was just a matter of time before someone saw the need and filled it. Since German subjects are so prevalent in 1/35 scale, it only makes sense that the Bf-109G-6 would be the first offering.
Pend Oreille has been known for producing some very interesting subjects in resin, and frankly, resin is probably the best medium for small production run kits of this kind. So, what about the kit. Well, the first thing that grabbed my attention was the box. At 11½ x 5½ inches, I couldn't see how they could put a 1/35 kit into the box. When I opened it, I found several large cream-colored resin parts carefully wrapped in bubble wrap, a bag of smaller parts, a smaller bag with some sheet metal parts, an instruction sheet, a decal sheet and two sets of vacuform canopies.
I have shown most, but not all of the bits in the image above to give you an idea of what is in the kit. The cream color of the resin is quite hard to scan and show detail, but from what you can see, it is very well done. The surface is nice and smooth. There were a few air bubbles on some interior bits, and on the wing, I found several bubbles very close to the surface. I'll have to remind myself to do no sanding in that area!
There is the typical amount of flash on some of the parts that is inevitable with a resin kit. In the corners of some parts, such as the wheel wells, interior and underwing radiators, there is some residue that has built up and will need to be scraped out, but the amount is really tiny and should be easy to remove. There was also a bit of residue on the wing, prop tips, and some other exterior parts, but again, it should be easy to remove. Several parts are on wafers and will need some careful cleanup prior to construction.
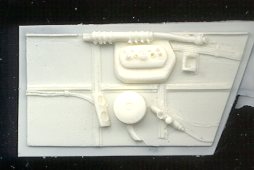 The cockpit is
well detailed with a nice resin tub, sidewalls, instrument panel, rudder pedals,
cannon housing, and control stick. Seat belts are molded on the seat and look a
bit small for the scale. The right sidewall (shown to right), has a radio panel
unlike any I have ever seen before on a 109G. I'll leave it to the experts to
decide the validity of that one! One thing that seems to be missing from the kit
cockpit are the trim wheels. They are not shown in the instructions anywhere
either. Obviously an omission of some sort and finding suitable replacements
will be an interesting quest!
The cockpit is
well detailed with a nice resin tub, sidewalls, instrument panel, rudder pedals,
cannon housing, and control stick. Seat belts are molded on the seat and look a
bit small for the scale. The right sidewall (shown to right), has a radio panel
unlike any I have ever seen before on a 109G. I'll leave it to the experts to
decide the validity of that one! One thing that seems to be missing from the kit
cockpit are the trim wheels. They are not shown in the instructions anywhere
either. Obviously an omission of some sort and finding suitable replacements
will be an interesting quest!
To accommodate the casting process, the tail section is separate. The kit also offers both the standard and the taller, wooden tail as fit on later production aircraft. To help prevent alignment and gluing problems, the horizontal stabilizer is a single piece that is trapped between the lower and upper fin. Rudder and elevators are separate pieces. The fabric detailing on the control surfaces seems a bit overdone, but should tone down some under a few coats of paint.
The fuselage itself is commendably thin for a piece of resin of this size. As you can see from the image above, there is the additional bump on the right side under the gun fairings. This is usually found on the pressurized 109G-5, but was also found on a number of 109G-6s. You need to check your references to see if it applies. If not, simply sand it off. The wings are a single casting and include the fuselage fairing. It should make for a more accurate and stout join. The dihedral of the wings is a bit more than what is shown in the three-view drawings that come on the instruction sheet.
When I initially opened the kit, and saw that it was basically an all resin kit, I was concerned about the ability of the landing gear to support all the weight. Fortunately Pend Oreille has done what I wish all resin kit makers would do and that is to cast metal rod into the landing gear. I have a shelf full of resin kits on bowed landing gear from those that were not so thoughtful! The tail wheel strut is the short version and is resin, but won't have all the weight to contend with. You also get two canopies; a standard one and the later Erla Haube or Galland hood. A nice touch is that you get two of each, perfect for the klutzes amongst us!
 As for the other
bits, there are sheet metal parts for the exhaust shields. This is a nice
addition as one can bang them up a bit as was often found on the real aircraft!
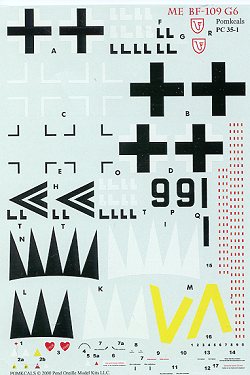
The decal sheet is from Pomkals, which I guess is basically in-house. They
provide markings for two aircraft. One is a standard G-6 in RLM 74/75/76 for
Black 9 of III./JG 3. The other is a later version of the ace Erich Hartmann of
I./JG 53. It is in a winter camo of white over RLM 76 and has his characteristic
'tulip' markings.
As for the other
bits, there are sheet metal parts for the exhaust shields. This is a nice
addition as one can bang them up a bit as was often found on the real aircraft!
The decal sheet is from Pomkals, which I guess is basically in-house. They
provide markings for two aircraft. One is a standard G-6 in RLM 74/75/76 for
Black 9 of III./JG 3. The other is a later version of the ace Erich Hartmann of
I./JG 53. It is in a winter camo of white over RLM 76 and has his characteristic
'tulip' markings.
The decals themselves are matte and are not separate. At least, I think they have a carrier film over them. Frankly, I think I would recoat them with Microscale decal film just to be sure! They are crisply done and in register. I am concerned that the white and yellow are a bit too transparent. The yellow in particular is of a very bright shade. The tulip decorations and tail swastika have the black and white as separate parts. The swastika will be replaced with a 1/32 one on my kit as there is no way I'll be able to align eight separate decals of that size!
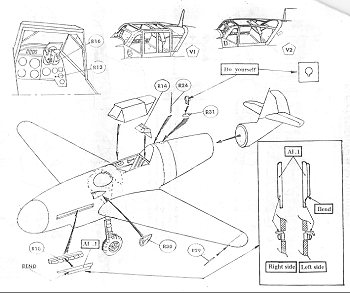 The instruction
sheet is on eight pages and is perfectly adequate for the job. The first page is
a short history of the 109G-6. Next is a list of parts with part numbers. The
next three pages are construction diagrams and drawings (one of which is shown
here). The next two pages are exterior painting and decal placement with the
final page being a five view drawing of a standard Bf-109G-6. There is no color
information on the interior at all. I can only assume that, considering the
experience level required to build the kit, this information is considered
superfluous and should already be known by those who'd build the kit.
The instruction
sheet is on eight pages and is perfectly adequate for the job. The first page is
a short history of the 109G-6. Next is a list of parts with part numbers. The
next three pages are construction diagrams and drawings (one of which is shown
here). The next two pages are exterior painting and decal placement with the
final page being a five view drawing of a standard Bf-109G-6. There is no color
information on the interior at all. I can only assume that, considering the
experience level required to build the kit, this information is considered
superfluous and should already be known by those who'd build the kit.
Overall it looks like a very nice kit and should not be that difficult to build. Stay tuned.
Review copy courtesy of Pend
Oreille 
If you cannot find Pend Oreille kits at your local hobby shop, click on the link above to get them direct from the manufacturer.
If you would like your product reviewed fairly and quickly by a site that has over 900 visits a day, please contact me or see other details in the Note to Contributors.