| KIT #: | HC1545 |
| PRICE: | $5.00 on the sale table |
| DECALS: | Two options |
| REVIEWER: | Scott Van Aken |
| NOTES: |
| HISTORY |
The first production Daimler Benz powered Bf-109s were the E variants. These started with a number of preproduction aircraft, the Bf-109E-0. In the numbering system used at the time in the Luftwaffe, preproduction planes were all '-0' after the model number. Depending on the aircraft type, this could mean just one plane or a couple of dozen. The Luftwaffe used the 109E-0s in propaganda to make people think that it was the Bf-109D. In reality, the Jumo powered 109D was in some ways inferior to the previous Bf-109C in that the D used a carbureted engine where the C had fuel injection. The deception is still enough to foil many modern authors who tend to use older books as references rather than doing any actual research into the subject.
Anyway, the Bf-109E had
several differences from the earlier Jumo powered aircraft other than just the
engine. Because of the
 DB.601, the cowling was much cleaner than with the Jumo.
The large under nose radiator was gone replaced by a small oil cooler radiator.
The coolant radiators were embedded partially into the wings leaving little to
the airflow, but able to pull in all the required cool air needed. The rest of
the airframe was pretty much the same as with the earlier models. The E-1 and
E-3 were built concurrently with the at about a 47-53 ratio of -1s to -3s. The
difference in the two was wing armament. The E-1 had four MG 17machine guns, two
in the nose and two in the wings. The E-3 had MG FF 20mmcannon in the wing and
can be distinguished from the E-1 by small under wing bulges to clear the cannon
feed mechanism. In all other respects the planes were identical. Though designed
to carry a 20mm cannon firing through the prop hub, apparently only two
nose cannon armed Bf-109E-2s were ever built with this weapon. It wasn't until
the F model that the engine-mounted gun was successfully used on production
109s.
DB.601, the cowling was much cleaner than with the Jumo.
The large under nose radiator was gone replaced by a small oil cooler radiator.
The coolant radiators were embedded partially into the wings leaving little to
the airflow, but able to pull in all the required cool air needed. The rest of
the airframe was pretty much the same as with the earlier models. The E-1 and
E-3 were built concurrently with the at about a 47-53 ratio of -1s to -3s. The
difference in the two was wing armament. The E-1 had four MG 17machine guns, two
in the nose and two in the wings. The E-3 had MG FF 20mmcannon in the wing and
can be distinguished from the E-1 by small under wing bulges to clear the cannon
feed mechanism. In all other respects the planes were identical. Though designed
to carry a 20mm cannon firing through the prop hub, apparently only two
nose cannon armed Bf-109E-2s were ever built with this weapon. It wasn't until
the F model that the engine-mounted gun was successfully used on production
109s.
As the E-1/3 was replaced on the production line with the E-4/7, older planes were often updated with the newer canopies and a number of these planes were fitted with centerline bomb racks as E-1B fighter-bombers or Jabos. Others were modified to full E-4/7 standards if damaged badly enough in combat or accidents. The E-4/7 version were built with more robust canopies and windscreens, the latter with armored glass. The E-7 was the first 109 plumbed for a drop tank, which helped to improve range, something that was sorely needed, but not incorporated in the aircraft until after the Battle of Britain. Many E-4s were brought up to E-7 standards. Most E-7 versions also had a more pointed spinner. While made obsolescent by the 109F, the E soldiered on in ground attack units and with German Allies.
| THE KIT |
Those who have been reading Modeling Madness
for a while know that I have built a few Hobbycraft 109s over the years. While not to the detail level of the
Hasegawa or Tamiya kits, they are quite passable and can often be found for a
lot less money. They are a great way to use up some of those decals that have
been collecting dust.
The kit has nicely engraved panel lines, a reasonably well equipped
interior with seat, trim wheels, rudder pedals and the whole ball of wax.
You also get a drop tank and bomb for the underside rack. The kit includes separate flaps as really its only option. I whined about
not having nose guns in an earlier 109E previous review, but must have lost them or something
as they are included in the kit. The canopy is clear, but is in the closed
position. I should mentio
The canopy is a bit too narrow for the
opening, probably the one major downside of this kit. You can get vac ones or
use one that is spare from other E kits to replace it. You could even spruce up
the cockpit with an etched set or resin set and not even come close to the SRP
of a Hasegawa or Tamiya kit.
This one is one of the 'black box' kits and so the decals within are
going to be pretty darn good. Markings are for a Rumanian AF version, yellow 65,
which has been photographed quite a bit. Basically, this plane is listed as
being RLM 71 over RLM 76 with a large yellow nose. The other option is for a
III./SKG 210 plane in Russia during the opening months of the Soviet invasion.
This one is in RLM 74/75/76 with lots of mottling.
This is a period of time where the
instruction sheet was adequate to build the kit, but gave no color information
other than the exterior scheme. Old Luftwaffe modelers will know what color to
do things, but new people will be left scratching their heads. On the 109E the
wheel wells, gear struts, and interior were RLM 02 grey with the instrument
panel in RLM 66 dark grey. Wheels could be RLM 02 or black, your choice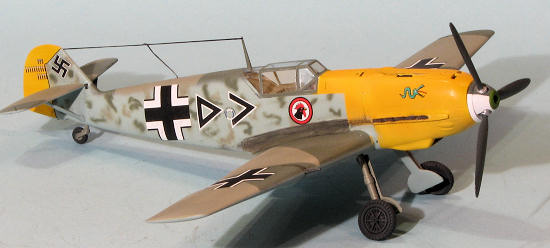 n that the tan color in the image above is a photo
glitch and not the color of the plastic. It very much seems that regardless of
which variant of the E you buy, the bits in the kit are pretty much the same.
n that the tan color in the image above is a photo
glitch and not the color of the plastic. It very much seems that regardless of
which variant of the E you buy, the bits in the kit are pretty much the same.
| CONSTRUCTION |
The first thing I did was to hunt around for a 109E cockpit set to fit this kit. Nothing in the stash now that I used my last Cooper's Details set a few years ago, and apparently no one has decided to produce one for this kit. At least I could not find one.
As this was a 'started' kit, and on the 'buyer beware' sales table, I went
through the box to see if anything was missing. Right off I found there was no
control stick so that was robbed from another Hobbycraft kit I picked up from
the tables. The previous owner had removed all the interior bits and painted
them black. Well, that would soon change as I decided to build this as an E-4
version from mid Battle of Britain. I had an old Aeromaster sheet that had
already donated three of its five options to kits, and so decided to do one
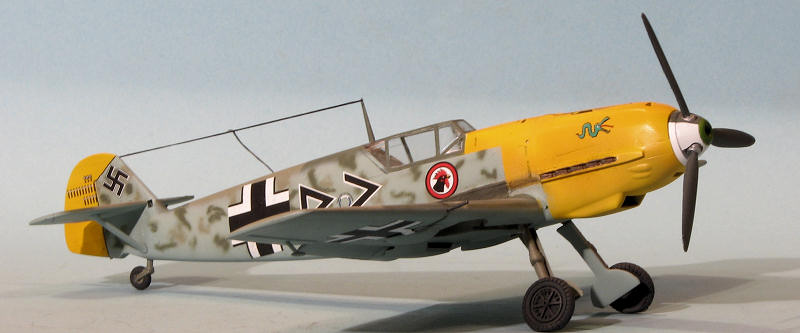
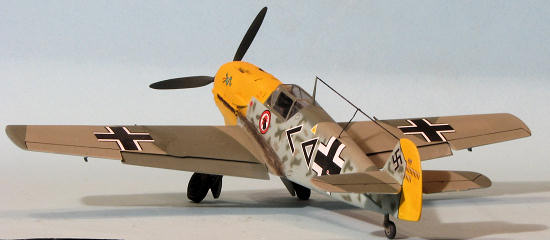
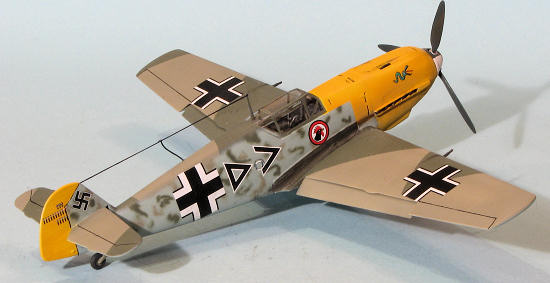
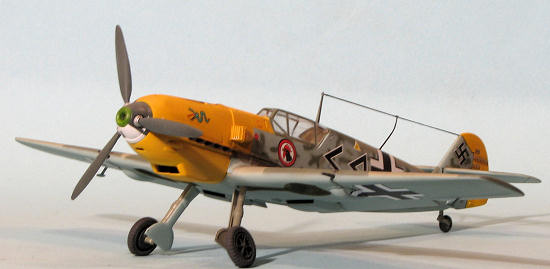
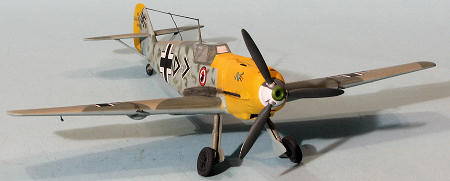
other. This was the plane of Gerhardt Schöpfel,
which was qu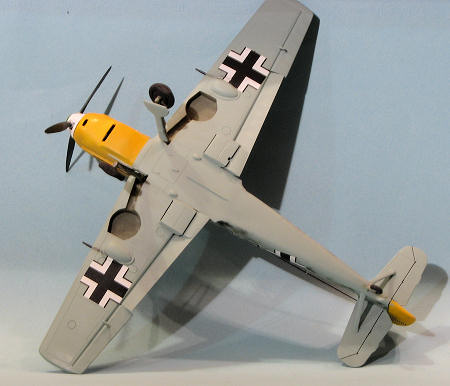 ite colorful. It would leave only Helmut Wick's plane still to be
done, but as this would only leave the unique markings for his plane, I could
consider the sheet done.
ite colorful. It would leave only Helmut Wick's plane still to be
done, but as this would only leave the unique markings for his plane, I could
consider the sheet done.
So, starting with the robbed control stick, I assembled most of the interior, leaving the side walls off until after painting. Then these bits were painted RLM 02, the standard shade for 109Es of this period. Some detail stuff was done to the side walls and the instrument panel was painted RLM 66. This was all drybrushed and once the sidewalls were glued to the floor of the tub, one side was glued into a fuselage half. I had to use a pair of small clamps to hold the sidewall to the fuselage side while the glue dried. The same was later done to the other side.
There is a simple blanking plate that fits where the nose radiator would be. It is sorta the shape of the nose cavity and is wedge shaped from top to bottom, with the thin part of the wedge (and the only place glue will hold) on the bottom. The other fuselage side was then attached. Fit is fairly good. I then glued the upper wing halves to the lower wing section after painting and inserting the wing radiator pieces. Fit here is also fairly good. The wing assembly was then glued to the fuselage. As usual, there is need for some filler at the rear wing/fuselage join. Upper wing root is a very good fit. Hobbycraft molds the upper cowling as one piece, which is good. it is also not a perfect fit on the nose section so you will find it undersized a bit in the back and front.
Tailplanes are next. The struts are too long. No other way to say it. I would recommend filling in the attachment holes on the underside of the tail planes and remove the upper pin from the struts. The other option is to fill the fuselage attachment holes. While I did not fill the tailplane holes, I did remove the upper pins. You have to look hard to see the holes, but they are there. To not do so will result in a slightly vee shaped pair of tailplanes.
| COLORS & MARKINGS |
I then decided to start some major painting. I am
building this kit to use up a set of markings on a decal sheet and this is a
Battle of Britian aircraft with a yellow nose and rudder. It is in RLM 71/02/65
with mottling on the fuselage sides. I first painted on the RLM 02, making sure
I got the back of the interior where I had to do some late filler work. Then I
masked and attached the canopy and masked over the dry RLM 02 before spraying on
the RLM 71. More masking and the nose and rudder were painted white then
 RLM 04
using Tru-Color and ColourCoats paints respectively. When dry, that was masked
and the underside and side of what was left was painted RLM 65. I used Testors
ModelMaster enamels for the major colors. I then removed the masking from the
upper fuselage and hand sprayed the upper RLM 65 demarcation line. The rest of
the fuselage side was mottled in RLM 71 and RLM 02.
RLM 04
using Tru-Color and ColourCoats paints respectively. When dry, that was masked
and the underside and side of what was left was painted RLM 65. I used Testors
ModelMaster enamels for the major colors. I then removed the masking from the
upper fuselage and hand sprayed the upper RLM 65 demarcation line. The rest of
the fuselage side was mottled in RLM 71 and RLM 02.
With all that dry, I proceeded to attach the main landing gear legs before spraying the whole thing with clear gloss.
I then started on the decals. I had chosen this kit to use up a set of markings in Aeromaster sheet #48-249, Marauding Emils part IV. Believe it or not, this was the fourth of five markings options I have used from this sheet, which is something rather rare for most modelers when it comes to multi-option sheets. The down side is that I had used up all the under wing crosses on the other three options and this would take care of all the upper wing, fuselage and tail markings. However, the kit sheet would supply the missing insignia and the data markings. This will require a pretty full aftermarket sheet for insignia for the final option. Anyway, the kit decals I used provided no obstacles and worked nearly as well as the Aeromaster ones.
| FINAL CONSTRUCTION |
 With the
markings in place, I added some of the rest of the bits. This included
assembling the prop and hub. The backing plate is larger than the spinner so you
need to be aware of that. The main gear were then glued in after the oleo
scissors were installed. These really are not good landing gear and if you have
the option to use any others, then do so. The holes for the wing cannon were
drilled out and the guns installed. Same for the aileron mass balances. I then
drilled out the True Details resin wheels and slid them on the axles.
Unfortunately, I got them on a bit wrong as the glue dried very quickly. The
last items were the main gear doors.
With the
markings in place, I added some of the rest of the bits. This included
assembling the prop and hub. The backing plate is larger than the spinner so you
need to be aware of that. The main gear were then glued in after the oleo
scissors were installed. These really are not good landing gear and if you have
the option to use any others, then do so. The holes for the wing cannon were
drilled out and the guns installed. Same for the aileron mass balances. I then
drilled out the True Details resin wheels and slid them on the axles.
Unfortunately, I got them on a bit wrong as the glue dried very quickly. The
last items were the main gear doors.
The airframe was then sprayed with a matte clear using Pledge and Gunze flat base. There was quite a bit more painting to do, including the exhaust and the nose guns as well as the tip of the spinner. I used pastels for the exhaust stains. EZ-Line was used for the radio antenna. Then the masking was taken off the canopy and the kit was done.
| CONCLUSIONS |
Hobbycraft has certainly sold quite a few of these,
and they are a nice diversion. However, they are lacking in quite a bit when it
comes to accuracy. To name a few, there is no head armor. The main gear legs are
far too thick and not prototypical. There is no
 fin antenna
mast (small though it is). The under wing cannon bulges are too large. There are
no position lights on the wing tips or rudder. There is no oil cooler exhaust.
In terms of fit, the horizontal stabilizer struts are too long and the canopy is
a tad too narrow, though that is not that big a deal for most. I am sure there
are other items that some could find, but the bottom line is that for those
wanting a really accurate E model 109, they need to spend the bucks on the
Tamiya or Hasegawa offering. This does not mean that the Hobbycraft kit is a
total loser. On the contrary, most who will build this kit will be happy with
the result. It is not a difficult build and certainly looks the part when done.
What's more, the kit is inexpensive and frequently found for $10 or less at swap
meets and other places that sell second hand kits. It is a guilt free kit as you
know going into it that it is not going to win prizes. It is perfect for
finishing out a decal sheet. If you get the 'black box' version, you will find
an excellent set of decals
fin antenna
mast (small though it is). The under wing cannon bulges are too large. There are
no position lights on the wing tips or rudder. There is no oil cooler exhaust.
In terms of fit, the horizontal stabilizer struts are too long and the canopy is
a tad too narrow, though that is not that big a deal for most. I am sure there
are other items that some could find, but the bottom line is that for those
wanting a really accurate E model 109, they need to spend the bucks on the
Tamiya or Hasegawa offering. This does not mean that the Hobbycraft kit is a
total loser. On the contrary, most who will build this kit will be happy with
the result. It is not a difficult build and certainly looks the part when done.
What's more, the kit is inexpensive and frequently found for $10 or less at swap
meets and other places that sell second hand kits. It is a guilt free kit as you
know going into it that it is not going to win prizes. It is perfect for
finishing out a decal sheet. If you get the 'black box' version, you will find
an excellent set of decals
| REFERENCES |
Messerschmitt Me-109 Part 1 by Robert Michulec, AJ Press, 2001
July 2012
Thanks to me and my ability to be cheap for this one.
If you would like your product reviewed fairly and fairly quickly, please contact the editor or see other details in the Note to Contributors.