
Hobbycraft 1/48 Bf-109D
| KIT #: | HC 1568 |
| PRICE: | $3.00 at a swap meet |
| DECALS: | Two options |
| REVIEWER: | Scott Van Aken |
| NOTES: |
| HISTORY |
The Bf-109 (or Me-109 if you prefer), is probably one of the most recognizable of WWII aircraft. And it should be as it was the most produced (and re-produced if you include rebuilds) German aircraft of WWII. As with most aircraft, it came into being as much as a  result of heavy politicking as on the merits of the airframe. To be sure, several aircraft developed around the same time were probably better in many aspects of their performance and undoubtedly able to be developed into more capable versions as was the 109. However, the 109 was offered at a lower unit cost and was also probably easier to construct. One reason is that Messerschmitt designed the aircraft after a sporting aircraft so it was the smallest airframe that could accomplish the job. Smaller airframe means fewer resources, higher speed and all that.
Initial types were powered by a Junkers engine that produced about 600 hp. Adequate for the aircraft at the time and one that made it more than a match for the competition. This was proven in battle during the Spanish Civil War where the type was put up against the best the Soviets and other suppliers could put against it. Even in the early stages of WWII, the Jumo powered 109 was able to hold its own. However, it was the Daimler Benz powered 109s that were to soldier on through the rest of the war, with the Jumo engined variants being used for home defense and fighter pilot schools.
| THE KIT |
Hobbycraft is a company that elicits commentary from many sources. Some proclaim all their products to be garbage while the others realize that the company has produced some pooches and some gems; just like most model companies.
Like many, I'm a fan of the 109, basically because of the wide variety of camouflage schemes one can apply, so it was with delight that I embraced this kit when it first appeared. Now, no longer did we have to resort to conversions, vacuforms and short run kits to get a nice early 109.
To be sure, it has its problems, as do most kits. As Hobbycraft was wanting to box this as several variants of the Jumo-powered  109, they had to make things slightly generic. The mold makers in Korea also 'borrowed' from extant kits that were similar. This meant the Hasegawa 109E as it was the only good 1/48 'square tipped wing' version on the market. Hence, you get a 109E wing, thankfully without the cannon blisters. The Koreans also 'borrowed' from an aftermarket cockpit and so you get a 109E cockpit. You can tell it is an E cockpit as it has a map case, the one item that is most telling. However, the cockpit for the Hobbycraft kit is better detailed than that of the Hasegawa kit. Same goes for the kit's wheels. They have better detailing than that provided by Hasegawa. The landing gear and wheels are such that they will fit perfectly into the Hasegawa kit's wings.
However, it isn't just a warmed over Hasegawa kit as Hobbycraft had to do the Jumo engine thing. According to Lynn Ritger's 'The Bf-109 part 1' book, the nose is too flat. The upper cowling should have more curve and the radiator housing should also curve up slightly in the back. There are a few other things like the wrong fuel filler door location, but unless you are one who is a subject matter expert, you won't really notice or even care about some of these things. One thing you will notice is that the canopy is a little too small in width. Aftermarket is the only cure for this. As this kit is boxed as a D version, one only gets the metal prop. The Academy releases offers all possible sprues in all their boxings, albeit at a significantly higher price than even a 'new' Hobbycraft kit.
This kit is a 'white box' Hobbycraft kit, which means that the decals for a Swiss and 1940 Jagdfliegerschule 1 aircraft are best discarded. The instructions are also quite basic, but usable. Please note that they show the upper cowling scoop on the wrong side of the cowling. There is also no construction painting guide, only a camouflage one.
Still, it is a fairly nice kit and most modelers will be pleased with it and the results they get.
| CONSTRUCTION |
Not to sound too conventional, but I did start with the interior. First, I glued the seat, control stick and the trim wheels to where they were supposed to go. Then all the interior bits were painted with RLM 02 using Agama's fine enamel paints. I decided to use  one of the Airwaves photo etch sets I'd had laying about for years on this one. It is a fine set, but for me, most of the set was not useful. I had no intention of opening up the fuselage or gun bay access hatches so those pieces will go unused. I also did not use the belts that were provided. The ones molded on the seat are really quite good and more detailed that even those on the Hasegawa kit, so these aftermarket ones will be used at a later date on another kit.
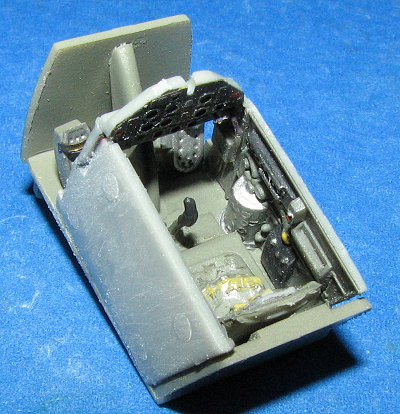 After the 02 had dried, I did some detail painting on the various pieces. The etched instrument panel was used, though there is no acetate instrument sheet provided. I also had to cut the upper and lower panel away and apply those separately to get them to fit as the attaching piece between the two is too deep when folded. This was then attached to the cockpit sidewalls which had been glued to the floor piece after I'd added the two etched rudder pedals. Fit of the instrument panel is poor as the etched part covers the section on the plastic panel that one uses to hold it in place.
I would have liked to have built the fuselage and then inserted the cockpit, but the way it is designed, that is not possible. In fact,  one has to clean up some ejector stubs just to get the kit parts to fit. Even then, there is a gap at the back behind the seat that I couldn't figure how to close without trimming the top of the side panels. That would have thrown off the instrument panel so I left it as is. After closing the interior in the fuselage halves, I applied the usual filler to all the seams. I then cemented the wing halves together. Though this is supposed to be D variant, there are no gun holes in the wing leading edge. I'll wait until near the end to add those.
Fit of upper cowling piece is not bad, but it is a tad small in width. Nothing major and some may want to incorporate a spreader bar, but then that will reduce the height of it so there is really no way to attach it without some body work. Those who look at the cowling and know something about the plane will realize that the front of it isn't exactly the right shape. One can either fix it or leave it as is and I chose option two. With that done, I attached the lower wing. The fit here is actually quite good though you will need the requisite filler on the lower bits and the leading edge. The flaps were next and are actually a 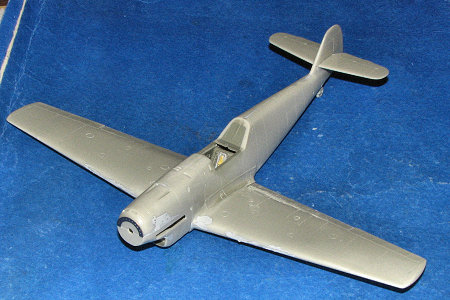 tad too thin in height. My original plan was to pose these lowered, but I came to realize that it just isn't really possible.
 With the wing in place, the stabs were next and those were no problem. Be sure the holes are in the bottom of them so you can later fit the struts. I then attached the forward cooling scoop on the upper canopy (instructions show it going on the wrong side but there is only one attachment hole) and the lower oil cooler. I had not used either of the kit's exhaust options as I wanted to use the flat brass piece in its place. In hindsight, it may have been better to cobble up some short exhaust stubs for it or even put a piece of plastic behind them to prevent see-through, but I didn't. Next time. I did try to fit the kit exhaust piece behind it, but the holes just didn't match up very well so I didn't use it.
Canopy was next. It was masked and I have to say that there seem to be some frame lines missing for the upper portion forward on the moveable portion and the upper aft portion of the windscreen assembly. Some freehand masking is in order for this. I then attached the etched rear cockpit section and glued on the canopy. The canopy is also a tad too narrow, but again, is something you can live with if you have to. I looked at a Squadron replacement, but it does not offer a closed cockpit option as it is molded in three distinct parts.
| COLORS & MARKINGS |
 Now that the airframe was pretty well complete, it was time for paint. I used Agama's enamels on this one. First, the underside, tailplane struts and outer gear doors were painted with RLM 65. Up top, the canopy was painted RLM 02 as were the gear legs and the inside of the gear doors. When the underside was dry, the lower part of the tailplanes was masked off and the upper part of the kit was painted RLM 70 as was the spinner and prop blades. Then came the chore of masking the splinter camouflage. I am using Cutting Edge sheet 48-264 for early 109s and chose the mount of Lt. Hermann Reifferscheidt who was with 1./JG 131 'Richtofen' at the start of the war. I started masking, but was having trouble getting the upper view to match the left side fuselage scheme. The sheet offers no right side view so rather than guess, I opened up my copy of Luftwaffe Camouflage and Markings 1 by K.A. Merrick and used plan 7a for early 109s as my basis. There is also a plan 7b that could have been used, but the difference in the two is minimal.
 After MUCH masking and trimming, I spent the required 2 minutes spraying on the RLM 71. Perhaps I should have done the 71 first, but it seemed easier to do the 70. You might also note from the image that I tend to resuse Tamiya tape. I can generally get two good masking sessions out of it before it gets too far gone to be used again. Anyway, the major colors were in place. With the upper colors dry, more masking and repainting of the underside. But before I did that, I glued on the aileron balances. As a note, you will see that the RLM 70 and RLM 71 produced by Agama are quite prototypical for the paints as the two shades are rather indistinguishable unless the light hits the model just right. One reason that many early 109 color profiles show it as a single shade.
I then glued on the landing gear; twice. You see, though they look like an easy fit, I managed to break the mounting pegs on both  of them. No option other than to drill out both the gear and mounting points, install a small section of metal rod, and super glue the gear in place. I had no problems with the wheels and though I had a set of the excellent Ultracast wheels to use, I decided that the detail on the kit wheels was pretty good so saved the Ultracast ones for a later project. I should mention that the kit struts look a bit too beefy for my tastes, something that was brought even more to light when I used the etched oleos, which looked far too petite for these struts.
With the model on its gear, I gave it several coats of Future/Kleer to provide a glossy surface for the markings. The decals went on without a fuss and I was able to get by with MicroSol as a setting solution. One does have to fiddle a bit with the fuselage X to be sure that it meets on both the upper and lower surfaces. I did not put on any of the data markings aside from fuel and oil filler markings, saving those for another project. Besides, as dark as the paint is on this one, they would be pretty much invisible.
| FINAL CONSTRUCTION |
 A coat of Future/Flat Base mixture to provide a semi-matte finish was applied to seal in the markings. In peacetime, an airplane would not have been that grungy as the ground crew would have had time to keep the planes in a clean condition. Looking in the box, I noticed a few other parts to add. One are the gear doors. These fit fairly well, though you'll need to gently file down the pins on the gear legs as the matching surface on the doors is extremely shallow. I then trimmed and slid in the Airwaves grille, which was a perfect fit once it was trimmed from the sprue. I glued the prop and backing plate to the prop shaft, leaving some sticking out the back. When dry, I cut off the large end of it, glued on the spinner and glued the prop to the front of the cowling. At the back, it was time to add on the rear struts. However, those of you who have built this kit will remember that these struts are too long. I trimmed them to fit and glued them in place. A bit of final touch-up painting, and the model was done.
| CONCLUSIONS |
I'm sure that many of you are wondering why I put all this work into what is not the best kit of this plane in this scale. Two reasons, One is that I have quite a few of them and figured I'd put some of what is in the stash to good use. Second is that MM isn't always about the latest and greatest. I'm a modeler just like most of you and have a number of older kits in my stash. We don't always want to spend $40-50 on a newer kit, and just because a kit is old does not mean that it won't provide a very nice model for your display shelves. Though it isn't perfect, it can be had for a very small price, requires a few of the less demanding modeling skills and the end result is pleasing.
October 2007
#1488 in a series
My thanks to Agama for providing the paints used for this model.
If you would like your product reviewed fairly and quickly, please contact me or see other details in the Note to Contributors.