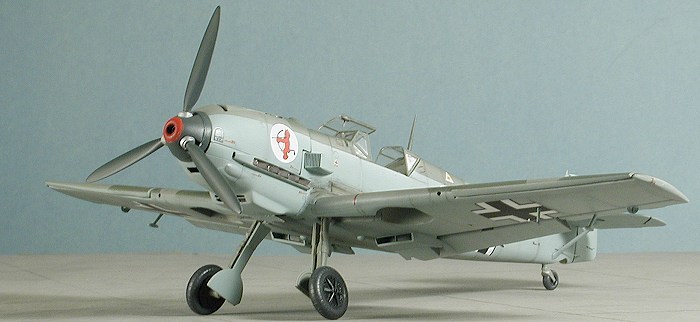
Hasegawa 1/48 Bf-109E-1 'Sitzkrieg'
|
KIT # |
09482 |
|
PRICE: |
£16.00 |
|
DECALS: |
Two options |
|
REVIEWER: |
Scott Van Aken |
|
NOTES: |
includes resin bits to backdate to an E-1 |
|
THE KIT |
Please visit the preview for a look at what's in the box and a short history of the type.
|
CONSTRUCTION |
Installment 1
 This
kit was started on a Friday afternoon, and worked on a little bit in
spurts of time over a weekend for the first installment. Gives one
something to start with. It will not be a super quick build, but it
should take at least a couple of weeks to finish, thanks to all the
aftermarket stuff that I don't normally
use. If you want to see how a fumble-fingered builder handles an etched
brass set with nearly 100 pieces, stay tuned!
This
kit was started on a Friday afternoon, and worked on a little bit in
spurts of time over a weekend for the first installment. Gives one
something to start with. It will not be a super quick build, but it
should take at least a couple of weeks to finish, thanks to all the
aftermarket stuff that I don't normally
use. If you want to see how a fumble-fingered builder handles an etched
brass set with nearly 100 pieces, stay tuned!
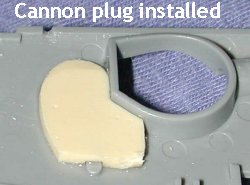
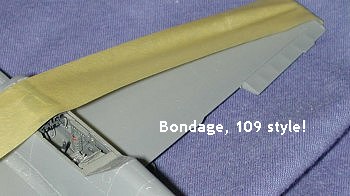
However, I first started with the resin inserts and glued
those into the cannon bulges in the wings. I put in quite a bit of
superglue; in fact, too much as even after 3 hours it wasn't dry so I had
to hit it with accelerator. Then I began a rather tedious session of
sanding. Took about half an
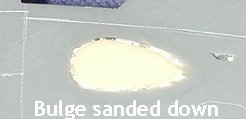 hour to sand them both
down. Of course, I had to rescribe the lost panel lines that
inevitably take a hit when one is sanding things down to a baseline.
Despite filling the bottom of the bulges with superglue, there are gaps
that will need to be filled and then sanded smooth again. You can see
these pesky gaps in the image to the right.
hour to sand them both
down. Of course, I had to rescribe the lost panel lines that
inevitably take a hit when one is sanding things down to a baseline.
Despite filling the bottom of the bulges with superglue, there are gaps
that will need to be filled and then sanded smooth again. You can see
these pesky gaps in the image to the right.
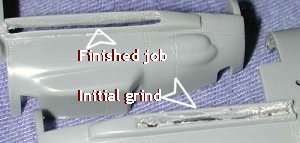
While waiting for the filler to dry on the wings, I decided to tackle the exhaust. You see, I've had this set of Moskit 109E exhausts for at least a couple of years, but using them has meant that a lot of work has to be done on the kit. The kit exhaust are molded in with the fuselage. Add to that the fact that Moskit exhausts always seem just a bit larger than the holes they have to go into, meant a lot of cutting and other kinds of tedium.
 I
started by putting a small cutting disc into my Dremel tool, putting it
on low speed and then doing the initial cutting on the exhaust. I also
cut rather deeply on the back side towards the front as the forward
exhaust needs to fit there and won't if you don't cut out a lot of
plastic. After the initial cuts were
I
started by putting a small cutting disc into my Dremel tool, putting it
on low speed and then doing the initial cutting on the exhaust. I also
cut rather deeply on the back side towards the front as the forward
exhaust needs to fit there and won't if you don't cut out a lot of
plastic. After the initial cuts were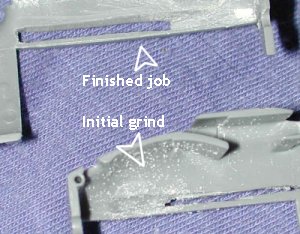 made, I did a rough clean up with my hobby knife. At least until there
was enough room to get a flat file into the opening. I highly recommend a
set of quality files for doing this kind of work. After much filing, I
wrapped a piece of coarse sandpaper around the file and opened things out
even more. This was followed by a square file to neaten up corners and
dig out more plastic from the back side so that the exhaust would fit.
All of this made several of the parts very thin so you really have to
take care. I even had to file off a bit of the forward exhaust down near
the base. Moskit exhaust are very thin copper so you have to be extremely
careful when doing any work on these items. After about two hours of
work, I had things to where the exhaust would fit in place. You can
see from the enclosed images what the outside and inside look like before
and after. I took a nice long break.
made, I did a rough clean up with my hobby knife. At least until there
was enough room to get a flat file into the opening. I highly recommend a
set of quality files for doing this kind of work. After much filing, I
wrapped a piece of coarse sandpaper around the file and opened things out
even more. This was followed by a square file to neaten up corners and
dig out more plastic from the back side so that the exhaust would fit.
All of this made several of the parts very thin so you really have to
take care. I even had to file off a bit of the forward exhaust down near
the base. Moskit exhaust are very thin copper so you have to be extremely
careful when doing any work on these items. After about two hours of
work, I had things to where the exhaust would fit in place. You can
see from the enclosed images what the outside and inside look like before
and after. I took a nice long break.
Should start this next bit off by saying that I generally don't like etched metal detail sets. I have trouble with them and vastly prefer using resin. However, I didn't have a resin set for this plane and was able to get an Eduard etched set for it (#48-355) so decided to really give the etched stuff a chance. The Eduard set has all sorts of bits and pieces in it to replace a plethora of kit parts. My experience has been that often there are etched bits just put in there to fill the fret and often they are no better than the kit parts. However, I'll use as many of them as I can just to stay true to things.
But anyway, I started cutting away at the various bits where the etched stuff has to go. On the wings, this meant the aft radiator doors; on the fuselage it meant the aft oil cooler door; in the cockpit it meant a couple of things had to be sanded off. I also removed the small amount of detail in the upper wing that stood in for the wheel well detail as there is an insert that goes there and I didn't want it interfering.
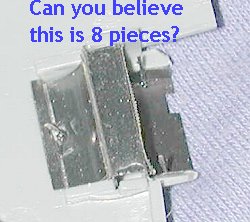 I
then started on with the Eduard stuff. Beginning with the wings, I
started folding and bending bits for one radiator. Each radiator area has
eight parts, three of which are small actuating arms, two screens, a
center block, the forward ducting (which
requires some curve bending, and the exhaust door. On the other side,
there is a small insert for the short stretch of wheel well. Though it
doesn't look like much, it to
I
then started on with the Eduard stuff. Beginning with the wings, I
started folding and bending bits for one radiator. Each radiator area has
eight parts, three of which are small actuating arms, two screens, a
center block, the forward ducting (which
requires some curve bending, and the exhaust door. On the other side,
there is a small insert for the short stretch of wheel well. Though it
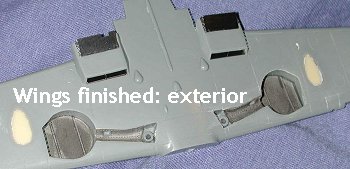
doesn't look like much, it to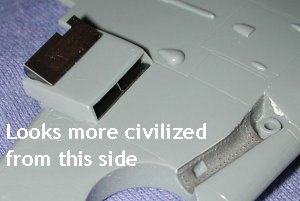 ok about an hour to do each side. As you can
see from the interior and exterior shots, the interior is a bit on the
messy side so it is a good thing it will be hidden from view. I also had
to trim the aft screen as I didn't fit it down low enough or something
and when I test fit the upper wing on it, it got bent.
ok about an hour to do each side. As you can
see from the interior and exterior shots, the interior is a bit on the
messy side so it is a good thing it will be hidden from view. I also had
to trim the aft screen as I didn't fit it down low enough or something
and when I test fit the upper wing on it, it got bent.
Back at the cockpit, I installed the right side and
started bending and installing various boxes. You really need some sort
of vision enhancement to see these parts as you bend them as some are
very small. The instructions are not very clear about the starboard
sidewall fitting and there is a
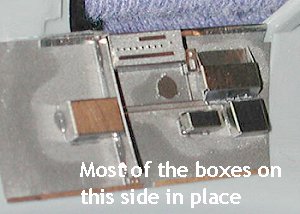 piece that I'm not sure if it is bent in
half or just a quarter and then placed on the sill. I bent it in half and
hope that I got it right. Actually, with my luck, I bent it the wrong
way! Anyway, after about an hour or so of slow work, I managed to get
most of the major bits on the right side. There are still quite a few
pieces of wiring and such to go and I've not even started on the left
side of things or the floor. More of that next installment.
piece that I'm not sure if it is bent in
half or just a quarter and then placed on the sill. I bent it in half and
hope that I got it right. Actually, with my luck, I bent it the wrong
way! Anyway, after about an hour or so of slow work, I managed to get
most of the major bits on the right side. There are still quite a few
pieces of wiring and such to go and I've not even started on the left
side of things or the floor. More of that next installment.
Installment 2
Today was spent working more on the wings, I
completed the starboard radiator assembly and put in the upper wheel
wells. These fit atop the o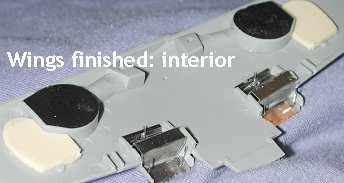 penings
already on the kit, though I must caution you that they will have to be
bent to match the curve. I suspect that when I get ready to install the
upper wing halves that I may have to do a bit of carving to get them to
fit properly, but I'll wait to see on that.
penings
already on the kit, though I must caution you that they will have to be
bent to match the curve. I suspect that when I get ready to install the
upper wing halves that I may have to do a bit of carving to get them to
fit properly, but I'll wait to see on that.
I also did a bit of work on the floor of the
cockpit. There I installed a raised portion into which the
 control column fits.
There is also a ramp area just in front of that. I've not paid that much
attention to early 109 interiors but it is there and something that was a
bit unexpected. I also made a command decision to use a True Details
resin seat with the belts already molded in place rather than to go
through the work of carving the detail off the kit seat, modifying the
seat to accept the Eduard belts and then glue in the belts. Should save
about an hour's work and a lot of frustration. Well worth the $3.98 for
the pair and I have one left over for another project!
control column fits.
There is also a ramp area just in front of that. I've not paid that much
attention to early 109 interiors but it is there and something that was a
bit unexpected. I also made a command decision to use a True Details
resin seat with the belts already molded in place rather than to go
through the work of carving the detail off the kit seat, modifying the
seat to accept the Eduard belts and then glue in the belts. Should save
about an hour's work and a lot of frustration. Well worth the $3.98 for
the pair and I have one left over for another project!
Since I'd basically finished with the wings, it was time to paint what had been done. I used Testors Model Master enamel RLM 02 for this as it is the standard Luftwaffe primer. The paint not only covered up many ills, but also helps to hold some of the more flimsy parts in place (like the wheel well braces).
Installment 3
 Several
days have passed since the last installment, many of those doing other
things besides working on this kit. Once I got some spare time, I
continued with the attachment of teeny-weenie etched pieces to the
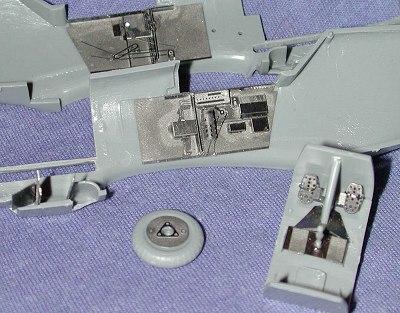
interior and other parts of the plane. As you can see by the image, there
are an awful lot of bits and pieces. Each one of those chain/cables is
separate and had to be stacked in just the right order. The photo shows
the extent of all the parts, finally in place and ready for a coat of RLM
02 paint.
Several
days have passed since the last installment, many of those doing other
things besides working on this kit. Once I got some spare time, I
continued with the attachment of teeny-weenie etched pieces to the
interior and other parts of the plane. As you can see by the image, there
are an awful lot of bits and pieces. Each one of those chain/cables is
separate and had to be stacked in just the right order. The photo shows
the extent of all the parts, finally in place and ready for a coat of RLM
02 paint.
As I mentioned, I decided to eschew the etched bits for the seat and use a resin one. I did, however, attach the trim wheels and braces to the resin seat. I also left on the back brace as it seems as if the etched part will drape right atop it with no problems. I found that the side rails on the back of the interior did not fit as well as I'd like so I shortened them somewhat. With all that 'stuff in there, fit is quite tight. I test fit a great deal after adding in various bits and pieces to make sure that all would eventually cooperate with each other and not leave me with a real mess.
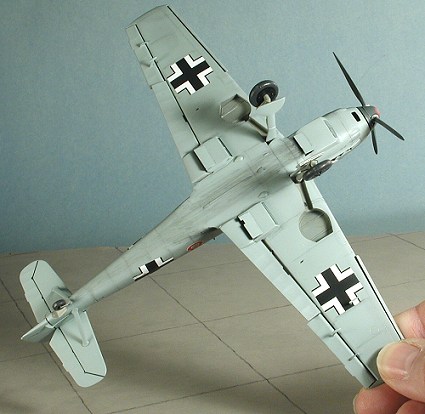
I also managed to glue in the parts for the oil
cooler and I did install the splitter section to the forward cooler
screen. Later in service, these parts were often left out as they really
served little good. A good base line is that if your 109E has a lot of
 mottling on the side, the splitter was probably not there. As always, it
is good to have a photo of the plane in question, but I found very few
images of any kind taken from the front that will show this feature.
Noting the really nice backing piece for the wheels, I decided to use
them and the kit wheels for this build. I'll save the TD resin ones for
the Hobbycraft kits, which really need the extra help a lot more than the
Hasegawa one.
mottling on the side, the splitter was probably not there. As always, it
is good to have a photo of the plane in question, but I found very few
images of any kind taken from the front that will show this feature.
Noting the really nice backing piece for the wheels, I decided to use
them and the kit wheels for this build. I'll save the TD resin ones for
the Hobbycraft kits, which really need the extra help a lot more than the
Hasegawa one.
I also glued the upper and lower wing halves together and sanded the leading edges smooth. I also drilled out the area where I cut off the cannon barrels. Later, I'll install some thin tubing to represent the machine gun barrels.
Once the interior parts had been painted with RLM 02, they were drybrushed and given a wash of dirty thinner. Then the instrument panel was glued in place and the fuselage halves glued together. I must have messed up something as my instrument panel was slightly squished when I put the halves together. The whole thing was set aside to dry until the next installment.
Installment 4
Since last time, I have filled and sanded down the fuselage, getting it ready to mate to the wing. The interior has been finished up with the seat installed and the few additional bits added to the area behind the seat. The resin seat is a good fit though I should have trimmed the back brace a bit more than I did. I attached the etched piece to the inside plate of the spinner as directed by the instructions. The next step is installing the wing.
 This
didn't go as easily as I'd have hoped. I seems that all the stuff added
to the cockpit made things a bit wider than the norm. As a result, the
upper wings were a bear to get into place. I sanded down the wing roots a
tad, but was afraid of over-doing it and and that would have meant a seam
to fill. Instead, I flooded the wing root with glue and the softening of
the glue, along with forcibly holding the wings up with tape was enough
to overcome most of the problems. It also made the rear wing/fuselage
join on the underside better. Better, but not perfect and I had to apply
filler to take care of some gaps.
This
didn't go as easily as I'd have hoped. I seems that all the stuff added
to the cockpit made things a bit wider than the norm. As a result, the
upper wings were a bear to get into place. I sanded down the wing roots a
tad, but was afraid of over-doing it and and that would have meant a seam
to fill. Instead, I flooded the wing root with glue and the softening of
the glue, along with forcibly holding the wings up with tape was enough
to overcome most of the problems. It also made the rear wing/fuselage
join on the underside better. Better, but not perfect and I had to apply
filler to take care of some gaps.
While all this dried, I set about cleaning up some
of the other parts and getting them ready for some preliminary painting.
Test fitting the upper cowling showed that I'll have a gap to deal with
on the left side. As a result, I won't fit the supercharger intake until
after that gap situation is
 taken care of as it is a pretty healthy one.
I also spent some time pondering how to keep the Moskit exhaust from
getting paint on them after I install them as masking them won't be the
easiest thing to do.
taken care of as it is a pretty healthy one.
I also spent some time pondering how to keep the Moskit exhaust from
getting paint on them after I install them as masking them won't be the
easiest thing to do.
Installment 5
Next step was to do some work at the back of the plane. This meant installing the horizontal stabs. I didn't put in the braces as that will be done after the aircraft is fully painted. I also cut off the tabs for the rudder controls and substituted the photo etched ones, which are considerably larger and a bit of a chore to install. Then it was time for some painting.
|
COLORS AND MARKINGS |
Using Testors ModelMaster RLM 02, I painted the upper wings, rear fuselage and horizontal stabilizers. I also sprayed the main gear and inside of the slats at this time. Switching to the same brand's RLM 65, much of the underside of the wings, fuselage and horizontal stabs was covered. I also did the gear doors and some of the smaller under-wing bits. The prop and hub were painted RLM 70, also with ModelMaster paints. The whole thing was set aside to dry.
 I'm not sure if everyone does painting in this
manner, but I do the big areas and paint many parts on the sprue. Later,
when the bits are removed from the sprue, they are cleaned up and those
areas repainted. It just seems easier this way. For the whole airframe, I
end up going back over parts rather frequently so doing sections and then
repainting them later after other smaller bits have been added isn't
really much of a problem. Those that finish kits in a weekend undoubtedly
don't use this method! :o)
I'm not sure if everyone does painting in this
manner, but I do the big areas and paint many parts on the sprue. Later,
when the bits are removed from the sprue, they are cleaned up and those
areas repainted. It just seems easier this way. For the whole airframe, I
end up going back over parts rather frequently so doing sections and then
repainting them later after other smaller bits have been added isn't
really much of a problem. Those that finish kits in a weekend undoubtedly
don't use this method! :o)
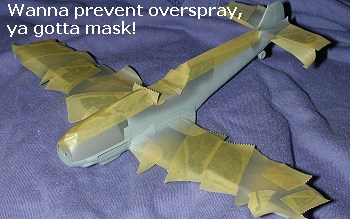
The RLM 02 part was masked over and I sprayed RLM 71. Having forgotten to attach the slats and flaps while doing the 02 part, I did so during the RLM 71 session. When dry, I removed them, masked off the 71 and resprayed the RLM 02. I also masked the wheel wells and finished doing the RLM 65 on the underside. Now all I have to do (once I get the canopy in place) is to mask the upper surface of the fuselage and spray the RLM 65 once again.
Installment 6
 Well,
the major painting is done. After a couple of masking and painting
sessions, all the big colors are done. As usual, masking the canopies was
a bit time consuming, but on the 109 it is relatively easy. One thing I
should mention is that there is no vertical framework in the middle of
the main canopy. I'm just as guilty as most when it comes to painting one
on there, but on the early planes, this was nothing more that a double
thickness of the Plexiglas as the forward section could be slid back open
to allow some air to come in. I should also point out that prior to
painting the rest of the RLM 65, I attached the supercharger intake. The
Eduard set provides a new intake grille that looks much better than the
kit part.
Well,
the major painting is done. After a couple of masking and painting
sessions, all the big colors are done. As usual, masking the canopies was
a bit time consuming, but on the 109 it is relatively easy. One thing I
should mention is that there is no vertical framework in the middle of
the main canopy. I'm just as guilty as most when it comes to painting one
on there, but on the early planes, this was nothing more that a double
thickness of the Plexiglas as the forward section could be slid back open
to allow some air to come in. I should also point out that prior to
painting the rest of the RLM 65, I attached the supercharger intake. The
Eduard set provides a new intake grille that looks much better than the
kit part.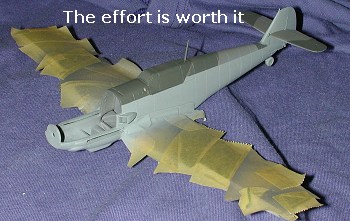
Also done during this time was the drilling out of the nose guns. I also cut off the oleo links from the main gear and glued on the etched oleo links. Bare Metal foil was placed over the oleos. I also tried to glue in the small etched hand holds for the windscreen, but was totally unsuccessful in my attempts. Eduard gives you twice as many as you'll need, but I lost three of them so gave up! I also forgot to drill out the hole for the radio mast so had to pop off the aft section to perform that task before gluing it back in place. Eduard's set provides a correctly shaped antenna mast, but it is two-dimensional and looks decidedly odd.
Now that the majority of painting is done, the next step will be to glue on the gear, exhausts and some other small bits prior to applying the decals. That should be fun as the kit is finally nearing completion.
Final Installment
 You'd think that things would be just a few minutes
away from completion. Well, that isn't exactly so, especially when you
are dealing with etched metal sets. I had a base paint scheme on the kit,
but still had a number of bits to add to it. First off, I went to work on
the gear. With the oleos cut off, I bent the metal replacements and glued
them into place. Several times. With them sturdily attached, it was time
for the brake lines. These took a bit of fiddling as I just couldn't seem
to get the hang of them. I finally got them in place and then started to
attach the wheels. Oops, the holes on the etched backing plate were too
small so they needed to be rounded out a bit more. With that done, they
were glued on, making sure that the brake line attachment point was in
the same place on both wheels. Then the little end of the line was glued
on with a dab of superglue. Were I smart, I'd have drilled out the hole
in the backing plate. Would have made things a lot easier. Then the gear
were glued into the wheel wells. They are a loose fit so one has to be
careful, especially with all the weight of the wheels. I'm glad now that
I didn't use the resin wheels on this as those combined with the metal
backing plate would have given me fits to get things properly lined up to
match the flat spots!
You'd think that things would be just a few minutes
away from completion. Well, that isn't exactly so, especially when you
are dealing with etched metal sets. I had a base paint scheme on the kit,
but still had a number of bits to add to it. First off, I went to work on
the gear. With the oleos cut off, I bent the metal replacements and glued
them into place. Several times. With them sturdily attached, it was time
for the brake lines. These took a bit of fiddling as I just couldn't seem
to get the hang of them. I finally got them in place and then started to
attach the wheels. Oops, the holes on the etched backing plate were too
small so they needed to be rounded out a bit more. With that done, they
were glued on, making sure that the brake line attachment point was in
the same place on both wheels. Then the little end of the line was glued
on with a dab of superglue. Were I smart, I'd have drilled out the hole
in the backing plate. Would have made things a lot easier. Then the gear
were glued into the wheel wells. They are a loose fit so one has to be
careful, especially with all the weight of the wheels. I'm glad now that
I didn't use the resin wheels on this as those combined with the metal
backing plate would have given me fits to get things properly lined up to
match the flat spots!
With the gear on, I was able to move to the aileron hinges. These were not that difficult to install, though I made my usual glue blob on the attachment point. Once the two-sided hinge was on. I simply inserted the single hinged piece and attached it with gloss paint. While at that place of the kit, I glued on the mass balances.
Turning my attention to the front of the model, I
threaded the prop 'hold-back' through the nose orifice (after opening it
up a bit), and glued on the spinner backing plate. At this time, I also
glued on the tail plane braces. There I let things sit for a bit as
returned to the paint shop to spray all those new metal bits I had
attached to the lower outer wings. It also gave me the opportunity to
paint the bottom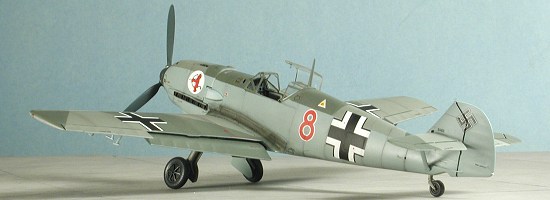 edges of the slats.
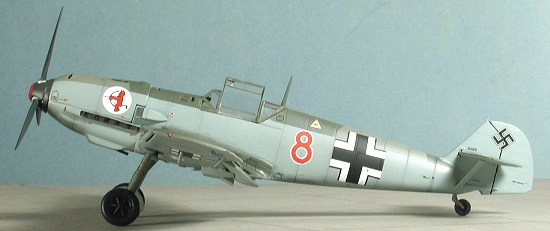
Then it was on to the decals. I chose a rather clean looking plane from Aeromaster sheet 48-514. This one was Uffz. Ludwig Beimeier's plane from 2./JG 52 in France during 1940. Basically the only thing to make it a bit different was a tactical number and unit badge. I picked it because I figured that most would go for the somewhat fancier options on the sheet! The sheet offers the tactical number in both red and black as it is impossible to tell which was used. Naturally, I took the red. I also made a big goof by putting my thumb right on the corner of the fuselage cross while it was being treated with Solvaset. It attached itself to my thumb and off came that section of decal. I cut a replacement chunk out of one of the other crosses to repair it. As the decal sheet came with minimal stenciling, I used quite a few of the others stencils out of the kit decals and they seemed to work OK, even with Solvaset on them.
|
FINAL CONSTRUCTION |
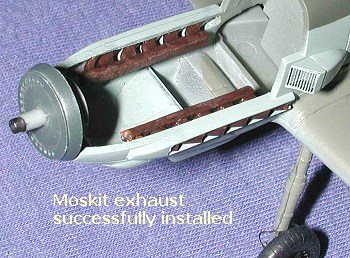 After
all the decals were dry, I continued on by gluing in the Moskit exhaust.
I'd purposely not glued on the upper cowling, despite its poor fit so
that I could put in the exhaust near the end of construction. Basically,
I didn't want to lose that great patina that was on them and repainting
them at all would have lost it. Though the exhausts are fairly long, only
a tiny portion of them will fit into the exhaust opening. Once I got them
into place, I used a bit of superglue on the top of each exhaust pipe to
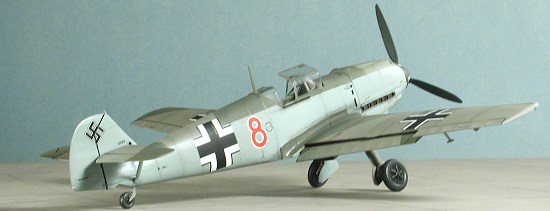
hold them in place. As you can see from the image, they do tend to stick
inside the nose section quite a bit. You can also see the prop hub and
the brake lines on the main gear in this image.
After
all the decals were dry, I continued on by gluing in the Moskit exhaust.
I'd purposely not glued on the upper cowling, despite its poor fit so
that I could put in the exhaust near the end of construction. Basically,
I didn't want to lose that great patina that was on them and repainting
them at all would have lost it. Though the exhausts are fairly long, only
a tiny portion of them will fit into the exhaust opening. Once I got them
into place, I used a bit of superglue on the top of each exhaust pipe to
hold them in place. As you can see from the image, they do tend to stick
inside the nose section quite a bit. You can also see the prop hub and
the brake lines on the main gear in this image.
With the exhaust in place, I glued the upper
cowling. As expected, the fit was not that great, but not that bad,
either. Then I glued the prop blades onto the prop shaft, after painting
the blades RLM 70 and the blade attachment areas with aluminum. Then the
red-tipped prop hub was glued atop all of that. Moving to the underside,
the main gear doors were glued in place and finally the oil cooler aft
door was glued in the slightly open position. This didn't fit as well as
I'd have liked and I wasn't as careful with the superglue as on other
parts. 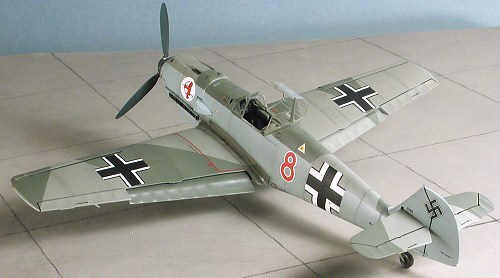
Taking my drafting pen, I used it to highlight the control surfaces, vents and fill in the tail wheel area. Then the aircraft was given an overall spray of matte clear. After that had dried, I removed the masking from the clear bits and placed the canopy in the open position. Then I did all the panel lines using a grey pastel. After scrubbing the pastels into the panels, I wiped the surface of the model with a dry rag, removing the majority of the pastels. I've always felt that the best way to do panel line accentuation was to make it subtle and this method provides that as well as any other I've seen. I also used the pastels to provide some exhaust stain. I thought about rigging an antenna wire, but decided against it at this time as I didn't want to mess anything up! With that, the model was done.
|
CONCLUSIONS |
First, I'd like to thank Military Precision for the opportunity to build this kit. I learned a great deal from all the extras I added to it. This was only the second time I've used Moskit exhaust and the first time I've used one of the more comprehensive Eduard etched sets. Both are a heck of a lot more work than just plunking in a resin cockpit tub and I've not really acquired the skills needed to do a good job with etched brass. As to the kit itself, I have built several Hasegawa 109s and can tell you that they are good builds, but not the perfect 'shake and bake' kits that many believe. They do need a bit of care in construction.
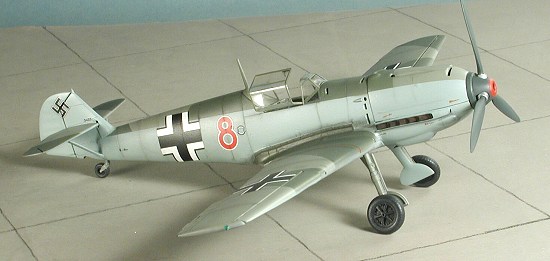
Overall, I'm quite happy with the end result. I have always liked this particular camo scheme as it just looks nice. It looks a lot better than the 70/71/65 painted Hobbycraft 109E-1 that I did several years ago. If you have the opportunity to build this factory conversion kit, by all means pick it up!
April 2004
# 1310 in a series
Thanks to
 for the review kit.
If you would like your product reviewed fairly and fairly quickly, please contact the editor or see other details in the Note to Contributors.