Fine Molds 1/72 Bf-109G-6 'Suomen Ilmavoimien'
| KIT: | Fine Molds 1/72 Bf-109G-6 'Suomen Ilmavoimien' |
| KIT #: | FL 14 |
| PRICE: | $25.00 from www.wingsntreads.com |
| DECALS: | Five options |
| REVIEWER: | Scott Van Aken |
| NOTES: | Limited release |
| HISTORY |
 Another warrior of WWII is the Bf-109 and the most
produced version of that is the G model. This introduced the DB 605 engine at
about 1,500 hp, enabling the aircraft to overcome most of the additional weight
that inevitably gets added onto an airframe as time goes on. Of course, this was
at the expense of maneuverability, something that was basically gone by the time
that these later planes were built.
Another warrior of WWII is the Bf-109 and the most
produced version of that is the G model. This introduced the DB 605 engine at
about 1,500 hp, enabling the aircraft to overcome most of the additional weight
that inevitably gets added onto an airframe as time goes on. Of course, this was
at the expense of maneuverability, something that was basically gone by the time
that these later planes were built.
The G model is also one that was pretty heavily exported to countries either allied to or friendly to the Germans, including Italy, Hungary, Romania, Bulgaria, Switzerland, and Finland, who operated several hundred over the war years. The type was even flown post-war and manufactured in both Czechoslovakia and Spain, though with other engines as the DB 605 became very scarce once the war was over.
| THE KIT |
This
is a continuation of the superb 1/72 Bf-109 series from Fine Molds. All these
kits are based on at least one common sprue (sometimes two) which includes the
wings and most of the general parts like wheels, interior, landing gear and the
such. Each kit then gets any specific sprues needed to do the variant being
kitted. If you read the G-10 article, you've seen all the bits that this one
gets. In addition, there are 'G only' parts, all assigned
to their own specific sprues, and these come packed in their own bag. In this
case, as you can see by the image, it is the prop, tailplanes and wheels, engine
cowling, lower cowling, drop tank, wing
 mounted 20mm pods, supercharger intake
and a number of other smaller bits.
mounted 20mm pods, supercharger intake
and a number of other smaller bits.
The general molding is quite good. I'd say pretty close to Hasegawa in quality. The wing sprue has some flash thanks to being common to all their F/G 109 kits. The rest of the parts are well molded. Experience has shown that one needs to be a bit careful removing some of the smaller parts from the sprues. It is a good idea to test fit some of the bits. Those parts that attach to drilled out holes have some pretty large attachment points so you'll need to drill the holes larger than you normally do to get a good fit. But once in place, it looks great. It is also nice that Fine Molds makes an attempt and providing engine detail, but frankly, most of us will simply close the cowling sections.
Instructions are quite well done with most of the instructions in Japanese. Tamiya and Gunze paint references are provided with RLM numbers given where appropriate. Construction drawings are quite well done and include any color information needed. Markings for five aircraft, all but one of them basically in RLM 74/75/76. Two of them are pre 1944 markings with the proper grey'd out backgrounds and the other three are later in 1944 markings when the Finns signed a peace treaty with the Russians and had to force the Germans out of their territory. A full set of stencils is provided and for those in places that are squeamish about any showing of a swastika, there are 'blank' roundels for the earlier markings. These instrument decals fit perfectly so use them!
| CONSTRUCTION |
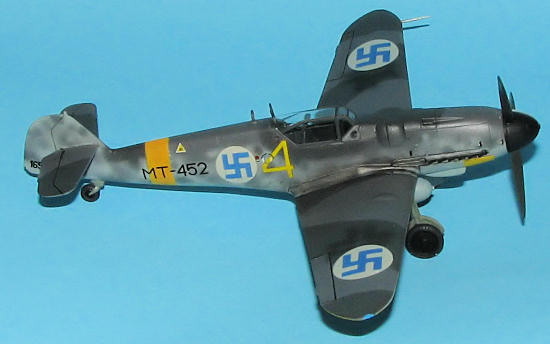
Step one was determining which of the markings options I wanted to use.
This will decide which bits to be used during construction. I decided on one of
the mid-1944 versions with the Erla Haube canopy, but without the underwing
cannon. This meant a pretty standard camo scheme, but with the yellow ID
markings used prior to Finland turning against the Germans in late 1944.
Besides, I have built three other Finnish 109s; two of them in postwar roundels
so felt this one needed the wartime swastikas. As Fine Molds correctly supplies
these with the dark grey background and my other was with the white one, this
 would be an additional set of markings for me.
I started with sub assemblies. This meant building up the interior, assembling the drop tank and gluing the upper and lower wings. I also removed the umbrella clamps from the fuselage as shown in the instructions. Fine Molds offers a base 109 and then puts in whatever sprues are needed for the versions to be modeled. Means you'll have a bunch of spare bits. A cushion is provided for the seat in case you wish to use the nicely molded pilot. I chose not to use this part. While this was going on, I cemented the fuselage halves together and added my usual filler to the seams. The cockpit was then inserted from underneath and the opening taped off.
The upper cowling is in two parts, in case you wish to show off the engine. As it is a bit on the basic side, I generally close this off. One has to take great care when installing these cowling parts as the fit is a bit shaky. Lots of adjustment is needed to get a good fit. I also forgot to stick the guns through the trough openings (DOH!). The lower cowling section is a snap fit and was left off until the end.
Wings and tail planes and rudder were then glued in place, after opening the holes for the drop tank rack. At this stage, I did the preliminary painting.
| COLORS & MARKINGS |
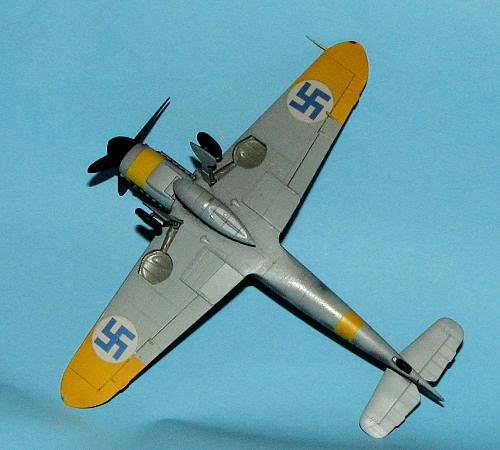
Standard shades for this one in RLM 74/75/76 with RLM 74/75 mottling. I
used Agama enamels for this one. These are really fine paints and if available
in your area, I can recommend them to you. They take a bit longer to dry than
some, but the results are great. Prior to adding the main colors, I sprayed the
tail band and lower wing tips with white than RLM 04 yellow. Same with the
 forward section of the lower cowling. These were then masked when dry and the
rest of the colors sprayed on. Thanks to my Skybow 100 detail air brush, the
mottling was a cinch. Once done, I misted on some more RLM 76 to lighten things
up a tad. I also masked the upper camouflage. In this scale, it is all dependent
on how good you are at free-handing things and frankly, both look just fine.
Your choice.
forward section of the lower cowling. These were then masked when dry and the
rest of the colors sprayed on. Thanks to my Skybow 100 detail air brush, the
mottling was a cinch. Once done, I misted on some more RLM 76 to lighten things
up a tad. I also masked the upper camouflage. In this scale, it is all dependent
on how good you are at free-handing things and frankly, both look just fine.
Your choice.
It was at this time that I glue on the landing gear, after painting the wheel wells and legs with RLM 02. The oleos were covered with Bare Metal Foil Chrome, something I try to do with all my aircraft models as it just looks so much better than silver paint. The fit of the main gear was pretty good, though it was a touch loose so care had to be taken when letting it dry.
When that was done, the entire airframe was given a coating of Future/Kleer
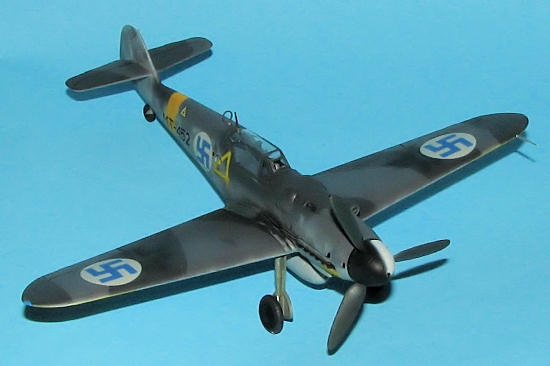
in preparation for markings. I first did the underside and found that the
roundels were a bit transparent, allowing the yellow to peer through. I used the
blank roundels provided under
 the main ones and that was a huge help. Once the
under wing and some side markings were on, I noticed I had forgotten to put on
the DF loop antenna. So I get out my drill, put in the hole and attached the
antenna. I also attached the canopy that had been pre-painted. Yikes, a large
gap at the front. Well, this would not do so filler was applied and the next day
it was sanded smooth. Once again the Skybow air brush showed its usefulness as I
was able to touch up the areas without worry for overspray. I also sprayed RLM
66 where the old Luftwaffe crosses would have been on the upper wings.
the main ones and that was a huge help. Once the
under wing and some side markings were on, I noticed I had forgotten to put on
the DF loop antenna. So I get out my drill, put in the hole and attached the
antenna. I also attached the canopy that had been pre-painted. Yikes, a large
gap at the front. Well, this would not do so filler was applied and the next day
it was sanded smooth. Once again the Skybow air brush showed its usefulness as I
was able to touch up the areas without worry for overspray. I also sprayed RLM
66 where the old Luftwaffe crosses would have been on the upper wings.
I then continued the decal application. Didn't choose the full stencil suite as I doubt if the plane had all of them anyway. Decals reacted fairly well to the Microsol/set though a few needed an additional dose.
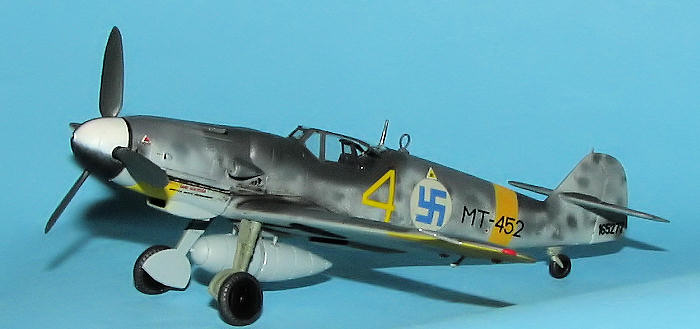
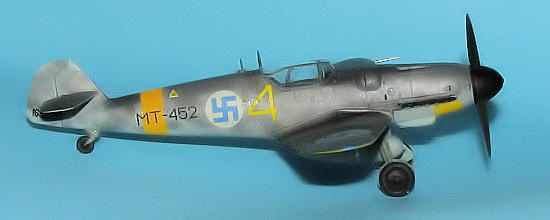
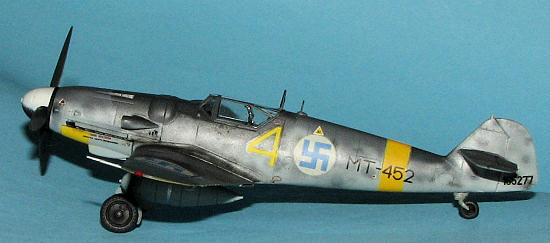
I chose the markings for Jorma Kalevi Saarinen, a Finnish ace with 23 victories who was killed in action on 18 July 1944. Probably in the aircraft shown on the sheet. Saarinen flew with LeLv 24 and produced his victories in a number of aircraft, including 5 with the Brewster Buffalo and the rest with the Bf-109G-2/6. These were all scored within 139 sorties.
| FINAL CONSTRUCTION |
Last bits were to attach the wheels, gear doors and the radio mast. I painted the spinner backing plate and prop blades with RLM 02 and the spinner black. I then used my Skybow air brush to do the white quarter segment. If you've seen photos of this feature, you'll recall that few were neatly done. The airframe was then treated to some Tamiya weathering colors around the exhaust area. I then sealed everything in place with Future mixed with Gunze flat base. The masking was removed from the canopy and photos taken for this article.
| CONCLUSIONS |
 While
not the least expensive 1/72 109 on the market, it does happen to be the most
accurate available. This is readily apparent when comparing it side by side with
others. If you have not built one of these, you really should give it a go.
While
not the least expensive 1/72 109 on the market, it does happen to be the most
accurate available. This is readily apparent when comparing it side by side with
others. If you have not built one of these, you really should give it a go.
May 2008
My thanks to www.wingsntreads.com for the review kit and air brush. Thanks to www.agama.cz for the fine paints.
If you would like your product reviewed fairly and quickly by a site that has over 300,000 visitors a month, please contact me or see other details in the Note to Contributors.