| KIT #: | FL 2 |
| PRICE: | $33.98 MSRP |
| DECALS: | One option |
| REVIEWER: | Scott Van Aken |
| NOTES: |
| BACKGROUND |
For a short background history and a look at what comes in the box, please visit the preview.
| THE KIT |
Every year, I try to build at least one
Bf-109 model. In past years, that has been easy as I've done several a
year. However, for some reason, this year I've not gotten around to doing
one. Rather odd for me as I really like 109s. I didn't have a good 109F in
the collection as until the release of this kit, there wasn't one. That
made it a no brainer to me and it also gave me an
 opportunity to try out
what is the highlight of this kit; the decal camouflage scheme.
opportunity to try out
what is the highlight of this kit; the decal camouflage scheme.
This isn't the first time this has been offered as Sweet released a 1/144 Macchi C.200 a year or so back that did the same thing. However, these Fine Mold 109Fs are the first time I've seen this in the larger scale. The decals are well thought out and should provide no problems, but one never really knows until one tries something.
There may be several of you out there who think that things like this are a cheat and somehow take away from the hobby, and I do understand this as I'm not sure I'm in full agreement on things like this. However, one has to try something to see how much one likes it. Besides, as most of you know, it is not always easy to get large decals to work properly and look good when one is finished. Thankfully, the 109F is devoid of some of the 'lumps and bumps' on other aircraft so should work fairly well.
We'll see.
| CONSTRUCTION |
 While Fine Molds kits look like
Hasegawa kits, they are not. In fact, they are a bit 'thicker' than what
one gets from Hasegawa. They are also a bit differently engineered. In many
cases, they combine parts that might be separate in a Hasegawa kit. In this
case, the interior is a floor with rear bulkhead and rudder pedals molded
in, a seat pan, control stick, forward bulkhead with instrument panel
backing and gun housing, and a separate, but thick instrument panel, which
gets a decal. Sidewall detail is there, but it is rather shallow.
While Fine Molds kits look like
Hasegawa kits, they are not. In fact, they are a bit 'thicker' than what
one gets from Hasegawa. They are also a bit differently engineered. In many
cases, they combine parts that might be separate in a Hasegawa kit. In this
case, the interior is a floor with rear bulkhead and rudder pedals molded
in, a seat pan, control stick, forward bulkhead with instrument panel
backing and gun housing, and a separate, but thick instrument panel, which
gets a decal. Sidewall detail is there, but it is rather shallow.
I glued all of the interior bits together as they were to be painted the same RLM 66 color. I also glued the drop tank halves, the prop/hub/backing (again, because they were to be painted the same color) and the fuselage halves. The interior will fit in from the underside. The fuselage has very nice engine detail for those who want to display the upper cowling(s) open. I decided that I'm not going to do that, but it is great that Fine Molds provides that option. The fuselage halves and interior were then painted RLM 66. I also did a bit of detail painting with various colors for the interior and the sidewalls. I didn't overdo it as the canopy is a single piece and a bit thick so not much fine detail will be visible.
 With the cockpit drying, I glued
together the fuselage halves. The interior will slide in from underneath
with no problems. Fit here was fairly good, though I did use some filler. I
then slid in the cockpit and glued on the wings, which I'd previously glued
together. Fit is quite good, though I did use a touch of filler at the very
front and at the lower rear. The tail planes were next attached and I found
the fit excellent on these. The separate rudder was also glued on at this
time.
With the cockpit drying, I glued
together the fuselage halves. The interior will slide in from underneath
with no problems. Fit here was fairly good, though I did use some filler. I
then slid in the cockpit and glued on the wings, which I'd previously glued
together. Fit is quite good, though I did use a touch of filler at the very
front and at the lower rear. The tail planes were next attached and I found
the fit excellent on these. The separate rudder was also glued on at this
time.
Next, I glued on the upper engine cowlings after installing the machine guns. The lower cowling was left off for painting. I then glued on the canopy and carefully masked it. I also carefully forgot to install the armor plating, something I didn't realize until the end of the build! With a complete airframe, I was now ready for the underlying paint.
| COLORS & MARKINGS |
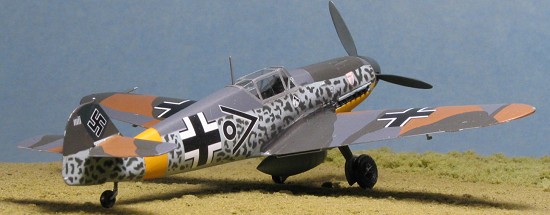 First thing I did was to paint the
lower cowling, forward lower nose, and the wing tips with Floquil's Reefer
White. This would provide a base for the RLM 04, which I later applied
using Aeromaster Acrylics. The lower cowling was set aside and the other
areas masked using Tamiya tape. I then painted the entire airframe RLM 76
as indicated in the instructions, using Testors Model Master enamels. I
also painted the canopy area RLM 75 to match the decals. The instructions
state RLM 79, but that is definitely not correct. While there, I painted
the prop assembly with RLM 70, again using Testors enamel paints. Once all
had dried, the airframe was given a coat of gloss clear in preparation for
the decals.
First thing I did was to paint the
lower cowling, forward lower nose, and the wing tips with Floquil's Reefer
White. This would provide a base for the RLM 04, which I later applied
using Aeromaster Acrylics. The lower cowling was set aside and the other
areas masked using Tamiya tape. I then painted the entire airframe RLM 76
as indicated in the instructions, using Testors Model Master enamels. I
also painted the canopy area RLM 75 to match the decals. The instructions
state RLM 79, but that is definitely not correct. While there, I painted
the prop assembly with RLM 70, again using Testors enamel paints. Once all
had dried, the airframe was given a coat of gloss clear in preparation for
the decals.
Before applying the decals, I painted the wheel wells RLM 02 using Testors enamels and put Chrome Bare Metal Foil over the landing gear oleos. I'd painted the gear and wheels a bit earlier so once the oleos were covered, the struts were glued in place. Fit is quite good, but loose so one has to be sure they dry at the proper angle. I also glued in the tail wheel at this time. When those dried, the main wheels were glued in.
 It
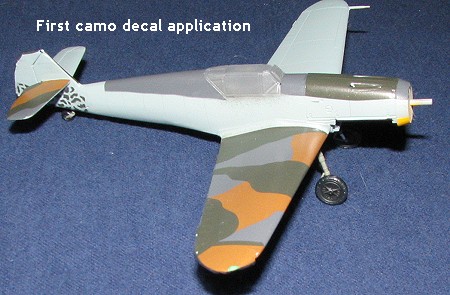
was now time to give these decals a try. I have to say that I've some
apprehension about this all as I'm not really that good with large decals
like these. I started at the tail and applied the left side of the fin and
those under it. Fit was OK, but it seemed a bit ov
It
was now time to give these decals a try. I have to say that I've some
apprehension about this all as I'm not really that good with large decals
like these. I started at the tail and applied the left side of the fin and
those under it. Fit was OK, but it seemed a bit ov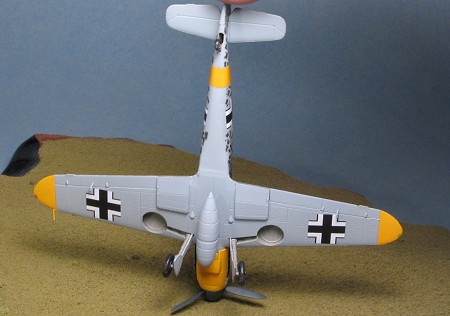 ersize.
The right tail plane was installed and it seems a bit undersized. I also
put on the gun trough decals and then the forward and aft fuselage decals.
You have to cut some of these to get a good fit. I dared to be stupid and
applied some Champ setting solution to see if I could get the decals to
snuggle down. It was not the best choice I've made.
ersize.
The right tail plane was installed and it seems a bit undersized. I also
put on the gun trough decals and then the forward and aft fuselage decals.
You have to cut some of these to get a good fit. I dared to be stupid and
applied some Champ setting solution to see if I could get the decals to
snuggle down. It was not the best choice I've made.
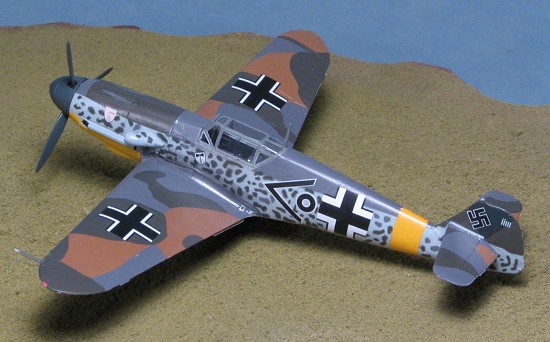
The Champ worked fairly well on some of the more difficult decals, but the end result was still a lot of wrinkles around the areas that had to conform to compound curves (like wing roots and tips). I found that I had to cut the fuselage band in half to get it to properly conform. I suggest painting this to be sure it matches the wing tips and lower cowling color. In several portions along the fuselage, you have to put down the mottle, place a marking decal down to fit into the 'cut out' sections, and then place another mottle decal down to fill in the holes. Rather fussy and one that works OK, but not great. I then added the usual markings over the top of the camo ones.
| FINAL CONSTRUCTION |
 Once I had all the decals
in place and dry, I gave the model a coat of clear matte to seal things in
place. I noticed quite a lot more silvering than I'd have liked, but I'd
resigned myself to this at this time. There really were not that many
additional bits. The gear doors were glued on as were the wing mass
balances and the radio mast. I then glued in the exhaust bits and painted
them. The lower engine cover was a tight fit and basically snapped into
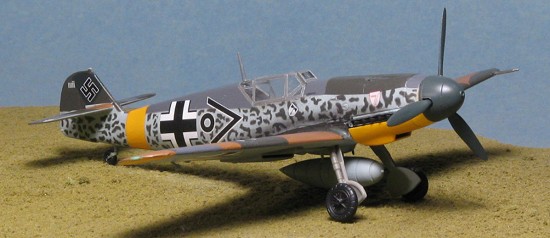
place. On the bottom, the drop tank was attached and I pressed the prop
onto its shaft. Then the masking was removed from the canopy, a bit of
pastels used for exhaust stains and the model was finished.
Once I had all the decals
in place and dry, I gave the model a coat of clear matte to seal things in
place. I noticed quite a lot more silvering than I'd have liked, but I'd
resigned myself to this at this time. There really were not that many
additional bits. The gear doors were glued on as were the wing mass
balances and the radio mast. I then glued in the exhaust bits and painted
them. The lower engine cover was a tight fit and basically snapped into
place. On the bottom, the drop tank was attached and I pressed the prop
onto its shaft. Then the masking was removed from the canopy, a bit of
pastels used for exhaust stains and the model was finished.
| CONCLUSIONS |
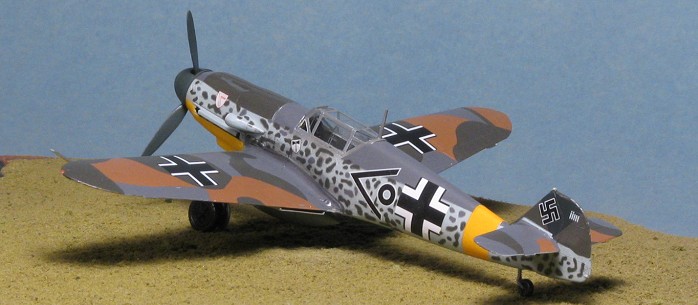
I'll have to divide the conclusions
into two parts. First one is the kit itself. I'm really pleased to see an
accurate 1/72 Bf-109F after all these decades of poor representations of
the type. I'm puzzled as to why it has taken so long. This is a very nice
kit with good fit and few problems. Part two concerns the decals. The idea
of doing all the camouflage as decals is a g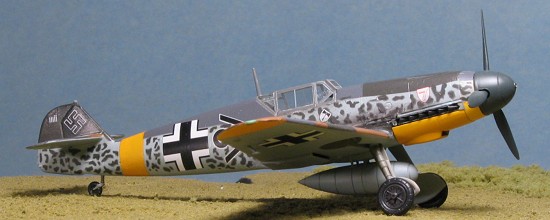 ood
one, but one that I had a lot of trouble with. Were I to do another of
these types of kits, I'd paint on the majority of the camo and use only the
side mottling decals. That part seemed to work well. The rest just ended up
looking terrible (in my opinion). For this to work, the decals have to be
able to be used with setting solutions as that is the only way most of us
are going to be able to get them to work. Either that, or have detailed,
step by step instructions (in English) on just how the folks at the factory
who did this got them to behave and conform properly. Bottom line for
me is that the kit is great but the jury is still out on the decals.
ood
one, but one that I had a lot of trouble with. Were I to do another of
these types of kits, I'd paint on the majority of the camo and use only the
side mottling decals. That part seemed to work well. The rest just ended up
looking terrible (in my opinion). For this to work, the decals have to be
able to be used with setting solutions as that is the only way most of us
are going to be able to get them to work. Either that, or have detailed,
step by step instructions (in English) on just how the folks at the factory
who did this got them to behave and conform properly. Bottom line for
me is that the kit is great but the jury is still out on the decals.
October 2005
#1385 in a series
Copyright ModelingMadness.com. All rights reserved.
If you would like your product reviewed fairly and fairly quickly, please contact the editor or see other details in the Note to Contributors.
2020