| KIT #: | 09166 (Jt 106) |
| PRICE: | $Cheap as the box was badly accordioned. |
| DECALS: | Three options |
| REVIEWER: | Scott Van Aken |
| NOTES: |
| HISTORY |
The first major change since the more streamlined F
model was produced, was the 109G. The major difference in this aircraft was the
DB 605A engine of lar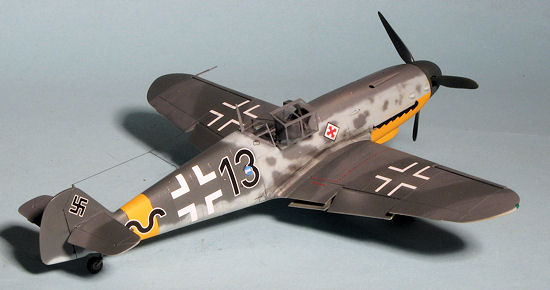 ger displacement and more horsepower. Of course, by this
time, the 109 needed the additional horsepower as the weight of the aircraft had
continued to grow. Though faster than the F in a straight line, it was not the
somewhat nimble dog-fighter that the F was. Not only that, but engine cooling
issues plagued the early G model and the Luftwaffe limited the amount of power
than the pilot could use until this issue was corrected. It was this issue that
took the life of Hans Marseilles in North Africa as his new G had the engine
seize from overheating and he died in the subsequent crash.
ger displacement and more horsepower. Of course, by this
time, the 109 needed the additional horsepower as the weight of the aircraft had
continued to grow. Though faster than the F in a straight line, it was not the
somewhat nimble dog-fighter that the F was. Not only that, but engine cooling
issues plagued the early G model and the Luftwaffe limited the amount of power
than the pilot could use until this issue was corrected. It was this issue that
took the life of Hans Marseilles in North Africa as his new G had the engine
seize from overheating and he died in the subsequent crash.
The G-2 was the standard fighter version of the new G as the G-1 was pressurized for higher altitude operations and few were built. The G-2 still had the F wheels so no wing wheel bulges. Also no bulges on the forward cowling that was part of the G-6 update. It did have a strengthened wing and larger framed canopy than the F. About 1600 G-2s were built.
| THE KIT |
Hasegawa's
G/K ,kits have been around a pretty long time. I would have to say at least 20
if not 25 years and are still the choice of
 many modelers who want to build a
1/48 kit of this aircraft. What Hasegawa has done, is provide a basic Bf-109F
airframe and then add bits of sprue to make the version being kitted. This does
require some filling and hole opening to do non-F airframes, but the concept has
worked just fine for a long time.
many modelers who want to build a
1/48 kit of this aircraft. What Hasegawa has done, is provide a basic Bf-109F
airframe and then add bits of sprue to make the version being kitted. This does
require some filling and hole opening to do non-F airframes, but the concept has
worked just fine for a long time.
This is a somewhat special boxing in that it includes an Aeromaster decal sheet for its three markings options. The box art plane is Yellow 11 as flown by Herman Graf in 1942 when with 9. JG 52. Standard RLM 74/75/76 scheme with Eastern Front ID markings. The second is Walter Krupinski's plane, yellow 5 when he was with 6./JG 52 in late 1942. Same basic scheme as Graf's. The third is a desert scheme of 79/80/78 as flown by Heinz-Edgar Berres in Tunisia during 1943. For this one the usual Mediterranean white bits. All of this from 1995.
| CONSTRUCTION |
 Building one of these is pretty straight forward as kits go. On this one, I
wanted to use a True Details resin cockpit. Sawing away at the bottom of the
cockpit section, I managed to break away one of the rudder pedal rests and one
of the small floor boxes. This caused me to set it aside and rethink my plans.
In the meanwhile, I opened the holes for the drop tank mount and carved away at
the wheel well openings. Hasegawa gives you the round F openings and for other
models, this additional material has to be removed. It is a simple process.
With that done, the fuselage halves were cemented together and the few seams
taken care of with super glue. The fuselage halves showed a bit of flash, not
surprising even in 1995 as this kit have been molded a ton of times.
Building one of these is pretty straight forward as kits go. On this one, I
wanted to use a True Details resin cockpit. Sawing away at the bottom of the
cockpit section, I managed to break away one of the rudder pedal rests and one
of the small floor boxes. This caused me to set it aside and rethink my plans.
In the meanwhile, I opened the holes for the drop tank mount and carved away at
the wheel well openings. Hasegawa gives you the round F openings and for other
models, this additional material has to be removed. It is a simple process.
With that done, the fuselage halves were cemented together and the few seams
taken care of with super glue. The fuselage halves showed a bit of flash, not
surprising even in 1995 as this kit have been molded a ton of times.
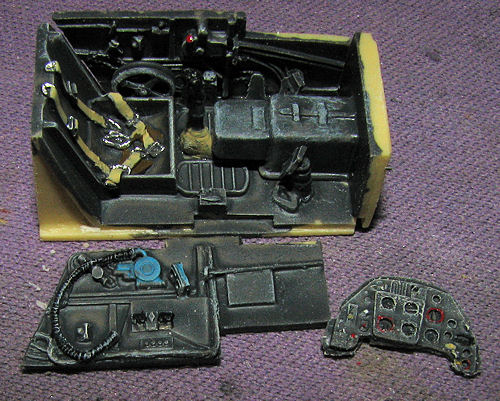 Back at the resin interior, I
got a bigger saw and got most of the pour stub off the bottom. I then painted
all of the interior pieces with Testors RLM 66 enamels using a brush. I then
detail painted the interior and instrument panel. True Details set 48490
includes a full color painting guide. When that was done, it was all lightly
dry-brushed using Citadel white. This may be a bit stark for some, but it
certainly does bring out detail. I then glued the forward bulkhead/gun cover and
one of the side panels. One uses the kit trim wheels on this. When I do side
panels like this that are glued to the tub, I generally angle them out a little
bit so that there will not be much in the way of gaps when the interior is
installed. The rudder pedals were cut from the resin and the control
column was
Back at the resin interior, I
got a bigger saw and got most of the pour stub off the bottom. I then painted
all of the interior pieces with Testors RLM 66 enamels using a brush. I then
detail painted the interior and instrument panel. True Details set 48490
includes a full color painting guide. When that was done, it was all lightly
dry-brushed using Citadel white. This may be a bit stark for some, but it
certainly does bring out detail. I then glued the forward bulkhead/gun cover and
one of the side panels. One uses the kit trim wheels on this. When I do side
panels like this that are glued to the tub, I generally angle them out a little
bit so that there will not be much in the way of gaps when the interior is
installed. The rudder pedals were cut from the resin and the control
column was 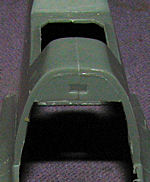 glued in place. Then
the other side panel was glued on and I test fit it into the fuselage. The
forward bulkhead sections need to be trimmed way back to get the resin cockpit
to fit. It is an easy task.
glued in place. Then
the other side panel was glued on and I test fit it into the fuselage. The
forward bulkhead sections need to be trimmed way back to get the resin cockpit
to fit. It is an easy task.
There are small holes in the very forward fuselage and the cowling covers
that need to be drilled out for the small cooling scoops. I recommend doing the
fuselage ones before cementing the halves together. Though I sorta followed the
instructions, I missed this until the haves were together and it was a bit more
difficult. The radiator inserts were then installed in the wings and the oil
cooler housing. Then the wings were glued together with no issues. Back at the
fuselage, I had to trim the resin instrument panel to fit. During this fitting
stage, the gun sight disappeared from the panel and a goodly search failed to
turn it up. Too bad as it was nicely detailed. I will undoubtedly use the kit
one in its place. The interior was then glued in and the fit was actually pretty
good. Next step was to drill out the barrels of the machine guns and then glue
that part to the fuselage.
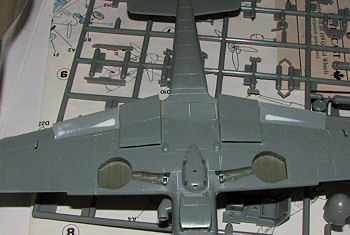
Next major bit was to attach the wings. For this, I
glued the front and the rear portion first. The fit here was quite good. It has
been a while since I have built a kit that gave me few issues so it was a nice
break to have this one fit so well. I then glued on the
horizontal stabs before attaching
the engine cowlings. Here is where I had a pretty good sized fit issue. I got
the cowling to fit well all around, but to do so meant there was a sizeable gap
at the top. I could close the gap, but then the fit of the rest of the cowling
would be poor.
 To see if this was just a one shot I checked an earlier 109F
build I did and found the same thing. As in that build, I simply filled the gap
with super glue and sanded it down smooth. It took a couple of applications.
To see if this was just a one shot I checked an earlier 109F
build I did and found the same thing. As in that build, I simply filled the gap
with super glue and sanded it down smooth. It took a couple of applications.
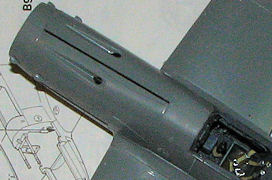
The next area of work was the flaps and the radiator
outlets. There are several poses for the radiator outlets, but the one I
generally choose is the upper flap level with the wing while the lower one is
deflected down. This will take a couple of glue applications. The first to get
it into position and the second to make
sure it stays there. I also glued
the flaps in the lowered position. These items have large sink areas on the top
and bottom and should be filled prior to installation. Again, two glue
applications are recommended as per the radiator exhaust flaps. I also glued on
the oil cooler housing and the rack for the drop tank. The supercharger intake
 was glued together and attached. Note that these were from thin stamped metal
and there should be a prominent exterior seam so don't remove it.
was glued together and attached. Note that these were from thin stamped metal
and there should be a prominent exterior seam so don't remove it.
The prop was assembled and painted RLM 70. Next, the small aileron balances were glued on. At the cockpit, the kit gun sight was installed and I cemented the backlight clear bit into place. Next, the windscreen was masked and glued on followed by the canopy, which was simply tacked into place. There is a bit of a step at the very front of the windscreen. Whether this is a result of the resin interior or not, it required some filler. With the inside pretty well covered up, it was time to think about painting.
| COLORS & MARKINGS |
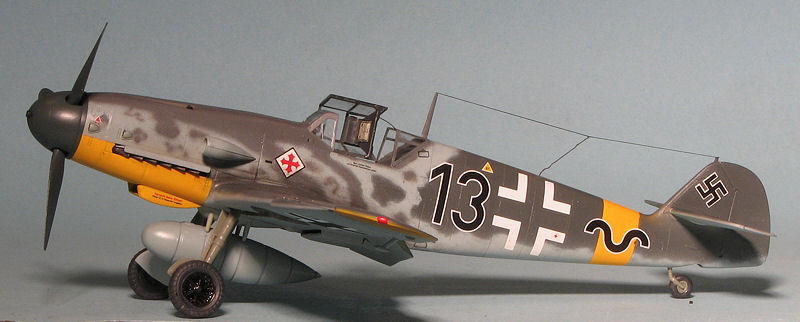
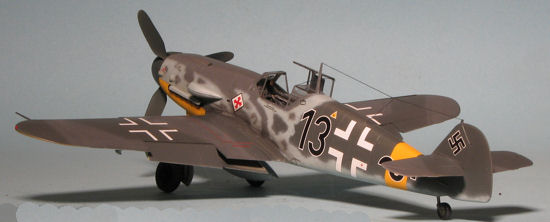
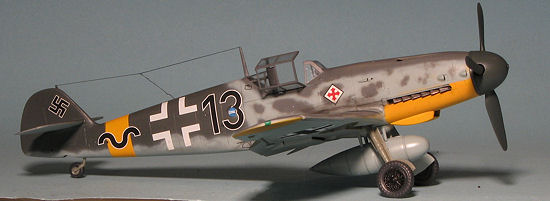
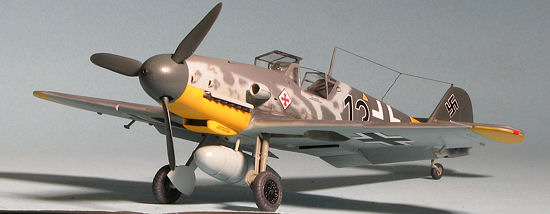
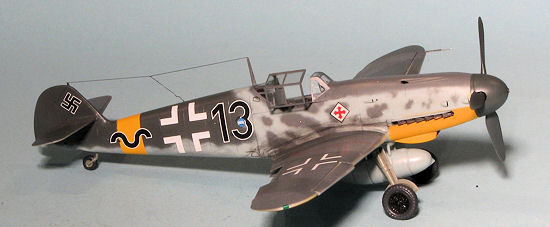 First of all, a scheme had to be found. There are not
a lot of decals for the G-2 or the G-4, but they can be found if you have enough
decal sheets on hand. Fortunately, I have several dozen 1/48 109 sheets in the
collection and after a bit of hunting, found a couple I liked. I finally settled
on a scheme in Aeromaster's Augsburg Eagles part XI, sheet 48-461, printed in
1999, so it was relatively new as old sheets go. This was the aircraft of Oberst
Gunther Rall when with 8./JG 52 in the Fall of 1942. As a typical Russian Front
plane, it had yellow bits under the cowling, wing tips and a yellow fuselage
band. The aircraft was in RLM 74/75/76 with a rather heavily over-painted
fuselage. An interesting sort of scheme that I was seeking. Despite Rall being
the third highest scoring fighter pilot of all time, there were no victory
markings on this aircraft.
First of all, a scheme had to be found. There are not
a lot of decals for the G-2 or the G-4, but they can be found if you have enough
decal sheets on hand. Fortunately, I have several dozen 1/48 109 sheets in the
collection and after a bit of hunting, found a couple I liked. I finally settled
on a scheme in Aeromaster's Augsburg Eagles part XI, sheet 48-461, printed in
1999, so it was relatively new as old sheets go. This was the aircraft of Oberst
Gunther Rall when with 8./JG 52 in the Fall of 1942. As a typical Russian Front
plane, it had yellow bits under the cowling, wing tips and a yellow fuselage
band. The aircraft was in RLM 74/75/76 with a rather heavily over-painted
fuselage. An interesting sort of scheme that I was seeking. Despite Rall being
the third highest scoring fighter pilot of all time, there were no victory
markings on this aircraft.
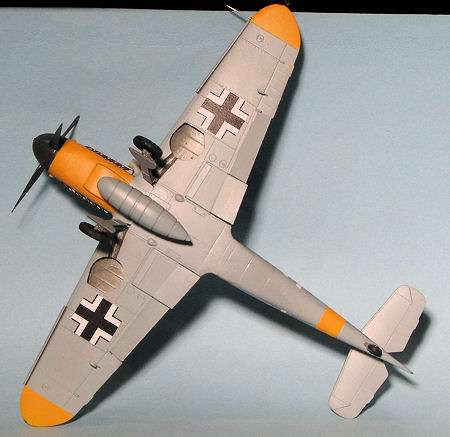 First step in painting was to paint the areas that
would be done in yellow with an underlying white. For this, I used Tamiya Gloss
White. The RLM 04 was from the Agama line. These areas were masked and the
underside was painted with Testors Model Master RLM 76. For the upper surface
RLM 74/75 I also used Model Master enamels. The 74 was sprayed on first followed
by the wing and tail camo in 75. This was free-handed and a bit ragged as the
instructions showed it like this. I then went back over the side areas
with RLM 76 after masking the wings and stabs to prevent issues with overspray.
This was followed by the mottling in RLM 75 and some additional detail work with
the RLM 76.
First step in painting was to paint the areas that
would be done in yellow with an underlying white. For this, I used Tamiya Gloss
White. The RLM 04 was from the Agama line. These areas were masked and the
underside was painted with Testors Model Master RLM 76. For the upper surface
RLM 74/75 I also used Model Master enamels. The 74 was sprayed on first followed
by the wing and tail camo in 75. This was free-handed and a bit ragged as the
instructions showed it like this. I then went back over the side areas
with RLM 76 after masking the wings and stabs to prevent issues with overspray.
This was followed by the mottling in RLM 75 and some additional detail work with
the RLM 76.
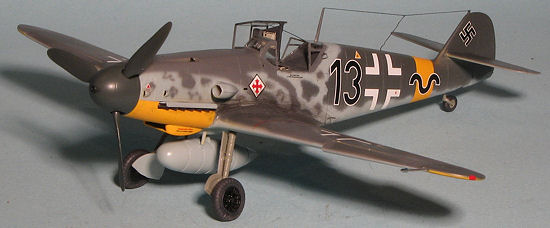
When that was done, the wheel wells were painted in RLM 02 and the masking taken off the flight surfaces. I then installed the main gear legs and the tail gear. This allowed the kit to stand on its gear while it was sprayed with Future in preparation for the decals.
These Aeromaster decals were printed in Mexico and while colorful and in register, I found that they not only took considerable time to come clear of the backing sheet, but seemed to be a bit oversize when compared to the placement diagram. A few of the markings were two piece and this includes some of the data markings. Otherwise, they worked well with Microsol setting solution and are properly opaque. As usual, it took me nearly a week to apply even this small number of markings as I would do a few, let them dry, apply setting solution and then let it dry overnight before doing others.
| FINAL BITS |
With all the decals in place, I then started attaching other pieces. This included the gear covers and the resin Ultracast wheels. You actually do not need the Ultracast wheels as the kit wheels are fine. These are a bit wider and offer a touch more detail, but are not a major improvement over the kit versions. The big benefit is not having to remove the mold seam that goes around the circumference of the tire.
 I also glued
on the radio mast before giving the airframe a coat of near matte clear using
Future and Tamiya Flat Base mixed together. This effectively sealed the decals
in place. One of the many 109 detail bits I had in my stash was a set of
Quickboost resin exhaust. The major improvement of these over the kit exhaust is
that the seams are intact and the exhaust ends are slightly opened up. On the
kit exhaust, there are a pair of sprue attachment points on the outside of the
exhaust stacks and you will destroy the seam that is supposed to be there when
you remove them. These had the shields placed atop them and were press fit into
the openings. They are a tight fit.
I also glued
on the radio mast before giving the airframe a coat of near matte clear using
Future and Tamiya Flat Base mixed together. This effectively sealed the decals
in place. One of the many 109 detail bits I had in my stash was a set of
Quickboost resin exhaust. The major improvement of these over the kit exhaust is
that the seams are intact and the exhaust ends are slightly opened up. On the
kit exhaust, there are a pair of sprue attachment points on the outside of the
exhaust stacks and you will destroy the seam that is supposed to be there when
you remove them. These had the shields placed atop them and were press fit into
the openings. They are a tight fit.
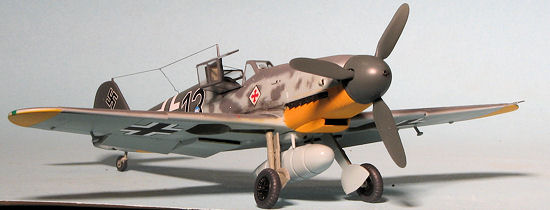
The prop was then glued to the hub, the masking taken off the clear bits and the canopy posed open after the head armor was installed. The radio mast and pitot tube were then painted. I used EZ-Line to make a radio antenna as well as the cable that holds the canopy. Pastels were used for the exhaust and detail stuff like the position lights and areas that needed a bit of touch up were taken care of.
| CONCLUSIONS |
 Yet another
109 to add to the shelves. I am an unabashed 109 fan and will keep building them
until I can no longer build models of any sort. The Hasegawa family of kits are
the right combination of detail and relative ease of building that keep people
coming back to them time and time again. I like that if you want to build them
right out of the box, you can do so and have a very nice model when done. You
can also load them up with aftermarket if that is your choice and have an even
nicer model.
Yet another
109 to add to the shelves. I am an unabashed 109 fan and will keep building them
until I can no longer build models of any sort. The Hasegawa family of kits are
the right combination of detail and relative ease of building that keep people
coming back to them time and time again. I like that if you want to build them
right out of the box, you can do so and have a very nice model when done. You
can also load them up with aftermarket if that is your choice and have an even
nicer model.
| REFERENCES |
Probably used Wikipedia for some of the background, but really, most of it came from just knowing quite a bit about the aircraft.
December 2012 If you would like your product reviewed fairly and fairly
quickly, please
contact
the editor
or see other details in the
Note to
Contributors.