 Revell 1/48 Bf-109G-10
Revell 1/48 Bf-109G-10
Kit #: 4235
Price: $7.50 (Back in 1985)
Decals: Generic 109G-10
Date of Review: 10 March 1999
Review and Photos by: Scott Van Aken

Late in WW2, the venerable Bf-109 was still in production and being modified. The 109G-10 was an improvement over the G-6 with wider wheels and a more powerful engine. The wider wheels meant a large panel on the upper wings, while the larger engine produced a reshaped upper engine cowling and deeper radiators. G-10s could have tall or short tail wheels, and could have two different types of taller rudder; one the was nearly straight on the bottom and another that was more rounded. All of them had the later cowling and wider wheel bulges. If you want a real challenge, try to figure out G-14 versions. Some of them looked like G-6s, and some like G-10s, and a few even could be mistaken for K's! But I'll save that mess for when I do another one of those!
 Revell's kit is dated 1982, which makes it over 15 years old. Looking
at it, it holds up well with today's kits. It is pretty cheap too, as they
can be picked up by the staffel at swap meets for $5 or less. Engraved
panel lines, separate canopy/windscreen and details on the inside of the
fuselage walls show that Revell was near the cutting edge at that time. In
terms of shape, many say that this is the most accurate 109 on the market.
However, it will soon be eclipsed by the new Hasegawa 109G-10 and K-4 kits
due out later this year.
Revell's panel lines and details are a bit soft and there was a touch
of flash on some of the parts. In addition a few parts had some heavy seam
lines and ejector pin marks and pips (see photo to
Revell's kit is dated 1982, which makes it over 15 years old. Looking
at it, it holds up well with today's kits. It is pretty cheap too, as they
can be picked up by the staffel at swap meets for $5 or less. Engraved
panel lines, separate canopy/windscreen and details on the inside of the
fuselage walls show that Revell was near the cutting edge at that time. In
terms of shape, many say that this is the most accurate 109 on the market.
However, it will soon be eclipsed by the new Hasegawa 109G-10 and K-4 kits
due out later this year.
Revell's panel lines and details are a bit soft and there was a touch
of flash on some of the parts. In addition a few parts had some heavy seam
lines and ejector pin marks and pips (see photo to
 right). The kit also has
a molded on tail wheel and underwing fuel tank mount. In fact, there really
are not that many parts to this kit since it doesn't have separate flaps,
slats, and radiator exhaust ports like the Hasegawa and Fujimi kits enjoy.
right). The kit also has
a molded on tail wheel and underwing fuel tank mount. In fact, there really
are not that many parts to this kit since it doesn't have separate flaps,
slats, and radiator exhaust ports like the Hasegawa and Fujimi kits enjoy.
I made a decision to use some brass etched parts to help add a bit more detail to it. Reheat and Airwaves supplied the brass bits. Used from these sets were a new seat, rudder pedals, radiator screens, landing gear links, shoulder harness, and instrument panel. Not a lot of stuff, but enough to help liven up the kit a bit. In addition, some extra bits and pieces from past Hasegawa and Fujimi kits were used to replace some of the Revell offerings. Finally, an Aeromaster decal sheet replaced the yellowed and very matte kit decals.
As is typical with me, the first step was to start putting in brass bits. In this case, the nose and wing radiator screens. They were cut from the fret with scissors, held in place and a bit of superglue was used for a firm hold. A blanking plate made from scrap sheet was put above the nose radiator schreen. Afterward, they were painted, along with the surrounding area, with RLM 02 grey.
 |
 |
While that was going on, the interior bits were assembled. Here the brass rudder pedals were installed. Unlike the rather flat Reheat pedals, the Airwaves ones are three parts; a foot plate, heel plate and the toe straps. Rather fiddly and a magnifier of some sort is needed for construction. Once done, they were simply glued atop the existing pedals. The kit seat is really rather poor, so one of the two Reheat seats were used as a replacement. The holes in the floor were filled in and sanded smooth. The seat and belts were left off until later stages of construction. The Airwaves instrument panel was installed after the existing panel was sanded smooth.
 |
 |
Early G-10s with the shorter tail wheel strut were more likely to have a n instrument panel like a G-6 while later ones it was more like a K. I used the K-type panel. When glued on, it was then painted RLM 66, then the instrument areas painted white, Reheat decals installed and the whole thing drybrused. The whole interior was then drybrushed, seat belts were installed, then the assembly was glued into a fuselage half. Next the fuselage halves were glued together as were the wings. There is a strange bump in the back of the cockpit. That is supposed to be there are it is for part of the MW 50 injection system, whose filler tank is right behind the cockpit. Again, not all G-10s had it, but the one at Chino, CA, which was used as a pattern aircraft for this kit, does have one.
After the usual amount of filling, sanding, and rescribing, the fuselage was ready to have the wings attached. It was at this time that I figured the molded in drop tank rack wasn't good enough. I wanted to use a better drop tank and the Revell rack was too small. So I carved off the Revell one and replaced it with the Hasegawa rack. This was a pretty painless process.
 |
 |
Next on to gluing the wings. Not a problem as the wings fit just great. Minor filler at the front and rear was it. The tailplanes also fit very well after a bit of cleanup. Next the gunsight was installed and the windscreen put into place. It was at this time that I made the decision to do a later G-10 so the tailwheel was hacked off. The area was cleaned up and a hole drilled to accept the replacement. The longer replacement is courtesy of a Fujimi kit. In fact, a lot of the smaller bits are courtesy of Hasegawa, Fujimi and Hobbycraft as they are much crisper moldings. Don't ever toss away spare parts as they are perfect for projects like this. Then the tailplanes were glued in place. Following that, the aileron balances and the df loop antenna were installed. The canopy and windscreen were masked off and the canopy attached with white glue. Now on to the painting stage.
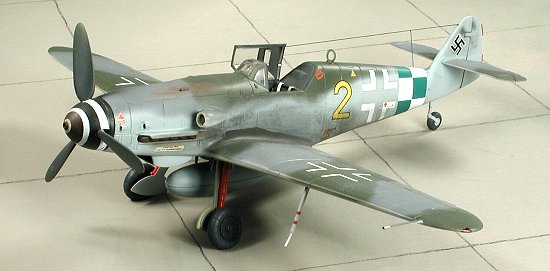
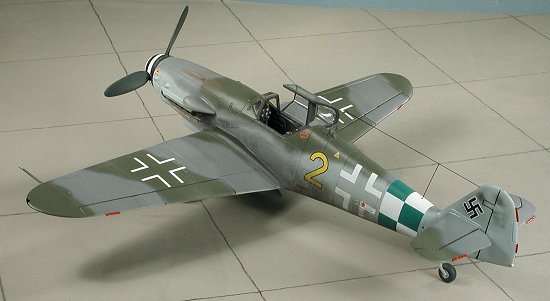 The colors chosen for this aircraft were RLM 75/82/76. All camouflage colors are from the Aeromaster line of enamel paints. First the 76
was sprayed and when dry, the underside of the tailplanes masked and the
75 grey painted on all the uppersurfaces. The decal sheet says to then
use 74 for the green, but many late war aircraft had 82 substituted for the
dark green and this is the color I chose. The 82 was sprayed freehand
in a pattern typical of the time. Typical of many late war paint schemes,
the mottling is minimal; in this case only a small bit on the tail.
The colors chosen for this aircraft were RLM 75/82/76. All camouflage colors are from the Aeromaster line of enamel paints. First the 76
was sprayed and when dry, the underside of the tailplanes masked and the
75 grey painted on all the uppersurfaces. The decal sheet says to then
use 74 for the green, but many late war aircraft had 82 substituted for the
dark green and this is the color I chose. The 82 was sprayed freehand
in a pattern typical of the time. Typical of many late war paint schemes,
the mottling is minimal; in this case only a small bit on the tail.
While all this was drying, the main gear legs had the oleo support chopped off and replaced with brass ones. Then they were painted gloss white and when dry, red was sprayed on. The reason for this is that this aircraft uses the MW 50 methanol injection system. This means the aircraft must have 100 octane fuel instead of the usual 87 octane. To differentiate which needed the 100 octane, it was common practice to paint part or all of the gear legs and sometimes the wheels in red so they wouldn't get the wrong grade of fuel. I don't know how long this practice lasted, but it does add some color to the model!
Then the struts were installed along with the underwing Morane antenna (from a Fujimi kit), and a section of small brass tubing replaced the kit wing pitot tube. Once it was able to stand on its own, the paint was then touched up and bit of mottling added to the fin and rudder. When dry, Future clear acrylic was sprayed on to prepare the kit for the decals.
 Now on
to the decals. From an early sheet, 48-005, I chose a nice scheme with
a green and white checkered tail band. It was listed on the sheet as
from an unidentified Industry Protection Flight (ISS). A Monogram 262
I did several years ago identifies this flight as part of ISS1. Little
is known of these flights except that they were short-lived. Apparently
the G-10 was used for airfield protection for the Me-262s. Anyway,
the decals are all you can expect from Aeromaster. Nice and thin, well printed
and react well to just about any setting solution. However, this sheet
has a glitch. The tail band does not fit the aircraft at all. The
geometry is all wrong; at least it is for the Revell 109G-10. I ended
up having to cut it into sections in order to get it to fit. A couple
of bits had to be painted to cover up gaps! Were it not the checked
band, then it would have been painted on. I hope I have learned from
this. Anyway, once on it looks good. The white in this sheet
is not perfectly opaque and any overlapping of the white shows as a more
intense white.
Now on
to the decals. From an early sheet, 48-005, I chose a nice scheme with
a green and white checkered tail band. It was listed on the sheet as
from an unidentified Industry Protection Flight (ISS). A Monogram 262
I did several years ago identifies this flight as part of ISS1. Little
is known of these flights except that they were short-lived. Apparently
the G-10 was used for airfield protection for the Me-262s. Anyway,
the decals are all you can expect from Aeromaster. Nice and thin, well printed
and react well to just about any setting solution. However, this sheet
has a glitch. The tail band does not fit the aircraft at all. The
geometry is all wrong; at least it is for the Revell 109G-10. I ended
up having to cut it into sections in order to get it to fit. A couple
of bits had to be painted to cover up gaps! Were it not the checked
band, then it would have been painted on. I hope I have learned from
this. Anyway, once on it looks good. The white in this sheet
is not perfectly opaque and any overlapping of the white shows as a more
intense white.
 Once those were on and dry, the various stencils came from the spares box
and other sheets. The kit ones being very flat and yellowed after all
these years. Once dry and the setting solution wiped from the kit, then the
rest of the fiddly bits were put on, like the True Details wheels, gear doors
and such. The shoulder harness was put in the interior, the antenna stub
attached to the canopy and painted, then the whole aircraft was sprayed with
clear semi-matte. When that was dry, the canopy mask was removed, the pastels
brought out to give it some character, and finally the canopy placed in the
open position and the antenna made from stretched sprue.
Once those were on and dry, the various stencils came from the spares box
and other sheets. The kit ones being very flat and yellowed after all
these years. Once dry and the setting solution wiped from the kit, then the
rest of the fiddly bits were put on, like the True Details wheels, gear doors
and such. The shoulder harness was put in the interior, the antenna stub
attached to the canopy and painted, then the whole aircraft was sprayed with
clear semi-matte. When that was dry, the canopy mask was removed, the pastels
brought out to give it some character, and finally the canopy placed in the
open position and the antenna made from stretched sprue.
The end result is a kit that looks very nice. From my standpoint, I didn't spend a zillion dollars on aftermarket stuff and the addition of bits from the spares box really enhance the kit. If you like 109s, the Revell/Monogram kit is still a beauty and can be recommend to all, even after the Hasegawa ones hit the market!!