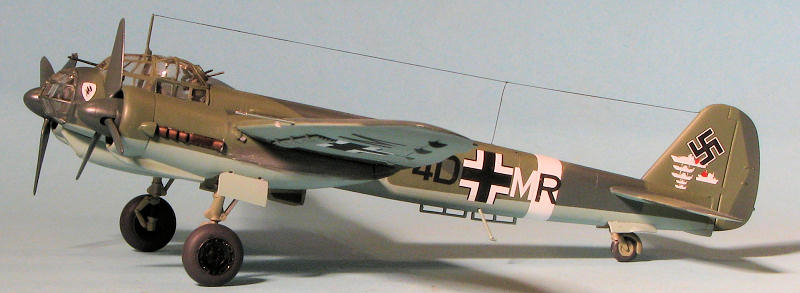
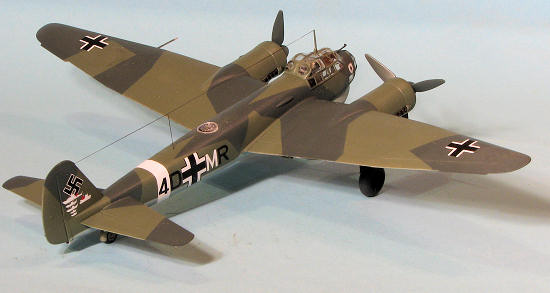
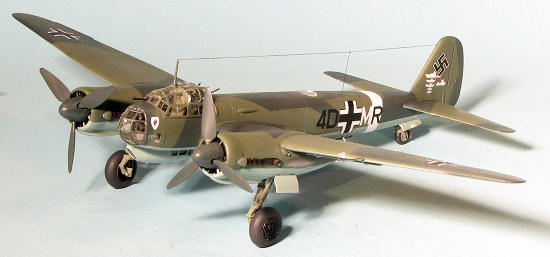
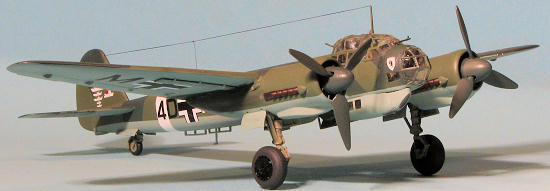
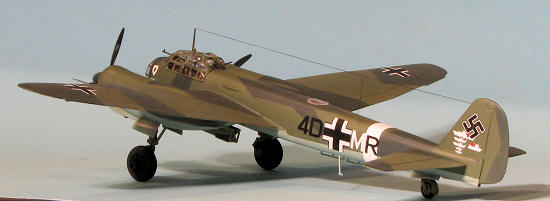
Zvezda 1/72 Ju-88A-4
| KIT #: | 7282 |
| PRICE: | $28.00 MSRP |
| DECALS: | Four Options |
| REVIEWER: | Scott Van Aken |
| NOTES: | Newish kit (2009 molding) |
| HISTORY |
 Germany produced two widely used bombers that fought on
all fronts throughout the war. One was the He-111 and the other was its
replacement, the Ju-88. Over 15,000 were built, rivaling it with many other
types in terms of numbers built and making it the third most produced German
aircraft after the Bf-109 and FW-190.
Germany produced two widely used bombers that fought on
all fronts throughout the war. One was the He-111 and the other was its
replacement, the Ju-88. Over 15,000 were built, rivaling it with many other
types in terms of numbers built and making it the third most produced German
aircraft after the Bf-109 and FW-190.
Designed as a high speed bomber with the ability to perform dive bombing missions, the Ju-88A-4 was the third major production variant after the A-1 and A-5 version. Though the Ju-88A-4 entered service during the summer of 1940, it was the A-1 and A-5 subtypes that saw the greatest amount of action during the Battle of Britain. The Ju-88 went on to more subtypes and even a wider array of missions, but it was the early versions that are most remembered by enthusiasts.
| THE KIT |
The
1/72 Ju-88 has seen its share of plastic over the years. We have had kits from
Revell, Matchbox, AMT, and Hasegawa just to name those I can think of off the
top of my head. Each newer kit was an improvement over the other in terms of
detail and accuracy. The Hasegawa kits are still very nice, but they have been
pricing themselves out of the reach of many. This new kit from Zvezda does much
to bring a quality Ju-88 back into the reach of modelers. When I opened the box,
two things immediately grabbed my attention. One is that the largest sprue was
not in a polybag, whereas the other two were. The second is that Zvezda
 has
packaged the clear bits in its own small box. This will definitely reduce the
chances of scratching while rattling around in the big box, though the sprue
does rattle around in the smaller one.
has
packaged the clear bits in its own small box. This will definitely reduce the
chances of scratching while rattling around in the big box, though the sprue
does rattle around in the smaller one.
Speaking of sprues, the quality of the clear bits is good, though several of the pieces were slightly 'crazed' or had very tiny air pockets in them. This wasn't on all the parts, but it is something to watch out for. The engraved detailing can be called crisp. The other detailing, such as the cockpit is pretty basic and not as detailed as what you would find in a Hasegawa kit for example. I did notice some sink areas around the outside of the cockpit pieces, which I guess is to be expected due to the detailing on the inside of the cockpit walls.
Another
difference between this kit and some of the previous ones is that the cockpit
section and tail section are not separate from the rest of the fuselage. While
this may well reduce the number of variants they can kit from the same mold, it
is so much nicer for the builder not to have one other large seam to worry
about. I also noticed that the wings are in two sections with the outer section
being separate from the inner at the inner aileron separation line. This brings
the possibility of the early A-1 version and some of the longer wing planes
being done without have to resort to wing tip inserts. It is hoped that this
method of treating things will be the way to go. For things under wings, aside
from the usual dive brakes, there are four bomb racks and four bombs
 to put in
them. If the plane was travelling any real distance, it would probably not carry
all four. I would be remiss not to mention a fatal flaw. For some reason, the
rudder hinge line is straight without the usual kink in the upper section.
to put in
them. If the plane was travelling any real distance, it would probably not carry
all four. I would be remiss not to mention a fatal flaw. For some reason, the
rudder hinge line is straight without the usual kink in the upper section.
Instructions are very well done with color information in what looks like Zvezda's own brand and Model Master colors. Interestingly, there are no RLM references at all. It suggests Olive Drab for the interior, USSR Pale Blue for RLM 65 and other somewhat unlikely shades for the other colors. Four markings options are provided, three of them in RLM 70/71/65 with the third in a desert scheme. The box art option is from KG.30's Werner Baumbach and his goodly tally of ship kills. Next with a white fuselage band is a KG 28 plane from the Mediterranean theater. From the same area of ops in 1943 is a I./KG 54 plane with what is shown as yellow wing tip undersides and yellow lower cowlings. The final option is one with a sand upper surface that has dark green and white upper squiggles with dark green squiggles all over the undersurface. This one operated from Sicily with 4./KG 54 in 1943. Decals are quite well printed and should work OK.
| CONSTRUCTION |
 First step had me opening the various holes in the fuselage and lower wings
to accommodate bomb racks, dive brakes and antennas. I also glued together
the wheels. These are treadless, which is no big deal as both styles were
used. I also slightly kicked myself from tossing the 'normal' fin from the
Hasegawa kit. The Zvezda one has the fatal flaw of not having the kink in
the upper rudder hinge line. This was duplicated with a motor tool and the
old line filled in with super glue.
First step had me opening the various holes in the fuselage and lower wings
to accommodate bomb racks, dive brakes and antennas. I also glued together
the wheels. These are treadless, which is no big deal as both styles were
used. I also slightly kicked myself from tossing the 'normal' fin from the
Hasegawa kit. The Zvezda one has the fatal flaw of not having the kink in
the upper rudder hinge line. This was duplicated with a motor tool and the
old line filled in with super glue. 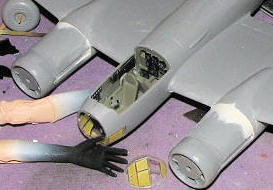 I then glued on the engine nacelles. These fit fairly well, though the need
for filler is obvious and so you will need to rescribe the rear door
outlines. The engines are an upper and lower half onto which the radiator
section fits. The upper and lower halves have to be fit to the nacelle prior
to the installation of the radiator and, if you have fit it at this time,
the prop assembly. There is a lone key for the upper piece for alignment. It
is impossible to glue the upper and lower halves first as there is but a
very thin section of plastic between them that is not keyed. It makes things
a tad more difficult in that the curvature of these upper and lower sections
are not the same with one being a bit tighter than the other so a good fit
will not happen. Attaching these two pieces to the nacelle also shows
problems with alignment and so there are either gaps, steps or both to
repair. The radiator pieces were also glued in place.
I then glued on the engine nacelles. These fit fairly well, though the need
for filler is obvious and so you will need to rescribe the rear door
outlines. The engines are an upper and lower half onto which the radiator
section fits. The upper and lower halves have to be fit to the nacelle prior
to the installation of the radiator and, if you have fit it at this time,
the prop assembly. There is a lone key for the upper piece for alignment. It
is impossible to glue the upper and lower halves first as there is but a
very thin section of plastic between them that is not keyed. It makes things
a tad more difficult in that the curvature of these upper and lower sections
are not the same with one being a bit tighter than the other so a good fit
will not happen. Attaching these two pieces to the nacelle also shows
problems with alignment and so there are either gaps, steps or both to
repair. The radiator pieces were also glued in place. 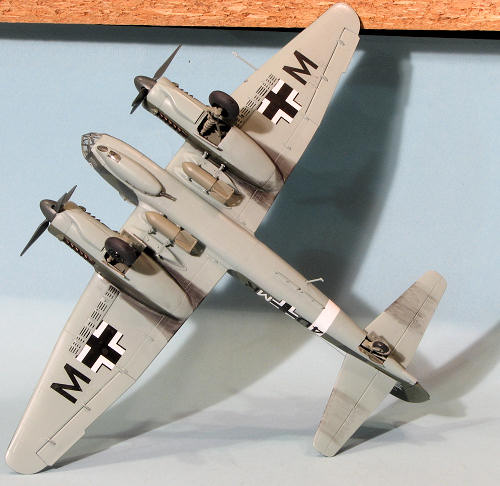 are two ADF inserts. I used the
wrong one. The sink areas on the fuselage were filled at this
time.
are two ADF inserts. I used the
wrong one. The sink areas on the fuselage were filled at this
time. | COLORS & MARKINGS |
 First order of business
was to paint over all the clear bits with RLM 02. Then the lower surface
was painted RLM 65 using Testors Model Master paint. I used MM paint on
the upper colors as well. Now I fully realize that these colors are not
as close to each other as you will find from other brands, but I like the
difference in upper colors. With the lower shade applied and dried,
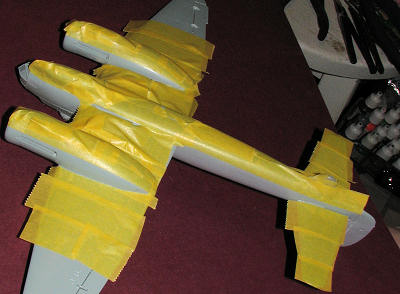
quite a bit of masking was done. This is because the upper surface
colors follow the sides of the nacelle under the wing. On the next
similar Ju-88, I will be leaving off the bomb racks as they interfere
with masking and just make the job more difficult.
First order of business
was to paint over all the clear bits with RLM 02. Then the lower surface
was painted RLM 65 using Testors Model Master paint. I used MM paint on
the upper colors as well. Now I fully realize that these colors are not
as close to each other as you will find from other brands, but I like the
difference in upper colors. With the lower shade applied and dried,
quite a bit of masking was done. This is because the upper surface
colors follow the sides of the nacelle under the wing. On the next
similar Ju-88, I will be leaving off the bomb racks as they interfere
with masking and just make the job more difficult. 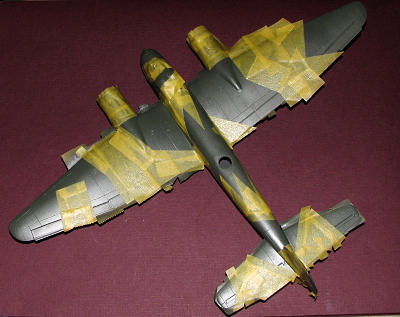 The upper surface RLM 71 was painted on first. I then let it dry for at
least 24 hours. I find this works well in preventing any issues when
masking over it. I am sure you can do so in less time, but in a hurry I
am not. It gave me time to work on other parts of the kit such as
assembling and painting the bombs, props, landing gear and gear doors.
Of course, this is another case of spending an hour or more masking for
five minutes of spray painting. This was made even more difficult by the
incomplete painting guide in the Zvezda kit. For instance, it shows no
upper camo past the right engine. It shows no right side scheme at all
and whatever things are supposed to look like on the nose is hidden by
the engine. It leads one to improvise, and so I did. As with the RLM 71,
I used Testors Model Master enamels for the RLM 70. Once dry, it took a
bit of time to remove all the tape from the upper and lower surfaces.
The upper surface RLM 71 was painted on first. I then let it dry for at
least 24 hours. I find this works well in preventing any issues when
masking over it. I am sure you can do so in less time, but in a hurry I
am not. It gave me time to work on other parts of the kit such as
assembling and painting the bombs, props, landing gear and gear doors.
Of course, this is another case of spending an hour or more masking for
five minutes of spray painting. This was made even more difficult by the
incomplete painting guide in the Zvezda kit. For instance, it shows no
upper camo past the right engine. It shows no right side scheme at all
and whatever things are supposed to look like on the nose is hidden by
the engine. It leads one to improvise, and so I did. As with the RLM 71,
I used Testors Model Master enamels for the RLM 70. Once dry, it took a
bit of time to remove all the tape from the upper and lower surfaces.
| FINAL CONSTRUCTION |
With the paint in place, I installed the landing gear. Though designed to be glued in place earlier, they can be left off until all the painting is done as they fit quite well. This is not true of the tail gear as it has to be installed with the fuselage halves, increasing the chance of breakage. Some folks build little cardboard housings to help keep this from happening. I just try not to be so ham-fisted that I break them, though there are times when this does happen. I also glued on the outer main gear doors as I knew I still had to attach the bombs and would knock off an inner one.
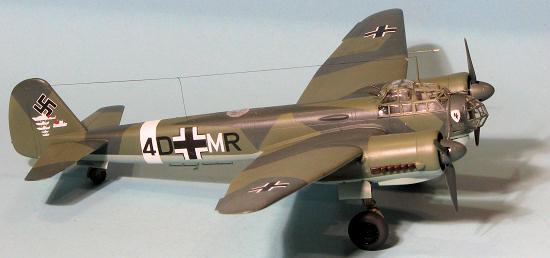 I did not
gloss coat this one as the extant paint was semi-matte and I figured it
would not be an issue. For this, I wanted an aftermarket scheme, but my
stash of Ju-88A-4 decals is quite slim. I chose a nice set of markings that
were similar to one of the kit offerings from AIMS 72D005 that had a scheme
for an aircraft of 7./KG30 based at Gerbini airfield near Catania Sicily in
1941. The markings are thin and went on with no real issues aside from a bit
of silvering due to my not using a gloss clear earlier. Setting solutions
took care of this situation, though. I then went back to do some more
construction.
I did not
gloss coat this one as the extant paint was semi-matte and I figured it
would not be an issue. For this, I wanted an aftermarket scheme, but my
stash of Ju-88A-4 decals is quite slim. I chose a nice set of markings that
were similar to one of the kit offerings from AIMS 72D005 that had a scheme
for an aircraft of 7./KG30 based at Gerbini airfield near Catania Sicily in
1941. The markings are thin and went on with no real issues aside from a bit
of silvering due to my not using a gloss clear earlier. Setting solutions
took care of this situation, though. I then went back to do some more
construction.
In this case, there still was quite a bit. I glued on the sway brace bits to the bomb racks, the under fuselage antennas, and the tail wheel doors. The inner main gear doors and wheels were then attached. I then glued in the exhaust. These bits are far too narrow to fit into the slots provided and required some sanding down to get them to fit. I also attached the dive brakes. After painting the engine openings with some detail work, the RLM 70 painted prop and spinners were glued in place. Then, after some more touch up painting, the airframe was given a clear flat coat.
But this was not all as I had to install the guns. After laboriously removing the canopy masking, I installed the clear rear canopy gun mounts. These needed to be hand painted and so it was done. For the rear gondola guns, I had no choice but to cut most of the twin guns away and then just glue it in place. The main canopy guns were all attached using clear gloss paint as was the radio mast. This was then glued back onto the airframe. I removed the rest of the masking and using Tamiya Weathering Kit, applied large soot areas under the wings behind the engine. I applied a bit lighter amounts on the tailplanes. Then the bombs were glued on. I only attached two on the inner pylons as a full bomb load was infrequently carried as it limited range. The last step was to add a radio wire using EZ-Line.
| CONCLUSION |
 This
makes the fourth brand of 1/72 Ju-88 I have built. I built the
really old Revell kit several times, as I have the Italeri
offerings. I recently completed a Hasegawa version and now this one.
I would categorize this one as second best with the Hasegawa at the
top and the old Revell trailing. The kit provides nice detail and in
most areas is a solid build. The gaffe on the rudder hinge can be
easily fixed, but should not have had to have been. I also found the
engine installation to be less than satisfactory, an issue I have
had with the Italeri offerings as well. In all fairness, I have not
built a Jumo Hasegawa kit nor the new Revell A-4, so it remains to
be seen how those makers do on the engine deal. However, if you can
deal with those two areas, you will find this to be a worthwhile
build.
This
makes the fourth brand of 1/72 Ju-88 I have built. I built the
really old Revell kit several times, as I have the Italeri
offerings. I recently completed a Hasegawa version and now this one.
I would categorize this one as second best with the Hasegawa at the
top and the old Revell trailing. The kit provides nice detail and in
most areas is a solid build. The gaffe on the rudder hinge can be
easily fixed, but should not have had to have been. I also found the
engine installation to be less than satisfactory, an issue I have
had with the Italeri offerings as well. In all fairness, I have not
built a Jumo Hasegawa kit nor the new Revell A-4, so it remains to
be seen how those makers do on the engine deal. However, if you can
deal with those two areas, you will find this to be a worthwhile
build. September 2012
Copyright ModelingMadness.com. All rights reserved. No reproduction in part or in whole without express permission from the editor.
My thanks to Squadron Products for the review kit. Get yours at your favorite shop or ask them to order it for you.
If you would like your product reviewed fairly and quickly, please contact the editor or see other details in the Note to Contributors.