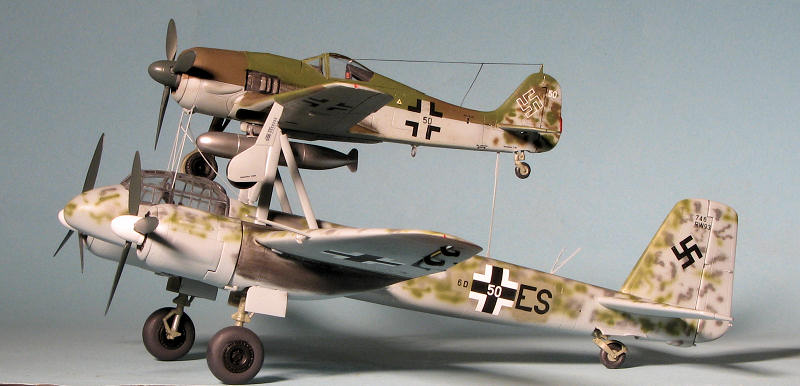
Hasegawa 1/72 FW-190A & Ju-88G-1 "Mistel S2"
| KIT #: | 01975 |
| PRICE: | 3,360 yen (about $43.00) |
| DECALS: | Two Options |
| REVIEWER: | Scott Van Aken |
| NOTES: | Two kits. Updated parts to make the Mistel |
| HISTORY |
Mistel was originally a bomber airframe, usually a Junkers Ju 88 variant, with the entire nose-located crew compartment replaced by a specially-designed nose filled with a large load of explosive, with a fighter aircraft on top, joined to the bomber by struts. The combination would be flown to its target by a pilot in the fighter; then the unmanned bomber was released to hit its target and explode, leaving the fighter free to return to base. The first such composite aircraft flew in July 1943 and was promising enough to begin a programme by Luftwaffe test unit KG 200, code-named "Beethoven".
 The definitive Mistel warhead was a shaped charge of nearly two tons in
weight fitted with a copper or aluminium liner. The use of a shaped charge was
expected to allow penetration of up to 7 meters of reinforced concrete.
The definitive Mistel warhead was a shaped charge of nearly two tons in
weight fitted with a copper or aluminium liner. The use of a shaped charge was
expected to allow penetration of up to 7 meters of reinforced concrete.
Some 250 Mistels of various combinations were built during the war, but met with limited success. They were first flown in combat against the Allied invasion fleet during Battle of Normandy, targeting the British-held harbour at Courseulles-sur-Mer.
While Mistel pilots claimed hits, none of these match Allied records; they may have been made against the hulk of the old French battleship Courbet, which had been included as a component of the Mulberry harbour at Arromanches and specially dressed up as a decoy by the Allies. Serious blast and shrapnel damage from a near miss was suffered by HMS Nith, a floating headquarters, on 24 June. Nine men were killed and 26 wounded, and Nith was towed back to England for repairs.
A second opportunity to use the Mistels, in Scapa Flow in 1944, was abandoned after the sinking of the German battleship Tirpitz led to the departure of all the Royal Navy's major surface units from the target.
As part of Operation Iron Hammer in late 1943 and early 1944, Mistels were selected to carry out key raids against Soviet weapons-manufacturing facilities—specifically, electricity-generating power stations around Moscow and Gorky. These plants were known to be poorly defended by the Soviets and irreplaceable. However, before the plan could be implemented the Red Army had entered Germany, and it was decided to use the Mistels against their bridgehead at Küstrin instead. On 12 April 1945, Mistels attacked the bridges being built there, but the damage caused was negligible and delayed the Soviet forces for only a day or two. Subsequent Mistel attacks on other bridges being thrown across the Oder were similarly ineffective.
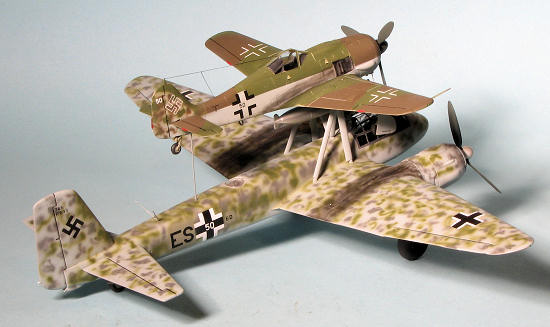
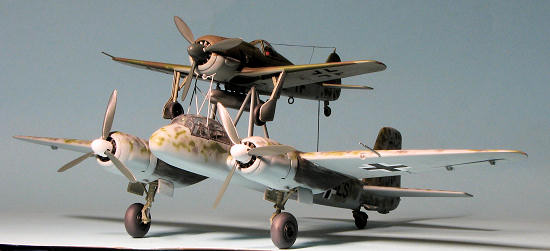
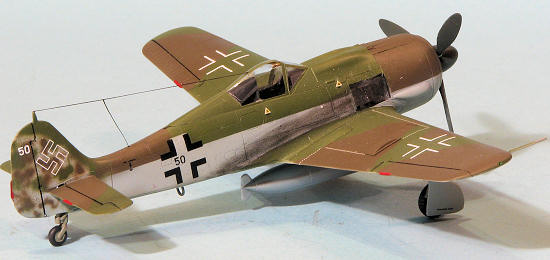
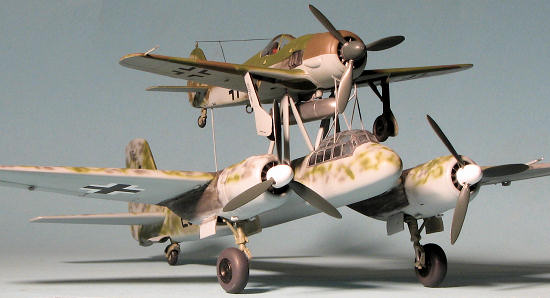
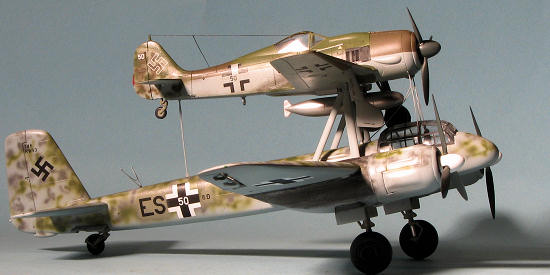
The Mistel 2 was a combination of the FW-190A-8 or F-8 combined with a Ju-88G-1 airframe. The trainer version, which had no warhead, was the Mistel S2.
| THE KIT |
This one is a bit unique in terms of Hasegawa's double kits. It mates the venerable Hasegawa 1/72 FW-190A-8 kit with their Ju-88G-1 night fighter kit and includes the additional bits needed to make the unusual Mistel combination.
This is not the first Mistel in this scale as Italeri did the Mistel 1 using their Ju-88 and horrible Bf-109F kit in 1/72. AMtech also did the lower component of a Mistel 3B/Fahrungsmachine with the Ju-88H. In 1/48, one of the first Dragon/DML kits ever produced was the Mistel 2 using their 190A-8/88G-1 kit. However, 1/48 takes up a huge amount of room so having one in 1/72 is a real boon to most modelers.
 The FW-190A-8 kit is no stranger to dedicated 1/72 modelers, and the
molds have held up quite well over the last 20 or so years. The 190 bag
includes the Mistel braces and the huge drop tank the was used by the 190.
Apparently these aircraft did not have any wing guns as the inner cannon are
shown to be cut off and the holes for the outer ones are to be filled.
The FW-190A-8 kit is no stranger to dedicated 1/72 modelers, and the
molds have held up quite well over the last 20 or so years. The 190 bag
includes the Mistel braces and the huge drop tank the was used by the 190.
Apparently these aircraft did not have any wing guns as the inner cannon are
shown to be cut off and the holes for the outer ones are to be filled.
The main component of the Mistel is, of course, the Ju-88G. At this stage of the war, there were plenty of Ju-88Gs available as fuel was a major issue that reduced night fighter operations. Apparently it has been planned for a long time to do a Mistel as the inner upper wings have holes ready to be drilled out to accept the braces for the 190. The holes for the nose radar will also have to be filled in and there are plates to put over where the fuselage antennas would go. Other than that, the kit is exactly the same as their standard G-1. This means that the cockpit is fairly well appointed with decals used for the various instrument panels and faces.
As an addition to this kit, there is a pretty good size photo etch fret included. The major components of this fret are the front and rear braces for the 190 as well as a very long ladder assembly. The forward 190 brace is peculiar to the trainer to keep the nose of the 190 from accidentally 'dipping' into the cockpit and snuffing the crew. Mission aircraft would not need that. As you might have guessed, the trainer was to train the 190 pilot to fly what had to be a cumbersome combo. The Ju-88 crew was only there as a safety measure.
Markings are for two combos. The box art set is from 6./KG 200 based in Denmark during early 1945. The FW-190 is in RLM 74/75/76 with fuselage mottling while the Ju-88 is in RLM 76 with RLM 75 upper surface mottling. The rudder on this one is in RLM 74/75 and is obviously a replacement. The other is from an unknown unit at the end of the war. Again 74/75/76 for the 190 with side mottling being much heavier. The Ju-88 is in RLM 76 with tight squiggles all over the airframe in RLM 81/82. The decal sheet is pretty good sized and is up to Hasegawa's usual standards.
| CONSTRUCTION |
Starting what can be a complex kit like this is
always a bit of a poser. In this instance, I decided to begin this build by
tackling the easiest part, and that is building the FW-190A-8. This
venerable kit has been around for decades and is still considered to be the
best 190 in this scale. Since it has been the subject of so many boxings,
there are a ton of areas that can be drilled out on the lower wing. The
instructions are very specific on just which ones to do so, grabbing a #68
drill bit, I proceeded to open them up f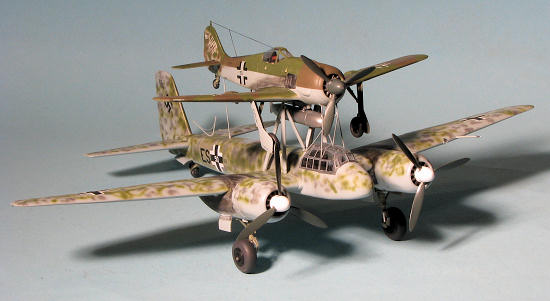 our of them as well as two on the
upper wings. With that done, I cemented the wings together. I was somewhat
surprised by the gaps on the leading edge and think these may have been
caused by the alignment pins so I would recommend removing those prior to
cementing. I also took this time to cement the large fuel tank halves
together.
our of them as well as two on the
upper wings. With that done, I cemented the wings together. I was somewhat
surprised by the gaps on the leading edge and think these may have been
caused by the alignment pins so I would recommend removing those prior to
cementing. I also took this time to cement the large fuel tank halves
together.
The interior had the seat installed before painting it and the inside of the fuselage halves with RLM 66. Back at the wings, the gaps were filled with super glue as were the outer cannon openings. The area around these need to be sanded down and the inner gun barrels removed as well. I would have thought that the lower wing shell ejector chute pieces would have been sanded off as well, but there is no indication that it is the case.
Before gluing in the interior and mating the fuselage halves, I installed a set of Eduard pre-painted belts. The fuselage was assembled and after filling and sanding (which was not all that much), the wing was attached. Fit is actually very good with only a tad of filler needed on one wing root. Fit of the upper cowling section is also quite good. The tailplanes were then glued on and I painted the area behind the cockpit and the instrument anti-glare panel in RLM 66.
During all of this, I started on the Ju-88. First order of business was some paint. Interior bits got RLM 66 while the wheel wells and struts and inner gear doors got a dose of RLM 02. I then glued the wheel wells to the inside of the upper wing and then attached the lower wing and the engine nacelle insert. This latter piece fit very well on one wing, but did not on the other. In both cases there were somewhat large gaps that needed filled and after much filling and sanding were acceptable. The wing tip inserts were the same. On one wing it fit well and on the other it did not.
I slowly built up the cockpit during this as
there are not only a lot of pieces, but a lot of decals to install. The
decals did go on quite well so that was nice. The fuselage was cemented
together after painting and installing the ADF antenna. I also glued
together the fin and horizontal stabs for latter use. There are two bomb bay
inserts to glue on. These fit fairly well, though nothing I build goes
filler free!. With the cleaning of the fuselage bits, the fin was glued in
place. I should mention that the instructions will have y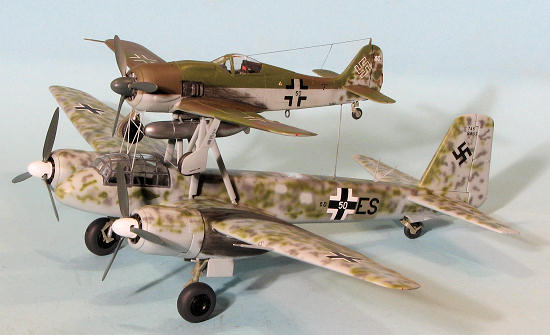 ou glue in the tail
wheel assembly at this time. Well, I know that I would break it and during
test fitting before the fuselage halves were glued, determined that it could
be installed once the fuselage was complete.
ou glue in the tail
wheel assembly at this time. Well, I know that I would break it and during
test fitting before the fuselage halves were glued, determined that it could
be installed once the fuselage was complete.
The model will have a solid nose so a number of clear parts that would normally fit in the nose were glued in place. These were then filled in with super glue and after several applications and sanding, I got a smooth nose in these areas. The nose cap also needed the antenna mounting holes filled in and this was done. During this, I glued on the tail planes and the fin/rudder. I then glued on the wings. Fit for all these was fairly good, though there were a few gaps on the fin. There are a bunch of small intakes and exhausts around the engines that need to be glued on. No placement area is shown on the plastic so you have to use the drawings in the instructions for placement. For this scheme, I did not use the cooling intakes on the fuselage.
The next step on this was to mask and install the clear bits. This took a while but eventually all but the rear machine gun mount were masked and the parts fit onto the fuselage. Back at the wings, I painted up and assembled the engines, gluing those in place. With a fairly complete airframe, all the wheel wells and engine openings were stuffed with tissue in preparation for painting.
Back at the 190, the canopy was masked and glued in place. The frames for the canopy are very difficult to see as the mold has been used so much. I had to prescribe the frames before applying the masking material in order to see them. A bit of a pain, really.
With both airframes ready for paint, I headed for the paint shop.
| COLORS & MARKINGS |
To be honest, the FW-190 was ready to paint
before the Ju-88 so I did that one first. The decal sheet I was to use by
AIMS, is totally devoid of color information regarding the option I wanted
to do. I guess the assumption is that we all know what colors these planes
are to be painted. The only saving grace is that I had the reference book by
Classic Publications on the Mistel from
 whence
the decal options were taken. The color profile led me to believe that this
was not only a 190F-8, but also in the darker camouflage scheme of RLM 81/82
over 76. The fuselage side was unmottled until it came to the fin/rudder and
the area inside the fuselage insignia was also light blue. After the usual
fussing around with masking and fixing overspray, I carefully cut the upper
portion of the fuselage decal and outlined it in pencil. Then I painted the
area slightly inside it with RLM 76 before using the decals, erasing the
markings prior to the next step.
whence
the decal options were taken. The color profile led me to believe that this
was not only a 190F-8, but also in the darker camouflage scheme of RLM 81/82
over 76. The fuselage side was unmottled until it came to the fin/rudder and
the area inside the fuselage insignia was also light blue. After the usual
fussing around with masking and fixing overspray, I carefully cut the upper
portion of the fuselage decal and outlined it in pencil. Then I painted the
area slightly inside it with RLM 76 before using the decals, erasing the
markings prior to the next step.
Once the painting was done, I sprayed on a couple of Future coats and installed the landing gear legs. I then used both AIMS sheet decals and the stencils from the Hasegawa sheet. Both sets of decals worked just great. I found the wing walk decals on the Hasegawa sheet to be a bit large, but easily trimmed. With decals in place, it was given a semi-matte clear finish. More on building this one a bit later, but now to the Ju-88
The Ju-88 was overall RLM 76 with RLM 75 and RLM
82 mottling. I first applied all the RLM 75 splotches before going back and
filling in with RLM 82. It was difficult to see if the green was on the
upper surface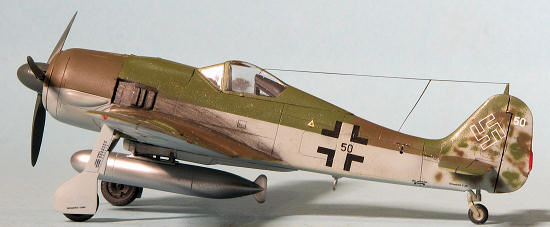 s,
but the photos in the reference book had that area appear pretty densely
painted. The cockpit area had the sections around it masked and that was
painted RLM 66. I should have painted that area first then masked as the
underlying RLM 76 peeks through when the tape was removed. The area on the
left side that should have had a pair of cooling intakes, were repainted RLM
76. I also needed to paint RLM 02 where the old code letters were applied,
but had to wait to paint that until after the insignia were in place. I
glued in the main gear and the tail gear after removing the tissue. It also
got a coat of Future. For this one, I used all AIMS markings. Apparently the
Ju-88 was devoid of stencils, unlike the FW-190. After applying the insignia
and letting it dry, I broke out the RLM 02 and carefully sprayed where the
missing code letters would be. This area was then clear coated again and the
code letters applied. Again, a clear matte was applied once the decals were
on. I used Mr. Mark Softer applied lightly for all the decals to prevent
silvering.
s,
but the photos in the reference book had that area appear pretty densely
painted. The cockpit area had the sections around it masked and that was
painted RLM 66. I should have painted that area first then masked as the
underlying RLM 76 peeks through when the tape was removed. The area on the
left side that should have had a pair of cooling intakes, were repainted RLM
76. I also needed to paint RLM 02 where the old code letters were applied,
but had to wait to paint that until after the insignia were in place. I
glued in the main gear and the tail gear after removing the tissue. It also
got a coat of Future. For this one, I used all AIMS markings. Apparently the
Ju-88 was devoid of stencils, unlike the FW-190. After applying the insignia
and letting it dry, I broke out the RLM 02 and carefully sprayed where the
missing code letters would be. This area was then clear coated again and the
code letters applied. Again, a clear matte was applied once the decals were
on. I used Mr. Mark Softer applied lightly for all the decals to prevent
silvering.
| FINAL CONSTRUCTION |
 clear
paint (canopy) or super glue. The masking was removed from the canopy and
pastels used for exhaust soot. With the 190 done, I turned to the Ju-88.
clear
paint (canopy) or super glue. The masking was removed from the canopy and
pastels used for exhaust soot. With the 190 done, I turned to the Ju-88.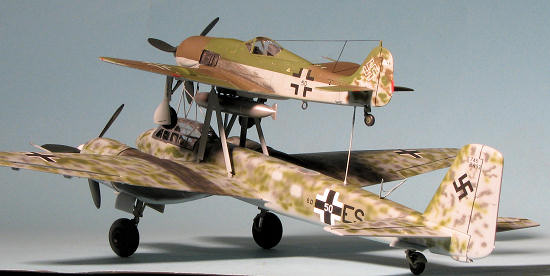 had
an extra piece left over from the Mistel frame sprue and after searching the
instructions, noticed that this went on the underside of the forward cowling
of the 190. The instructions show it attached just behind the cowl armor
ring, but it really fits a bit farther back on the next engraved panel line.
It has to be centered or the p.e. brace will not fit. I drilled the hole and
fit it.
had
an extra piece left over from the Mistel frame sprue and after searching the
instructions, noticed that this went on the underside of the forward cowling
of the 190. The instructions show it attached just behind the cowl armor
ring, but it really fits a bit farther back on the next engraved panel line.
It has to be centered or the p.e. brace will not fit. I drilled the hole and
fit it.| CONCLUSIONS |
 This
was a pretty fun kit. First time I have built a Hasegawa Ju-88, though the
FW-190 is an old favorite. The fit of the parts is about normal for a
Hasegawa kit so one knows what one is getting into. I really do not like the
separate wing tip and aileron, but know that this is used by Italeri as well
and is expected. Much prefer the whole outer wing approach of the Zvezda
kit. The end result is a pretty neat looking model of a combo that
previously has only been available in 1/48 with this pair and in 1/72 by
Italeri as a Mistel 1 with their horrid Bf-109F. Cheap it is not, but then,
what is any more?
This
was a pretty fun kit. First time I have built a Hasegawa Ju-88, though the
FW-190 is an old favorite. The fit of the parts is about normal for a
Hasegawa kit so one knows what one is getting into. I really do not like the
separate wing tip and aileron, but know that this is used by Italeri as well
and is expected. Much prefer the whole outer wing approach of the Zvezda
kit. The end result is a pretty neat looking model of a combo that
previously has only been available in 1/48 with this pair and in 1/72 by
Italeri as a Mistel 1 with their horrid Bf-109F. Cheap it is not, but then,
what is any more?| REFERENCES |
http://en.wikipedia.org/wiki/Mistel
If you would like your product reviewed fairly and fairly quickly, please contact the editor or see other details in the Note to Contributors.
Back to the Review Index Page 2024