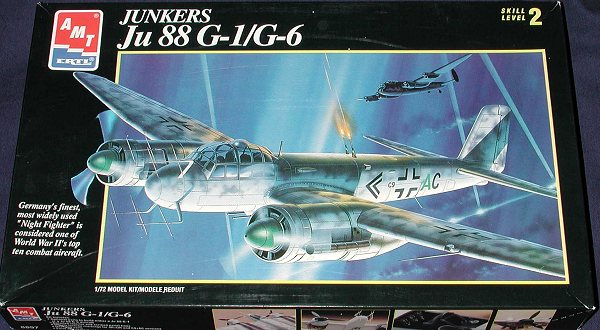
AMT 1/72 Ju-88G-1/6 Nightfighter
|
KIT # |
8897 |
|
PRICE: |
$12.98 |
|
DECALS: |
Two Aircraft |
|
REVIEW : |
|
|
NOTES: |
` |
|
HISTORY & THE KIT |
For a preview of the kit and a short history of the type, follow this link.
|
CONSTRUCTION |
As with most
of my kits, construction on this beastie starts with subassemblies. In this case
that meant interior, wings, and fin. AMT uses a rather softish plastic which
makes for easy removal from sprues and easy gluing, but also makes it easy to
damage. Be very careful when cutting it and when applying glue. Too much solvent
will easily melt the plastic, especially where the plastic is thin.
The wings and fin glued together with no problems. You do have to remove the
attachment points for the underwing dive brakes as the night fighter does not
use them. Interior pieces were then assembled and glued together. Once all the
bits were in place, the interior and surrounding interior fuselage walls were
painted RLM 66 using Testors Model Master enamels. I personally find enamels
much easier to work with than acrylics, though they do require the use of
solvents that are more harmful. Always wear a quality respirator when spraying
these paints. Once the interior was painted the overall color,
various black boxes were painted with Humbrol matte black. The seats have belts
molded in. Not very 3-D, but better than nothing. These were painted matte white
with silver buckles. Then the interior was dry-bushed with aluminum to bring out
the highlights. It was then glued into the fuselage. The clear bits can be left
off until the fuselage is complete if you so desire as they insert from the
outside. Just make sure you put them in prior to installing the nose cap!
At this time, I assembled
the engines of choice. You can do a radial-engined G-1 or an inline-engined G-6.
I chose the latter. The engine cowlings are handed so make sure you get them
correct. I etched an 'L' into the inside of the left hand assembly prior to
gluing them on the wing. Before you can fit them, the engine nacelles need to be
installed.
There are three parts to these nacelles; a left, right and
insert. The insert looks as if it should fit with the small rounded part to the
aft, but it does not. Frankly, I'm not exactly sure why it is molded that way,
but it is. The nacelles don't fit perfectly. Mostly it is due to some
interference in the back section. Though I did not, I'd suggest some careful
sanding on that are to help improve the fit. Naturally, filler is needed. You
will also need to be sure that any sink marks (and there were some) are filled.
The natural seam is not the same as the aft gear door seam, so pay attention to
this area as well. Fit of the nacelles in the leading wing edge area is also not
good. Making it difficult to sand in that area is a small exhaust. On the next
similar kit, I'm going to cut those off and glue them back on later as it will
make sanding in this area MUCH easier. With the nacelles done,
the engines can be glued on. Fit is absolutely horrible. If you glue them on
flush with the mounting surfaces, the engines will point up at about 15-20
degrees. It looks most silly. What I ended up doing, was to glue just the bottom
parts of the engine, and then put in shims made of thin styrene strip. This
offered a solid bond. The other gaps were filled in several sessions.
Now back to the wings. With the engines on and smoothed out, the supercharger
intakes and flame suppressors were attached. These suppressors were actually
circular in shape so you may want to make the proper modifications. As with just about all of the
parts, there were small bits of flash on them that had to be removed. I also
found that some of the mating surfaces needed sanded down to get the lumps and
bumps off them. An easy job considering the soft plastic. I also filled in the
bomb rack holes as I could not find images of Ju-88Gs with these racks
installed.
Turning my attention to the nose, the small windows were installed. Not that
difficult a job, but one that needs careful gluing. When dry, they were masked
and the nose cap glued on. Fit of this is fair. By that I mean that it fit well
on the bottom, but did not follow the contour of the upper section. It was a bit
too small. Nothing that sandpaper and filler can't fix. With that done, the arms
for the radar waveguides were glued in place. These fit OK, but not great. They
are not keyed and so you just have to glue them in and fiddle with them to get
them properly aligned. It can be done, but takes time. In actuality, these need
to be airfoil shaped not the round ones provided in the kit.
The canopy was masked at this time and then tacked into place in preparation for
painting. Off to the paint shop I went.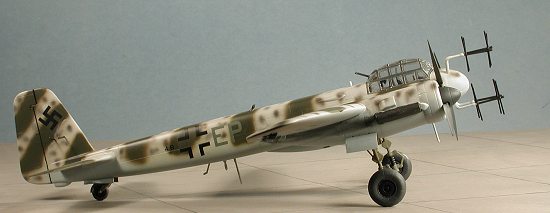 With the interior installed, the fuselage halves were glued together. Fit is
fair, but not great. Apparently the aft interior bulkhead is a trifle too wide
as there was a gap on the top. Don't forget to install the wing mount in the
center fuselage section prior to gluing the fuselage together. Failure to
remember will cause you grief later on! With the fuselage glued, several filler
applications were needed to smooth things out. Unfortunately, this also wipes
out some of the upper fuselage detail.
With the interior installed, the fuselage halves were glued together. Fit is
fair, but not great. Apparently the aft interior bulkhead is a trifle too wide
as there was a gap on the top. Don't forget to install the wing mount in the
center fuselage section prior to gluing the fuselage together. Failure to
remember will cause you grief later on! With the fuselage glued, several filler
applications were needed to smooth things out. Unfortunately, this also wipes
out some of the upper fuselage detail.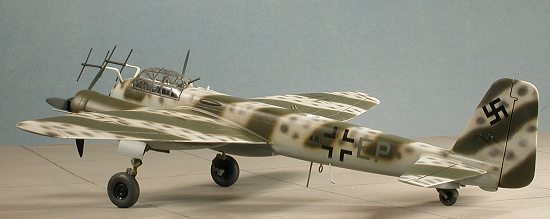 Attention was then turned back to the fuselage. The single piece tailplanes were
glued in without too much trauma. On my kit, one of them had some depressions
that were rather evident. Rather than go through all the work of filling and
rescribing them, I placed them facing down so they couldn't be seen without
picking up the model. Fit of these was good. The fin was then glued on and it
ended up being a bit wider than the mounting area. Out came the filler.
Attention was then turned back to the fuselage. The single piece tailplanes were
glued in without too much trauma. On my kit, one of them had some depressions
that were rather evident. Rather than go through all the work of filling and
rescribing them, I placed them facing down so they couldn't be seen without
picking up the model. Fit of these was good. The fin was then glued on and it
ended up being a bit wider than the mounting area. Out came the filler.
|
PAINT & DECALS |
At this stage, I was going to do the box art plane. That called for an overall light grey that some refer to as RLM 77. It is also Humbrol 168 as few people make RLM 77 premixed. However, I got to looking at some references and noticed a number of interesting schemes. Several had RLM 76 undersides and RLM 77 uppers with interesting patterns in different paints. I then painted the undersides RLM 76 and when dry masked off the tailplanes.
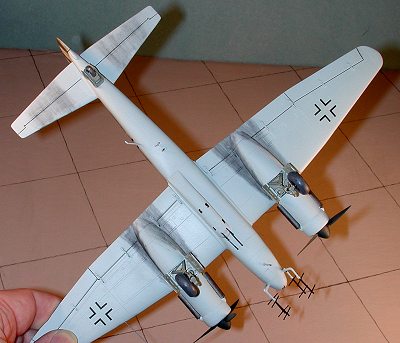
 While masking was going on, I also cut the schräge musik cannon from their
backing plate and glued them onto the upper fuselage just near the aft section
of the wing. These fit quite well. The kit was returned to the painting area and
the upper surface painted RLM 77. The Humbrol paint is really quite good. I do
wish, however, that the British would discover screw top jars as tinlets are a
bit of a pain to use.
While masking was going on, I also cut the schräge musik cannon from their
backing plate and glued them onto the upper fuselage just near the aft section
of the wing. These fit quite well. The kit was returned to the painting area and
the upper surface painted RLM 77. The Humbrol paint is really quite good. I do
wish, however, that the British would discover screw top jars as tinlets are a
bit of a pain to use.
While this was all drying, I did some more reading. It was then that I discovered a number of glitches in the AMT kit. First of all, those small exhaust I was worried about are completely absent from the Ju-88G-6. I could not find a single picture of them with it. Out came the knife and they were gone! There are no windows in the lower nose section of any photo I looked at. This means that one can blend them in with filler or simply repaint over them. Other things that need corrected to do a proper G model is that the outer ailerons were enlarged, a trait not supplied with the kit. You need to fill the antenna mount on the canopy as the G had a retractable antenna just aft of the cockpit section. This should be an easy fix. I also did not find any photos of G models with the bomb racks installed. You'll need to fill in those holes.
 With the basic paint colors dry, the kit was returned to the workbench to have
the landing gear installed. This just makes it much easier to continue with the
painting. The gear itself fits well, but there is no positive alignment features
for it. The kit drawings do not clearly show if the gear is straight or slightly
canted forward. Photographs show it as being nearly straight so you should build
it as such. The aft braces on the gear will be a challenge as they apply forward
pressure on the landing gear. Installing these after the main gear legs will be
a major hassle so one needs to be sure that the gear assembly is braced
externally while it dries. It is then back to the paint shop.
With the basic paint colors dry, the kit was returned to the workbench to have
the landing gear installed. This just makes it much easier to continue with the
painting. The gear itself fits well, but there is no positive alignment features
for it. The kit drawings do not clearly show if the gear is straight or slightly
canted forward. Photographs show it as being nearly straight so you should build
it as such. The aft braces on the gear will be a challenge as they apply forward
pressure on the landing gear. Installing these after the main gear legs will be
a major hassle so one needs to be sure that the gear assembly is braced
externally while it dries. It is then back to the paint shop.
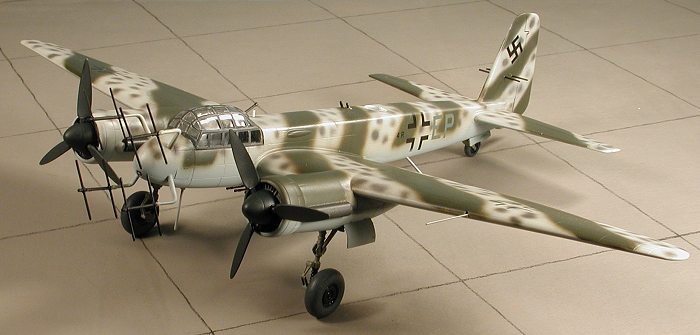
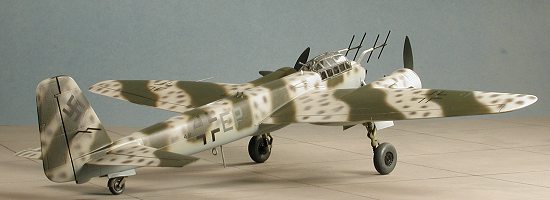
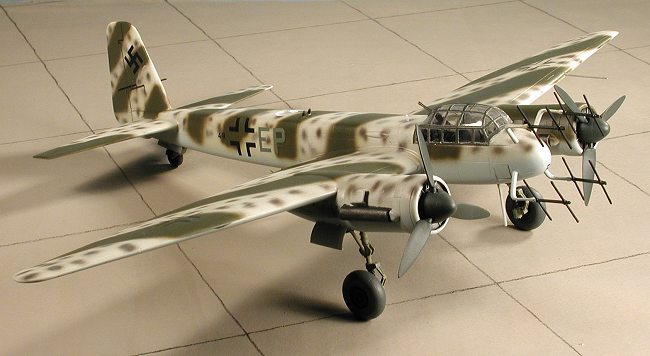
The aircraft had bands of RLM 82 sprayed on the upper surfaces. I used a profile in the first reference for this plane. I wanted something a bit different from the norm, and though there are no specific aftermarket decals, using a combination of kit and spare decals should work well for this scheme. Once the 82 was sprayed, I went back and did dots of RLM 75. Some back and forth work was done, but though it looks ok, it isn't one of my better camo schemes. Next one will be better!
Following that, the kit was sprayed with gloss clear and the decals added on. I used decals from various sources and only the two small unit code letters were used from the decal sheet itself.
|
CONSTRUCTION CONTINUES |
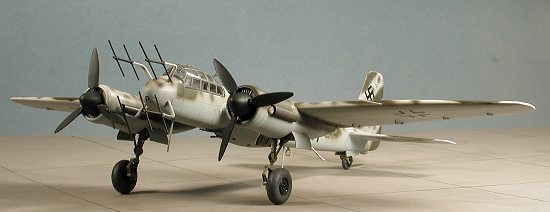
With the decals on, I turned my attention to the other parts that still needed fitted. First the tail wheel was glued in place. Then the oleo scissors were glued on the main gear. These are a bit too wide for the associated mounting area. Then the wheels, which had been painted black with dark grey tires, were glued in place. A super fit.
Some painting needed done on the engine fronts. These were painted matte black and when dry, drybrushed with steel to bring out the detail. At this time, I also painted the exhaust manifolds a burnt iron color.
 Moving on to the last bits now.
The trailing wire antenna just aft of the wing root needs to be moved farther
aft. This required sanding off the old mount and filling the hole. The new mount
was simply drilled in place. There are other antennas that need added as well.
Three of them under the belly, a simple job of drilling holes for them, and a
pair of aft radar warning antennas on the fin. The kit supplies blocky mounts
for these so I didn't use them. Instead, two holes were drilled completely
through the fin and thick stretched sprue antennas inserted. These were then
painted as were the other areas that I messed up.
Moving on to the last bits now.
The trailing wire antenna just aft of the wing root needs to be moved farther
aft. This required sanding off the old mount and filling the hole. The new mount
was simply drilled in place. There are other antennas that need added as well.
Three of them under the belly, a simple job of drilling holes for them, and a
pair of aft radar warning antennas on the fin. The kit supplies blocky mounts
for these so I didn't use them. Instead, two holes were drilled completely
through the fin and thick stretched sprue antennas inserted. These were then
painted as were the other areas that I messed up.
With the fuselage antennas in place, I turned my attention to the nose radar dipoles. These are simply butt joined to the end of the mounts. Not an easy task but after much fiddling they were on. At least long enough to finish the kit and take pictures! I used liquid cement as it softened the plastic making a better bond than I'd get with superglue. These dipoles were painted flat black though they could have been painted fuselage color or RLM 02.
Next, the canopy, which had just been tacked in place, was removed and painted RLM 66 dark grey. There is much photographic evidence of canopies in this color. Then the aft facing machine gun was installed. Using liquid cement, the canopy was glued in place. The fit is not that great. It is slightly too narrow and slightly skewed. What with all the other glitches on the kit, I didn't bother to fix this, but you do need to make sure the canopy fits squarely once the fuselage is glued together. I'll definitely be on the watch for the next kit I do.
With the canopy in place, I installed the props and put in a short section to represent the retractable antenna just aft of the canopy. No long wire is needed for this aircraft. Out came the pastels for the engine soot. It was then I noticed that there was no wing pitot tube on the plane. I couldn't find anything left on the sprues to put in the hole, so I made one and installed it. We won't even talk about the missing landing light. A bit of final touch up painting, a spray of matte clear and the masking was taken off the canopy. Finally, the clear ADF antenna was snapped into the housing in the upper fuselage. After all of that, I had a decent representation of a Ju-88G.
|
CONCLUSIONS |
AMT provides a basis from which to build a proper Ju-88G model. In actuality, they have supplied all the bits that are normal for a Ju-88C and added most G pieces. You can make a plane that looks like a G, but isn't. To bring the kit up to G specifications isn't beyond the abilities of many modelers, it is just the willingness to do so. If you have read this far, you know that I did not do my research prior to building this kit. Had I done so, I'd have caught several of these problem areas (like the nose windows) and fixed them from the start.
The kit itself is not that bad a model. It goes together with minimal trauma and is one that most modelers will be satisfied with. If you can live with or don't mind fixing the errors, then you will enjoy this kit.
October 2001
|
REFERENCES |
Camouflage and Markings: Luftwaffe 1939-45, Vol 4, by
Robert Michulec, AJ Press, 1998
Junkers Ju-88 in Action, Part 2, #113, by Brian Filley, Squadron/Signal,
1991
Review kit courtesy of me and my wallet!
Copyright ModelingMadness.com. All rights reserved. No reproduction in part or in whole without express permission from the editor.
If you would like your product reviewed fairly and fairly quickly, please contact the editor or see other details in the Note to Contributors.