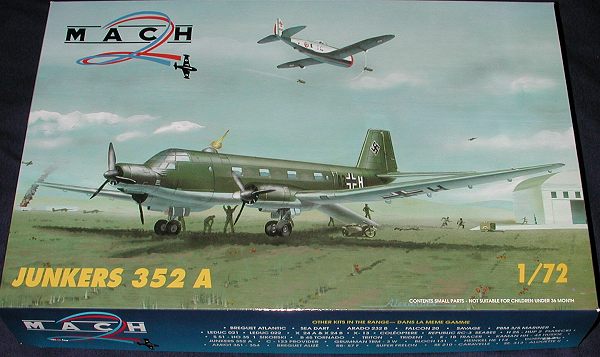
Mach 2 1/72 Ju-352
|
KIT # |
0031 |
|
PRICE: |
$59.98 MSRP |
|
DECALS: |
one aircraft |
|
REVIEWER: |
|
|
NOTES: |
Short run injected plastic kit |
|
BACKGROUND |
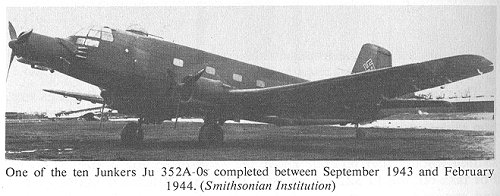
Please visit the preview to get a short history of the aircraft and a look at what is in the box.
|
CONSTRUCTION |
You know, it is difficult to toss away preconceived notions about some things. One of the ones I have is that I don't have much faith in quality French short-run kits. My few experiences with them have not been the most positive, so to myself, I've condemned the whole group. It may not be fair, but that is how I've felt about them. In doing this kit, I told myself to put that all behind me and just treat it as a short run kit, regardless of its origin. I've never built a Mach 2 kit so I headed into this one with that attitude. It will be interesting to see how things go.
 As I
mentioned in the preview, there is no cabin for this kit. All of the parts have
some level of mold flash, from minimal to a lot. All of the attachment points
are large so care must be exercised in removing the parts from the tree. Though
the low pressure molding does not provide the same level of detail that high
pressure injection molding machines provide, it does bring with it the benefit
of softer than usual plastic, so cleanup is not as arduous as it initially
appears.
As I
mentioned in the preview, there is no cabin for this kit. All of the parts have
some level of mold flash, from minimal to a lot. All of the attachment points
are large so care must be exercised in removing the parts from the tree. Though
the low pressure molding does not provide the same level of detail that high
pressure injection molding machines provide, it does bring with it the benefit
of softer than usual plastic, so cleanup is not as arduous as it initially
appears.
With this kit I started by gluing together the tail planes and the wheels. One pair of tail planes had a greater thickness at the trailing edge, but I fear that was because I did not scrape away enough of the inside of the two parts. The other side did not give me any problems. With all of the parts, you will have to scrape or sand the mating surfaces as they are generally rough and a few have intrusive ejector towers that will need cut away. I use an Xacto chisel to remove these towers and it works quite well.
I next went to the wheel wells, and after removal and clean up, these were glued into the lower wings. The instructions are really quite vague and incomplete in many cases, but careful study of what is there will provide clues to what goes where. In terms of short run kits, Mach 2 gets low marks for instructions. I clamped the wells into the lower wing and let the 'hot' liquid cement I use provide a strong bond. When that was complete, the upper wing was attached. I did have a bit of a problem with this as the wings are very long and have a dihedral change just outboard of the engines. This meant that they matched well at the tips or the root. I chose the root and made sure that the engine nacelles were as well aligned as possible. Again, clamping and 'hot' glue will cure many fit problems.
 While all of that was drying, I cleaned up the cockpit bits.
This consists of a floor with center console, a back bulkhead with some 'detail'
work on it, two seats, an instrument panel, two control columns and two control
wheels. You'll have to drill out the control column mounting holes in the floor
and I do think that the attachment stubs for the control wheels are too long,
but I didn't shorten them as I wasn't sure. The seats also have some holes in
them from the ejectors, but I didn't fill them. If you are doing a detailed
cockpit, you'll need to do that or replace the seats. One thing that is for sure is that
you'll not be able to see into the cockpit very well through the distorted clear
parts so unless you vac a replacement, I wouldn't put too much work into cockpit
detailing. All of the parts were glued together, using the alignment guides in
the fuselage half to make sure everything fit ok. At this time I also cleaned up
and installed the tail wheel well.
While all of that was drying, I cleaned up the cockpit bits.
This consists of a floor with center console, a back bulkhead with some 'detail'
work on it, two seats, an instrument panel, two control columns and two control
wheels. You'll have to drill out the control column mounting holes in the floor
and I do think that the attachment stubs for the control wheels are too long,
but I didn't shorten them as I wasn't sure. The seats also have some holes in
them from the ejectors, but I didn't fill them. If you are doing a detailed
cockpit, you'll need to do that or replace the seats. One thing that is for sure is that
you'll not be able to see into the cockpit very well through the distorted clear
parts so unless you vac a replacement, I wouldn't put too much work into cockpit
detailing. All of the parts were glued together, using the alignment guides in
the fuselage half to make sure everything fit ok. At this time I also cleaned up
and installed the tail wheel well.
Then the interior and inside of the fuselage was painted RLM 66 dark grey. Some small detail items were picked out in black in the cockpit and the cockpit was then glued to the fuselage half once the paint was dry. Then it was time to put in the cabin windows. My clear sprue was slightly short shot and I was short a transparency. These needed cleaned up as did the openings, which were actually too small. Naturally, I lost the smallest one that goes in the door so that meant two holes to fill with white glue. It was a fairly tedious job.
Back at the wings and tail planes, they were sanded down and whatever filler needed was applied. I then cut the engines off the sprue and spent some quality time cleaning up a bunch of the flash that was on them. I then cut off the engine cowlings and glued one of them together. Did I mention that I had to clean up the parts? When the cowling was dry, I tried to insert the engine through the front opening. It worked better than I'd have thought. This helps a lot as one can now more easily clean up the cowlings without having to sweat the engines getting in the way.
 Returning to the fuselage, the join between
the two sides was properly slathered with filler and sanded down. On the next
one that needs this much filler, I'll use some A+B epoxy putty as it doesn't
shrink and can be formed with a wet finger before it is fully cured. Also during
this time, I cemented together the other engine cowlings and sanded down the
wings and tail planes to get rid of some surface glitches. Be sure not to sand
off the hinge attachment guides on the lower wings. Fortunately, most of this
plane was made of wood so a smooth surface would be normal.
Returning to the fuselage, the join between
the two sides was properly slathered with filler and sanded down. On the next
one that needs this much filler, I'll use some A+B epoxy putty as it doesn't
shrink and can be formed with a wet finger before it is fully cured. Also during
this time, I cemented together the other engine cowlings and sanded down the
wings and tail planes to get rid of some surface glitches. Be sure not to sand
off the hinge attachment guides on the lower wings. Fortunately, most of this
plane was made of wood so a smooth surface would be normal.
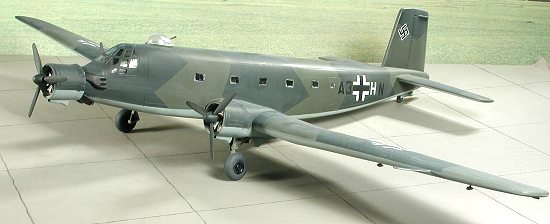
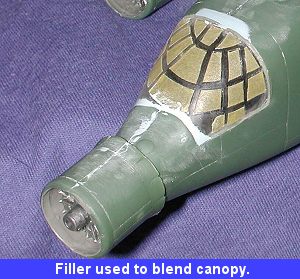
Moving to the front of the plane, I masked and then installed the cockpit canopy. The fit of this wasn't too bad. It rode a bit high in the back and a bit low in the front, but some filler took care of that without too much trouble. Then the tail planes were glued on. These are actually keyed so that you cannot put them on the wrong side. Of course, a bit of filler was needed.......
While all that was drying, I
attended to the other engine cowlings. They were glued together and then filled
and sanded. The other engines were inserted. It was now time
 to glue them onto
the nose and wings. The fit here was not at all good. More of a case of
'they fit where they touch' sort of thing. The joins were flooded with cement
and they were then pressed onto place, aligning them as best I could. When
I got finished, they just didn't look right. Wasn't sure just what the problem
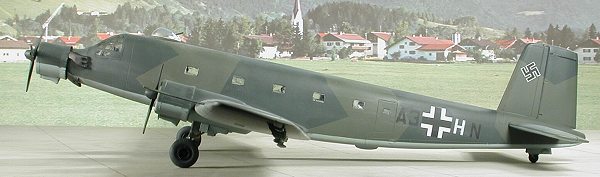
could be until I took a look at a photo of the plane. The engine cowlings are
too short The wing ones could pass, but not the one on the nose. If you
look at the photo, you can see the difference. The only fix is to cut them in
half and insert a plug of some sort. The next one I build, I promise I'll do
that!
to glue them onto
the nose and wings. The fit here was not at all good. More of a case of
'they fit where they touch' sort of thing. The joins were flooded with cement
and they were then pressed onto place, aligning them as best I could. When
I got finished, they just didn't look right. Wasn't sure just what the problem
could be until I took a look at a photo of the plane. The engine cowlings are
too short The wing ones could pass, but not the one on the nose. If you
look at the photo, you can see the difference. The only fix is to cut them in
half and insert a plug of some sort. The next one I build, I promise I'll do
that!
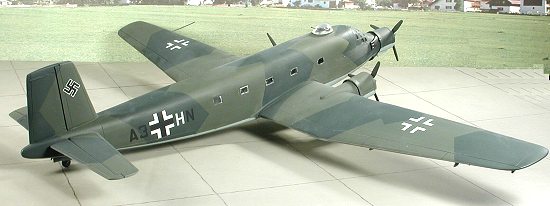
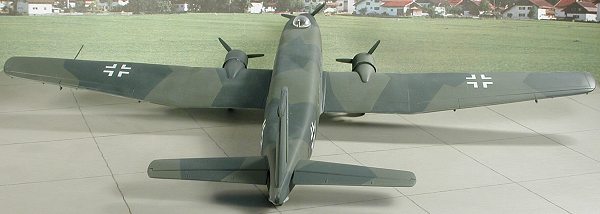
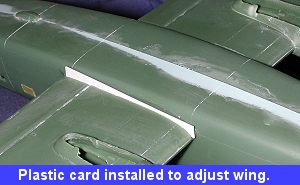 With the engines in place, the wings were glued on. The
left wing was glued in place first. It fit rather well. Not so the right one. It
tended to droop so I inserted a section of plastic strip in the lower wing root
to keep it at the same angle as the other. This was then trimmed flush and the
seam (as well as that on the other wing) was filled and sanded smooth. The plane
was complete enough to attempt some 'test' flights. This really is a big
aircraft with a wingspan that rivals the Lincoln bomber I have hanging from the
wall. A few minutes later, it was back in the shop to have more stuff added.
This time, I concentrated on the upper turret. This was a relatively simple
task. Once it was cleaned up and the hole in the upper fuselage opened up to the
proper size, I simply glued it in place. Flipping the model over, the flap and
aileron hinges were cleaned up and glued on.
With the engines in place, the wings were glued on. The
left wing was glued in place first. It fit rather well. Not so the right one. It
tended to droop so I inserted a section of plastic strip in the lower wing root
to keep it at the same angle as the other. This was then trimmed flush and the
seam (as well as that on the other wing) was filled and sanded smooth. The plane
was complete enough to attempt some 'test' flights. This really is a big
aircraft with a wingspan that rivals the Lincoln bomber I have hanging from the
wall. A few minutes later, it was back in the shop to have more stuff added.
This time, I concentrated on the upper turret. This was a relatively simple
task. Once it was cleaned up and the hole in the upper fuselage opened up to the
proper size, I simply glued it in place. Flipping the model over, the flap and
aileron hinges were cleaned up and glued on.
I then started to attach the lower radiators under the engine, but realized that 'hey, there are already some small ones there'. Well, it so happens that I screwed up. Those smaller radiator inlets are actually the carburetor intakes and they are supposed to be facing to starboard. Yes, I installed the engines off by 90 degrees. This may help explain the problem that I had getting the engines in place. Well, thanks to the incredible bonding abilities of Ambroid Pro-Weld, I was unable to pull any of the engines off, so I did the next best thing and cut off the offending carb intakes. The radiators were then glued over the holes that were made. If you didn't know the carb intakes were going to be there, you'd not think anything was amiss. I then went to the rear of the aircraft and glued in the tail wheel strut assy.
|
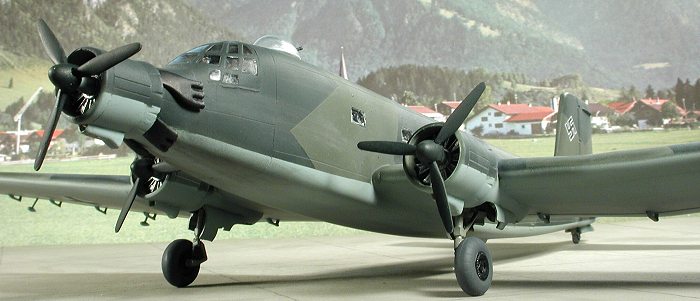
CAMOUFLAGE |
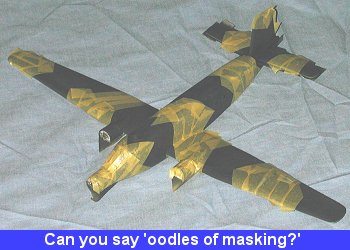 After that mini-fiasco, the only
thing left to do was to start painting. The entire underside of the kit was
painted RLM 65 using some of my dwindling stash of Aeromaster enamels. When dry,
the RLM 65 area as masked off. It takes quite a bit of tape. The upper surface
was painted RLM 70, again, using Aeromaster enamels. When dry, I masked it using
the kit instructions as a general guide. This took even more time, but really,
one can't free-hand this type of scheme and have it look decent. I then decided
that previous models painted with RLM 71 were too dark so I added a touch of
white to it. This was sprayed on. However the contrast was way too great. I then
poured out all of the paint (which really wasn't much) and added fresh RLM 71
(again, using Aeromaster enamels). This was applied and was MUCH better. It
wasn't as close to the RLM 70 as it had been and so should show some contrast.
When the masking was removed, I used 1200 grit paper to gently sand the ridges
that inevitably showed up along the borders. Then it was back to the bench to
have some more parts added.
After that mini-fiasco, the only
thing left to do was to start painting. The entire underside of the kit was
painted RLM 65 using some of my dwindling stash of Aeromaster enamels. When dry,
the RLM 65 area as masked off. It takes quite a bit of tape. The upper surface
was painted RLM 70, again, using Aeromaster enamels. When dry, I masked it using
the kit instructions as a general guide. This took even more time, but really,
one can't free-hand this type of scheme and have it look decent. I then decided
that previous models painted with RLM 71 were too dark so I added a touch of
white to it. This was sprayed on. However the contrast was way too great. I then
poured out all of the paint (which really wasn't much) and added fresh RLM 71
(again, using Aeromaster enamels). This was applied and was MUCH better. It
wasn't as close to the RLM 70 as it had been and so should show some contrast.
When the masking was removed, I used 1200 grit paper to gently sand the ridges
that inevitably showed up along the borders. Then it was back to the bench to
have some more parts added.
|
ADDING MORE BITS |
 The next items attended to were the wheel wells and landing
gear. First, the gear wells were painted RLM 02 using a brush and Model Master
RLM 02 enamel. Then I cleaned up the actuating rods and started to install the
main landing gear. I got the left main gear strut and brace in without any
problems. When it came to the right, there was something odd about it. It was
exactly like the left! Hmm..... Looking at it, I realized I'd been foxed by the
flat areas on the strut where the oleo scissor was glued. It was on the wrong
side of the strut for the right side. I clipped off the scissor and reglued it
on the proper side. Now I had a nice flat spot that isn't supposed to be there
on the right strut! Well, no one said this was going to be a perfect
model!
The next items attended to were the wheel wells and landing
gear. First, the gear wells were painted RLM 02 using a brush and Model Master
RLM 02 enamel. Then I cleaned up the actuating rods and started to install the
main landing gear. I got the left main gear strut and brace in without any
problems. When it came to the right, there was something odd about it. It was
exactly like the left! Hmm..... Looking at it, I realized I'd been foxed by the
flat areas on the strut where the oleo scissor was glued. It was on the wrong
side of the strut for the right side. I clipped off the scissor and reglued it
on the proper side. Now I had a nice flat spot that isn't supposed to be there
on the right strut! Well, no one said this was going to be a perfect
model!
|
PAINT & DECALS |
Decals were a piece of cake. There is darn little to an aircraft like this
other than insignia and codes. I decided to use as much of the kit sheet as I
could. First I tried the swastika. It was too large for the fin. I'm also
suspicious of the style that was offered. A smaller one from an Xtradecal sheet
worked just fine. The upper wing crosses and fuselage crosses were both just
plain white outlines. Fine for the upper wings but probably not the fuselage,
which would be an older style with the thin
 black outline. Those under the wings
were basic black centers with thick white borders. They could also be the same
with thin black outlines. I substituted the fuselage ones with a pair from an
old Microscale sheet of insignia that looked much more reasonable.
black outline. Those under the wings
were basic black centers with thick white borders. They could also be the same
with thin black outlines. I substituted the fuselage ones with a pair from an
old Microscale sheet of insignia that looked much more reasonable.
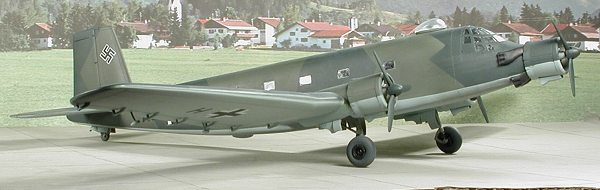
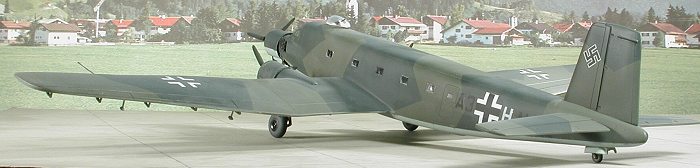
The fuselage codes were used as supplied. I was suspicious of the coding so grabbing my 'Luftwaffe Codes, Markings and Units 1939-45' book (a fine book, but really only for the very anal), I found that the A3+HN code was actually for a Ju-352A-0, so that was fine. Not sure if the last two letters of the code would be under the wings, though I do know that often the aircraft letter (the one after the +) were often carried under wing. Only one H was supplied so that was placed under one of the wings. The decals were all treated to Solvaset. The kit ones are a bit soft in detail and the white is slightly transparent. More dedicated modelers will probably want to replace them all with aftermarket.
|
FINISHING THINGS UP |
Once cleaned off, the kit was then sprayed with matte clear using my standard mix of Tamiya flat base and Future. It was then back to the work bench for the final pieces. First the aileron mass balances and the pitot tube were installed. The kit pitot tube is really a mess and would best be replaced with a section of tubing. However, on kits that are sent in for review, I use as much of what's in the box as I can. With those on, I did some touch-up spraying, making sure the decals were protected from overspray.
 Next, the gear doors were glued on.These have a rather large lip that is most
helpful when it comes to attaching them. The lip is actually too big for the
model, but then again, this isn't going to any contests so is not a worry in
that respect. Moving to the front of the engine, the exhaust were glued in
place. Fit was quite good, though again, not perfect. The exhaust had been
painted Burnt Iron metallizer before attaching. Oddly, there are no exhaust for
the wing engines. Not even a hint of how they got rid of the exhaust gasses!
Next, the gear doors were glued on.These have a rather large lip that is most
helpful when it comes to attaching them. The lip is actually too big for the
model, but then again, this isn't going to any contests so is not a worry in
that respect. Moving to the front of the engine, the exhaust were glued in
place. Fit was quite good, though again, not perfect. The exhaust had been
painted Burnt Iron metallizer before attaching. Oddly, there are no exhaust for
the wing engines. Not even a hint of how they got rid of the exhaust gasses!
With that done, I turned my attention to the upper turret. I debated over whether this should be RLM 66 on the inside and in the end left it the upper surface color. The gun that came with the kit snapped when I tried to remove it from the sprue so I used a spare from the recently reviewed Ju-88T kit. Once that was installed and painted, the 'clear' turret top was glued in place. Next step was the removal of the masking from the windows. I looked in the box and found I'd forgotten the mud guard on the tail wheel so that was glued in place and painted RLM 02. Final installation were the props. The holes in the front of the engines had to be opened up to accept the shafts. I also had to trim the shafts about half in order to have the props fit. A touch of superglue held them in place. I then used white glue to make the missing cabin windows. Final step was to use pastels to simulate the front engine exhaust.
|
CONCLUSIONS |
Only a company like Mach 2 could produce a kit like this. It is thanks to the hard work of the various short run model makers that unusual and exotic aircraft are available to us. That does not mean that this kit is for everyone. You really need to have a number of less involved short run kits under your belt and even then, the results will not be contest winners. However, if you are willing to use this kit as a basis for a more involved model, or you really want to add this aircraft to your collection or if you just want something to enliven the next meeting of your modeling friends, then this one that will definitely do it. Recommended to experienced modelers only.
August 2002
Copyright ModelingMadness.com. All rights reserved. No reproduction in part or in whole without express permission from the editor.
If you would like your product reviewed fairly and fairly quickly , please contact the editor or see other details in the Note to Contributors.
Back to Reviews Page 2015