AMtech 1/48 Ta-183
|
KIT # |
484601 |
|
PRICE: |
$39.95 |
|
DECALS: |
6 options |
|
REVIEW & |
|
|
NOTES: |
Kit being reviewed is a test shot with no decals or instructions provided. |
|
ALTERNATE HISTORY |

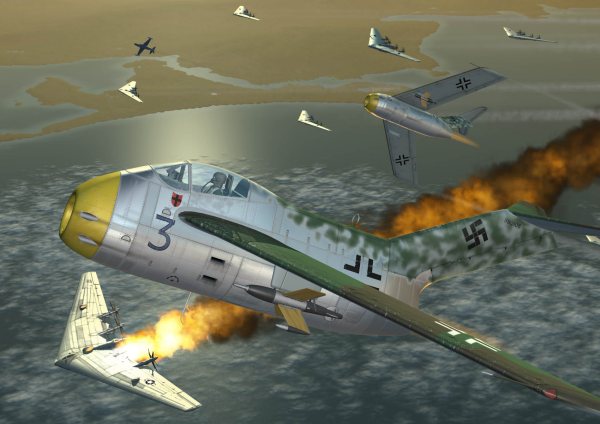
Maj. Rudolf von Erich was sitting in the mess hall with his other pilots, eating breakfast and wondering how he had gotten himself in this mess. 'I can only blame myself for this situation, he thought, 'had I not wanted one of these new wunderjets, I'd be happily back in Moscow instead of this bug infested hell-hole.
What he was referring to was his desire to get the new Ta-183 for his unit. They had been flying Ta-152Hs and had been quite pleased with the plane's performance, but the papers were all about the 'turbos' and his men had pleaded with him to use his influence to get them jets. What he hadn't realized was that by doing so, they would be send here to Kansk in the southern part of the Central Siberian Plateau.
'This place really stinks. It is freezing cold in the winter, hotter than the depths of Hell in the summer and has bugs everywhere! Fortunately, they had arrived in spring which was probably the best time of the year to be here (if it wasn't for the bugs!). It is also fortunate that their planes had no problem ingesting them into the intakes, though they made a real mess of the windscreens!
Their posting at this particular place was deemed necessary for two reasons. One was to help defend the town from attack by Allied bombers. The other was to supply ground attack capabilities for the Wehrmacht. The Wehrmacht still had not been successful in getting into India thanks to the combined efforts of the Allies in keeping them out. Having Japan out of the war against them allowed them to put more troops in South Central Asia. It was odd the way that Japan got out of things.
 The Japanese signed a separate treaty with the US after they had managed to win a
decisive victory at Midway. After
taking over Hawaii and basically isolating the US, there was a growing pacifist
movement in America that wanted the country out of the war before the mainland
was invaded. This allowed the Japanese to sign a non-aggression pact with the
United States that allowed the Americans to keep supplying arms to the British
and other Commonwealth forces, but did not allow direct involvement in the
Pacific theater nor against the other Axis partners. This was basically what the
Japanese wanted as there was no way they could successfully invade such a huge
country! A result of this was that
the US also pulled out of Europe. American ships supplying goods to the
Commonwealth were fair game for submarines past certain points in the ocean, so
it wasn't a freebie for the US. Hitler wanted to occupy the States, but the
Japanese knew it wasn't in their best interests and wouldn't allow it.
Therefore, the US was allowed to keep things as they were
with no interference. Only direct invasion of North or South America by an Axis
partner would void
the agreement with the Japanese.
The Japanese signed a separate treaty with the US after they had managed to win a
decisive victory at Midway. After
taking over Hawaii and basically isolating the US, there was a growing pacifist
movement in America that wanted the country out of the war before the mainland
was invaded. This allowed the Japanese to sign a non-aggression pact with the
United States that allowed the Americans to keep supplying arms to the British
and other Commonwealth forces, but did not allow direct involvement in the
Pacific theater nor against the other Axis partners. This was basically what the
Japanese wanted as there was no way they could successfully invade such a huge
country! A result of this was that
the US also pulled out of Europe. American ships supplying goods to the
Commonwealth were fair game for submarines past certain points in the ocean, so
it wasn't a freebie for the US. Hitler wanted to occupy the States, but the
Japanese knew it wasn't in their best interests and wouldn't allow it.
Therefore, the US was allowed to keep things as they were
with no interference. Only direct invasion of North or South America by an Axis
partner would void
the agreement with the Japanese.
The result was years of slow progress (and I mean slow). Here it was early 1946 and they still had not managed to successfully invade Britain or get Russia totally conquered. Even the Japanese were having trouble with the Russians in Manchuria and Mongolia. Despite having little in the way of factories or infrastructure, the Soviets fought for every centimeter of ground. Unfortunately, they were getting supplied by the Allies; mostly American equipment funneled through the British! How they managed to pay for it was anyone's guess.
Well, back to the day's missions. Today there was a major push to the east and nearly all of his aircraft would be used for that. He had two units armed with X-4 missiles to fly top cover against Russian planes; the rest would be armed with bombs and be attacking the troops. Naturally, I'll be flying top cover. One doesn't get a tail full of kill markings by dropping bombs!
As he strode out to his new plane, he wondered at the design. 'If I were to name this thing, it would have to be called a Toad! That short fuselage and skinny rudder doesn't even give one an opportunity to properly display one's kill markings!' He did the usual walkaround, checking to make sure that the missiles were properly installed and that the wires were properly connected. Learning how to use these wire-guided missiles was quite a task, but they are quite effective against large aircraft.
He clambered into the cockpit, where his mechanic strapped him in and made sure all was secure. With a wave, the engine was spun up to speed. At the proper RPM the engine lit, the starter cart was pulled away and the plane went bouncing over the rough ground to the assigned take-off area. Checking radios, the flight was given the go-ahead and quickly leapt into the air trailing a cloud of dust.
They headed in a north easterly direction to cut off any Soviet intrusions. After patrolling for a few minutes, ground control directed them to a flight of incoming aircraft at around 5,000 meters. Heading to 6,000 meters, the flight streaked towards the blip on ground radar sets. Shortly, they spotted aircraft below them.
Heading toward them, they could not see any markings on the upper wings of the sand and spinach colored aircraft. Getting even closer, they noticed that they were indeed Russian aircraft, a present from America, gun-nosed A-26 Invaders. These planes were particularly good at ground attack and general bombing. Though not jets, they were fast and hard to hit.
 Shouting 'Horrido' over
the radios, Maj. von Erich and his flight headed for the Soviets. He armed two
outboard X-4s in preparation for his first attack. It was best to fire these off
in pairs (especially the outboard ones) as not doing so caused a rather bad asymmetrical yaw that could
cause the pilot to lose control. As he neared his target, the defensive guns of
the Russian bombers opened up. At a range of just under two kilometers,
he fired the missiles and directed by the smoke from them, headed them for the
center bomber in the nearest box.
Shouting 'Horrido' over
the radios, Maj. von Erich and his flight headed for the Soviets. He armed two
outboard X-4s in preparation for his first attack. It was best to fire these off
in pairs (especially the outboard ones) as not doing so caused a rather bad asymmetrical yaw that could
cause the pilot to lose control. As he neared his target, the defensive guns of
the Russian bombers opened up. At a range of just under two kilometers,
he fired the missiles and directed by the smoke from them, headed them for the
center bomber in the nearest box.
Upon seeing the smoke, the Russians started to scatter, but thanks to his careful guidance, one of his missiles hit the fleeing Invader blowing off a wing in the process. Chalk up one more kill! After peppering the rest of the planes with a few rounds of 30mm, he gained altitude and selected the two inboard missiles. Turning back around, he looked for more bombers. He could see the smoke trails from his comrade's X-4s and so headed in that general direction. The Soviet planes had headed for the deck in order to be more difficult targets.
Selecting a plane, he chased it for a while and then fired his other two missiles. Tracking the plane, the missiles got closer and closer. Just as they were about to hit, the A-26 pilot pulled up as hard as he could without stalling the plane and the X-4s passed underneath the tail to impact with the ground.
'Damn', he thought, 'They did it to me again!' This quick pull up was the easiest way to avoid these missiles as it not only pulled the plane out of the direct line of fire, but the sudden change in speed of the target plane made it nearly impossible to correct the trajectory of the missile to hit.
Looking around, he saw basically empty sky. He also noted that lots of fuel he did not have, so calling together the rest of his unit, he headed back to Kansk to prepare for another mission. 'One of these days they will develop a missile that I don't have to steer. One of these days......'.
|
THE KIT |
Please see the preview to see what is in the box.
|
CONSTRUCTION |
As you probably read earlier, this is a first kit from a brand new company. AMtech is planning several other kits in various scales of equal quality to this one and their second release, The P-40E, is one that I know a bunch of people have been waiting for. If it is anywhere as good as this one, they will have trouble keeping up with the orders!
The first thing I did was to decide how I wanted my Ta-183 to be built. It was finally decided to use all of the available options on this one. That meant opening the holes in the wing for the X-4 missile pylons before gluing the wings together. Fit of the wings was superb and no filler was used on them at all, just sanding of the glue that squeezed out of the seams.
 The cockpit was the next assembly to tackle. I glued the control
stick into the tub and then gave all the cockpit components a coat of Testors
ModelMaster RLM 66 enamel. While I had the parts in the paint room, the wheel
wells, weapons bay, and inside gear doors were painted RLM 02, again using MM
enamels. Landing gear components were sprayed semi-matte black as were the
wheels. Outer gear doors got a coat of RLM 76 using Aeromaster enamels.
The cockpit was the next assembly to tackle. I glued the control
stick into the tub and then gave all the cockpit components a coat of Testors
ModelMaster RLM 66 enamel. While I had the parts in the paint room, the wheel
wells, weapons bay, and inside gear doors were painted RLM 02, again using MM
enamels. Landing gear components were sprayed semi-matte black as were the
wheels. Outer gear doors got a coat of RLM 76 using Aeromaster enamels.
When dry, the parts were taken back to the modeling bench. At this time, the instruments on the consoles and instrument panel were brush painted black as was the gun sight. The cushions on the seat were painted leather. The wheel wells were installed in the slots in the fuselage. Both the main wells fit superbly; make sure the holes are to the rear or you'll get the gear in backwards. The front wheel well also fit extremely well.
When the cockpit was dry, it was glued into the fuselage. You cannot install this wrong as there are positive locators that keep it firmly in place. The fuselage halves were then glued together. All the bits fit quite well with no problems at all. Naturally, I needed a touch of filler on the seams, but this is true form me even the Tamiyagawa kits. While all this was drying, I assembled the X-4 missiles. These fit together fairly well, but I managed to damage the fins. I broke some aft ones and gouged the trailing edges of a few of the forward fins. I also noted that the body of the missile isn't circular where the main fins are attached next to the join area. I guess it is part of the molding process, but they are flat in that area and are not supposed to be. You can see this if you look closely at the X-4s in the lead image. Those who want perfect missiles will want to fill in that area and add the trim tabs the missile carried to allow them to spin. You'll also want to reshape the aft fins as they are not exactly the same shape as I have seen in drawings and photographs. Hopefully these will be remedied before the kit hits the market.
Getting back to the rest of the kit, the engine exhaust area was glued in at this time. I had decided to do the Junkers Jumo 004 version. It is a bit longer than the He 109-011 engined version and has an aerodynamic bullet in it, just like on the Me-262. Test fitting the two exhaust sections, I found the Jumo one fit a bit better as the Heinkel engine piece had a bit of a gap near the base of the tail. Again, this kit was a test shot so some of these things are expected.
 It was obvious by test fitting the wings that this plane can be
a tail sitter. Fortunately, there is lots of room for weight in the nose
section, so I installed three largish fishing weights in under the cockpit to
take care of that. When dry, the nose piece was glued on. This bit is just a tad
smaller than the surrounding fuselage, so some filler and extra sanding was
needed to smooth things out.
It was obvious by test fitting the wings that this plane can be
a tail sitter. Fortunately, there is lots of room for weight in the nose
section, so I installed three largish fishing weights in under the cockpit to
take care of that. When dry, the nose piece was glued on. This bit is just a tad
smaller than the surrounding fuselage, so some filler and extra sanding was
needed to smooth things out.
Once the fuselage was properly fillered (yes, you too can invent words) and sanded smooth, the wings were attached. The fit is so good that you might be inclined not to even glue them in place. Yup, the fit is really that good! Then the tail was glued on to the top of the fin. There is a small ejector pin mark on the center of this that needs cleaned up first. It takes just a few moments of sanding to cure. With the tail attached, I now had a complete airframe. Total time from start of gluing to this point, about 24 hours.
The canopy was then attached and then masked off. The wheel wells were also masked using tissue and tape. Once that was done, it was time to head to the paint shop again for some overall painting.
|
PAINT & MARKINGS |
 I wasn't really sure about what colors to paint this one. One thing I did
know was that the underside was going to be RLM 76 so the underside surfaces as
well as the side of the tail and the wing pylons were painted this color. Having
then decided on a scheme, I painted the wing tips and the rear fuselage white
and then yellow. These areas were masked and the upper camouflage colors of
RLM 82/83 were applied in a freehand camo pattern. Naturally, there was the
usual back and forth stuff to get the demarkation lines just right. When dry,
the masking was removed from the wing tips and fuselage band and the kit was
given an overall coat or two of gloss clear in preparation for decals. But
first, more construction was needed.
I wasn't really sure about what colors to paint this one. One thing I did
know was that the underside was going to be RLM 76 so the underside surfaces as
well as the side of the tail and the wing pylons were painted this color. Having
then decided on a scheme, I painted the wing tips and the rear fuselage white
and then yellow. These areas were masked and the upper camouflage colors of
RLM 82/83 were applied in a freehand camo pattern. Naturally, there was the
usual back and forth stuff to get the demarkation lines just right. When dry,
the masking was removed from the wing tips and fuselage band and the kit was
given an overall coat or two of gloss clear in preparation for decals. But
first, more construction was needed.
|
MORE CONSTRUCTION |
In order to get things ready for decals, I had to put the kit on its landing gear. These had been painted black as late war aircraft could have had them in RLM 02 or even RLM 66 so you have a choice. Any overspray in the wheel wells was also touched up by brush at this time. I also picked out some components inside the wells in various colors and also painted the retraction strut molded in the nose gear in black. The wells were given a wash and then some drybrushing.
The oleos on the landing gear were covered in Bare Metal Foil chrome and then the struts glued in. Fit is very good, especially the nose gear. You do have to keep an eye on the main gear to make sure they dry at the same angle. Perhaps superglue wouldn't be a bad idea for these, though I didn't use it. Attaching the main wheels was easy; just put glue on the axles and slide them in place. The nose wheel fits between the two forks on the nose gear. It is a tight fit and no glue was needed.
Now the missile pylons were glued on as were the landing gear doors. It is quite possible that I glued the pylons on backwards as I had no instructions and did not see the box top until after the kit was built! The fit of the gear doors is the best I have seen in a long time. No problems whatsoever. The main gear doors have a strut that fits to them and the fit is positive, so no worries about things sliding around.
 Fitting the X-4 missiles was not a problem either. The attachment points are
well done and help with proper alignment. I had painted these RLM 02 with black
noses. Superglue was used to get them attached. I did notice that the missiles
are not all identical. In fact, they are handed. Not having instructions, I
wasn't sure which way was the proper one so put them on in a manner that looked
symmetrical.
Fitting the X-4 missiles was not a problem either. The attachment points are
well done and help with proper alignment. I had painted these RLM 02 with black
noses. Superglue was used to get them attached. I did notice that the missiles
are not all identical. In fact, they are handed. Not having instructions, I
wasn't sure which way was the proper one so put them on in a manner that looked
symmetrical.
At this time, I press fit in place the optional bomb bay with the drop tank. The bay was first painted RLM 02 like the landing gear bays and the edge was then brush painted with RLM 76. There are spots for two shackles to fit in there. You are given four in the kit and that is great as I broke one of them removing it from the sprue. The drop tank was assembled, painted RLM 76 and glued on the shackles. I'm sure that a bomb from the spares bin would have fit just as well. I wanted most options on the kit so that is why I included the bomb bay assembly. I'm thinking that normally the plane wouldn't be weighted down with the drop tank and the missiles. However, it is easy to remove the bomb bay and snap the smooth cover in place. The fit is that good. The kit was then ready for decals.
|
DECALS |
Well, the problem with doing test shots is that often they do not come with decals. No worries as we long-time modelers often have a ton of excess decals laying about. I happened to come across an old sheet for a Fujimi Fw-190D that I built more than 15 years ago. From it I used the insignia, the commander's chevron, and the unit badge for I/JG 54, which was appropriate since I was doing a Russian Front aircraft. The swastika came from an Xtra Decal sheet of swastikas and the kill markings from a Monogram Fw-190A sheet. They all worked very well and succumbed to setting solutions. The Fujimi fuselage insignia is a bit transparent and you can see the demarcation between the light band and the darker camouflage. Oh well! Once all those were on and dry, the plane was given a coat of semi-matte clear acrylic and left to dry.
The last bits of construction were the installation of the exhaust cone (again, just pressed in place as it fit so well) the removal of the tape from the canopy, and the addition of the boarding ladder (which is a bit fragile and would have probably been broken off earlier).
|
CONCLUSIONS |
To say that I'm pretty psyched about this kit would be an understatement. I have not seen such high quality in both molds and engineering from a new company in a very long time. I can only encourage you to support the folks at AMtech by buying this and other kits. I can tell you that some very interesting subjects are coming, but they need your support to make those a reality. (Late note: AMtech has been out of business for several years due to a near death accident of its founder. I doubt they will be returning.)

Thanks to
 for the review sample.
If you would like your product reviewed fairly and fairly quickly, please contact the editor or see other details in the Note to Contributors.