|
KIT: |
Hasegawa 1/72 FW-190D-9: |
|
KIT # |
51638 (AP 108) |
|
PRICE: |
$16.98 MSRP |
|
DECALS: |
Two Aircraft |
|
REVIEWER: |
|
|
NOTES: |
|
HISTORY |
Late in the Second World War, German fighter ace and hero, Adolf Galland, was ousted as General of the Jagdwaffe due to his alleged incompetence and inability to prevent Allied bombers from laying waste to Germany. Actually, the story is much more complicated than what it seems as it always is when political in-fighting gets to be the most important part of the job and not the mission at hand.
Needless to say, Galland was a bit on the insubordinate side, but not enough to have him shot. Instead, he requested to start a new jet unit called JV-44 and to use not only the Me-262, but to call in the best pilots (that were left) from around the Luftwaffe to join him. The word spread and a number of very famous and capable pilots joined with Galland when he got things going in early 1945. Of course, by that time of the war, the Germans were advancing to the rear at a rather high rate, so the unit spent most of its time moving and did very little in the way of shooting down enemy planes. I would not be too far off to say that in the few months of existence, JV-44 probably brought down only a few dozen planes if that many.
Now one of the problems of the 262 was that it was quite vulnerable during the landing and take-off phase. Since the Germans were unable to maintain air superiority over their own country, this meant that quite a few jets were shot down by marauding Allied fighters during this phase of operation. In order to protect the jets, most jet units had a dedicated 'protection flight', generally made up of the best piston powered fighters around, and that meant the FW-190D.
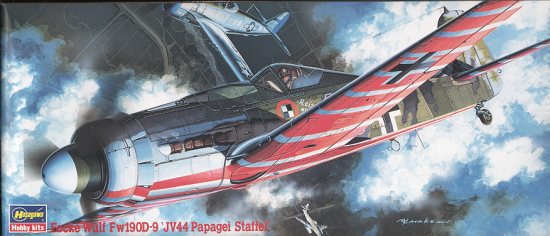
JV-44's protection flight consisted of around 4-6 planes, each with the underside gaudily painted in red (and some say black as well) with white stripes. These were to keep the local anti-aircraft batteries from blasting them out of the sky!. Due to these very colorful markings, they were called the 'papegei' or parrot Staffel. They are probably one of the most modeled units around. I can remember painting up an old Airfix 1/72 FW-190D-9 back a couple of decades ago. I used white stripe decal for the stripe and scrounged the spares box for the numbers.
|
THE KIT |
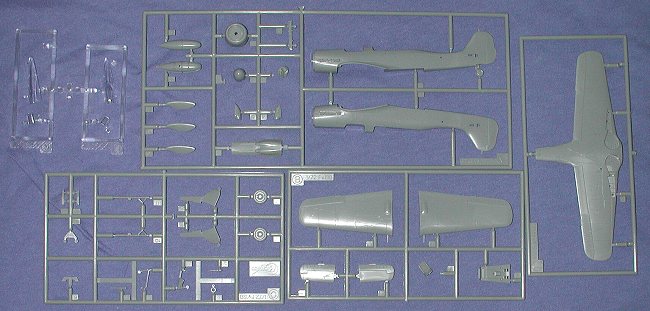
This is the second molding of the FW-190D-9 done by Hasegawa. The earlier kit wasn't bad, but it was brought up to current standards back in the late 1980s along with a number of other old Hasegawa favorites. That means the required engraved panel lines, optional bits for the head rest and canopy, and the interior that uses decals for instrument panels and side consoles. A drop tank and rack are also provided. Some 190D-9s were used in the fighter bomber role, but not often and no bomb or bomb rack is included. Thanks to Hasegawa's penchant for putting all the bits in one bag, mine had several pieces knocked off the sprue and the pitot tube had been broken off the wing tip. I'll leave it to the rivet counters to tell you if the kit has any accuracy problems, but it looks just fine to me.
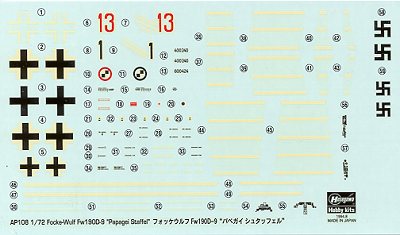
The instructions are well done and typically use Gunze paints for the color references. Markings are provided for two planes, both with red undersides and white stripes. First is red 13 in RLM 75/83 with a few spots on the fuselage/tail done in RLM 76. There are also some darker areas on the fuselage that are RLM 81. This aircraft is an early 190D-9 with the straighter hood and thinner cockpit armor mount. The other option is black 1 in RLM 82/83 uppers and areas of the fuselage/tail in RLM 76. This is a later version with the 'blown' hood and thicker armor support.
Both aircraft have separate windscreen/canopies so you can pose them
 open. If
you do the later 'blown' hood, you should remember that there was no antenna
tensioning system in it so the radio antenna just lay along the fuselage when
the canopy was open. The decals themselves are house decals from Hasegawa. That
means they are a bit thick, and the whites are actually ivory and will be a bit
transparent. The underside stripes are in large sections so you won't have to
put on each one individually. That also means there will be large areas where
silvering will be a problem, so make sure you use all the tricks when putting on
these decals!
open. If
you do the later 'blown' hood, you should remember that there was no antenna
tensioning system in it so the radio antenna just lay along the fuselage when
the canopy was open. The decals themselves are house decals from Hasegawa. That
means they are a bit thick, and the whites are actually ivory and will be a bit
transparent. The underside stripes are in large sections so you won't have to
put on each one individually. That also means there will be large areas where
silvering will be a problem, so make sure you use all the tricks when putting on
these decals!
Those of you into the 190 might want to compare this one with the Academy kit. Both kits have basically the same set of decals as well!
|
CONCLUSIONS |
This is a very nice kit and like all of Hasegawa's 1/72 kits can be made into a superb model. There are lots of aftermarket bits for it as well if you want to spend more $$ on it. It is one I can recommend to nearly all skill levels.
If you would like your product reviewed fairly and quickly by a site that has well over 150,000 visitors a month, please contact me or see other details in the Note to Contributors.