Hasegawa 1/72 FW-190A-9
| KIT #: | 51619 |
| PRICE: | $6.00 from a vendor. |
| DECALS: | Two options |
| REVIEWER: | Scott Van Aken |
| NOTES: | Includes metal prop blades and fan. 1993 Limited Edition |
| HISTORY |
The history of the Fw-190 series of fighters has been told
ad
nauseum so I'll limit this to the variant in question. The Fw-190A-9 fighter
was a development of the very successful A-8 that had been in service since late
1943. The major difference in the type was that it had a 2,000 hp BMW 801F
engine and also had armored leading edges to the wings. This was so that the
airplane could be used in ramming tactics to use the wings to cut off sections
of Allied bomber flight surfaces, such as a stabilizer or wing section.
 Two subvariants were the /R11 with a turbosupercharged BMW 801 TS engine and
the /R12 with 30mm cannon in the outer wings.
Two subvariants were the /R11 with a turbosupercharged BMW 801 TS engine and
the /R12 with 30mm cannon in the outer wings.
The Fw-190 A-8 and A-9 were also built in ground attack variants, the F-8 and F-9. These planes were reinforced for wing racks mounted on the outer sections of the underside of the wings and could carry a variety of weapons including the R4M unguided rockets, W/Gr 28 rocket tubes, anti-personnel bombs and other nasties. The F-9 differed in that it was powered by the BMW 801 TS engine like the A-9. This required a cooling fan with 14 instead of 12 blades and a propeller with wider blades than that carried on the A/F-8 versions. The F-9 started coming off the production lines in October of 1944. In January of 1945, all new 190s were fitted with the larger 'blown' hood, with many earlier machines being retrofitted. Most 190F-9s were used on the eastern front against the Soviets. It is unsure how many F-9 versions were actually built, but it is probable that the number was actually rather small.
| THE KIT |
If you have seen the Hasegawa Fw-190A-8 kit of many years back, then you have seen this kit.
In fact, all of the radial engine 190s Hasegawa has done since its 'new tool'
kit was introduced back in the 1990s are about the same. It is typical Hasegawa in that it has
finely engraved panel detailing, separate prop blades, a fair interior that uses
decals for the instrument panel and side consoles. It is also able to have
either a 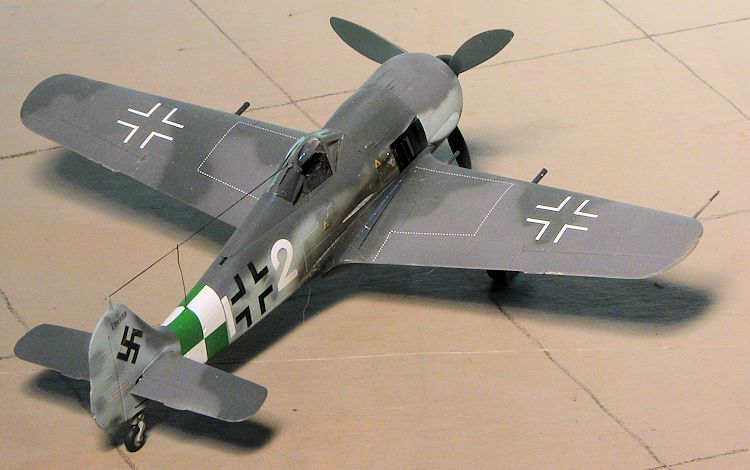 drop tank or bomb on the centerline. For the F version, you can have
bomb racks on the undersides of the outer wings. The kit instructions would have
you remove the small underwing bulges for the outer wing guns and have you fill
in the gun ports, which are not used in the A-9/R11 or the F-9 variant.
Included in the kit are new, wider prop blades and a new 14 blade cooling fan,
both done in metal.
drop tank or bomb on the centerline. For the F version, you can have
bomb racks on the undersides of the outer wings. The kit instructions would have
you remove the small underwing bulges for the outer wing guns and have you fill
in the gun ports, which are not used in the A-9/R11 or the F-9 variant.
Included in the kit are new, wider prop blades and a new 14 blade cooling fan,
both done in metal.
The instructions are all that you have come to expect from Hasegawa. They are well done and give you all you need to build the kit. Color references are for Gunze paints. You get two marking schemes for this kit. For the A-9 you can do a bird from II./JG301 in the 74/75/76 scheme that is so common on FW-190As. This one has a red/yellow fuselage band. Interestingly, the cover artwork shows this plane in late war colors of 81/82/76 so the choice is really yours! The F-9 is in 82/75/76 with a yellow nose ring and is the technical officer's plane from an unknown unit. Decals are typical Hasegawa in that they are a bit thick, but should be OK if you use caution applying them. A swastika is supplied with the sheet.
| CONSTRUCTION |
I started this one by first sanding off the shell ejector chutes on the
bottom of the wing, only to realize that this plane actually had them installed.
So I popped open another 190 kit and stole its lower wing. The next step was to
prepaint as many of the bits as I could while still on the sprue. Never mind
that I'd have to paint them again once the mold seams were fully removed, but
this just seems like the easiest way to handle things like this and I do it more
and more often. The interior bits and inside of the fuselage got a nice RLM 66.
I then started assembling the cockpit after applying the instrument panel decals
to the 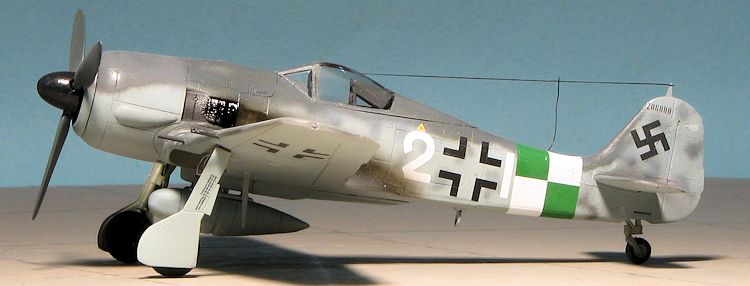 panels. I was not surprised when the decals started to break up as they
were 22 years old. For this kit, I used a set of Eduard photo etch belts and
harness, adding the harness after the airframe was complete.
panels. I was not surprised when the decals started to break up as they
were 22 years old. For this kit, I used a set of Eduard photo etch belts and
harness, adding the harness after the airframe was complete.
Once the assembled interior was completed, it was
glued into one fuselage half. I then attached the other half and added more glue
through the openings. The upper gun section was glued in place, followed by the
tailplanes. I had stupidly sanded away the lower gun ejection chutes on the kit
wings so used those on another build (reviewed last week), robbing the wing from
that kit. One thing I forgot was to drill open the holes for the upper wing
bulges (which the kit instructions did not show being done). With the wings
together (I did remember to open the holes for the centerline rack and radio
mast), I drilled out the inner guns as well as those in the upper cowling. The
wings and the forward cowling piece were then attached. Fit of the wings was
quite good 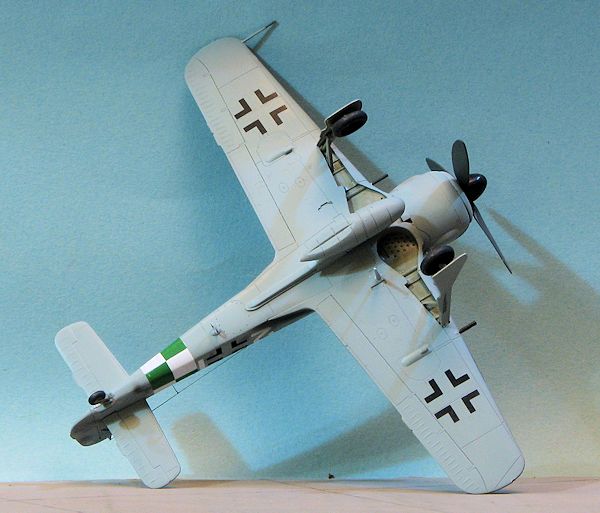 and
actually, though the molds are the same as the earlier build, the rear
wing/fuselage join was a lot better.
and
actually, though the molds are the same as the earlier build, the rear
wing/fuselage join was a lot better.
Once the wings were on and dry, I discovered that the cockpit had broken loose inside the fuselage. This was not good. Using a pair of tweezers, I grasped the control column and used that to hold the interior in place while I ran some super glue into the aft section of the cockpit. That seems to have held as it hasn't broken free. I then started to do some preliminary painting, as I was on hold for a proper canopy. You see, last week's 190F-8 used the canopy and bomb racks from this kit. I was quite pleased when a reader was able to supply a proper 'blown' canopy for use on this kit (thanks again, Nate). I then attached the seat harness, and after masking the windscreen and canopy, installed the head rest section into the canopy. These clear bits were then assembled in the closed position. You can clearly see the harness through the canopy and there really isn't all that much to see in a 190's cockpit anyway as it is very tight.
| COLORS & MARKINGS |
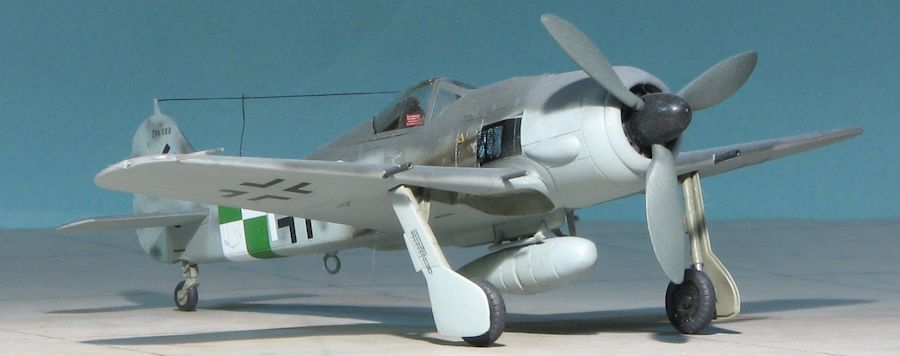
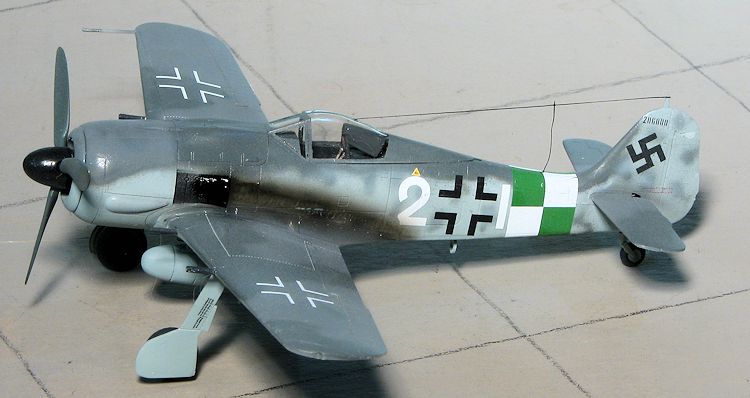
Despite being a late war FW-190A-9, the plane was painted in standard fighter camo of RLM 74/75/76. As usual, I painted the RLM 76 first, then masked some underside bits before painting the RLM 74/75 uppers. I free hand sprayed the camo and used very light RLM 75 for mottling on the middle and rear sections. In fact, it was a bit too stark so I misted on some RLM 76 to dampen the effect. Looks a lot like the decal instructions.
The wheel wells were brush painted RLM 02 and I then
installed the main landing gear. Fit of these is not very tight so one has to
keep an eye on it w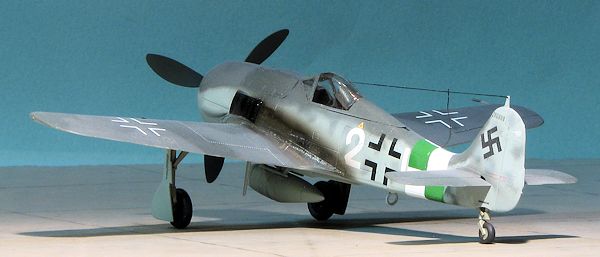 hile
it is drying. Meanwhile the metal prop blades were painted RLM 70 and the fan
section and spinner in black. Super glue was used to attach the metal props to
the metal fan. The FW-190A-9 and F-9 had a more powerful engine that required
wider prop blades and a 14 blade fan in lieu of the normal 12 blade one.
According to the folks at Eagle Cals, some of these planes reverted to 12 blade
fans as the 14 blade ones degraded engine performance. Though the kit includes
the stock 12 blade fan, I used the metal one.
hile
it is drying. Meanwhile the metal prop blades were painted RLM 70 and the fan
section and spinner in black. Super glue was used to attach the metal props to
the metal fan. The FW-190A-9 and F-9 had a more powerful engine that required
wider prop blades and a 14 blade fan in lieu of the normal 12 blade one.
According to the folks at Eagle Cals, some of these planes reverted to 12 blade
fans as the 14 blade ones degraded engine performance. Though the kit includes
the stock 12 blade fan, I used the metal one.
Once the airframe was on its gear, it got a coat of
clear gloss acrylic. For markings, I used Eagle Cals 72-166, a new sheet that
includes one FW-190A-9, this one from III./KG(J) 27 with a green and white
checkered tail band. I started by putting on the insignia and realized that I'd
forgotten to paint the area behind the exhaust outlet black. That was done and I
continued with the rest of the decals. The sheet offers a raft of stencils, but
I only used a few. The wing walk markings are provided as
very-difficult-to-see-on-the-sheet white markings. These are to be cut to length
using the placement markings. Not a fan of this approach, but it does work. In
order to prevent issues with silvering that I had on the previous build using
these decals, I used Mr Mark Softer by putting it on the airframe and setting
the decal into it. It works t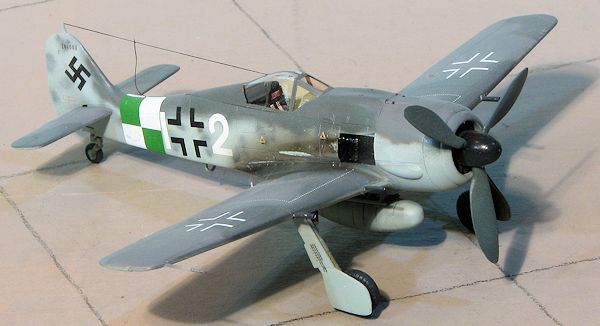 hough
one only has a very brief time to get the decal in place.
hough
one only has a very brief time to get the decal in place.
With the decals in place, I added the wheels, lower antenna, gear doors and the prop. Holes were drilled for the radio wires and the airframe given a coat of clear matte made by using Tamiya flat base and Future. One needs to get this mixture such that when looking at a bottle with the two in it after it has settled out, you will see half of it cloudy. I used Tamiya smoke for the exhaust staining by thinning it with alcohol first. That makes it much easier to control., Finally, the masking was removed and the radio antenna built using EZ Line. I seem to have trouble with the wire coming out of the fuselage. In an effort to not have this pull down on the long wire, I seem to get the feed line too loose. One of these days I'll get this right!
| CONCLUSIONS |
Despite the much nicer 190 by Eduard, I still like the Hasegawa kits. They are not as fiddly as the Airfix version and have all the various bits, something that Airfix seems to have difficulty with on its smaller kits. With still a couple of dozen Hase 190s, I don't see me doing a mass movement to other kits for a while. These are often found from vendors for a reasonable price and if you are comfortable ordering from Japan, they can be found at great prices.
| REFERENCES |
German Aircraft of the Second World War by JR Smith & Anthony Kay, 1978
November 2015
Copyright ModelingMadness.com Thanks to me for providing the kit and
Eagle Cals
for the decals. If you would like your product reviewed fairly and fairly quickly, please
contact
the editor or see other details in the
Note to
Contributors.