| KIT #: | 72032 |
| PRICE: | $12.98 when new last century |
| DECALS: | One option |
| REVIEWER: | Scott Van Aken |
| NOTES: | Short run with etched and vacuformed parts |
| HISTORY |
After the 109 had been in service for a number of years, it was
time to look for a supplemental fighter. In 1937 a request was made of
Focke-Wulf to start work on an aircraft using either the DB 601 in-line engine
or the BWM 601 12-cylinder, twin-row radial. Designer Kurt Tank chose the larger
radial engine. While this took many by surprise, it is surmised that this choice
was made because the BMW radial, being air-cooled,
 would not have radiators or
other things hanging off the airframe to spoil the aerodynamics. It also was one
less thing to worry about being damaged by enemy fire.
would not have radiators or
other things hanging off the airframe to spoil the aerodynamics. It also was one
less thing to worry about being damaged by enemy fire.
The unarmed prototype took off in June of 1939. It had a fan just behind the propeller to help cool the engine and it also had a large, ducted spinner in hopes that it would provide extra streamlining and speed. However, it just increased the engine's propensity to overheat. The second prototype also had the ducted spinner but was fitted with armament of two 13mm and two 7.7mm machine guns. Overheating was still a problem so the big spinner was discarded in favor of a close fitting cowling. While the prototype is easily recognizable as a FW-190, it went through many changes to the first production versions, the most obvious being longer wings and a shorter canopy.
| THE KIT |
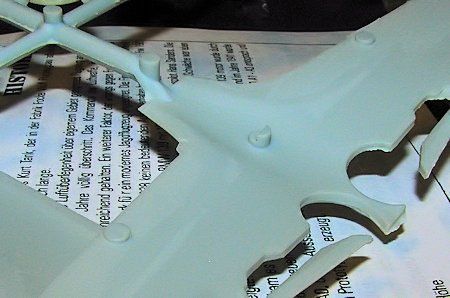 Allow me to perpetuate the cliché, 'this is a typical
early Czech
limited run kit'. It has all the standard features one expects in a 1995 vintage
short run kit; thick sprue attachment
points, flash, large ejector stubs on the big pieces, fine engraved panel lines,
a rather rough textured finish, etched brass fret, vacuformed canopy and
excellent Propagteam decals. Oddly the decals do not include a broken up
swastika, but that should not be a problem. Just to show you what I mean by
large sprue attachment points and ejector stubs, here is a look at
the lower wing piece. The incursion of the sprue into the part is typical of all
the 'flat' pieces like horizontal stabs and gear doors.
Allow me to perpetuate the cliché, 'this is a typical
early Czech
limited run kit'. It has all the standard features one expects in a 1995 vintage
short run kit; thick sprue attachment
points, flash, large ejector stubs on the big pieces, fine engraved panel lines,
a rather rough textured finish, etched brass fret, vacuformed canopy and
excellent Propagteam decals. Oddly the decals do not include a broken up
swastika, but that should not be a problem. Just to show you what I mean by
large sprue attachment points and ejector stubs, here is a look at
the lower wing piece. The incursion of the sprue into the part is typical of all
the 'flat' pieces like horizontal stabs and gear doors.
The cockpit is complete with seat, stick, floor and side consoles. The instrument panel, consoles, seat belts and rudder pedals are in etched metal. There is a film with instruments that fits behind the etched panel, though you can use the plastic instrument panel, though I don't know why as it is rather generic.
 Other etched metal parts are for
the oleo scissors, step and a canopy brace. There is no engine at all as the
spinner pretty well hides all of that. There are no holes in the spinner, the
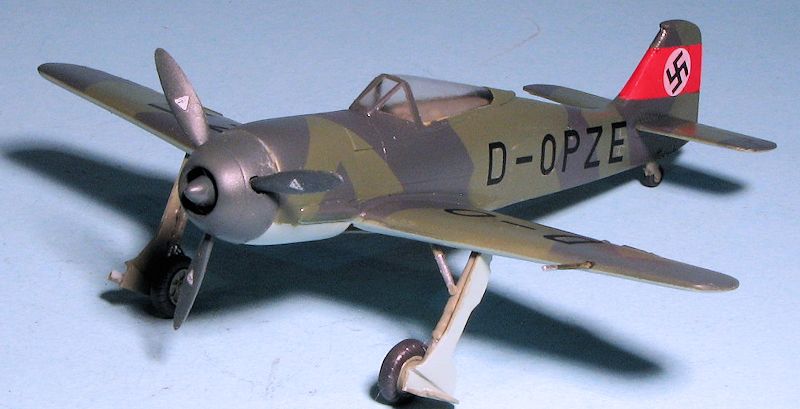
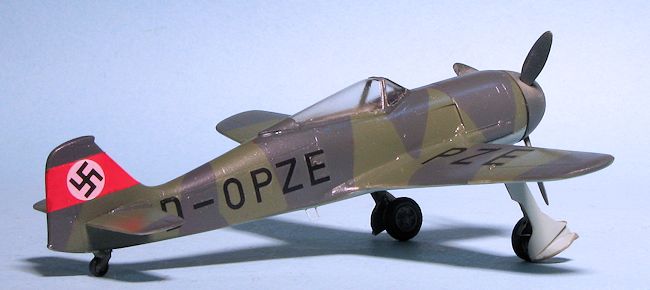
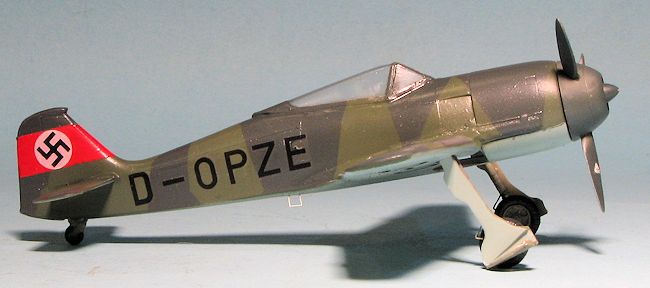
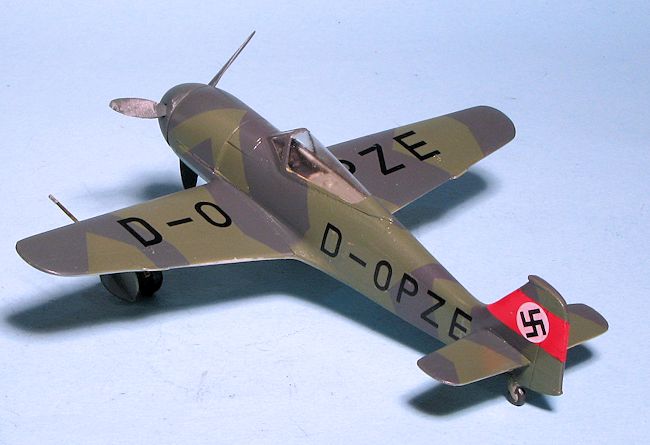
modeler needing to drill out those neat little ovals. Being the prototype, there is only one
option and that is in a splinter pattern of RLM 70/71 uppers with RLM 65 lower
surfaces. It also has a red tail stripe with a white circle in which is shown
the swastika. You'll have to paint the red tail stripe on or use a red stripe
decal from another sheet. The excellent decal sheet provides the civil codes and
white circle for the rudder.
Other etched metal parts are for
the oleo scissors, step and a canopy brace. There is no engine at all as the
spinner pretty well hides all of that. There are no holes in the spinner, the
modeler needing to drill out those neat little ovals. Being the prototype, there is only one
option and that is in a splinter pattern of RLM 70/71 uppers with RLM 65 lower
surfaces. It also has a red tail stripe with a white circle in which is shown
the swastika. You'll have to paint the red tail stripe on or use a red stripe
decal from another sheet. The excellent decal sheet provides the civil codes and
white circle for the rudder.
It looks like an easy kit to build, but I can tell you that it will take skill to do the model justice. If you like prototypes, then this is one you should have on your shelf.
| CONSTRUCTION |
The first step for me was to remove the major bits, wings and fuselage, and clean them up. In some cases the flash is thicker than the surrounding plastic, though how this is possible is beyond me. Having a motor tool is helpful with some items, like the ejector stubs.
When I started gluing, I started with the cockpit.
First I attached the seat, then, after sanding down the side console pieces
where they were square on the bottom instead of trapezoidal, these were glued in
place. Instructions are rather vague on their actual placement so I put them
forward and inboard of the
 edges. I then bent and installed the console photo
etch, which is larger than the space they are designed to fill. I also
attached the control column, which looks to be about twice as fat as it should
be. The rudder pedals are photo etch and frankly, you could leave them off as
the 190 cockpit is very small. The belts, however, cannot be left off as the
seat is the most prominent feature you see through the canopy. Once all that was
on, the interior was painted RLM 02 with bits picked out in RLM 66.
edges. I then bent and installed the console photo
etch, which is larger than the space they are designed to fill. I also
attached the control column, which looks to be about twice as fat as it should
be. The rudder pedals are photo etch and frankly, you could leave them off as
the 190 cockpit is very small. The belts, however, cannot be left off as the
seat is the most prominent feature you see through the canopy. Once all that was
on, the interior was painted RLM 02 with bits picked out in RLM 66.
Next, I cleaned up the fuselage halves and I glued together the flat section behind the cockpit and the bulkhead to which it attaches. Rather than attach this to the cockpit, I glued this assembly to the right fuselage half. I had decided to install the cockpit from the underside, especially as the indicated tabs on which the floor was to fit were not molded in the fuselage interior. Naturally, the bulkhead was too wide so had to be thinned down. With kits like this, multiple test fitting is a requirement. I then cemented the fuselage halves together, using both standard Tamiya cement and super glue to be sure things lined up properly.
The next step was to prep the instrument panel. You
are provided two options; one is a photo etch panel with acetate instruments and
the other is a plastic one. The plastic version is very blah so I used the
etched version. This is quite easily bent so I had to take care while installing
the acetate. There is also an anti-glare panel that has to fit in the cockpit
first. This piece is really a bit too wide, but I got it in place. Then I glued
in the instrument panel using super glue. While that was curing, I used my motor
tool to grind away the area where the featureless wheel well piece will fit. I
also cut out the vacuformed canopy. The
 plastic on this is properly thick, but I
found it a bit brittle, probably due to being 20 years old.
plastic on this is properly thick, but I
found it a bit brittle, probably due to being 20 years old.
I then installed the completed interior, attaching it to the rear bulkhead that was already there. The wheel well section was then installed, and thanks to my previous cutting and trimming, it fit well. The wing was then glued into place. Fit here was better than I'd have thought, again, thanks to some preparation. The rear wing/fuselage join had a gap and a step so that was taken care of with both super glue and standard filler. The tail planes were next followed by some painting and then the canopy. This had to be spread a bit and I used super glue to tack it in place, followed by clear paint to fill all the gaps.
The propeller assembly was next. The kit provides a standard
hub into which the blades are supposed to fit. Each blade has a key, though
there is no corresponding hole in the hub. Now, one has to remember that there
is an oversize spinner to fit in all this and there is a spinner backing piece
to fit behind it. One also has to open the holes in the spinner for the prop
blades. That took me some time to drill and then enlarge the openings so a blade
could fit into it. Not only that, but if one puts the hub into the spinner
backing plate, the blades do not stick straight out. Apparently the designers
did not take into account the extra thi ckness of the spinner backing plate. As a
result, I used my motor tool to grind down the places into which the blades will
fit so they will stick straight out. This actually has to be done anyway as the
hub cradles are smaller than the blade roots. One assembles this by first gluing
the hub piece (after thinning down the rear portion so it will fit flush) into
the spinner backing plate. Then one aligns this so that the blade cradles will
align with the holes that were opened. I did this by taping each blade in place
and then moving the spinner backing plate until I got the best alignment. Then
the backing plate was glued and the blades glued in place. A very fiddly
process. Finally, there is a small inner spinner. I just put glue on the blade
roots and maneuvered this piece to where it was centered as there is no positive
attachment guide for it. The entire assembly was painted RLM 70 and set aside.
ckness of the spinner backing plate. As a
result, I used my motor tool to grind down the places into which the blades will
fit so they will stick straight out. This actually has to be done anyway as the
hub cradles are smaller than the blade roots. One assembles this by first gluing
the hub piece (after thinning down the rear portion so it will fit flush) into
the spinner backing plate. Then one aligns this so that the blade cradles will
align with the holes that were opened. I did this by taping each blade in place
and then moving the spinner backing plate until I got the best alignment. Then
the backing plate was glued and the blades glued in place. A very fiddly
process. Finally, there is a small inner spinner. I just put glue on the blade
roots and maneuvered this piece to where it was centered as there is no positive
attachment guide for it. The entire assembly was painted RLM 70 and set aside.
| COLORS & MARKINGS |
With the airframe pretty complete, it
was time for paint. First the tail was painted white, then red for the fin
stripe. The underside was painted RLM 65. All this was masked and the upper
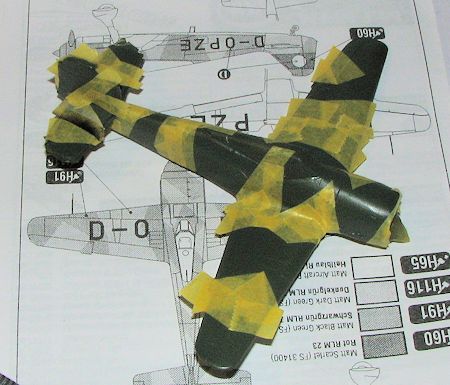
surface painted RLM 71. I decided to mask the splinter camouflage. Were it 1/48,
I would probably have free-handed it, but in 1/72, masking seems to look better.
Once that was done, the RLM 70 was sprayed on. For paints, I used AK
 Interactive's new line of acrylic paints.
Of course, when you do a splinter camo scheme, especially in this scale, you can
plan on the usual '1hour to mask; 15 seconds to paint' sort of deal. Unlike the
usual Model Master paint that I use, the RLM 71 is the proper shade and quite
close to RLM 70.
Interactive's new line of acrylic paints.
Of course, when you do a splinter camo scheme, especially in this scale, you can
plan on the usual '1hour to mask; 15 seconds to paint' sort of deal. Unlike the
usual Model Master paint that I use, the RLM 71 is the proper shade and quite
close to RLM 70.
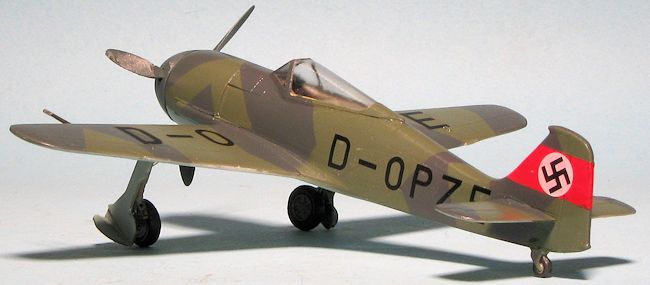
While that was going on, I tackled the landing gear. MPM pulled a bit of a boner and had both main gear legs molded exactly the same way. They should be handed. This means that one has to cut off the extant oleo scissors and use the etched ones provided, being sure not to simply put them back in the same place from which the plastic ones were attached. The gear required quite a bit of clean up, but the photo etch was easy to attach. These were then cemented to the gear wells by first using standard glue to get them about right and then using super glue to get them in final position. After this, the retraction struts attached. These have shallow (and too small) depressions in the well where they fit. You just have to best guess where they attach to the front of the strut. The tail gear is little more than a plastic blob that sorta looks like a 190 tail wheel assembly.
With the kit on its gear, I gave it a coat of clear gloss after fixing a few paint glitches. Then I started on the decals. These were, thankfully, usable even after all this time. I did find that the glue turned a rather milky color that is typical with some old decals. The white bits are not all that opaque and all the registration letters are separate, making alignment a bit of an issue. I also ran into problems with some of the decals curling up and becoming useless. Fortunately, Fantasy Printshop makes a variety of Luftwaffe code numbers and letters in black that worked perfectly as replacements. For this aircraft, I mostly used FP 900. Looking back, I should have replaced them all. I had to hit up the aftermarket sheets for a swastika.
 I then
painted up the main wheels and after drilling out the back of the wheel with a
#50 drill bit, attached them to the main gear. Once dry, the gear doors, which
had been assembled and painted earlier, were glued in place. These are far too
long and even after trimming them quite a bit, I could have cut off a bit more.
I drilled a hole for the pitot tube and installed that piece. Holes were also
drilled for the boarding step and that item attached. Chalk it up to old age,
but I put this on the wrong side. I then did a bit of touch up painting and gave
it a coat of semi-matte clear. Then I pulled away the masking and inserted the
prop assembly.
I then
painted up the main wheels and after drilling out the back of the wheel with a
#50 drill bit, attached them to the main gear. Once dry, the gear doors, which
had been assembled and painted earlier, were glued in place. These are far too
long and even after trimming them quite a bit, I could have cut off a bit more.
I drilled a hole for the pitot tube and installed that piece. Holes were also
drilled for the boarding step and that item attached. Chalk it up to old age,
but I put this on the wrong side. I then did a bit of touch up painting and gave
it a coat of semi-matte clear. Then I pulled away the masking and inserted the
prop assembly.
| CONCLUSIONS |
This is one of those kits I have had since it first came out and, for whatever reason, kept putting off building. Probably because I knew what I'd be in for in terms of the amount of work that would be required to make it look half decent. It turned out OK, but isn't anything that will win contests, however it will be a nice addition to my Luftwaffe prototype shelf and that is why I built it.
August 2014
If you would like your product reviewed fairly and fairly quickly, please contact the editor or see other details in the Note to Contributors.