
Hasegawa 1/72 FW-190A-7
|
KIT # |
00172 |
|
PRICE: |
$22.99 |
|
DECALS: |
One aircraft |
|
REVIEW |
|
|
NOTES: |
Resin fuel tanks included` |
|
HISTORY & THE KIT |

The background of the plane and a look at the kit is in the preview.
|
CONSTRUCTION |
What you have
is your now standard 1/72 Hasegawa kit. This means it is well molded and has
several bits and pieces that can be used for different variants. This particular
kit is for a very specific aircraft, so there are several modifications that
need to be made to the parts. These are mostly all spelled out in the
instructions. It involves the wings for the most part. On the upper surface, you
need to open up large holes for the mating of the resin tanks. Test fitting with
the tanks showed that the holes need to be slightly elongated in order to get a
good fit. On the leading edge of the wings, the outboard gun ports need filled
and the little fairing under the ports should be removed. The pitot tube should
be cut off the outer wing and the hole for the inside mounting opened up. On the
underside of the wing, the shell ejector fairings should be removed. The
instructions don't mention this, but without the outboard guns, the ejector
chutes would not be installed. You also need to fill in the underfuselage access
hatch and remove the loop antenna mount. Again, these are all easy modifications to make and should take
only a few minutes to do. Though I crammed all the mods into one paragraph, I
hope you realize that you must open up those holes in the wing before you
glue the upper and lower wing parts together!
Then it was
on to installing the wing tanks. After some final sanding and slicing to get a
good fit, the tanks were glued onto the upper surface with superglue. The fit
isn't perfect so I did have to clamp them down to make sure they fit relatively
snugly with the upper wing surface. The next step involved gluing on the
windscreen and masking both it and the canopy. The canopy was tacked in place
and it was time to do some serious painting.

Upper wing tank mounting holes opened up.
Underside modifications made. While all the
filler was drying for the wings, the cockpit interior was glued together and
those parts that needed painted RLM 66 had that done. Hasegawa correctly
provides a two piece instrument panel. The lower section glues to the tub and
the upper section under the anti-glare panel. Make sure you properly align the
upper panel part. You can do that by gluing it to only one side and then holding
the fuselage halves together while it dries. Once the paint had dried, the
instrument decals were applied, the interior drybrushed with some aluminum paint
and then glued into the fuselage. The fuselage was then cemented together and
left to dry. Naturally, some filler was used, but darn little compared to many
kits I build.
While all the
filler was drying for the wings, the cockpit interior was glued together and
those parts that needed painted RLM 66 had that done. Hasegawa correctly
provides a two piece instrument panel. The lower section glues to the tub and
the upper section under the anti-glare panel. Make sure you properly align the
upper panel part. You can do that by gluing it to only one side and then holding
the fuselage halves together while it dries. Once the paint had dried, the
instrument decals were applied, the interior drybrushed with some aluminum paint
and then glued into the fuselage. The fuselage was then cemented together and
left to dry. Naturally, some filler was used, but darn little compared to many
kits I build. When
the fuselage was dry and sanded, the lower wing was glued in place. Fit is quite
good, though filler was needed in the rear wing/fuselage join. Then the
tailplanes were glued on. Returning to the front, the upper machine gun cowling
was glued on. This part fit surprisingly well and no filler was needed on it at
all. You do have to be careful and adjust it while the glue is drying to get a
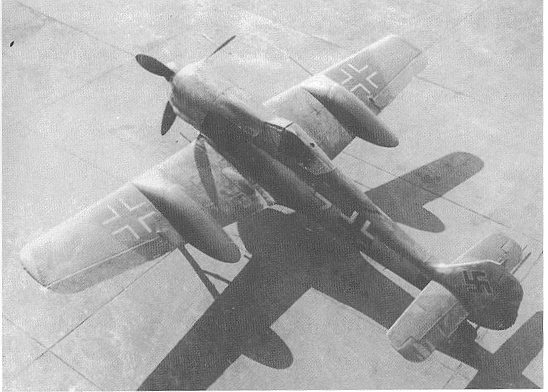
good fit. As you can see from the photo at the top of the page, this plane had
no cowl guns and the gun ports and gun troughs were smoothed out. Hasegawa
doesn't mention anything about this, but it is plain from the image that there
were no cowl guns. I duly sanded and filled to match the photo. Don't forget to
remove the little nubbins on the top of the gun cowl.
When
the fuselage was dry and sanded, the lower wing was glued in place. Fit is quite
good, though filler was needed in the rear wing/fuselage join. Then the
tailplanes were glued on. Returning to the front, the upper machine gun cowling
was glued on. This part fit surprisingly well and no filler was needed on it at
all. You do have to be careful and adjust it while the glue is drying to get a
good fit. As you can see from the photo at the top of the page, this plane had
no cowl guns and the gun ports and gun troughs were smoothed out. Hasegawa
doesn't mention anything about this, but it is plain from the image that there
were no cowl guns. I duly sanded and filled to match the photo. Don't forget to
remove the little nubbins on the top of the gun cowl.
|
PAINT & DECALS |
 Nothing really spectacular about the paint scheme on this on. It is the
usual boring RLM 74/75/76 that FW-190s were painted until later in the war when
the schemes started to get really interesting! The first thing I did was to
paint the underside RLM 76 blue-grey. For all the camo colors I used my
dwindling supply of Aeromaster enamel paints. Next the canopy area was painted
RLM 66 black-grey. When dry, the rest of the airframe was painted with RLM 75
grey. The kit was then taken back to the model room and had the RLM 75 masked
for the painting of RLM 74 grey. Once the 74 was sprayed on and dry, there was a
bit of back and forth with the RLM 76 and some 74 was also mottled on the fin. I
noticed that Aeromaster's RLM 74 isn't as light as I had thought the color to
be. Very little contrast between the two colors. After that had dried, it was
back to the work bench to have some other stuff glued on.
Nothing really spectacular about the paint scheme on this on. It is the
usual boring RLM 74/75/76 that FW-190s were painted until later in the war when
the schemes started to get really interesting! The first thing I did was to
paint the underside RLM 76 blue-grey. For all the camo colors I used my
dwindling supply of Aeromaster enamel paints. Next the canopy area was painted
RLM 66 black-grey. When dry, the rest of the airframe was painted with RLM 75
grey. The kit was then taken back to the model room and had the RLM 75 masked
for the painting of RLM 74 grey. Once the 74 was sprayed on and dry, there was a
bit of back and forth with the RLM 76 and some 74 was also mottled on the fin. I
noticed that Aeromaster's RLM 74 isn't as light as I had thought the color to
be. Very little contrast between the two colors. After that had dried, it was
back to the work bench to have some other stuff glued on.
|
THE HOME STRETCH |
 Back at the bench, it was time to touchup any overspray in the wheel wells
and attach the landing gear. I first applied Bare Metal Foil to the RLM 02
painted struts and then glued the struts in place. I never know just what angle
forward to glue these things as the instructions gives no help. Once the struts
were glued on, I attached the wheels and then, after trimming the upper portions
as shown in the instructions, the gear doors. With these on, the gear looked as
if it was sticking down too perpendicular. Either that, or I installed the gear
doors wrong.
Back at the bench, it was time to touchup any overspray in the wheel wells
and attach the landing gear. I first applied Bare Metal Foil to the RLM 02
painted struts and then glued the struts in place. I never know just what angle
forward to glue these things as the instructions gives no help. Once the struts
were glued on, I attached the wheels and then, after trimming the upper portions
as shown in the instructions, the gear doors. With these on, the gear looked as
if it was sticking down too perpendicular. Either that, or I installed the gear
doors wrong.
The kit was then taken back to the paint shop to have a couple of coats of clear gloss acrylic applied prior to attaching the decals. When dry, I started applying the kit decals. When doing a one-off plane like this one generally doesn't have any aftermarket options. The decals went on fairly well, but there was some silvering that even several applications of Solvaset could not cure. Once all the decals were on and dry, the kit was wiped down to remove any setting solution and glue residue. Then the kit was sprayed with a matte clear acrylic to seal in the decals.
With that done, the final bits were added. This really amounted to the antenna wire, which was made of clear stretched sprue, and the prop assembly. The very last was an application of pastel chalk for the engine exhaust. Since this was a test plane, I figured it had few flight hours on it so it wouldn't be grunged up with gun smudges and a lot of wear.
|
CONCLUSIONS |
A very satisfying factory conversion. Though the kit isn't as detailed as others I have seen, it goes together well and is probably the most accurate in outline. Many 1/72 190s seem to miss getting the fin and rudder right. This one looks as if it is spot on. However, I'm not an experten in the field and I'll let those folks argue the point. Is it worth the nearly doubling in price for the extra resin bits? I'll let you decide on that. One thing for sure, it is unlike any other 190A in my collection. (Yes, I know that the landing gear do not 'sit' properly).

|
REFERENCES |
Mistel: German Composite Aircraft and Operations 1942-1945, by Robert Forsyth, Classic Publications, 2001
September 2001
Copyright ModelingMadness.com. All rights reserved. No reproduction in part or in whole without express permission from the editor.
Review kit courtesy of me and my wallet!
If you would like your product reviewed fairly and fairly quickly, please contact the editor or see other details in the Note to Contributors.
Back to Reviews Page 2015