
Just Fantasy 1/48 Arado Ar-248
|
KIT: |
Just Fantasy 1/48 Arado Ar-248 |
|
KIT # |
48006 |
|
PRICE: |
$ |
|
DECALS: |
one option |
|
REVIEWER: |
Scott Van Aken |
|
NOTES: |
resin kit |
|
ALTERNATE HISTORY |
"Man, what a day. I must have flown four sorties." Relaxing with a beer after a harrowing day, Uffz Michael Dean leans back and thinks about the events of the day. He never would have thought that he'd have been involved in so many battles this far inside Germany. Assigned to the Schweinfurt factory protection flight with its relatively new Arado 248's, Michael was initially disappointed in his posting. He'd really wanted to be on the Eastern Front where all the action was and where pilots were amassing huge kill totals. He'd never have thought that sitting outside a ball bearing plant in Germany would have produced the kind of hectic fighting that he'd just engaged in.
His unit, JG 1, is one of only a few Geschwader that has been held back to combat the increasing onslaught of American Viermots, the Boeing Fortresses. Until now, they have never penetrated this far into Germany. With no escort fighters, such forays were near suicide as German Jagdwaffe units could then carry out massed attacks on the formations that were sure to decimate the incoming bombers. That is basically what happened today.
 First, there was the usual sitting around waiting for
something to happen. Most of this war has been 'hurry up and wait'.
Surely it will be different in the future. It gives Uffz Dean the chance
to go over his recent mount, the stalky and rather unusual 248. It looks
very much like the Habicht gliders he had flown as a youth (though
actually, that was only about a year ago!). These gliders are graceful,
fully acrobatic and have a gull wing that is very much like what his 248
now carried. The aircraft looks like a Dragonfly and so he had come to
think of it as such. Painted in the usual greys and light blue of most
fighters that are flying now in 1943, it has a powerful DB.605 engine and
an unusual pusher prop. There is a system designed to blow off the prop
in case he has to eject, but he hopes he'll never have to use it. The
thought of it failing and his being chopped up by that prop is not
exactly a fun idea.
First, there was the usual sitting around waiting for
something to happen. Most of this war has been 'hurry up and wait'.
Surely it will be different in the future. It gives Uffz Dean the chance
to go over his recent mount, the stalky and rather unusual 248. It looks
very much like the Habicht gliders he had flown as a youth (though
actually, that was only about a year ago!). These gliders are graceful,
fully acrobatic and have a gull wing that is very much like what his 248
now carried. The aircraft looks like a Dragonfly and so he had come to
think of it as such. Painted in the usual greys and light blue of most
fighters that are flying now in 1943, it has a powerful DB.605 engine and
an unusual pusher prop. There is a system designed to blow off the prop
in case he has to eject, but he hopes he'll never have to use it. The
thought of it failing and his being chopped up by that prop is not
exactly a fun idea.
Anyway, he was sitting around when the com people started coming around to the pilots and telling them that there was a huge formation of aircraft headed his way. They are given the 15 minute alert and things started to go into motion. Those pilots not already at dispersal head for their planes. Dean does another quick walk around and starts talking to his mechanic who came out to get the starter cart and other materials ready. Michael climbs into his flight suit. When the 10 minute alert comes, he grabs his parachute off the cart and puts it on. He then heads to the cockpit and climbs the ladder into his plane in preparation for the 5 minute alert.
When that came, he starts flipping switches to activate the engine and bring it to life. Looking over at his friend Karl, who has been maintaining his planes ever since he arrived, he gives a nod and hits the ignition switch. The engine coughs a few times, pouring out smoke before it finally comes to life with a roar. Sitting up in front of all of this power is quite a feeling. Also something that took some getting used to. Up in the air where he sits, the world shakes as he revves the engine to check pressures and temperatures.
 The tower gives him and his four comrades the OK to head
out to the take-off area. Karl pulls the chocks and Michael bounces over
the field to the take off area and to join the others. The field is quite
small and nearly next to the plant, but the 248 has plenty of power and
after a very short roll, he gently lifts off. After gaining a few meters
of altitude, he pulls up the gear and points the nose towards a darkening
mass on the horizon. With its low weight and near 1,500 hp, the 248
climbs like a home-sick angel. Part of this high performance comes at the
expense of fuel and firepower. The 248 carries but two 20mm cannon, though more could be bolted on if needed.
The tower gives him and his four comrades the OK to head
out to the take-off area. Karl pulls the chocks and Michael bounces over
the field to the take off area and to join the others. The field is quite
small and nearly next to the plant, but the 248 has plenty of power and
after a very short roll, he gently lifts off. After gaining a few meters
of altitude, he pulls up the gear and points the nose towards a darkening
mass on the horizon. With its low weight and near 1,500 hp, the 248
climbs like a home-sick angel. Part of this high performance comes at the
expense of fuel and firepower. The 248 carries but two 20mm cannon, though more could be bolted on if needed.
Thankfully, the designers didn't scrimp on cockpit armor as he feels very vulnerable as he climbs towards the oncoming hoard. Soon, he can see them more distinctly. American Boeings! The best way to attack these planes is a frontal assault as there are fewer guns pointing at you from the front. Problem is a closing speed in excess of 750 kph so one has to have steady nerves and a good aim. With a plane like a 248, one can come up from below and get a good chance to hit the fuel tanks in the wing root. It also means that only the belly turret had a good shot at you. If lucky, the first shots will put that out of action. He comes closer and closer. Soon tracers from the bombers could be seen. Every gun is pointed at him!
A few bursts from the 20mm. There are strikes! Pieces start coming off the plane when all of a sudden there is a huge explosion and the Boeing just disappears! He continues to climb, wondering what had happened. From what seemed like a distant place, his wingman calls his congratulations over the radio.
Continuing to climb, the flight gathers up for another
attack. Moving ahead of the formation, they again try a frontal attack.
This time, diving through at a breakneck speed. "Take careful aim;
quickly; pull the trigger..." the aircraft shudders under the cannon
recoil but nothing and they are diving away, tracers following them. He
feels a few hits, but looking at the
 instruments sees nothing. Enough
fuel for one more try. He swings around and heads for a box farther into
the stream. Again, the quick aim, the recoil of cannon, the river of
tracers, and a few hits, but not enough to bring down the plane, though
it does slowly fall out of formation. Wishing he had more fuel, Dean
gathers his bearings and heads for a landing and refueling.
instruments sees nothing. Enough
fuel for one more try. He swings around and heads for a box farther into
the stream. Again, the quick aim, the recoil of cannon, the river of
tracers, and a few hits, but not enough to bring down the plane, though
it does slowly fall out of formation. Wishing he had more fuel, Dean
gathers his bearings and heads for a landing and refueling.
Quickly the plane is refueled, rearmed, and he is back in the sky. They are able to hit at the rear of the formation this time and though he does not score, one of his comrades does. Other Jagdwaffe units have done well as many of the planes are streaming smoke and there are parachutes all over the sky. The ball bearing plant has taken some hits but most of the bombs have fallen around the plant and though there is smoke and some fires, the damage is not that bad. The airfield has taken a few bombs as well, and some minor damage has occurred, but not enough to close it.
Twice more during the day they are sent up after aircraft, but they are only enemy recce aircraft and they manage to get away.
"Still, it has been a good day" he thinks. "I've finally seen action, I've had a success, and I'm still alive." I wonder what the future will bring......
|
THE KIT |
For a look at what comes in the box, please visit the preview.
|
CONSTRUCTION |
Pend Oreille kits that I've done have always been well
thought out and just require the usual preparation one does for just
about any resin kit to get things underway. This means doing some
cleaning up of the parts prior to any gluing. Now the nice thing about PO
kits is that they use a very nice and semi-soft resin. It makes parts
removal and clean-up so much easier. Resin kits are prone to small balls
of rein in various nooks and crannies. They are really easy to remove and
can be done when cleaning up the various openings of the usual mold lines
or flash. I go over all of the panel lines with a used Xacto knife to
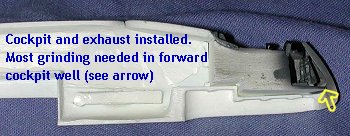
make sure all the micro-balls are gone. I did find that with this kit one
of the forward sections of the fuselage needed
 some grinding with a motor
tool to remove an area that had some excess resin in it. Without doing
so, it would be difficult to install the cockpit, though one could easily
trim the floor if one wanted. I did have to do some sawing on the excess
resin on the cockpit tub. There is a notch that has to be removed in
order to get the interior to sit properly. Don't cut too deeply. I did
and put a slice in the seat that shouldn't be there.
some grinding with a motor
tool to remove an area that had some excess resin in it. Without doing
so, it would be difficult to install the cockpit, though one could easily
trim the floor if one wanted. I did have to do some sawing on the excess
resin on the cockpit tub. There is a notch that has to be removed in
order to get the interior to sit properly. Don't cut too deeply. I did
and put a slice in the seat that shouldn't be there.
After removing all the bits from their various resin pour stubs or wafers I sanded off all the various pour stubs and mold seams. I was left with a box of ready-to-glue parts. Total time to get to this stage was about 2 hours.
Now for some construction. I first assembled the four pieces that make up the cockpit; tub, control column, rudder pedals, and instrument panel. I test fit this in the nose of the fuselage to make sure all fit. I found the instrument panel to be a tad narrower than the width it was to fit into, but had no trouble gluing it in. I made sure it was angled back a bit so as to fill the forward section and not leave much of a gap. Once all that was dry, the interior was painted RLM 66 Black-Grey as would be the norm during mid-war.
 Turning to the fuselage halves, I glued in the exhaust
pipes and the supercharger intake. The fit of the exhaust wasn't bad, but
I'd have liked a bit more of a positive locator for these. BTW, you can
glue them in without removing the resin pour blocks, but you do have to
cut them back a tad as they are a bit long. I then installed the interior
and the back cover plate. You have to trim on the resin on the left
fuselage half to get it to fit. Take care as I managed to over-scrape and
put a hole in the wing root area. It will be covered when wing is
installed, but be careful.
Turning to the fuselage halves, I glued in the exhaust
pipes and the supercharger intake. The fit of the exhaust wasn't bad, but
I'd have liked a bit more of a positive locator for these. BTW, you can
glue them in without removing the resin pour blocks, but you do have to
cut them back a tad as they are a bit long. I then installed the interior
and the back cover plate. You have to trim on the resin on the left
fuselage half to get it to fit. Take care as I managed to over-scrape and
put a hole in the wing root area. It will be covered when wing is
installed, but be careful.
With the cockpit in place, I detailed it with a few colors. Then I joined the fuselage halves, working in stages to make sure I didn't screw anything up. No nose weight will be needed as the main landing gear are aft of the wing, which will allow it to sit on the nose gear no problem. I then put filler on all the joins, sanding it down when dry.
 Next were
the tail planes. These are a butt join. I cleaned up the parts and then
glued them in place, trying to keep things properly perpendicular. With
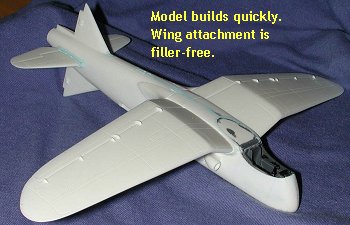
those in place, I cleaned up the wings and join area, gluing the wings in
place. The wings are a great fit, thanks to forethought by Pend Oreille
in designing this area. Filler was applied to the tail plane join areas
and any areas missed with the first round.
Next were
the tail planes. These are a butt join. I cleaned up the parts and then
glued them in place, trying to keep things properly perpendicular. With
those in place, I cleaned up the wings and join area, gluing the wings in
place. The wings are a great fit, thanks to forethought by Pend Oreille
in designing this area. Filler was applied to the tail plane join areas
and any areas missed with the first round.
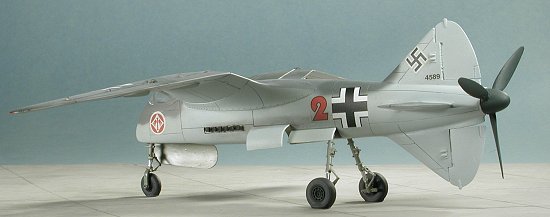
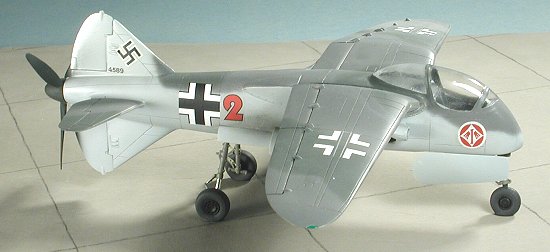
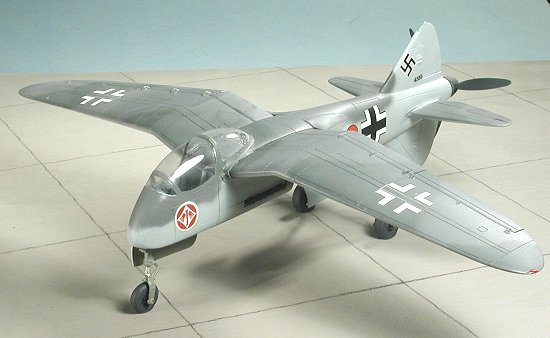
While all this was drying, I painted the landing gear and interior gear doors with RLM 02. I made sure I drilled out the lightening holes in the main gear oleo scissors to help things along. These look suspiciously like they came from a FW-190 as they have the small lower gear door attachment braces next to the axle! One could easily remove them, but I decided to leave them as they were.
I then trimmed out the canopy and glued it in place using what I thought was non-fogging superglue. I needed to fair in some areas that were a bit ragged and after the glue dried, I was surprised by a totally fogged up canopy! First time I'd ever run across that with the glue I was using. I poured Future inside to clear up the fogging, masked the canopy when the Future was dry, and reattached. I then added filler around the edges to make for a smoother (though not perfect) join. After sanding that pretty smooth (at least, as far as I could tell), I headed for a coat of paint or two.
|
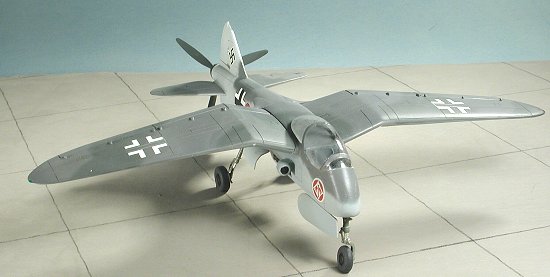
COLORS AND MARKINGS |
Since this aircraft allegedly operated from mid/late 1943
onward, the standard scheme would be RLM 74/75 over RLM 76. That being
the case, I first sprayed the underside with RLM 76. When dry, the upper
surface got a coat of RLM 75, the lighter of the two upper colors. Then
RLM 74 was sprayed in a random, disruptive pattern. When dry, the
tailplanes were 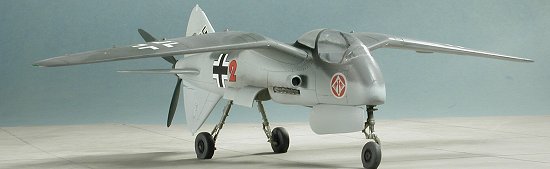 masked on the upper side and I returned to the RLM 76 to
complete the pattern. I didn't do a mottle on the side, though I did
think about it and decided against it.
masked on the upper side and I returned to the RLM 76 to
complete the pattern. I didn't do a mottle on the side, though I did
think about it and decided against it.
There followed a couple of coats of Future to provide a gloss surface for the decals. I hadn't had much luck with POM decals in the past but decided to give these a try. They are all under a single carrier and very gloss. I started with the swastika and serial on the tail. These were cut out and then put into water. After a bit of a wait, I checked them. They seemed a touch reluctant to come from the backing but after a bit of initial resistance, they came clear. They are a touch on the thick side but seemed to react well to solvents. Things were not as good with the insignia. It seems that I must have bent the sheet as they broke into parts along a crease line. This meant I had to find others. I used the markings from a Superscale FW-190 insignia sheet for these. I did use the numbers from the POM sheet and swiped the JG 1 decal from an ancient Monogram FW-190 sheet that has supplied a number of interesting bits over the decades. With all the decals on, the model was then given a coat of matte clear and returned to the bench.
|
FINAL ASSEMBLY |
 I still had
to attach a bunch of bits. First of all, I noted that there are no
dedicated gun ports on the kit, so I drilled a couple of them at the bend
in the gull wing. Then I glued on the wheels. As I mentioned in the
preview, these are really way too flat so either sanding them down a bit
or replacing them with something else might not be a bad idea. I used
them as is, for I like to build review kits as close to OOB as possible.
Unlike other resin wheels, I didn't have to drill them out. Just some
sanding on the axles to reduce their diameter a bit was all that was
needed.
I still had
to attach a bunch of bits. First of all, I noted that there are no
dedicated gun ports on the kit, so I drilled a couple of them at the bend
in the gull wing. Then I glued on the wheels. As I mentioned in the
preview, these are really way too flat so either sanding them down a bit
or replacing them with something else might not be a bad idea. I used
them as is, for I like to build review kits as close to OOB as possible.
Unlike other resin wheels, I didn't have to drill them out. Just some
sanding on the axles to reduce their diameter a bit was all that was
needed.
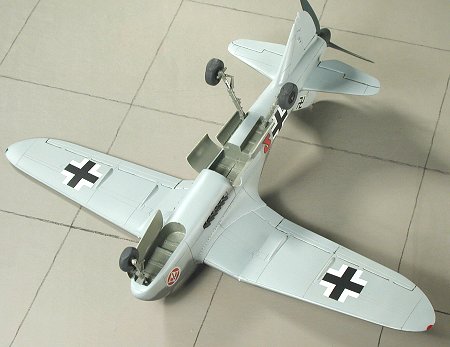
With the wheels in place, the gear doors were glued on and the overspray in the wheel wells was taken care of with some deft brush painting. Final item was the prop and it was glued onto the back of the fuselage. I took off the masking and was rewarded with some definite fogging of the canopy, especially in the back section. Nothing I could do about it now as I wasn't about to tear it off again and go through all that work putting on another. Next time I'll cut it open and won't have to worry about all that. Some exhaust stain and the model was done.
|
CONCLUSIONS |
I have enjoyed every Pend Oreille kit that I've built and despite the self-imposed problem with the canopy, this one is no exception. They are very well engineered and do not inundate the builder with a lot of unnecessary small bits or complex constructs. They use an outstanding resin, which really helps a lot. I'm always jazzed to receive one of these to build and have been very pleased with the results. It helps that they come out with some really cool stuff as well!
Late Note: Apparently the company has been out of business for quite a while so this kit will not be easy to locate.
January 2004
#1298 in a series
Copyright ModelingMadness.com. All rights reserved.
If you would like your product reviewed fairly and fairly quickly, please contact the editor or see other details in the Note to Contributors.