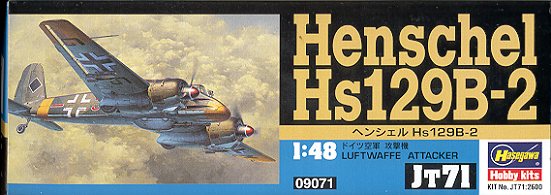
Hasegawa 1/48 Hs-129B-2
|
KIT # |
JT 71 (09071) |
|
PRICE: |
$29.98 |
|
DECALS: |
Two versions: 8./SG1 & 14./SG9 |
|
REVIEW : |
|
|
NOTES: |
|
|
HISTORY |
Henschel's Hs-129 was the Luftwaffe's first aircraft designed from the start to be used as a ground attack aircraft (the famed Ju-87 was a dive-bomber). Attempts at modifying other airframes with extra armor proved to be less than satisfactory. When the dust settled, there were two contenders, both of which performed about the same: the Hs-129 and an armored version of the FW-189. Seeing that the Hs-129 had a greater prospect of continued development as well as being a smaller aircraft and therefore a smaller target, it was chosen in September 1939.
Prototype versions of the 129 were powered by two Argus inline, air-cooled engines and had two 7.9mm MG 17 machine guns and two Oerlikon MG/FF 20mm cannon. However the preproduction Hs-129A-0 had the Oerlikon cannon replaced with Mauser MG 151/20 cannon. These weapons had a much higher rate of fire than the Oerlikon guns. It was found that the Argus engines were seriously underpowered and other than being used for initial testing and unit familiarization, were quickly passed on to training units.
Anticipating the Luftwaffe's refusal to accept the production Hs-129A-1, Henschel proposed building a slightly larger version powered by the more powerful Gnôme-Rhône 14M engine. The Luftwaffe didn't want any delays encompassed by a redesign and Henschel was told to convert the A-1 airframes to accept this new engine, the type being the Hs-120B-0. These engines were produced in two variants, each turning a different direction, one clockwise and the other counterclockwise. This prevented any torque problems with takeoff and landing. Despite the problems associated with this engine, it was used on all succeeding variants of the Hs-129.
Differences from the B-0 to B-1 were mostly minor, but the biggest was the cockpit. The vee shaped windscreen was replace with a larger, flatter paneled one. A variety of underfuselage weapons racks were available for the Hs-129 to carry a number of different weapons. Other weapons such as a pack with four 7.9mm machine guns, a bomb carrier for four 100kg bombs were designed for the 129. However, it was the MK 101 30mm cannon that really made the Hs-129 a superb anti-tank weapon.
The B-2 was version built in the greatest numbers, having just some minor differences from the B-1 including higher rated Gnôme-Rhône 14M engines and the ability to handle the BK 103 30mm gun later in 1943. The final variant was the C-1 with the 75mm cannon. There were less than a handful of these completed and only one or two actually saw any action in the last months of the war.
The 129 served primarily in North Africa and in the Eastern Front, not being used at all in the Western Front. The only air arm other than the Luftwaffe to use the aircraft was Romania, which used them against the Germans after they changed sides late in 1944.
The first pilot to earn the Ritterkreuz - Knight's Cross for his tank kills in the Hs-129 was Hptm. Rudolf-Heinz Ruffer for his 72 tank kills on 9 June 1944. He was killed by flak in July 1944. Less than a handful of 129 pilots would earn that distinction during the war.
There are no surviving Hs-129s, only a cockpit shell exists in Australia.
|
THE KIT |
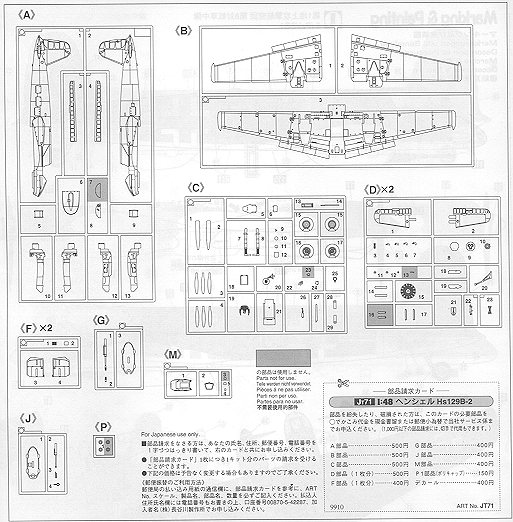 Typical Hasegawa kit of the late 90's; excellent detail and
those plastic thingies to hold in the props. All parts finely engraved in medium
grey plastic, etc. As you can see by the parts layout, there are a few bits not
used in this kit. Apparently a B-0/early B-1 or the later B-3 with the Pak 75mm
cannon is on the horizon. You have the option of two different 30mm belly
cannon, as well as wing mounted bombs.
Typical Hasegawa kit of the late 90's; excellent detail and
those plastic thingies to hold in the props. All parts finely engraved in medium
grey plastic, etc. As you can see by the parts layout, there are a few bits not
used in this kit. Apparently a B-0/early B-1 or the later B-3 with the Pak 75mm
cannon is on the horizon. You have the option of two different 30mm belly
cannon, as well as wing mounted bombs.
Canopy is a two piece affair that can be posed in the open position, though in the tight cockpit, there is little to see. Decals are for two aircraft on the Eastern Front; one early and one much later in the war, though the camouflage scheme for both is pretty much the same. the only other scheme that this aircraft flew in was with a majority of the uppersurface oversprayed in desert tan for use in the final months of the Tunisia campaign in 1943.
For those not wanting to use the kit supplied decals, there are sheets offered by both Aeromaster and Superscale, though the Superscale ones may be difficult to find. You do need to know that you cannot make a B-1 or B-3 from this kit. The B-3 needs the big Pak 75 cannon and the engine cowlings are not the same on the B-1 as they are with the B-2 version.
Also, the MK103 cannon wasn't introduced in service until the Kursk offensive in July 1943, so those aircraft in North Africa all used the older MK101 cannon. When installing the MK 103 in your Hs-129, make sure that the muzzle brake is canted at a 45 degree angle with (looking from the front) the side on your left higher.
|
CONSTRUCTION |
 In all my years of building models, few have gone together as well or as quickly
as has this kit. As I start writing this, 24 hours after opening the box, the
airframe is complete minus engines, landing gear, ailerons and canopy. Most
subassemblies including the engines and landing gear are complete and ready to
install. I'd be willing to bet that the first coat of paint on the fuselage will
have been applied within the next 24 hours. The kit is superbly engineered and
fit is equally excellent. Because of the speed at which this kit is going
together and the lack of glitches, there won't be the usual plethora of 'in
work' images.
In all my years of building models, few have gone together as well or as quickly
as has this kit. As I start writing this, 24 hours after opening the box, the
airframe is complete minus engines, landing gear, ailerons and canopy. Most
subassemblies including the engines and landing gear are complete and ready to
install. I'd be willing to bet that the first coat of paint on the fuselage will
have been applied within the next 24 hours. The kit is superbly engineered and
fit is equally excellent. Because of the speed at which this kit is going
together and the lack of glitches, there won't be the usual plethora of 'in
work' images.
First thing I did was to glue together the cockpit parts, the wings, tailplanes and wheel halves. I did not open the holes for the wing racks as I wanted a clean 129. There are some sink marks on the wings near the tips and back by the flap/aileron area. They are quite visible so need to be filled. The kit decals were applied to the instrument panel and cockpit tub after the parts had been painted RLM 66 dark grey. Once settled on the parts, Champ setting solution was used and the decals snuggled down on the raised instruments as if they had been painted on. The upper gun tubes were glued into the fuselage sides and the interior of the fuselage painted RLM 66. When dry, all the cockpit bits were dry brushed with steel. The cockpit snaps into place and needs no glue to hold it in. At this time the fuselage halves were glued together and the wings were also glued in place. The fit of the wings is superb requiring almost no filler at all!
Next the engine nacelles were
glued together and they as well as the underwing oil coolers were glued in place
Make sure you glue in the coolers before the nacelles. Next the
tailplanes were glued in. I removed the keyways from one of them as I
 found it
made it easier to install the tailplanes. The joins were sanded down and a small
bit of filler used on any glitches. A nice touch is that those hatches and
filler caps that are on the upper spine are separate pieces so that they are not
damaged during fuselage construction. An idea that I hope catches on as I am
constantly trashing these things during construction.
found it
made it easier to install the tailplanes. The joins were sanded down and a small
bit of filler used on any glitches. A nice touch is that those hatches and
filler caps that are on the upper spine are separate pieces so that they are not
damaged during fuselage construction. An idea that I hope catches on as I am
constantly trashing these things during construction.
Next the engines were painted black and then drybrushed with steel. These were then glued into the engine halves and the halves glued together. Some filler was needed on these joins and after it had dried, some additional bits were added to the cowlings.
Meanwhile, the landing gear components were painted RLM 02 as were the gear wells and gear doors. Then the boots on the struts as well as the wheels themselves were painted semi-gloss black. The underfuselage nose piece was glued in place. If you are using the MK 103 cannon, a hole for the stabilizing ring needs drilled. You have two noses to chose from as well. One is smooth and the other has the lumps, bumps and exhaust for the heater. If you are doing Russia in the Winter, the one with the heater is recommended and that is the one the kit chooses for both their options. I chose the other smooth nose for reasons soon to be seen.
|
PAINTING |
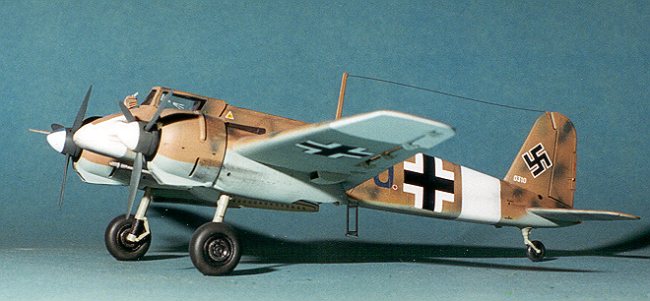
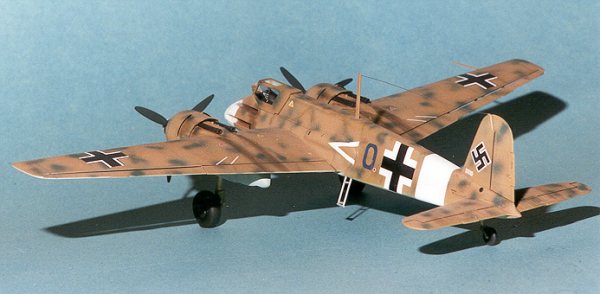
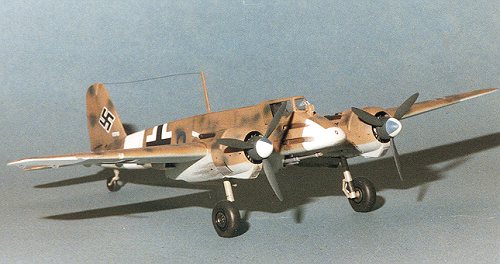
Both of the kit schemes are great. The SG1 scheme from the Kuban Front in May 1943 (Red J) and the SG9 aircraft from the Hungarian front in the last months of the war (Red F). However, I rarely use the kit decals if I have other options. And in this case I do. It is in the form of Superscale sheet 48-513 that has several different options. I really wanted to do a North African scheme and one is provided on this sheet. It is for a 4./SG2 aircraft found at Castel Benito, Libya in February 1943. Camouflage for it is RLM 79 with RLM 71 splotches and an underside of RLM 65. It has the typical white theater markings under the wings, on the nose and fuselage band. It was because I was doing a desert scheme that I didn't use the nose with the cockpit heater lumps and bumps.
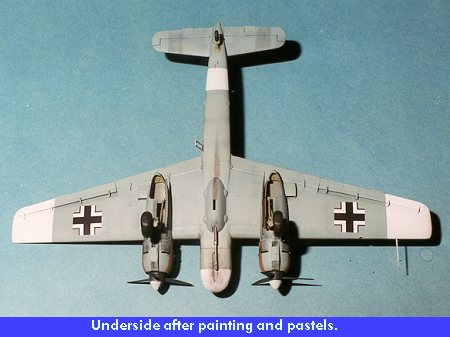
 First, the airframe was preshaded with RLM 66 then the underside
color painted on and when dry, the underside was painted in RLM 65 blue. All the
major RLM colors were done with Aeromaster enamels. Now the end of 48 hours
after opening the box, the kit was in the paint shop. Since I was doing an
Afrika Corps aircraft, this meant that the gunsight was in the upperfuselage
color so it was glued on. In addition, this aircraft has an antenna mast so
there was no need to use the DF loop antenna.
First, the airframe was preshaded with RLM 66 then the underside
color painted on and when dry, the underside was painted in RLM 65 blue. All the
major RLM colors were done with Aeromaster enamels. Now the end of 48 hours
after opening the box, the kit was in the paint shop. Since I was doing an
Afrika Corps aircraft, this meant that the gunsight was in the upperfuselage
color so it was glued on. In addition, this aircraft has an antenna mast so
there was no need to use the DF loop antenna.
The next day, the upper surface colors of RLM 79 sand with splotches of RLM 71 dark green was painted on. I had decided to do the theater markings just like the real aircraft and apply them after the factory applied colors had been put on. The only part not painted was the extreme nose as I needed somewhere to hold the model while painting. Since I routinely have to go back to patch up bits, this wasn't a real problem.
While this was going on, the canopy bits were masked off and
painted RLM 66. In addition, the MK 101 cannon was painted steel and the exhaust
stacks were assembled. The wheels were also painted with black hubs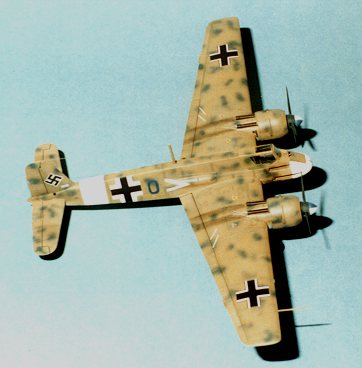 and
Aeromaster Tire Black for the tires. When all this was set aside to dry, it had
been 72 hours since opening the box. I was definitely on a roll!
and
Aeromaster Tire Black for the tires. When all this was set aside to dry, it had
been 72 hours since opening the box. I was definitely on a roll!
The next day, the white theater markings were applied. This was done by masking off around where I wanted to paint it. It may have been easier to paint these markings first and then mask over them, but I wanted to do it like it would have been done in the field.
A note on the Luftwaffe's desert schemes. There were two main ways these schemes were applied. One is like the review kit, where the aircraft was painted at the factory in overall tan upper with RLM 71 splotches and then delivered to the theater of operations where locally applied markings were done. The other was to overpaint the European scheme with desert tan. These schemes were almost always done after the aircraft arrived in theater.
The overpainted schemes varied wildly, some of them with lots of squiggles of tan, while others were almost completely covered with tan, leaving little of the original paint other than a few patches. Some even had the props painted in tan! With these field applied schemes, one has to have a good photo or two to reproduce it properly, and often they are the most interesting.
|
CONSTRUCTION CONTINUES |
Once the aircraft was painted, the landing gear were put on it and it was then sprayed with Future in preparation for final bits and the decals. The landing gear fits very well and it is great that they can be installed after the kit is painted. The wheels were left off until final assembly. Once the gear dried, the windscreen was glued into place as was the pitot tube and the antenna mast. At this time, I stupidly picked up the plane by the wing leading edge and aileron trailing edge. Naturally the aileron departed the kit and with it several of the attachment bits. Much hunting in the carpet finally found all the pieces and the aileron was reattached.
|
DECALS |
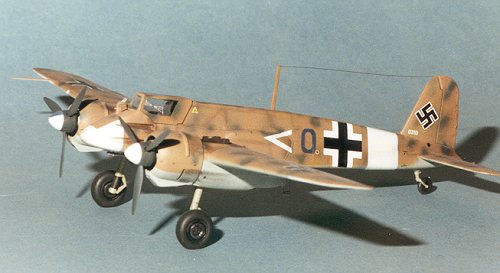
 At this time the decals were applied. I used
Superscale Sheet 48-513. On that sheet is a nice desert scheme Hs-19B that
is also in the reference book. Biggest difference is that the decal sheet has
this aircraft as red 'O', wherein the more recent and more accurate drawing in
Pegg's book has it as blue 'O'. No problem, I thought, just build it and look
for the proper sheet with a blue 'O' on it. RIGHT! No such beast exists that
matches the style that is needed. I pondered what to do and continued the
decalling.
At this time the decals were applied. I used
Superscale Sheet 48-513. On that sheet is a nice desert scheme Hs-19B that
is also in the reference book. Biggest difference is that the decal sheet has
this aircraft as red 'O', wherein the more recent and more accurate drawing in
Pegg's book has it as blue 'O'. No problem, I thought, just build it and look
for the proper sheet with a blue 'O' on it. RIGHT! No such beast exists that
matches the style that is needed. I pondered what to do and continued the
decalling.
Using a mixture of Superscale decals for the insignia and other major bits and the kit decals for stencils and warnings, the model was soon decalled. I used Champ setting solution to have them snuggle down. The kit engine instrument decals are shorter than the area that they need to cover. You need to be aware of that. Other than that, everything fit very well.
The exhaust pipes were painted and installed at this time. Once dry, the engines were glued in place permanently. Painting the propeller hubs was fun. They have a white tip with a 1/4 blue segment in them. This required several painting and masking sessions to get right. The back of the hub and prop blades were painted RLM 70 black green using Aeromaster paints. I do wish that kit makers would return to one-piece prop blade assemblies. Hasegawa did it for their Ki-84, why not the rest of their kits? Finally, the gear doors were glued in place. Hmm...either the slots for the doors are too far back or the door mounting posts are too far forward. Whatever the deal, the doors are a scale foot or two back further than they should be. You can either leave them or fill the improper slots and mount them more to the fore. Your choice.
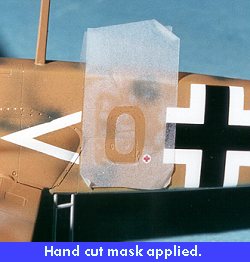 Final step was to find a blue number 0 or letter O to put in
place. It all boiled down to the fact that they would have to be painted on.
This was accomplished by making a stencil of sorts. Leaving the Superscale sheet
in its protective envelope, I attached some low tack Scotch tape to the cover
and using a fresh Xacto blade, outlined the O on the tape. I made several. Then
it was simply a matter to choosing the best ones, peeling them off the envelope
and sticking them on the kit. This was done and the letter painted on using
Xtracolor RLM 25 blue. The tape was peeled off and I had blue letters!
Final step was to find a blue number 0 or letter O to put in
place. It all boiled down to the fact that they would have to be painted on.
This was accomplished by making a stencil of sorts. Leaving the Superscale sheet
in its protective envelope, I attached some low tack Scotch tape to the cover
and using a fresh Xacto blade, outlined the O on the tape. I made several. Then
it was simply a matter to choosing the best ones, peeling them off the envelope
and sticking them on the kit. This was done and the letter painted on using
Xtracolor RLM 25 blue. The tape was peeled off and I had blue letters!
A final coat of clear flat, a bit of pastel weathering, and that was it.
|
CONCLUSIONS |
A truly excellent kit. I'd say this is one of the top five that I have built in terms of ease of construction and overall fit. It looks great right from the box. What can I say? Drop everything and go out and buy one, it is just great!!
|
REFERENCES |
Hs-129 Panzerjäger! by Martin Pegg; Classic Publications, 1977, $80.00
Copyright ModelingMadness.com. All rights reserved. No reproduction in part or in whole without express permission from the editor.