| KIT #: | 126 |
| PRICE: | $Currently OOP (July 2005), but not hard to find |
| DECALS: | Three options |
| REVIEWER: | Scott Van Aken |
| NOTES: |
| BACKGROUND |
Please visit the preview for a look at what comes in the box and a brief history.
| CONSTRUCTION |
 There are many reasons to build a
kit. For this one, I saw an old Eduard etched brass set (# ) and
thought that this and the Italeri kit may just make for a nice model. The
instructions with the set stated it was for the Italeri or Airfix kit.
Haven't built the Airfix kit and had an Italeri kit in the stash. I'd
already done a Matchbox 126 back about 30 years ago and remember it as a
well engineered and simple construct. The Italeri kit has more parts and
more options, but still looked like a pretty solid build. Downside is that
the decals were really yellow and not much in the way of aftermarket decals
for this one. This one sort of fits into the 'road less traveled' category,
but if you think of it, there has to have been tens of thousands of these
kits sold!
There are many reasons to build a
kit. For this one, I saw an old Eduard etched brass set (# ) and
thought that this and the Italeri kit may just make for a nice model. The
instructions with the set stated it was for the Italeri or Airfix kit.
Haven't built the Airfix kit and had an Italeri kit in the stash. I'd
already done a Matchbox 126 back about 30 years ago and remember it as a
well engineered and simple construct. The Italeri kit has more parts and
more options, but still looked like a pretty solid build. Downside is that
the decals were really yellow and not much in the way of aftermarket decals
for this one. This one sort of fits into the 'road less traveled' category,
but if you think of it, there has to have been tens of thousands of these
kits sold!
Naught to do but get underway. First
off, I assembled some subassemblies. Not many on this one, but a few, like
the wing, bomb, wheel pants, engine cowling and the basic interior parts. I
then started on the etched brass bits by painting the instrument panels and
console faces matte black. Next the back of the instruments acetate was
painted white.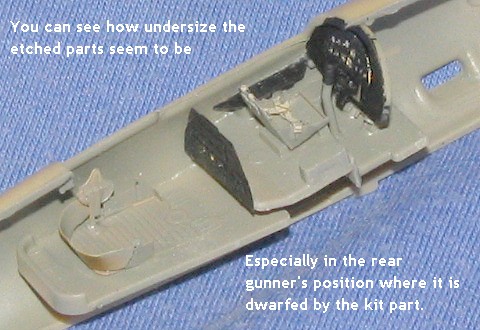
The seat was the first major bit and
it was carefully folded, then glued in place. It looks very small when
compared to the Italeri kit part. I also noticed that the side console
faces were not the same shape as the kit's consoles. I get the feeling that
this set is more for the Airfix kit, which has to be smaller than the
Italeri version. This was brought home by the gunner/radio operator's
position. The floor for this is so narrow and short that I had to install
the kit part on which to put it. This also held true for the main
instrument panel as no way would it fit by itself. This means that one of
these two kits is very off scale or the Eduard etched brass set is made for
a 1/96 kit! Having already committed myself to using it, I so ldiered
on with the various teensy weensy bits, gluing on what didn't disappear
into hyperspace when clipped from the fret.
ldiered
on with the various teensy weensy bits, gluing on what didn't disappear
into hyperspace when clipped from the fret.
I then attached the acetate instruments to the back of the various panels using clear gloss paint. Works just as good as superglue, especially when using it on non-stress parts. It's longer drying time is an asset as well. Before attaching these parts, I painted the interior bits and the inside of the fuselage with RLM 02 enamel from the ModelMaster line. After that had dried, the black panels were glued in place and the fuselage halves brought together.
After the usual filler and sanding, I glued on the forward canopy section, which I'd masked earlier. Then the interior was stuffed with tissue and it was off for the first of many rounds of painting.
| COLORS & MARKINGS |
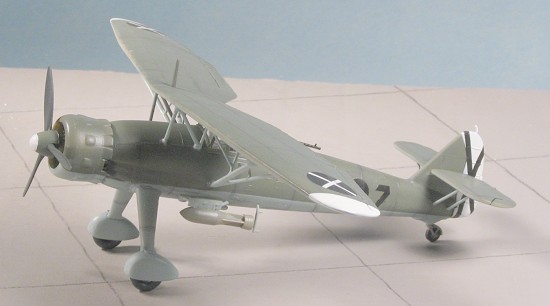
I hadn't decided on a scheme at this
time, but I knew that all of them had RLM 65 undersides, so I painted that
shade on the underside of the airframe, wings, wheel spats, and the struts.
Again, I used ModelMaster enamels for this as it is my favorite enamel and
easy to get. You know, if Humbrol actually marked on the tinlets what was
in it, I'd probably use those paints more often, but having to continually search out
a cross-reference to figure what's in the tinlet is not worth the effort.
Besides, we Americans have paint in something rather unheard of in the UK;
bottles.... Simply unscrew the cap, pour out what you need, screw the cap
back on. No need to worry about making a mess of things picking up the
tinlet lid or pouring 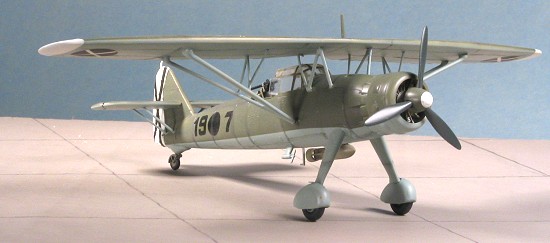 out the paint. :o). Seriously, I know why the tinlets; it is because they don't break in shipment, but they are a bit of
a hassle to use.
out the paint. :o). Seriously, I know why the tinlets; it is because they don't break in shipment, but they are a bit of
a hassle to use.
Anyway, once the preliminary underside color had been applied, I cleaned up the various wing and tail struts and had them repainted again. Much easier to see the mold lines when the part has been painted. Next, after masking the undersides, the upper surfaces were painted RLM 71. All the options on the sheet use that as well, so once again, it was easy to do.
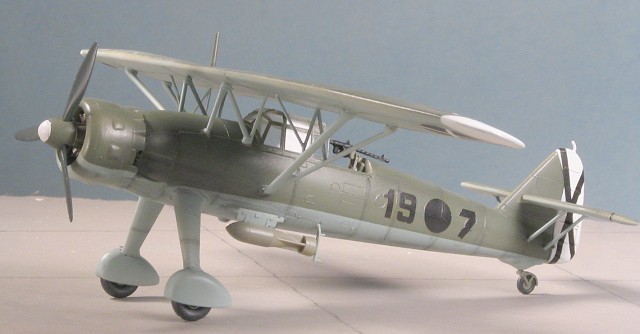
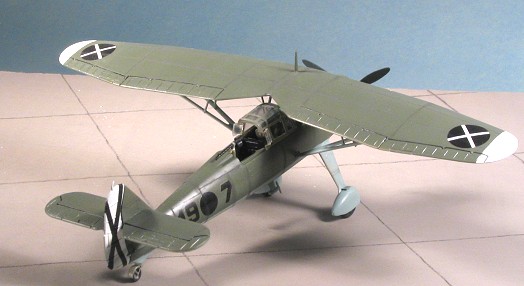
Once the paint was on, I went for the decals. I'd not done a Spanish Civil War aircraft in many years so that is the scheme I went with. This meant that the wing tips and the rudder had to be painted white. Not a problem with modern masking tape! A few coats of Floquil Reefer White and I was done. Then all the masking tape on the fuselage was removed and the control surfaces enhanced with a drafting pen. These pens can be purchased for under $10 ready to go and really are a big help for things like this as well as darkening vents and stuff. Well worth the investment.
 Now for the difficult part and
that was to attach the upper wing. The main struts just slot into the
fuselage so I attached those to the underside of the wing first using
standard cement. While that was still wiggling around I enlarged the wing
holes for the center N struts and glued those in place. Then I attached the
N struts to the upper fuselage and slid the main wing struts into their
holes. I had to do a lot of fussing around before the glue set to get
things straight. I eventually used super glue once all was properly aligned
to keep things in their place. It was quite an experience and while I'm
sure some sort of jig would have helped, I'm not good at jigs so went with
the super glue. Next were the bracing N struts about half way out the wing.
Basically, you slide them in place (after enlarging the wing mounting
holes) and glue them on the strut where they touch. Naturally, I broke one
of them and the fix was, well, less than perfect.
Now for the difficult part and
that was to attach the upper wing. The main struts just slot into the
fuselage so I attached those to the underside of the wing first using
standard cement. While that was still wiggling around I enlarged the wing
holes for the center N struts and glued those in place. Then I attached the
N struts to the upper fuselage and slid the main wing struts into their
holes. I had to do a lot of fussing around before the glue set to get
things straight. I eventually used super glue once all was properly aligned
to keep things in their place. It was quite an experience and while I'm
sure some sort of jig would have helped, I'm not good at jigs so went with
the super glue. Next were the bracing N struts about half way out the wing.
Basically, you slide them in place (after enlarging the wing mounting
holes) and glue them on the strut where they touch. Naturally, I broke one
of them and the fix was, well, less than perfect.
With the wing in place, I then glued on the tail wheel assembly and went to work on the gun. It is mounted with a rather neat arrangement to allow it to move from the ready to stowed position. There are little plastic O rings to glue onto the mount to hold stuff, but I reverted to the 50's and used the heated tip of a hobby knife to melt the plastic in place. Much neater. I also attached the prop to the still un-glued cowling and managed to get it to spin. Painting on the white tip was a real pain. Something else that I'm not good at. That was set aside until near the end.
I also glued on the bomb rack and painted the bomb RLM02 after assembling it and cleaning up the seams. Now it was time for decals. In preparation for them, I sprayed on some gloss clear acryic.
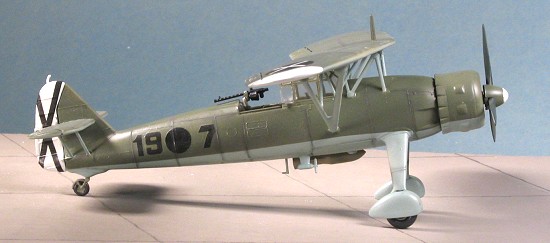 Not a lot around in terms of
aftermarket for the Hs-126 or for generic Condor Legion markings so I was
stuck with the kit decals. These had yellowed rather badly so it meant that
I had to trim off the yellowed carrier right down to the edge. I tested one
of the other markings on the sheet to see if they'd break apart once
trimmed down and this didn't happen. It did prove to be a bit on the
brittle side so I knew I had to use these with care. Heck, they have to be
30 years old if they are a day so I should be happy they would work!
Not a lot around in terms of
aftermarket for the Hs-126 or for generic Condor Legion markings so I was
stuck with the kit decals. These had yellowed rather badly so it meant that
I had to trim off the yellowed carrier right down to the edge. I tested one
of the other markings on the sheet to see if they'd break apart once
trimmed down and this didn't happen. It did prove to be a bit on the
brittle side so I knew I had to use these with care. Heck, they have to be
30 years old if they are a day so I should be happy they would work!
I first applied the left side insignia and code letters. So far so good. I tried some Microsol on them after they'd been on there a while and it caused the decals to start to curl. Using Solvaset only made matters worse so I quickly brushed on some clear gloss in hopes that it would flatten things out. It worked sorta well but caused one of the decals to break. I ran across breakage problems with other decals during this operation. The wing decals worked without any problems at all, while the tail crosses were a bit difficult. These decals were grossly oversized as I guess one was supposed to trim them once on. They also were not cooperative about conforming over the surface detail. Once in place and dry. I cut off the bits hanging over and used black paint to take care of the parts that should have hung over the corners. Then the kit was given several coats of semi-matte clear to seal in the decals.
| FINAL CONSTRUCTION |
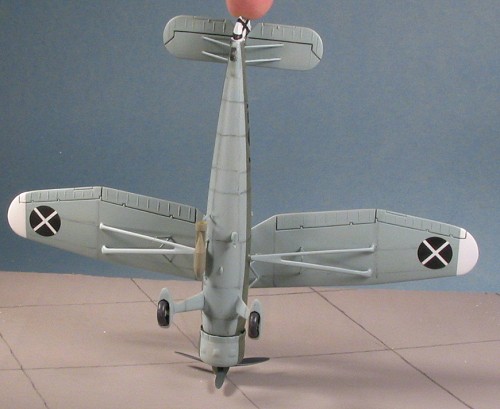 With the decals on I turned to
adding on the other stuff, as there really was quite a bit to go. I had
left off the tailplane struts as they'd just have gotten in the way when
putting on the tail stripes. These only have an indication as to where one
end fits on the underside of the tail planes. I noticed that one was longer
than the other so the shorter one went to the front and it was glued to the
fuselage where it touched. Next, the bomb attachment holes were enlarged
and the bomb glued to the rack. The foot step behind it was attached at
this time. I also glued on the engine with its prop. Moving to the upper
wing, the radio mast was cemented in place. I also glued on the little
brass foot steps atop the wheel spats, and finally glued on the generator
to the bottom of the fuselage.
With the decals on I turned to
adding on the other stuff, as there really was quite a bit to go. I had
left off the tailplane struts as they'd just have gotten in the way when
putting on the tail stripes. These only have an indication as to where one
end fits on the underside of the tail planes. I noticed that one was longer
than the other so the shorter one went to the front and it was glued to the
fuselage where it touched. Next, the bomb attachment holes were enlarged
and the bomb glued to the rack. The foot step behind it was attached at
this time. I also glued on the engine with its prop. Moving to the upper
wing, the radio mast was cemented in place. I also glued on the little
brass foot steps atop the wheel spats, and finally glued on the generator
to the bottom of the fuselage.
Then all the bits that were attached were brush painted to match whatever the surrounding color was. After the engine was glued in place, the tiny exhaust pipes were attached. I was less than thrilled with the match of the opening in the cowl and the opening in the fuselage. However, I did have the cowling attached the only way it would go so this has to be the way it goes. Grabbing a microbrush, I then scraped some dark pastels and proceeded to do the exhaust and the panel lines. The final part to work on was the canopy. I removed the masking (a difficult job and much of it was under the wing) and then glued on the little 'wing' windows in the back. That was the final touch and the model was complete.
| CONCLUSIONS |
Even taking into account the cost of the etched brass set (which, I came to find out, wasn't really for this kit), the total cost was around $12, not a bad investment for what is a pretty good sized model. In its basic form without the aftermarket, it is something that nearly any modeler can successfully complete. It goes together well, has better detail than the Matchbox kit, and was an aircraft that saw service in many fronts. It is too bad that there isn't a decent aftermarket decal sheet for it (at least I don't know of one).
Review kit and etched set courtesy of FBN Productions.
July 2005
Kit #1371 in a series
Copyright ModelingMadness.com. All rights reserved. No reproduction in part or in whole without express permission from the editor.
If you would like your product reviewed fairly and fairly quickly, please contact the editor or see other details in the Note to Contributors.