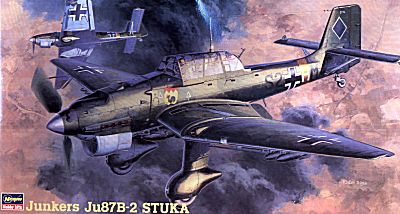
Kit: Hasegawa 1/48 Ju-87B-2 Stuka
Kit # : JT 13
MSRP: $32.95
Decals: Three Versions; 4/StG77 in Russia, 1941; 2/StG2 (looks like markings for Greece); and 3/StG5 in Russia, 1942. The first two are basically standard camo while the last is in temp white uppers.
Date of Review: 20 February 1999
Review and Photos by: Scott Van Aken
Junkers' Ju-87 was considered to be the ultimate terror weapon at the beginning of WWII. Newspapers around the world were full of stories of the destruction wrought by the screaming aircraft that plunged from the sky to wreak havoc on the troops and population below. Part of this aura of invincibility was encouraged by the German Propaganda Press, part by the lack of any real air opposition, and part because the Stuka had a siren built onto the gear leg that added to the effect.
By the time the Battle of Britain came about, the Ju-87 was up against determined resistance in the air and it was shown just what an easy kill it was. It's use in Africa, Greece and Russia was also against very light air resistance so it performed it's task admirably. It was also used for a number of other tasks such as tank busting, night fighter , glider tug, and sundry other tasks. Enough to keep it operational until the very end.
Hasegawa's kit is quite typical of the more recent releases, this one dated 1994. Nice engraved panel lines, sufficient interior detail and the promise of alternate versions. In fact, it was only recently that Hasegawa released the Ju-87G version with the larger engine. Have heard almost nothing about it though.
This kit is so normal as to really be a bit boring to describe. The
first part to be built is, of course, the interior. RLM 02 grey is the color for
this one as it is a relatively early war aircraft. There is a proper
gunner's seat made for this one. It is basically a basket in which the
seat parachute fit. No back rest at all. It swiveled so that he could
operate the radio as well. There are decent radios as well as other bits and
pieces for the interior. 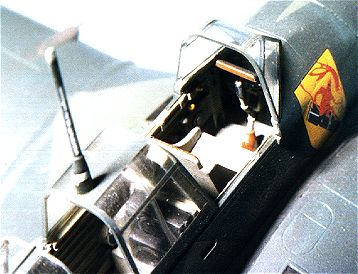 I have seen
an aftermarket resin set for this and it is really superior to the kit one, but
I wanted to build this one OTB with no aftermarket embellishments. There are
nicely detailed side walls as well with lots of detail that look great once
washed then drybrushed. Instrument panel has raised detail and a decal is
available as well. I used the decal. A nice touch are rudder pedals that
fit under the instrument panel.
I have seen
an aftermarket resin set for this and it is really superior to the kit one, but
I wanted to build this one OTB with no aftermarket embellishments. There are
nicely detailed side walls as well with lots of detail that look great once
washed then drybrushed. Instrument panel has raised detail and a decal is
available as well. I used the decal. A nice touch are rudder pedals that
fit under the instrument panel.
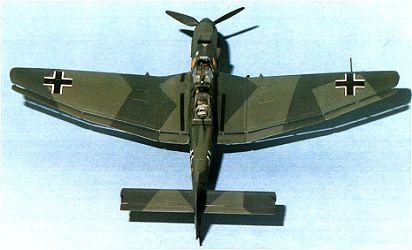
When the parts were all painted, washed and brushed they were assembled in the fuselage halves and the fuselage put together. In the meantime, the wings had the myriad holes in them opened for the bomb racks, dive brakes and wing guns. Then the wings were assembled. Not such a great fit, I fear. I had some overlap of the top wing that needed filed/sanded/filled. The rear of the wings were another fit problem. This might have been caused by warped wings, whatever the cause, getting them closed was problem. This was made even more so by the difficulty of cleaning up the training edges because the flaps/ailerons were molded to the rear and got in the way of clean-up.
Fit of the wings to fuselage were not that great either. It took much care to get the upper wing roots to match up; this at the expense of the leading and trailing edge fit. Of course, putty cures all ills!!
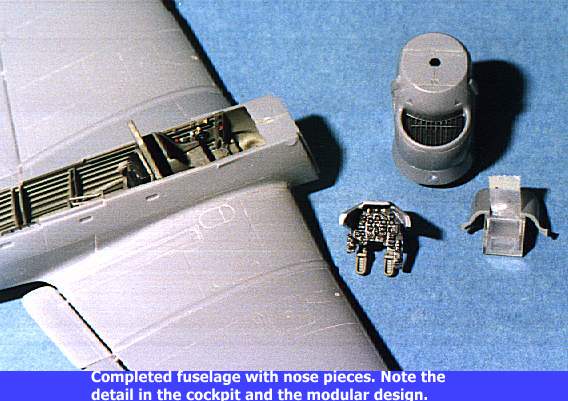 Then on to the forward fuselage bits. There are three
small subassemblies that make up the front of the aircraft. One is the
section with the instrument panel, which fits on top. On the bottom, is an
assembly that has the recess for the window the pilot looks out of when sighting
for a dive bomb attack. There is a triangular clear bit that goes here and
it's positioning is not clear in the instructions. It will only fit one of
two ways and I can only hope that I got it right. Masking this is fun as
well, but it was successfully done using strips of tape. Then the nose
section needs built. This encompasses a total of 12 parts! Careful
construction will give a good fit of most parts, however the bit that holds in
the swing arm will need filler to look right. Be especially cautious not
to lose the teeny little air intake that goes on the left side!! That part could
have easily been molded in with the rest of the upper nose piece!
Then on to the forward fuselage bits. There are three
small subassemblies that make up the front of the aircraft. One is the
section with the instrument panel, which fits on top. On the bottom, is an
assembly that has the recess for the window the pilot looks out of when sighting
for a dive bomb attack. There is a triangular clear bit that goes here and
it's positioning is not clear in the instructions. It will only fit one of
two ways and I can only hope that I got it right. Masking this is fun as
well, but it was successfully done using strips of tape. Then the nose
section needs built. This encompasses a total of 12 parts! Careful
construction will give a good fit of most parts, however the bit that holds in
the swing arm will need filler to look right. Be especially cautious not
to lose the teeny little air intake that goes on the left side!! That part could
have easily been molded in with the rest of the upper nose piece!
While the engine was drying, the forward, lower wing section was filled where the wing met the fuselage. It really needs it as fit is not good there at all. At this time, the wheel pants insert was simply snapped into place. It fits very tightly. Next the outer bomb racks were installed. The sloping part goes to the rear, unlike what the instructions show. Then the engine was installed as were the horizontal stabilizers. The stabilizers had previously had the end caps glued in place. Finally, the tail wheel was installed. The mounting for this was much larger and deeper than the slot in the lower tail so some sanding needed to be done to get a good fit. At this moment, all the small fiddly bits were added to the underside. Then it was ready for its coat of RLM 65 paint, so that was applied using Aeromaster paint.
Meanwhile, the wheels were assembled and painted then installed in the gear pants. The instructions would warn you that the wheels are handed. Just make sure that they look the same on the outside and inside. When you get to the wheels, you'll see what I mean as they are different on each side. These parts were then painted RLM 70 and 71 as per the instructions.
Now for the start of the fun parts. By this, I mean masking canopies
and painting. Before masking the canopies, the thin 'inside the canopy
frame' decals were installed. Then the canopy sections were masked with
Scotch tape. Fortunately, there are few trouble areas, but the next time I
will spend the money on EZ-Masks! The windscreen and center section were
permanently glued in and the fore and aft sections held in with white glue.
First, the underside of the stabilizers was masked to prevent overspray.
Then the upper surfaces was painted RLM 71 green using Aeromaster
paints. 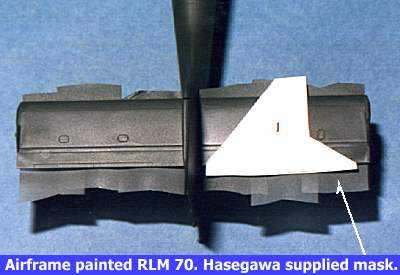 Hasegawa
gives you some really nice masks, but I ended up using tape to mask off all the
splinter camo. It really is easier for me. Once all the upper
surfaces were masked, it was painted RLM 70 black-green, again with Aeromaster
paint. Naturally, I had messed up a few areas so there was much back and forth
painting with the three primary colors. Then the movable canopy sections were
removed. These parts overlap the fuselage quite a bit so there was some touchup
needed. As with all these rather complicated splinter schemes, the painting took
the better part of a week.
Hasegawa
gives you some really nice masks, but I ended up using tape to mask off all the
splinter camo. It really is easier for me. Once all the upper
surfaces were masked, it was painted RLM 70 black-green, again with Aeromaster
paint. Naturally, I had messed up a few areas so there was much back and forth
painting with the three primary colors. Then the movable canopy sections were
removed. These parts overlap the fuselage quite a bit so there was some touchup
needed. As with all these rather complicated splinter schemes, the painting took
the better part of a week.
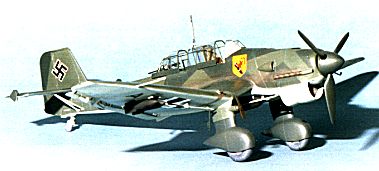
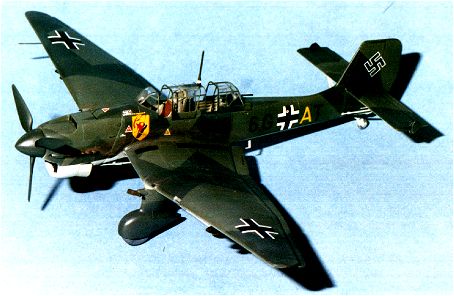
Once all that was accomplished and dry, it was time for a clear gloss overcoat and on to the decals. For this one, I didn't want to do a Russian Front aircraft. A great many of the schemes available for this model Stuka are for the Russian Front so finding one for somewhere else takes a bit of looking. I didn't need to look any further than Aeromaster's sheet 48-279, which has a B-2 from 9/StG 51 in France 1940. Would have preferred a Polish Campaign aircraft, but that would require a B-1 and the engine area is different for that one. Anyway, the scheme is standard, but it has a huge unit badge on it. Perfect for me.
 The Aeromaster sheet gives everything one needs, so other than
the instrument panel decal, none of the kit decals were used. They fit
beautifully, were opaque, and worked great with Champ setting solution. I
even forgot to gloss coat a section and the stencil decals didn't silver, thanks
to champ. then the kit was oversprayed with a matte coat, and pastels applied to
panel lines and for other stains.
The Aeromaster sheet gives everything one needs, so other than
the instrument panel decal, none of the kit decals were used. They fit
beautifully, were opaque, and worked great with Champ setting solution. I
even forgot to gloss coat a section and the stencil decals didn't silver, thanks
to champ. then the kit was oversprayed with a matte coat, and pastels applied to
panel lines and for other stains.
Last steps were to unmask the windows, attach the prop, and do any touchups before white gluing the fore and aft canopies in place.
Overall, I was very pleased with the way the kit turned out. It is a real improvement over the Airfix offering and is now available in various other versions like the B-2R as well as various G models as used later in the war.
![]()