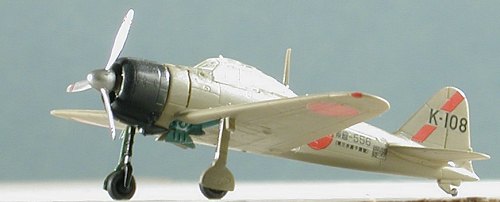
Sweet 1/144 A6M2b Zero
|
KIT # |
14107 |
|
PRICE: |
¥1000 (about $9.50) at Hobby Link Japan |
|
DECALS: |
Eleven options |
|
REVIEWER: |
Scott Van Aken |
|
NOTES: |
Two kits |
|
BACKGROUND |
Please visit the preview for a brief history and a look into the box.
|
CONSTRUCTION |
This kit has about 25 parts so there is darn little
in the way of a detailed construction sequence. The first thing I did was
to decide how this one was going to be built. Since it wasn't to be on a
carrier, I glued the wing tips in place. This is probably the most
difficult part of the build as the tips have to be properly aligned with
the rest of the wing or will look silly. I found
 that the area around the
aileron cut-out had a rather large (scale-wise) gap. Filling it in this
scale really isn't an option, but you do need to be aware that it is
there. The next thing I did was to glue the cowling halves together. When
dry, the small insert with the exhaust stubs was added. Next for gluing
were the two fuselage halves. There really isn't any interior to this
kit, just a shelf on which you could put a pilot, if you had one.
However, a problem it isn't in this scale as the thickness of the canopy
will prevent any detail from being seen.
that the area around the
aileron cut-out had a rather large (scale-wise) gap. Filling it in this
scale really isn't an option, but you do need to be aware that it is
there. The next thing I did was to glue the cowling halves together. When
dry, the small insert with the exhaust stubs was added. Next for gluing
were the two fuselage halves. There really isn't any interior to this
kit, just a shelf on which you could put a pilot, if you had one.
However, a problem it isn't in this scale as the thickness of the canopy
will prevent any detail from being seen.
Next, the wing was glued in place to the fuselage and the tail planes were glued on. The fit of the wing is OK, but you may want to do a touch of trimming to get a better join as there is a tiny bit of a step between the wing roots and the wing. The radio mast was then glued in place, as was the tail wheel, and it was time for some painting.
|
COLORS & MARKINGS |
 I
used the excellent ColourCoats Mitsubishi Zero Grey-Green on this one,
though I could also have used the Nakajima paint as they built A6M2s as
well. I must have over-thinned the paint as it took several days to dry.
Once dry, the kit was returned to the workbench to have the landing
gear installed. The gear had been painted black with aluminum oleos. I
also painted the gear doors when I did the overall fuselage. The interior
of the wheel wells and inside of the gear doors were brush painted in
Aotake using Polly Scale acrylics. I also brush painted the cowling
Mitsubishi Blue-Black, also using the ColourCoats enamels.
I
used the excellent ColourCoats Mitsubishi Zero Grey-Green on this one,
though I could also have used the Nakajima paint as they built A6M2s as
well. I must have over-thinned the paint as it took several days to dry.
Once dry, the kit was returned to the workbench to have the landing
gear installed. The gear had been painted black with aluminum oleos. I
also painted the gear doors when I did the overall fuselage. The interior
of the wheel wells and inside of the gear doors were brush painted in
Aotake using Polly Scale acrylics. I also brush painted the cowling
Mitsubishi Blue-Black, also using the ColourCoats enamels.
When removing one of the landing gear legs from the sprue, the lower section that holds the wheel broke off and went flying off into the dark, never to be found again. Fortunately, I was able to glue the wheel to the gear door and though it does look a tad odd, it is able to stand on its own. The next step was to install the canopy. I found that the radio mast interferred with the placement of the canopy. It must have dried angled too far forward or something as when I forced the issue to get the canopy in place, it broke off.
With the canopy in place, it was time to add the
decals. These are printed by Cartograf and are really excellent. I didn't
gloss the kit prior to their application and though I only
 used the Microscale
setting solutions, I had no real problem with them. Even the wing
insignia managed to snuggle down over the upper wing lights and suck into
the panel lines just fine. The most time consuming portion of decaling
was the application of the canopy frame decals. These are a different
color from the ColourCoats paint I used, being a bit more yellow. I also
found that I could have used an extra stripe or so. It may be a better
deal to either mask the canopy (yep, even at this scale) or perhaps a
steady brush paint on the frame lines. I did use paint on the very aft
section as I couldn't see the point in cutting out a section from the
large color section they gave.
used the Microscale
setting solutions, I had no real problem with them. Even the wing
insignia managed to snuggle down over the upper wing lights and suck into
the panel lines just fine. The most time consuming portion of decaling
was the application of the canopy frame decals. These are a different
color from the ColourCoats paint I used, being a bit more yellow. I also
found that I could have used an extra stripe or so. It may be a better
deal to either mask the canopy (yep, even at this scale) or perhaps a
steady brush paint on the frame lines. I did use paint on the very aft
section as I couldn't see the point in cutting out a section from the
large color section they gave.
The final steps were to glue in the engine, slide on the cowling and then push on the prop. This had been painted Alclad II Polished Aluminum on the front with the back of the blades painted flat black.
|
CONCLUSIONS |
 The
end result is a really nice little 1/144 Zero. Despite my fumble-fingered
glitches, it looks quite nice and now that I know what to expect, the
second one (when I get around to building it) can only be better. The key
to this kit is to take your time and be careful when removing the parts
as some of them are really tiny. Few parts does not equate to a quick
build!
The
end result is a really nice little 1/144 Zero. Despite my fumble-fingered
glitches, it looks quite nice and now that I know what to expect, the
second one (when I get around to building it) can only be better. The key
to this kit is to take your time and be careful when removing the parts
as some of them are really tiny. Few parts does not equate to a quick
build!
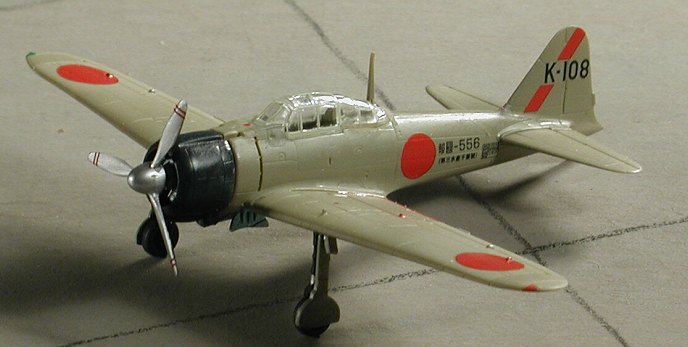
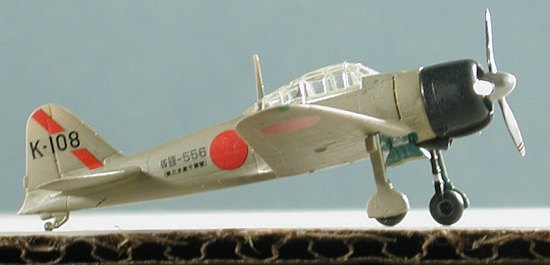
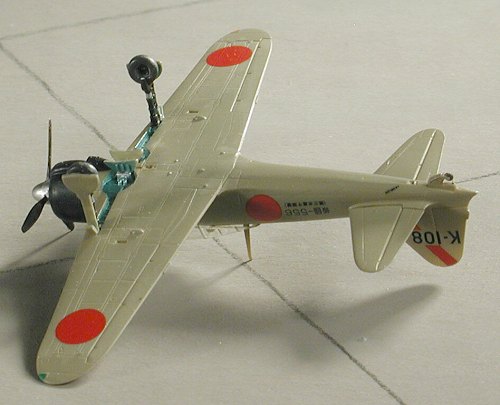
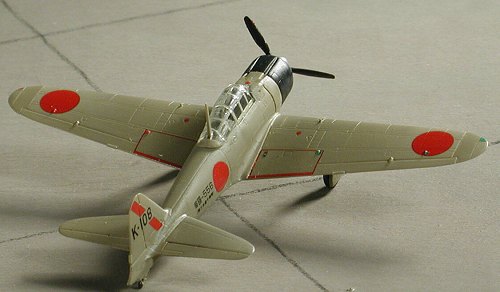
One other neat thing; every image on this page is greater than life size by at least 50%, so it isn't a big model!
May 2004
#1315 in a series
Copyright ModelingMadness.com. All rights reserved.
If you would like your product reviewed fairly and fairly quickly, please contact the editor or see other details in the Note to Contributors.