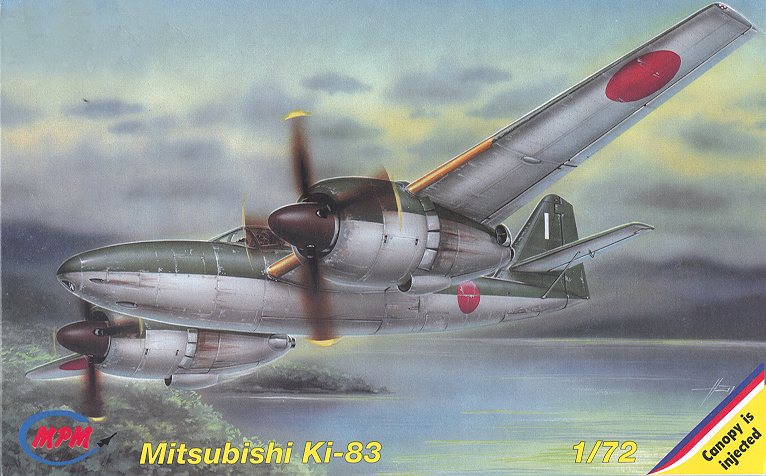
MPM 1/72 Ki-83
|
KIT # |
72088 |
|
PRICE: |
$20.98 |
|
DECALS: |
Two aircraft; see review |
|
REVIEW : |
|
|
NOTES: |
Short run-type kit |
|
HISTORY |
The Ki-83 was built to meet the requirements for a long-range escort fighter. The design team first tried a single engine design, the Ki-73. However, in light of severe problems plaguing the engine of choice, decided that it needed two engines to properly perform its design functions. The design team was the same that worked on the Ki-46, which accounts for some similarity between the two.
 The new design was exceptionally clean and designed around two
2,200 hp Mitsubishi Ha-203-II 18 cylinder turbosupercharged radial engines. It
was armed with two 30mm and two 20mm cannon. The initial prototype was completed
in late 1944 with first flight in November of that year. The aircraft exceeded
all expectations and was not only quite fast (426 mph) but very maneuverable as
well. As one would expect, all was not perfect and the airframe suffered from
engine and tail vibrations. The other three prototypes were produced with
modified engine mounts and strengthened tail surfaces. Actually, they used a
tail strut to take care of this last glitch!
The new design was exceptionally clean and designed around two
2,200 hp Mitsubishi Ha-203-II 18 cylinder turbosupercharged radial engines. It
was armed with two 30mm and two 20mm cannon. The initial prototype was completed
in late 1944 with first flight in November of that year. The aircraft exceeded
all expectations and was not only quite fast (426 mph) but very maneuverable as
well. As one would expect, all was not perfect and the airframe suffered from
engine and tail vibrations. The other three prototypes were produced with
modified engine mounts and strengthened tail surfaces. Actually, they used a
tail strut to take care of this last glitch!
Unfortunately for the Ki-83, only the four prototypes were completed as production had to concentrate on existing types. Has the war continued, the Ki-83 would have been a formidable weapon with performance on par with the F7F and DH.103 Hornet.
|
THE KIT |
When this kit arrived in the mail, I was both excited and concerned. First of all, I have been on a 1/72 twin engined aircraft kick over the last few months, building types like the Ki-45, Ki-67 and Beaufighter. This kit would fit right in with the other Japanese twins. However, I have not had that much success with MPM kits. To be honest, my limited experience was with the very early MPM models and Czech kits have improved a great deal since then.
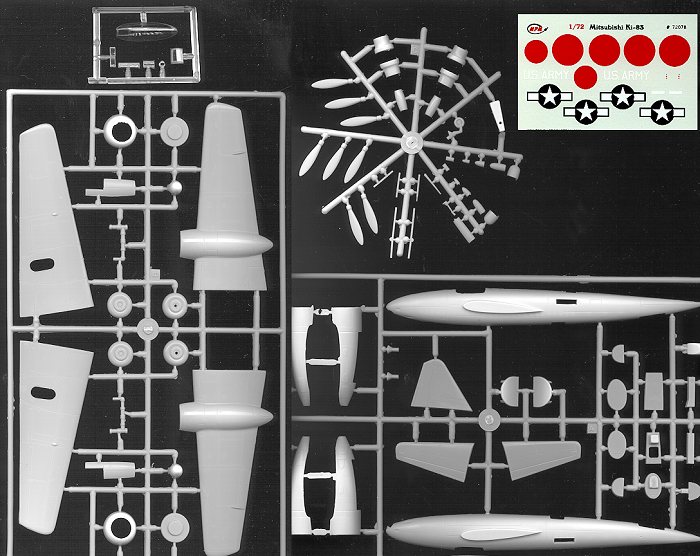
 Take this kit for instance. The detailing is very good and more pronounced
than on earlier kits. The sprue gates are also much smaller, though I would
still use a razor saw to remove the parts. There is also a lot less flash on
this kit than I have seen in the past, making clean-up much easier. In fact
there is darn little flash and the mold lines are quite small as well. There are
no ejector pin marks on any of the smaller parts and those on the larger bits
(wings, fuselage) are easy to remove.
Take this kit for instance. The detailing is very good and more pronounced
than on earlier kits. The sprue gates are also much smaller, though I would
still use a razor saw to remove the parts. There is also a lot less flash on
this kit than I have seen in the past, making clean-up much easier. In fact
there is darn little flash and the mold lines are quite small as well. There are
no ejector pin marks on any of the smaller parts and those on the larger bits
(wings, fuselage) are easy to remove.
Cockpit detail is sufficient for this scale, the only real detail being on the instrument panel. There is none on the side consoles or the fuselage interior. Wheel well detail is also acceptable, though minimal as well. Typical of a short run kit, there are no locator pins on any parts, and the wings, tail and stabilizers are all butt joined. Thankfully missing from the kit are any etched metal or vacuformed parts. For that I am truly grateful as I feel these items add little to my modeling experience! The clear parts are not too thick and are reasonably clear. The canopy is in the closed position only.
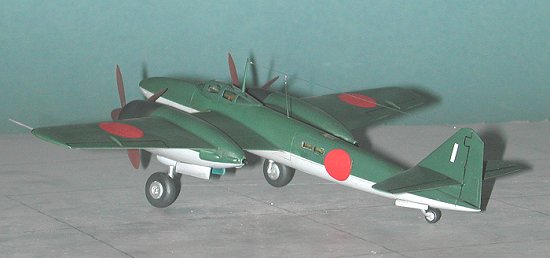
 Since this aircraft was only built as a prototype, decals are minimal. There
are two aircraft given; the first prototype and the same aircraft as
captured by the USAAF. Both are in dark green upper and light grey lower
surfaces with yellow IFF bands on the leading edges of the wings. The American
scheme is listed as USAF, which, as we know, wasn't around in 1945. A bit of a
yuk. :o)
Since this aircraft was only built as a prototype, decals are minimal. There
are two aircraft given; the first prototype and the same aircraft as
captured by the USAAF. Both are in dark green upper and light grey lower
surfaces with yellow IFF bands on the leading edges of the wings. The American
scheme is listed as USAF, which, as we know, wasn't around in 1945. A bit of a
yuk. :o)
Instructions have 9 construction steps along with a short history and a color reference chart. All colors given are Humbrol and those items needing painting during construction are shown. The color chart gives generic names for the colors but is adequate.
|
CONSTRUCTION |
With much trepidation after having had some 'interesting' experiences with previous MPM kits, I started construction. The first thing I did was to remove the wings from the sprues. Then I clipped off the rather long ejector pin stubs and sanded them flat with the bottom of the wings. The wings were then glued together. No traumas there.
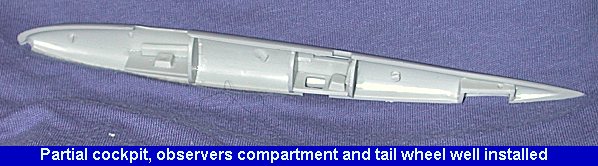 Next, I went to
the fuselage. Other than cleaning up a bit of flash, nothing else was done to
the halves. There are three compartments that go into this aircraft. There is a
one piece tail wheel well, a three piece observers compartment and a 6 piece
cockpit. There is no sidewall detail. I installed these bits into the fuselage,
making sure the other half fit after installing each one. The pilot's cockpit
will have the seat, stick, instrument panel and other console installed after
the interior is painted. The fit is quite good. No problems here, either.
Next, I went to
the fuselage. Other than cleaning up a bit of flash, nothing else was done to
the halves. There are three compartments that go into this aircraft. There is a
one piece tail wheel well, a three piece observers compartment and a 6 piece
cockpit. There is no sidewall detail. I installed these bits into the fuselage,
making sure the other half fit after installing each one. The pilot's cockpit
will have the seat, stick, instrument panel and other console installed after
the interior is painted. The fit is quite good. No problems here, either.
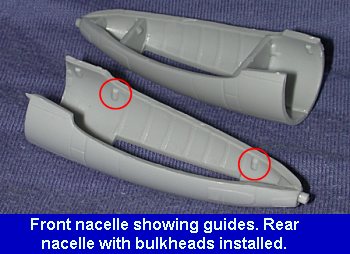 Next I started to
glue together the engine nacelles. These are basically five pieces. Once the
halves are glued together, there is an exhaust and two bulkheads to install.
There are small placement guides to help with the
Next I started to
glue together the engine nacelles. These are basically five pieces. Once the
halves are glued together, there is an exhaust and two bulkheads to install.
There are small placement guides to help with the
 bulkheads. The fit here was
also pretty good. Make sure you don't cut off the little guides on the bulkheads
as they help with gear installation. They face each other. Now I am getting
worried. This is not at all like previous MPM kits. In fact, it is going rather
smoothly. I like that!
bulkheads. The fit here was
also pretty good. Make sure you don't cut off the little guides on the bulkheads
as they help with gear installation. They face each other. Now I am getting
worried. This is not at all like previous MPM kits. In fact, it is going rather
smoothly. I like that!
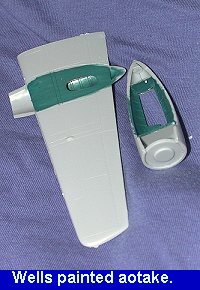
Once the bulkheads
have been installed and dry, the nacelles and surrounding wing areas were
painted Aotake from Xtracolor's range of paint. Also painted was the tail wheel
well. Once the paint had dried, the engine nacelles were then glued to the
wings. Fit was OK, but not great. Application of a 'hot' solvent type cement
really helps in cases like this as it melts the
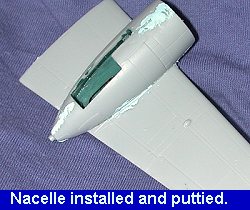 plastic and helps to improve the fit. Still, despite that and
sanding of the joins, filler was needed to take care of the seams.
plastic and helps to improve the fit. Still, despite that and
sanding of the joins, filler was needed to take care of the seams.
 Before gluing on the engine nacelles, I installed the engine
backing plates to ensure a good fit to the wing. Actually, this kit has no
engines in it. The engines are so closely cowled that you wouldn't see the
engines anyway so none are included with the kit.
Before gluing on the engine nacelles, I installed the engine
backing plates to ensure a good fit to the wing. Actually, this kit has no
engines in it. The engines are so closely cowled that you wouldn't see the
engines anyway so none are included with the kit.
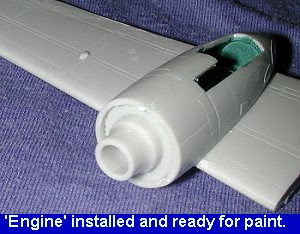
Once the nacelles were glued in place, puttied and sanded, the 'engines' were installed. Actually, these are little more than conical cylinders on which the props will eventually sit. These are two pieces so needed gluing together. I test fit them and the engine cowlings several times to make sure that they would be centered. Once installed and dry, the whole area was painted black so you couldn't see that there was nothing in them!
 While that was
drying, the interior was given its painting. The two forward compartments were
painted Mitsubishi interior green using the Aeromaster acrylics while the tail
well was painted aotake from Xtracolor. Then the consoles were painted flat
black as was the instrument panel. This panel was later dry brushed with
aluminum to bring out what detail there was. The fuselage side windows were
installed and it took a bit of sanding and shaving to get a good fit.
While that was
drying, the interior was given its painting. The two forward compartments were
painted Mitsubishi interior green using the Aeromaster acrylics while the tail
well was painted aotake from Xtracolor. Then the consoles were painted flat
black as was the instrument panel. This panel was later dry brushed with
aluminum to bring out what detail there was. The fuselage side windows were
installed and it took a bit of sanding and shaving to get a good fit.
 Then the
fuselage halves were glued together. Before doing this, I made sure that the
upper and lower transparencies for the observer's compartment fit. Naturally,
they were also too big and needed thinning down. The pilot's
seat will be installed just before gluing on the canopy.
Then the
fuselage halves were glued together. Before doing this, I made sure that the
upper and lower transparencies for the observer's compartment fit. Naturally,
they were also too big and needed thinning down. The pilot's
seat will be installed just before gluing on the canopy.
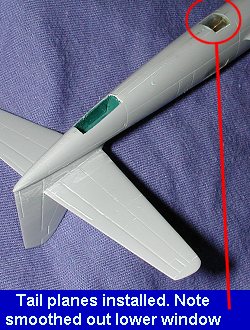
Once any fuselage seams were filled and sanded, the tail was glued in place. This needed filler as well. Then the remaining transparencies were installed. As mentioned, these were too big and needed thinning down to fit. The lower window also stuck up proud of the fuselage in the fore/aft plane. The reference that I have shows this to be flush with the fuselage so I sanded it down to match. This also needed some filler around it and when dry, the clear bit was polished back to its original transparency.
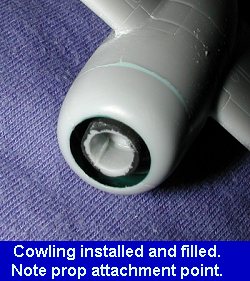 At this same time, the engine cowlings were attached to the
nacelles. The fit was not good and there were plenty of gaps. However, this was
cured by the usual method of filler and sanding. An alternate method would have
been to sand the nacelle face flat, but I have not had good luck with that
method so kept with what works for me. It took several applications.
At this same time, the engine cowlings were attached to the
nacelles. The fit was not good and there were plenty of gaps. However, this was
cured by the usual method of filler and sanding. An alternate method would have
been to sand the nacelle face flat, but I have not had good luck with that
method so kept with what works for me. It took several applications.
Back at the fuselage, the tailplanes were cleaned up and attached to the tail section. These are a bit longer than what is shown in the instructions and the reference. However once attached and any gaps at the attachment point filled and sanded, it looks OK. I seriously doubt if anyone knows enough about this aircraft to call me to task on it!
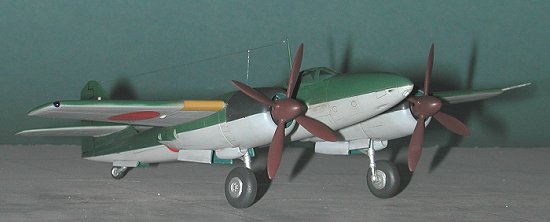
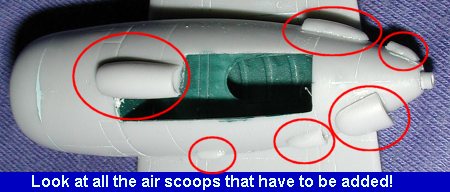 Returning to the
engine nacelles; once the cowlings were glued in place and smoothed out, there
were a myriad of intakes and exhausts to glue on. What looks like a very clean
aircraft from the front, is really a very busy one due to all the scoops and
things needed for the turbo-supercharging system. Actually, it looks like a bit
of a mess once you get the intakes and such glued on. That is because they are
molded for a flat surface and have to fit on a cone. This requires either
sanding them down on the inside prior to gluing them on, or using some filler to
smooth out the gaps. I chose the latter method.
Returning to the
engine nacelles; once the cowlings were glued in place and smoothed out, there
were a myriad of intakes and exhausts to glue on. What looks like a very clean
aircraft from the front, is really a very busy one due to all the scoops and
things needed for the turbo-supercharging system. Actually, it looks like a bit
of a mess once you get the intakes and such glued on. That is because they are
molded for a flat surface and have to fit on a cone. This requires either
sanding them down on the inside prior to gluing them on, or using some filler to
smooth out the gaps. I chose the latter method.
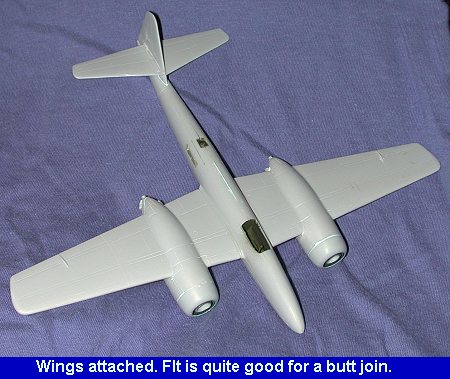
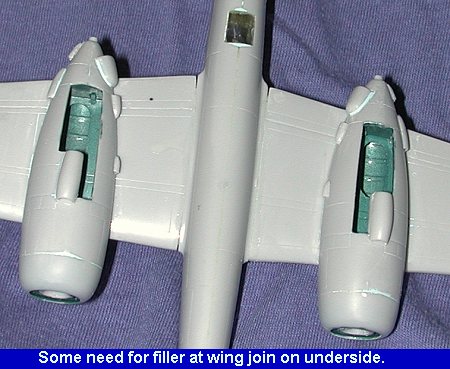 Once the scoops had
been faired into place, it was time to attach the wings. This is a simple butt
join and is not a problem. Much to my delight, the wings and wing root were
exactly the same. A lot of glue was placed on the fuselage join and on the wing
itself once the wing was sanded as flat as I could get it. Then the two parts
were pushed together. The pressure was maintained until the plastic at the join
started oozing out of the seam. Then more glue was put in the area to smooth it
out. This was done to both wings and resulted in a nice, solid join. Sure, there
was some need for filler at the join, but that is to be expected from me and
short run kits.
Once the scoops had
been faired into place, it was time to attach the wings. This is a simple butt
join and is not a problem. Much to my delight, the wings and wing root were
exactly the same. A lot of glue was placed on the fuselage join and on the wing
itself once the wing was sanded as flat as I could get it. Then the two parts
were pushed together. The pressure was maintained until the plastic at the join
started oozing out of the seam. Then more glue was put in the area to smooth it
out. This was done to both wings and resulted in a nice, solid join. Sure, there
was some need for filler at the join, but that is to be expected from me and
short run kits.
Once the wings were nice and dry, I test fitted the main gear legs and the canopy. The canopy fit beautifully with no problems. The attachment of the main gear legs is a bit vague, but I believe it is to fit in between the two angles inside the front gear well. If that is the case you may need to trim down the width of the gear attachment point as mine were a touch too wide. It just took a few runs with sandpaper to get it down to size. Then all the holes were filled with tissue and the clear parts masked with tape in preparation for round one of painting.
|
PAINTING & DECALS |
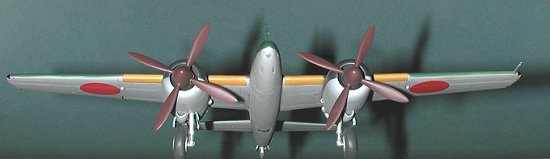
Then
the upper portion of the cowlings were painted Mitsubishi Cowling Blue-black.
The aft fuselage was masked off and the rear portion of the kit as well as much
of the wings were painted Mitsubishi Green. I did this to give me somewhere
to grab the plane when painting the front of the kit. The model was then set
aside for a few days to dry before continuing on. At this time, the props were
also painted using Aeromaster Japanese primer brown. Don't know about you, but
I'll be sad when all my Aeromaster paint is used up and I can't get any more!
As mentioned earlier, the
decals are by Propagteam and very thin. They are also quite simple to apply. As
it is a prototype, all that goes on it are roundels and the prototype number 1
on the tail. I had seriously thought about doing a JAAF '46 bird using some of
the colorful unit markings from other sheets, but in the end decided against it.
The decals fit beautifully and reacted well to the Solvaset I used. Once they
were dry, the excess setting solution was cleaned from the kit with a damp
cloth. 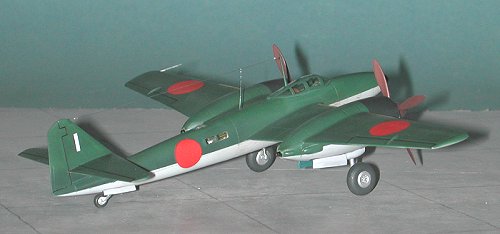 The first thing I did was to paint the underside of the entire
aircraft and the top front of the wings with Aeromaster Mitsubishi Grey
acrylic. Once that was done, the leading edges were painted with Japanese ID
Yellow, another Aeromaster acrylic. When dry, the yellow sections were masked. I
used Tamiya masking tape for this as it has given me very good service. I
haven't used it over acrylic paints yet, so it will be interesting to see if it
works as well as it does when masking enamels (which I prefer).
The first thing I did was to paint the underside of the entire
aircraft and the top front of the wings with Aeromaster Mitsubishi Grey
acrylic. Once that was done, the leading edges were painted with Japanese ID
Yellow, another Aeromaster acrylic. When dry, the yellow sections were masked. I
used Tamiya masking tape for this as it has given me very good service. I
haven't used it over acrylic paints yet, so it will be interesting to see if it
works as well as it does when masking enamels (which I prefer).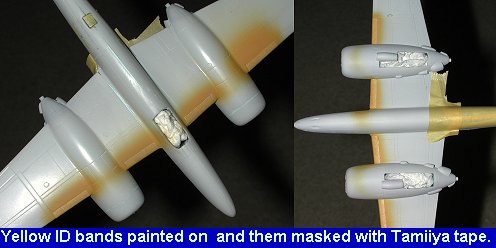 Once
the kit was painted, the areas that would take the decals were sprayed with
clear gloss acrylic. Then the kit was taken back to the work bench to have the
decals and other bits put on.
Once
the kit was painted, the areas that would take the decals were sprayed with
clear gloss acrylic. Then the kit was taken back to the work bench to have the
decals and other bits put on.
|
CONSTRUCTION CONTINUES |
Not being very good at doing
washes, I took it easy, making sure that I had the wash thinned enough to follow
the panel lines, yet think enough to be seen. I was told that the right
consistency is when you put some on your finger and it highlights your
fingerprints! The wash was mixed in a non-porous container. I used Windsor and
Newton Burnt Umber and Turpenoid as the carrier
The method I used was to touch the brush to the panel lines
and allow capillary action to carry the paint in the panel lines. After a few
hours and much of it had evaporated, I took a soft cloth and gently removed the
excess. It worked rather well, but a second application was needed. Then it was
all sealed under a clear flat coat. The control surfaces were then enhanced with
a Rapidograph. Any needed touch ups were done and then resealed.
Final
steps were painting the wing tip lights and the installation of the radio
antenna which was made from stretched sprue. I use clear for this as it produces
a stiffer product and is easier to glue because of that. Besides, most antennas
in photos are nearly invisible. 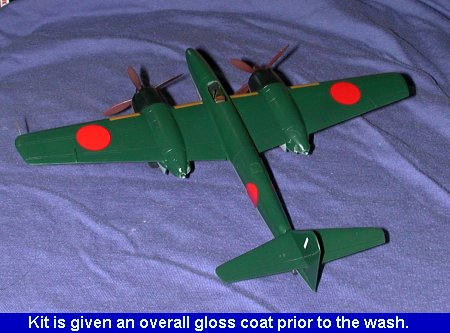 At this time, the landing gear was glued in place as were the
braces. These were painted aluminum. The wheels were then added and when dry,
the gear doors were cut into sections and glued in place. Also glued on were the
props and pitot tube. When I went to cut the braces for the tailplanes off the
sprue (and I used a razor saw), they both broke into pieces. The choice here is
to make new ones or to build the aircraft as it was in early flights before the
braces were installed. I chose the lazy way out and did mine in that manner.
Once all the door interiors and such were touched up, the kit was sprayed
overall with gloss clear acrylic. This was to seal in the decals and to get the
kit ready for an oil wash.
At this time, the landing gear was glued in place as were the
braces. These were painted aluminum. The wheels were then added and when dry,
the gear doors were cut into sections and glued in place. Also glued on were the
props and pitot tube. When I went to cut the braces for the tailplanes off the
sprue (and I used a razor saw), they both broke into pieces. The choice here is
to make new ones or to build the aircraft as it was in early flights before the
braces were installed. I chose the lazy way out and did mine in that manner.
Once all the door interiors and such were touched up, the kit was sprayed
overall with gloss clear acrylic. This was to seal in the decals and to get the
kit ready for an oil wash. 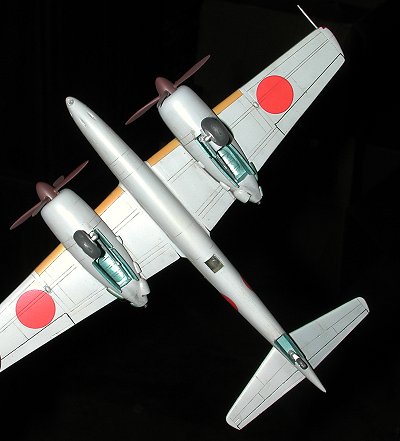 material. This stuff will eat
enamels, and even though I painted most of the kit with acrylics, it also needs
a gloss surface or it will diffuse into the flat paint. That is why the gloss
coat.
material. This stuff will eat
enamels, and even though I painted most of the kit with acrylics, it also needs
a gloss surface or it will diffuse into the flat paint. That is why the gloss
coat.
|
CONCLUSIONS |
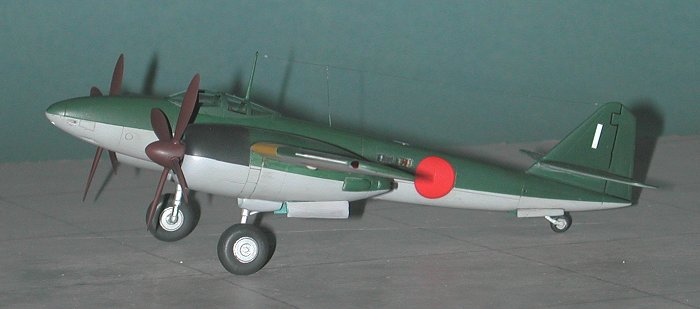
I am very pleased with the results of this kit. MPM has made
huge strides in the last few years. This kit is a result of that. While still a
short run model, it is ever closer to a mass produced kit. Improvements in fit
and getting rid of those vacuform clear bits is a major plus in my book. I look
forward to seeing the next MPM 1/72 kit.
REFERENCES Japanese Army Experimental Fighters #2, Famous Aircraft
of the World #94, February 1978. October 2000 Copyright ModelingMadness.com. All rights reserved. No reproduction in part or in whole without express permission from the editor.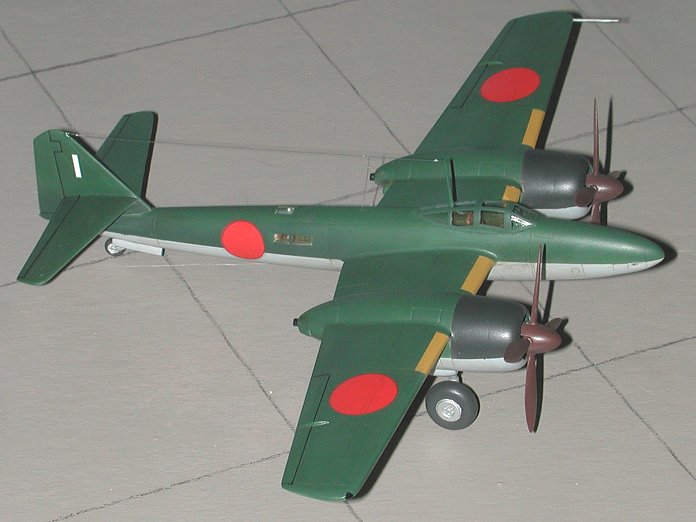
If you would like your product reviewed fairly and quickly, please contact the editor or see other details in the Note to Contributors.