 Kit Number: JT 37 (09137)
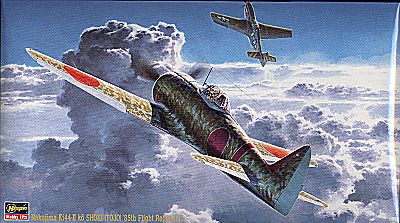
Hasegawa 1/48 Ki-44-II ko "85th Fighter Regiment"
Kit Number: JT 37 (09137)
Price: $25.00
Decals: Two versions; 85th Fighter Regiment (bare metal with mottling), Akeno Fighter School (bare metal with white wing and fuselage bands)
Date of Review: 20 October 1997
Reviewer: Scott Van Aken
The Ki-44 was the JAAF's first interceptor fighter. It was designed from the start to combine the largest, most powerful engine into the smallest possible airframe. In order to achieve some increased maneuverability, 'butterfly' flaps were mounted inboard of the ailerons on the underside to increase lift for use during combat. All in all, it was somewhat successful in its role, being one of the few Japanese aircraft that were able to reach the altitude of raiding B-29s.
 The differences in the several versions of Ki-44 are almost indistinguishable,
allowing Hasegawa to release at least three different versions of the Tojo
using almost identical sprues and changing only decal sheets. In any
case, this kit was typical Hasegawa and very easy to build. The only
construction problems I had were when it came to fitting the cowling. I must
have messed something up as I had to resort to superglue to get a tight fit.
All the other parts fit like a dream and I only used putty where I
made some sort of an error.
The differences in the several versions of Ki-44 are almost indistinguishable,
allowing Hasegawa to release at least three different versions of the Tojo
using almost identical sprues and changing only decal sheets. In any
case, this kit was typical Hasegawa and very easy to build. The only
construction problems I had were when it came to fitting the cowling. I must
have messed something up as I had to resort to superglue to get a tight fit.
All the other parts fit like a dream and I only used putty where I
made some sort of an error.
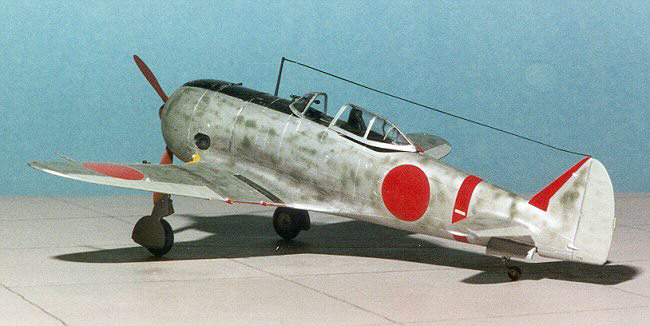
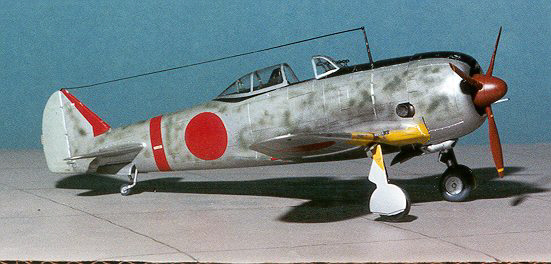
The interior is sufficiently detailed with sidewall boxes and a nice interior. All that really needs added is a harness assembly. The cockpit was painted an overall 'Nakajima Green' and the instrument panel was picked out with fine detail brushes. Again, the rest of the kit was trouble free so I shall not go into any detail on its construction.
Painting and decaling were the biggest challenges. I chose to use the kit decals and to do the 85th Regiment version of green mottling over bare metal. This meant that the kit had to be undercoated in gloss white to get a smooth aluminum finish. After it was painted white, the control surfaces were painted a grey green, masked off and Testor's Aluminum Metallizer was sprayed onto the entire airframe. Once dry, the decals were applied. It was here that I ran into trouble. There are decals for the yellow ID stripes on the wing leading edge. Do yourself a favor and paint them on. Mine did not fit well and setting solutions were unable to overcome the wrinkles in the decals. The rest of the decals went on without fuss. Hasegawa's decals are getting better and better, although they are still a bit less opaque than I would like, on this scheme it did not matter.
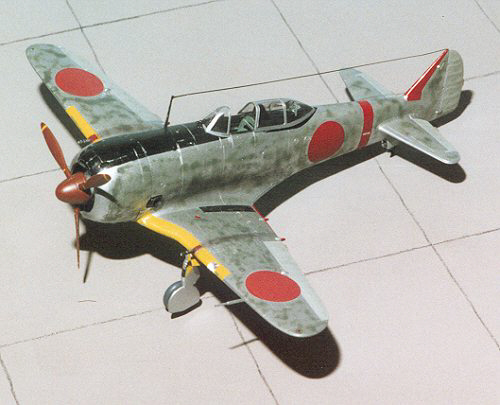 Japanese mottling was not applied at the factory. As such, to properly
duplicate the effect, the kit must be fully decaled and the mottling sprayed
around the decals. This a a real challenge as errors cannot simply
be removed or painted over. The trick is to get the paint quite thin
and spray close to the model at low pressure. My effort did not turn
out too bad and really was fun to apply. It is properly spotty and
only in a few places, as in real life, did I get paint onto a decal. Final
painting included trashing up a few areas of the paintwork to make it look
scuffed and used.
Japanese mottling was not applied at the factory. As such, to properly
duplicate the effect, the kit must be fully decaled and the mottling sprayed
around the decals. This a a real challenge as errors cannot simply
be removed or painted over. The trick is to get the paint quite thin
and spray close to the model at low pressure. My effort did not turn
out too bad and really was fun to apply. It is properly spotty and
only in a few places, as in real life, did I get paint onto a decal. Final
painting included trashing up a few areas of the paintwork to make it look
scuffed and used.
Overall an excellent kit. I am surprised that it has not sold as well as I would have thought. Although not that much superior to the older and much cheaper Otaki kit, if you don't have the Otaki kit, then this one is well worth your building.
Copyright ModelingMadness.com. All rights reserved. No reproduction in part or in whole without express permission from the editor.
Back to Reviews Page 2023