
Hasegawa 1/48 Ki-43-II "Late Version"
|
KIT # |
9082 (JT 82) |
|
PRICE: |
$ |
|
DECALS: |
Two Aircraft |
|
REVIEWER: |
|
|
NOTES: |
|
|
BACKGROUND |
For a look inside the box and a brief history, please
visit the preview.
|
CONSTRUCTION |
I really don't want to make this a brief, 'everything fit well
with no problems' construction review, though I could easily do just that. This
version, as with the earlier -I kit, is quite well
engineered, and since the Ki-43 is a pretty basic plane, there is not the myriad
of teeny parts one finds in some other kits.
Construction with this one starts on the interior. I glued on
all the parts that were to be painted Nakajima Interior Green, and this included
just about all of them! Then the interior and sidewalls were taken to the paint
shop and painted using my dwindling supply of Aeromaster paints. This color was
also sprayed onto the inside of the fuselage. When dry, the instrument panel
decals were applied and a touch of Solvaset used to snuggle them down. I had a
disaster with the upper one as I dropped the panel right after putting on the
solvent so that one was painted black and dry-brushed. Doesn't look as nice. The
rest of the interior had some detail painting done, a black wash with dirty
thinner applied and then the whole thing dry-brushed with aluminum. The side
panels were glued in place and then the rest of the interior glued in place as
the fuselage halves were glued. Don't forget the little plastic insert where the
tail wheel will go!
Meanwhile, the engine was painted steel and given a thin black
wash. Then the rest of the bits were painted and glued together. At this time
the inside of the engine cowling was painted interior green as recommended
by the instructions. The prop and hub were painted a brown primer color. Then
the cockpit was filled with tissue and the area around it painted a dark grey. I
used RLM 66 for this purpose. On the underside, the oil cooler (itself a rather
fiddly three-piece construct) was glued on. Finally, the tissue taken out of the
cockpit, and the clear bits were masked with Tamiya tape. The windscreen glued
on and the sliding part of the canopy tacked in place. Then the cowling with
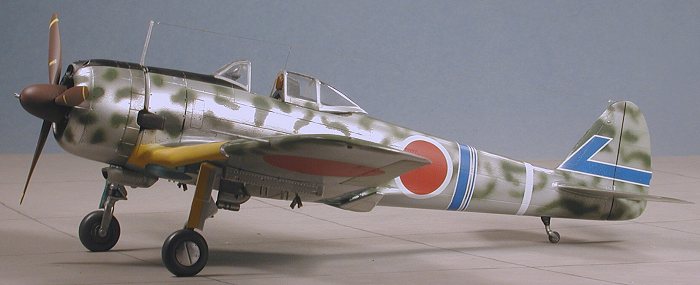
engine was tacked into place and it was time for paint. CAMOUFLAGE
Once the 'undercoat' of Alclad was down, it was a simple matter (though time
consuming) to mask off various panels and apply differing shades of aluminum.
With that in place, the black anti-glare panel area was masked off and painted
matte black. Then the entire upper surface was painted in random spots of
Nakajima Army Green from the Aeromaster acrylic line. Just before this, I
removed the masking from the control surfaces as that would be painted as well.
This was an incredibly time consuming task that turned into a chore. I really
hate acrylics for fine detail work. Regardless of what kind of airbrush I use,
the stuff clogs the tip after just a minute or two of spraying and often less
than that. I've tried different air pressures; putting an extender into the
paint to slow drying; thinning the paint; all to no avail. It isn't a problem
when doing large areas as there is a much larger paint flow. It is just doing
the detail work that sucks when using acrylics. Oh yes, I also got along the
undersides of the leading edges of the wings as shown in the decal sheet. To
simulate some wear, parts of the model were lightly sanded using 1200 grit.
Enough whining on my part. The end result is acceptable and once that was done,
the model was taken back to the workbench. SOME MORE BITS Before attempting to apply decals, I always like to do any brush
painting and then put the model on its landing gear. For the brush painting,
this meant the wheel wells. These were painted Aotake using the Polly S
bottling. This is a more blue green color than others I've used and I like it
more. I also thinned the paint before brushing it to make it a touch more
translucent and to cut back on brush lines in the paint. At this time the wing
pylons were attached. I also glued on the exhaust and tried to glue on the
cowling. It just didn't want to fit very well at all. So I broke the engine
loose from its mounts in the cowling and glued the engine to the forward
fuselage. I then cut some of the engine/cowling attachments until I could get
the cowling to fit properly. It was then glued in place with superglue.
I'm not sure why the problem and don't recall reading any other reviews that had
this difficulty. DECALS FINAL STUFF The pitot tube, radio mast, gear doors, landing light lens, combat flaps, and
drop tank shackles were then glued on. I decided not to use the drop tanks as I
think they are ugly as all get out and would rather have empty racks than those
tanks! The masking was removed from the clear bits and the canopy glued open. I
then rigged the radio long wire. Rather than use clear stretched sprue, I used
hair. It is amazingly resilient, takes super glue well and is pretty well scale
thickness (i.e. nearly invisible). Fortunately, I have several shades from brown
to white to choose from! Any touch-up painting was done, pastels were used for
the exhaust and the prop pressed into place. The model was complete and so I
hurriedly photographed it before something happened to it!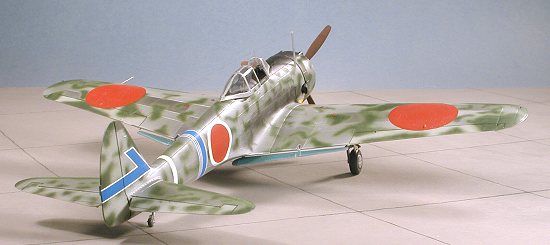 Moving on, the wings had the pylon holes,
fuel cooler and oil cooler holes opened and then the upper wing sections glued
on. No worries with this. They were then glued to the fuselage. Fit is very
good, though I did use a touch of filler at the forward and aft lower
fuselage/wing joins. During this time the rest of the joins were sanded and any
filler needed (and it was just a teeny amount) applied where needed. With all
that done, the tail-planes were glue in. Then the roll over pylon was glued in
place behind the seat. The exact placement of this part is not the most positive
so you'll probably have to do a best guess on it.
Moving on, the wings had the pylon holes,
fuel cooler and oil cooler holes opened and then the upper wing sections glued
on. No worries with this. They were then glued to the fuselage. Fit is very
good, though I did use a touch of filler at the forward and aft lower
fuselage/wing joins. During this time the rest of the joins were sanded and any
filler needed (and it was just a teeny amount) applied where needed. With all
that done, the tail-planes were glue in. Then the roll over pylon was glued in
place behind the seat. The exact placement of this part is not the most positive
so you'll probably have to do a best guess on it.
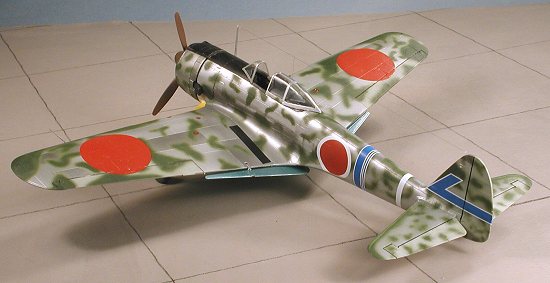
 I chose not to use most of the kit decals on this one. Sorry, but I just can't
pass up using an aftermarket sheet if one is around. For this one I picked a
bare metal plane with lots of mottling from
Aeromaster 48-319; IJAAF Falcons, Pt
2. First thing I did was to paint all of the control surfaces Japanese Army
Grey/Green; I used Aeromaster acrylics for this. When dry, they were masked.
Then the leading edges of the wings were painted white with Floquil Reefer
white, then when dry, painted with Aeromaster Japanese Yellow, an acrylic. When
dry, it was also masked. This same white/yellow treatment was given to the gear
doors as well.
I chose not to use most of the kit decals on this one. Sorry, but I just can't
pass up using an aftermarket sheet if one is around. For this one I picked a
bare metal plane with lots of mottling from
Aeromaster 48-319; IJAAF Falcons, Pt
2. First thing I did was to paint all of the control surfaces Japanese Army
Grey/Green; I used Aeromaster acrylics for this. When dry, they were masked.
Then the leading edges of the wings were painted white with Floquil Reefer
white, then when dry, painted with Aeromaster Japanese Yellow, an acrylic. When
dry, it was also masked. This same white/yellow treatment was given to the gear
doors as well.
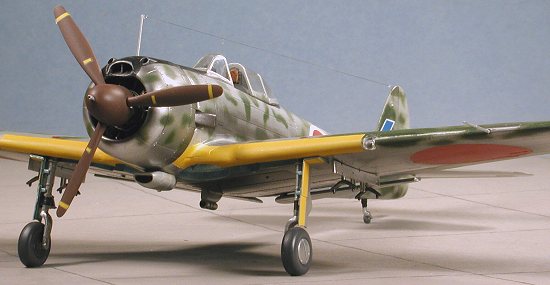
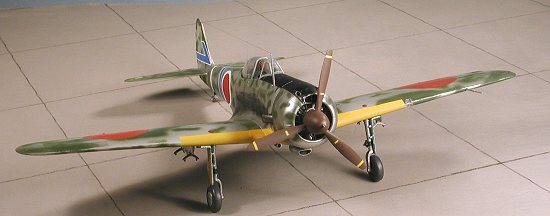
 A bare metal finish means that the plane needs a nice gloss undercoat so I used
Testors gloss light gull grey. I let it dry for several days and I thought that
would be enough time. Once the various parts had been allowed to cure (I
thought), the entire kit was given several light mistings of Alclad II aluminum.
This is not a shiny or glossy paint as real bare aluminum is rather matte and a
bit dull. Much to my dismay, I had a couple of places crack or show flow marks.
This is directly due to those spots not having a fully cured undercoat.
Fortunately, it was pretty minor compared to some other models, but it only goes
to show that one needs to allow a lot of time for curing of gloss enamels.
A bare metal finish means that the plane needs a nice gloss undercoat so I used
Testors gloss light gull grey. I let it dry for several days and I thought that
would be enough time. Once the various parts had been allowed to cure (I
thought), the entire kit was given several light mistings of Alclad II aluminum.
This is not a shiny or glossy paint as real bare aluminum is rather matte and a
bit dull. Much to my dismay, I had a couple of places crack or show flow marks.
This is directly due to those spots not having a fully cured undercoat.
Fortunately, it was pretty minor compared to some other models, but it only goes
to show that one needs to allow a lot of time for curing of gloss enamels.
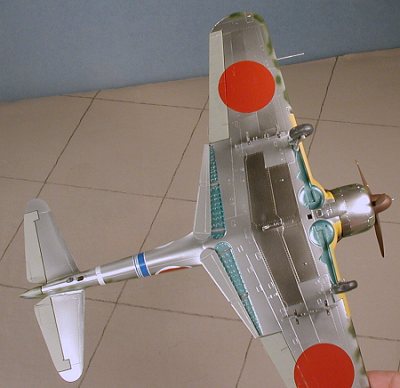
 This kit's main landing gear is an odd set-up with the upper
strut one part and the lower section below the oleo that holds the wheel the
second. The little alignment setup pretty well guarantees that you'll not be
able to properly align the wheels directly fore and aft. I'm not sure why this
is designed this way as I'd much rather have a single piece main gear strut. I
had this problem with the earlier -I kit as well. The wheels are a three piece
construct with separate tire and front and back hub. I do like this a lot as it
makes perfect wheels a cinch. However, the fit of the wheels on the gear is
sloppy so I highly recommend superglue for assembly. Make sure the flats of the
tire are on the bottom. The already painted tail gear was simply plugged into
its receptacle in the back.
This kit's main landing gear is an odd set-up with the upper
strut one part and the lower section below the oleo that holds the wheel the
second. The little alignment setup pretty well guarantees that you'll not be
able to properly align the wheels directly fore and aft. I'm not sure why this
is designed this way as I'd much rather have a single piece main gear strut. I
had this problem with the earlier -I kit as well. The wheels are a three piece
construct with separate tire and front and back hub. I do like this a lot as it
makes perfect wheels a cinch. However, the fit of the wheels on the gear is
sloppy so I highly recommend superglue for assembly. Make sure the flats of the
tire are on the bottom. The already painted tail gear was simply plugged into
its receptacle in the back.
 I had to deviate from the norm when it came to putting on the
decals. Usually I clear gloss coat a kit, but when dealing with bare metal, that
isn't a good idea. However, the green mottled areas were flat! I just trusted
that the decals would work well and forged ahead. As I mentioned earlier, I used
Aeromaster 48-319 and chose the 77
Sentai plane as it was the scheme and the exhaust that I was seeking. When it
comes to markings, there really are not that many. From the kit I used the fuel
filler cap ones and the ones for the prop blade. The rest came from the sheet.
They really fit well and I used Microscale setting solution on them. This
provided an odd reaction to the wing roundels as they initially worked well, but
5 minutes later when I looked at them, they had curled up like some large water
lily. Very odd as the decals were printed by Microscale. I doused the trouble
areas with Solvaset and they settled down, though I did have some problems with
mini-bubbles and creasing, probably due to the incompatibility between Solvaset
and the Microset. Once the decals were on and dry, the entire plane was wiped
down with clean water to remove any solvent or glue residue.
I had to deviate from the norm when it came to putting on the
decals. Usually I clear gloss coat a kit, but when dealing with bare metal, that
isn't a good idea. However, the green mottled areas were flat! I just trusted
that the decals would work well and forged ahead. As I mentioned earlier, I used
Aeromaster 48-319 and chose the 77
Sentai plane as it was the scheme and the exhaust that I was seeking. When it
comes to markings, there really are not that many. From the kit I used the fuel
filler cap ones and the ones for the prop blade. The rest came from the sheet.
They really fit well and I used Microscale setting solution on them. This
provided an odd reaction to the wing roundels as they initially worked well, but
5 minutes later when I looked at them, they had curled up like some large water
lily. Very odd as the decals were printed by Microscale. I doused the trouble
areas with Solvaset and they settled down, though I did have some problems with
mini-bubbles and creasing, probably due to the incompatibility between Solvaset
and the Microset. Once the decals were on and dry, the entire plane was wiped
down with clean water to remove any solvent or glue residue.
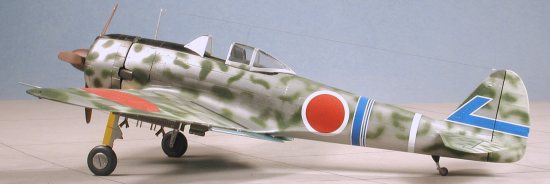
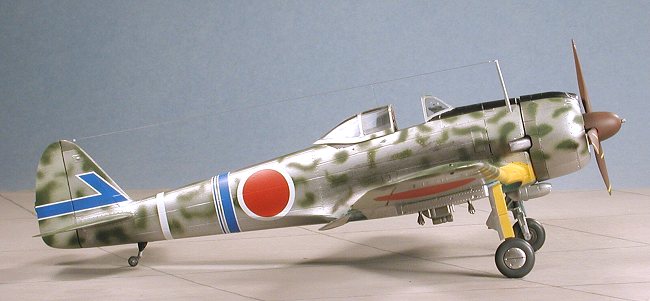
 First of the last steps was to spray the decals with some clear matte as they
looked darn silly all glossy. I also sprayed the flat where the exhaust stain
would go. One of these days I'll start using Tamiya smoke, but I fear screwing
up the paint work with it! I then started scraping some of the black anti-glare
panel where I thought it would be abraded. Very effective looking as the black
rather easily scraped off showing the much harder Alclad beneath it.
First of the last steps was to spray the decals with some clear matte as they
looked darn silly all glossy. I also sprayed the flat where the exhaust stain
would go. One of these days I'll start using Tamiya smoke, but I fear screwing
up the paint work with it! I then started scraping some of the black anti-glare
panel where I thought it would be abraded. Very effective looking as the black
rather easily scraped off showing the much harder Alclad beneath it.
|
CONCLUSIONS |
This model was even more fun to build that the earlier version. This is because I knew of the 'areas of concern' so was able to plan for them. This is the fourth 1/48 Ki-43 I've built in the last couple of years (Two Hasegawa, an Otaki and a Fine Molds). It is one of my favorite JAAF planes as it fought for the entire war and had many interesting camo and markings schemes. It is a kit that I know you'll have fun building.
June 2002
Review kit courtesy of Marco Polo Imports (now no longer in business).
If you would like your product reviewed fairly and quickly , please contact me or see other details in the Note to Contributors.