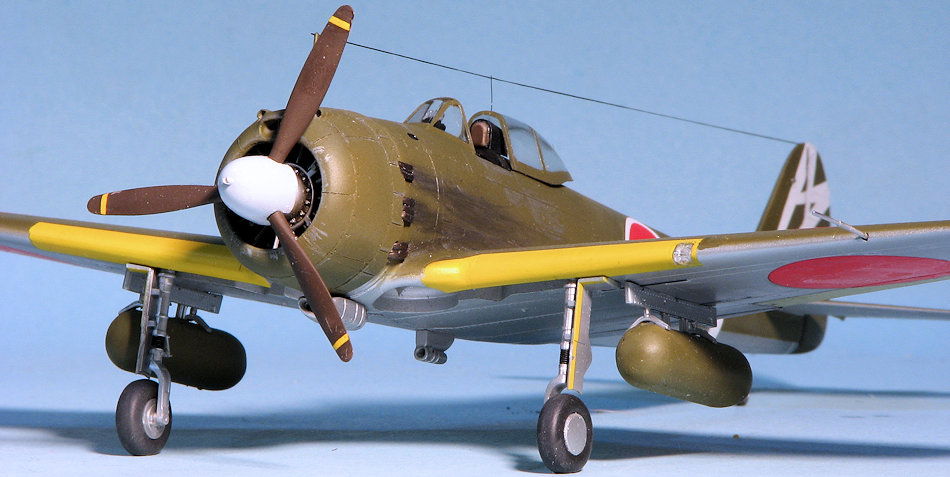
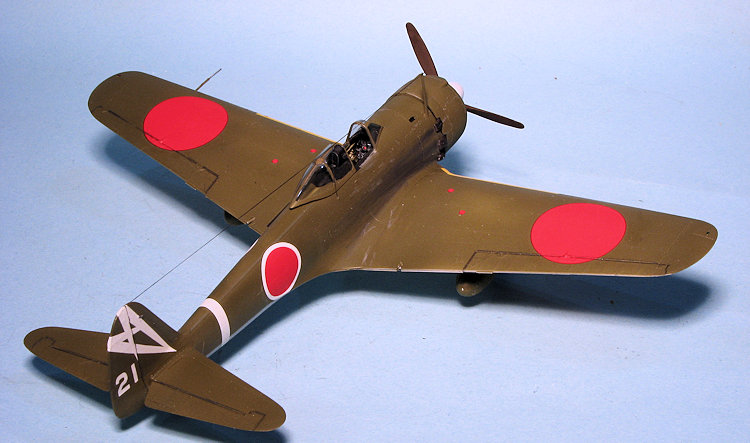
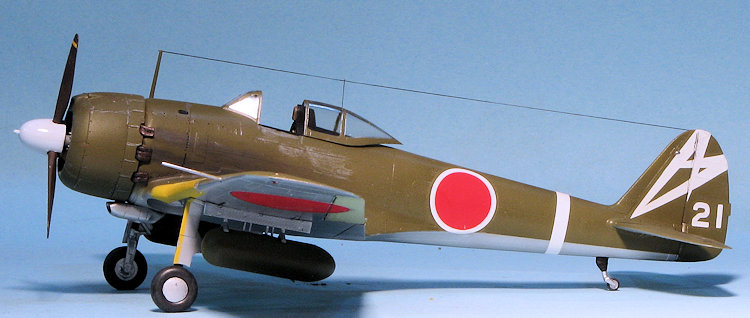
Hasegawa 1/48 Ki-43-III Hayabusa '48th Flight Regiment'
| KIT #: | 07418 |
| PRICE: | 3200 yen (about $27.00) at www.hlj.com |
| DECALS: | Two options |
| REVIEWER: | Scott Van Aken |
| NOTES: | Limited Edition (2015) |
| HISTORY |
The Nakajima Ki-43
Hayabusa (隼, "Peregrine
Falcon") was a single-engine land-based tactical fighter used by the Imperial
Japanese Army Air Force in World War II. The Army designation was "Army Type 1
Fighter" (一式戦闘機); the Allied reporting name was "Oscar", but it was often called
the "Army Zero" by American pilots for its side-view resemblance to the
Mitsubishi A6M Zero that was flown by the Japanese Navy,
 using essentially the
same radial engine as the Army's Oscar,
and with the Oscar
having much less framing for its all-around vision canopy than the Zero used.
using essentially the
same radial engine as the Army's Oscar,
and with the Oscar
having much less framing for its all-around vision canopy than the Zero used.
Like the Mitsubishi-produced A6M Zero, the radial-engined Ki-43 was light and easy to fly and became legendary for its combat performance in East Asia in the early years of the war. It could outmaneuver any opponent, but did not have armor or self-sealing tanks, and its armament was poor until its final version, which was produced as late as 1945. Allied pilots often reported that the nimble Ki-43s were difficult targets but burned easily or broke apart with few hits. In spite of its drawbacks, the Ki-43 shot down more Allied aircraft than any other Japanese fighter and almost all the JAAF's aces achieved most of their kills in it.
The final version of the Ki-43 was the Ki-43-III which utilized the more powerful Nakajima Army Type 1 Ha-115-II engine. Maximum speed increased to 358 mph. This variant was produced until the end of the war, though it did not see the widespread use of the earlier versions and did not offer much additional in the way of pilot protection or heavier armament, though the nose guns were increased to 12.7mm and a version with 20mm cannon was being developed, but never reached production.
Total production amounted to 5,919 aircraft. Many of these were used during the last months of the war for kamikaze missions against the American fleet.
| THE KIT |
 The
Ki-43 was one of Hasegawa's initial forays into their new tool program of 1/48
Japanese aircraft kits and still remains the best one available in this scale in
terms of fidelity and ease of construction. Of course, it wouldn't be Hasegawa
unless the molds were developed to cover a variety of different variants.
However, the vast majority of those kits have been either the -I or -II
versions. To do the later -III, Hasegawa has had to resort to using resin parts.
I am not sure why they simply did not tool a new cowling with the requisite
exhaust and other bits to do a proper -III as it certainly does not seem to be
all that much. However, resin is the way they have chosen to go.
The
Ki-43 was one of Hasegawa's initial forays into their new tool program of 1/48
Japanese aircraft kits and still remains the best one available in this scale in
terms of fidelity and ease of construction. Of course, it wouldn't be Hasegawa
unless the molds were developed to cover a variety of different variants.
However, the vast majority of those kits have been either the -I or -II
versions. To do the later -III, Hasegawa has had to resort to using resin parts.
I am not sure why they simply did not tool a new cowling with the requisite
exhaust and other bits to do a proper -III as it certainly does not seem to be
all that much. However, resin is the way they have chosen to go.
Let me start with that aspect of the kit. There is a separate bag in with most of the base kit, and this bag includes a new resin cowling and a sprue of resin parts. In amongst those are a new head rest, new exhaust pipes, inserts for the fuselage opening behind the cowling, new oil cooler intake, new wheel hubs and a number of other bits. The resin itself is free of air pockets, but on the cowling the surface feels rough. The pour stubs are rather large considering how small some of the parts are. It certainly isn't up to the quality of say, Ultracast and these bits will take some care in cleaning up.
The rest of the kit is standard with a nicely done cockpit, a
well molded engine, separate wing tips, a pair of drop tanks for under the
wings, and a two piece windscreen/canopy so you can pose the canopy open. Also
included are the butterfly flaps, though these can only be built in the deployed
position, something t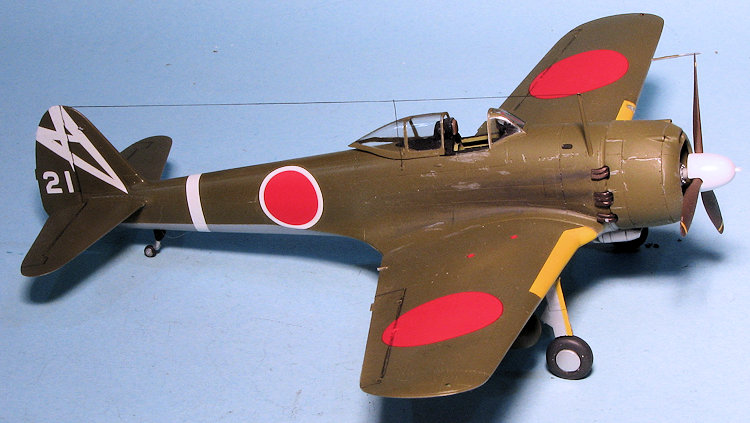 hat was very rare when on the ground. I've ended up sanding
these very thin and gluing them in the closed position as this was more the
norm.
hat was very rare when on the ground. I've ended up sanding
these very thin and gluing them in the closed position as this was more the
norm.
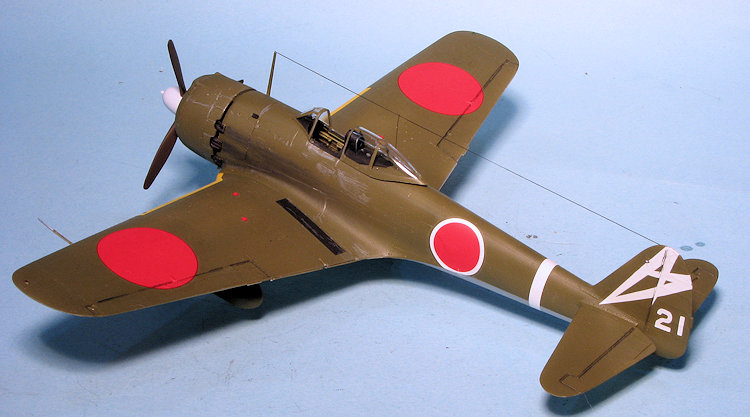
Instructions are well done with the usual Gunze paint references. As the boxing is for the 48th Flight Regiment, both options are for this unit, differing only in the thickness of the tail marking, the number and the white band around the rear fuselage. Both are listed as an olive drab over grey-green. It is quite probable that the underside of these planes was unpainted, so you may wish to keep that in mind. The decal sheet includes stencils, instrument decals, a wing walk decal as well as prop markings and the yellow wing ID markings. I would paint the latter, especially if you are like me and can never get these decals to look right after application. As you can see, the white is actually white so these decals are as good as any aftermarket sheet.
| CONSTRUCTION |
FIrst things first and in the case of airplanes, it means
dealing with the interior. I broke out the brush as my remaining Aeromaster
Nakajima Interior Green. For those who cannot find this shade, and it is done by
some of the more exotic paint brands, Italian Interior Green is pretty close,
though the Nakajima color is a bit more yellow. I find brush painting to be
rather therapeutic so do this whenever the opportunity presents itself; mostly
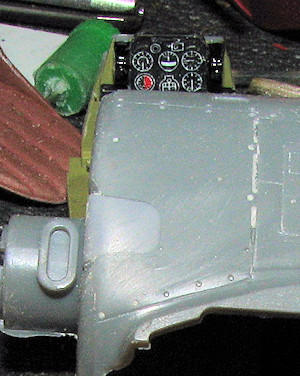
interiors and wheels. While building up the interior, I was quite pleased that
the decals matched the instruments exactly. I have found this to be true of most
of Hasegawa and Tamiya's l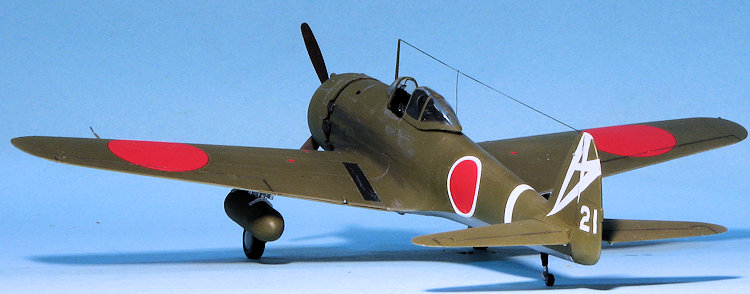 arger scale kits so have no qualms about using their
decals atop the panels. Sure saves on a lot of painting.
arger scale kits so have no qualms about using their
decals atop the panels. Sure saves on a lot of painting.
During this time, I also assembled the upper and lower wing sections, after opening the various holes required for this version. The kit has separate wing tips which fit fairly well, but not as well as if they had been molded on the wings. It is best to install these before the glue sets as one can then scoot the bits into position a bit better. As I mentioned in the kit description, the butterfly flaps were almost never deployed on the ground. This means having to sand them very thin as well as grind out much of the well to get the thinner flaps to fit in place. Each of the flaps has, on the outer side, three ejector pin marks that you will have to fill. In all, getting the flaps modeled closed took about an hours worth of work.
With the flaps installed and the wings together, I then
painted the leading edge white, followed later by yellow. I'm not good at the
decals provided for somewhat complex leading edges like this and also thought
 that perhaps prepainting and then masking this feature prior to installation
might work out better.
that perhaps prepainting and then masking this feature prior to installation
might work out better.
Meanwhile the cockpit bits were slowly assembled and the engine parts painted and washed. For the engine, I used steel and dry brushed it with silver. Seems to look OK. The cockpit side walls were installed and I glued in the exhaust blanking pieces. These are resin and like most of the resin provided, is rather flashy. Trimming this got a good fit and once installed, filler was used to obliterate the rivet detail around them and smooth the surface. I then glued together the fuselage halves after trapping the poly-cap for the tail gear.
The interior was then installed and I glued on the tailplanes. Meanwhile, I cleaned up the cowling to be sure that it would fit properly. The resin is surprisingly soft so one does have to be careful when sanding and removing flash. I test installed the engine and it fits, though the cowling seems a bit large on the inside so it is not a tight fit. It also fits on the fuselage, though needs a little bit of trimming on the inside.
| COLORS & MARKINGS |
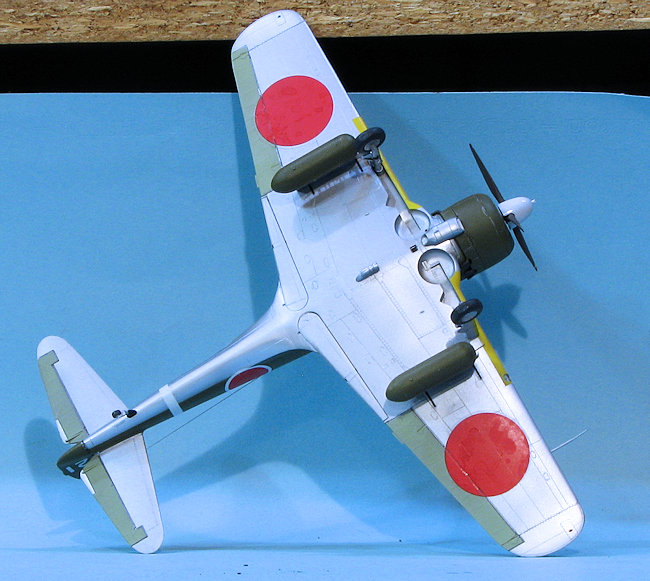
I then chose to paint the wing. For this, I used aluminum on the underside, followed by IJAAF grey-green for the lower surface ailerons and olive drab for the upper surface. The underside of the tail planes were also painted in a similar manner at this time. I did the usual back and forth getting pretty much all the airframe done save the area around the cockpit. I still had some bits to add there.
 Those bits included the head rest with its insert, the gun
sight and two small resin bits, one on the right side of the head rest and what
is a fuel filler neck behind the head rest. I also assembled the main landing
gear legs. These are in two pieces, though I'd have preferred them being a
single casting. The result of this method (so they could be included on a pair
of common sprues), is that the oleo scissors do not point in the same direction
on each leg. They also ended up with one of the gear being a bit misaligned and
some trimming of the mounting leg was required when the gear were glued in.
Those bits included the head rest with its insert, the gun
sight and two small resin bits, one on the right side of the head rest and what
is a fuel filler neck behind the head rest. I also assembled the main landing
gear legs. These are in two pieces, though I'd have preferred them being a
single casting. The result of this method (so they could be included on a pair
of common sprues), is that the oleo scissors do not point in the same direction
on each leg. They also ended up with one of the gear being a bit misaligned and
some trimming of the mounting leg was required when the gear were glued in.
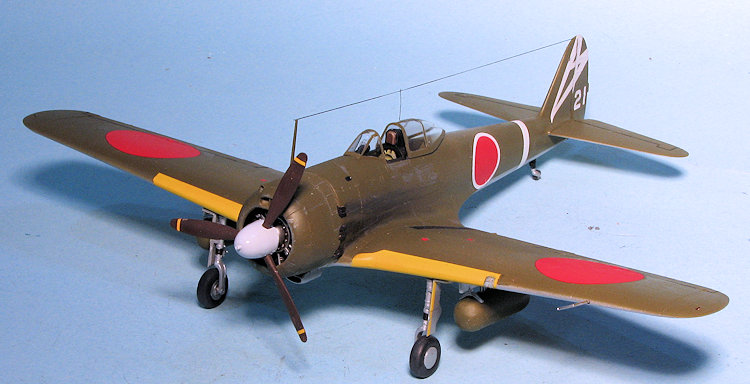
The canopy items were masked, with the windscreen being glued in and the canopy was tacked on until after painting. Some time during this the fuel filler pipe behind the head rest disappeared. The forward antenna was glued in and I did some more painting of the upper surface to take care of the areas missed earlier.
Then it was time for decals. I went with the kit decals on this one to make it completely out of the box build. The Hasegawa decals are matte and came free from the backing rather quickly. I used Mr. Mark Softer on them and that worked perfectly. I chose the box art plane as all the other models I'd seen with markings from this unit had chosen the other option, probably due to the additional markings aft of the fuselage stripe.
| FINAL CONSTRUCTION |
 Once all those were in place, I glued on the exhaust, which
required some trimming of the mounting area to get them to fit. Thanks to the
very flexible resin, I had some paint flake off during this procedure. The
engine was then glued in, followed by the resin cowling. The instructions would
have you cut off the mounting posts from the circumference of the engine. I did
not and used those to mount the cowling. Fit is quite good.
Once all those were in place, I glued on the exhaust, which
required some trimming of the mounting area to get them to fit. Thanks to the
very flexible resin, I had some paint flake off during this procedure. The
engine was then glued in, followed by the resin cowling. The instructions would
have you cut off the mounting posts from the circumference of the engine. I did
not and used those to mount the cowling. Fit is quite good.
Next, I built up the wing pylons with their anti-sway braces. Hasegawa has molded half the brace post on the pylon and the other half on the brace itself. One then mates these two halves. It takes a steady hand and one needs to be sure things are properly aligned, but it works. I think it would have been easier to have a hole in the bottom of the pylon and then a solid shaft on the brace that one could then simply insert into the hole. The resin oil cooler was then glued on and when the braces were dry, the pylons were attached. Meanwhile the wheels were built up, taking care not to scratch the resin covers. The wheels are not a solid fit on the axle and one has to take care to align them properly so the flat spot on the tires is down. It would have been nice if, like the Fine Molds kit, these had been keyed.
 With those
in place, there were still a few things to add. This included the pitot tube
(which bends VERY easily), the main gear doors and finally the drop tanks. The
tanks actually fit quite well and I only had one brace fall off during this. It
was easy to get back on with the fuel lines leading into the tanks helping hold
it all in place. There is a tiny clear landing light to be installed that I
almost forgot to include. There is also a clear lens to go over this. I had a
few items to touch up in terms of paint and in with this were the formation
lights that took a tiny bit of paint using AK Interactive's clear lacquers. I
then outlined the control surfaces with a pencil and added some exhaust stain
with pastels. The long wire was added using EZ-Line and I removed the masking
from the clear bits. I wanted to pose the canopy open and it fits fairly well,
though the rear of the canopy should be pretty much flush with fuselage.
Unfortunately, the design of this area is such that I could not get it to
cooperate. The prop was pushed on and that was it.
With those
in place, there were still a few things to add. This included the pitot tube
(which bends VERY easily), the main gear doors and finally the drop tanks. The
tanks actually fit quite well and I only had one brace fall off during this. It
was easy to get back on with the fuel lines leading into the tanks helping hold
it all in place. There is a tiny clear landing light to be installed that I
almost forgot to include. There is also a clear lens to go over this. I had a
few items to touch up in terms of paint and in with this were the formation
lights that took a tiny bit of paint using AK Interactive's clear lacquers. I
then outlined the control surfaces with a pencil and added some exhaust stain
with pastels. The long wire was added using EZ-Line and I removed the masking
from the clear bits. I wanted to pose the canopy open and it fits fairly well,
though the rear of the canopy should be pretty much flush with fuselage.
Unfortunately, the design of this area is such that I could not get it to
cooperate. The prop was pushed on and that was it.
| CONCLUSIONS |
I started this kit and the Fine Molds Ki-43-III kit at the
same time. This one took a bit longer due to the various inserts required to
make the -III version and the need to be careful with the resin bits. T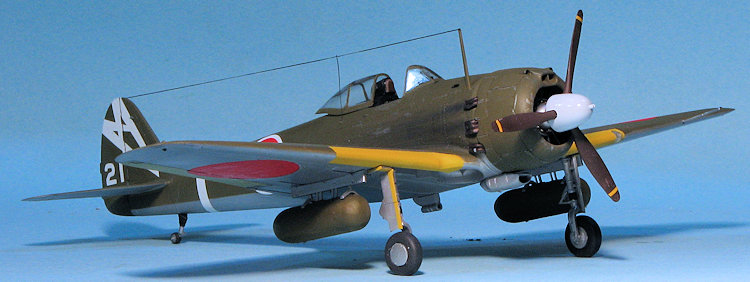 his
kit also had more pieces and was a bit more complex to build. The fit of the
Hasegawa kit is superior to the Fine Molds version and that alone should be
enough to lean one towards this kit if one has a choice. I found the decals to
be very good, though the Hasegawa reds are brighter than those on the Fine Molds
kit and these had no issues with being off register. On the plus side for the
Fine Molds kit, it offers more markings option and is a bit easier to build,
even if one has to do more sanding on seams. For a modeler of average skills, it
is pretty much a toss up though I'd lean towards this one due to the finesse in
detail. Either way, you get an excellent model of this late war and relatively
obsolescent IJAAF fighter for your collection.
his
kit also had more pieces and was a bit more complex to build. The fit of the
Hasegawa kit is superior to the Fine Molds version and that alone should be
enough to lean one towards this kit if one has a choice. I found the decals to
be very good, though the Hasegawa reds are brighter than those on the Fine Molds
kit and these had no issues with being off register. On the plus side for the
Fine Molds kit, it offers more markings option and is a bit easier to build,
even if one has to do more sanding on seams. For a modeler of average skills, it
is pretty much a toss up though I'd lean towards this one due to the finesse in
detail. Either way, you get an excellent model of this late war and relatively
obsolescent IJAAF fighter for your collection.
| REFERENCES |
https://en.wikipedia.org/wiki/Nakajima_Ki-43
Famous Aircraft of the World #65, July 1997, Burin-Do
February 2016
Copyright ModelingMadness.com Thanks to Hobby Link Japan for the review kit. You can find
this kit
at this link. If you would like your product reviewed fairly and fairly quickly, please
contact
the editor or see other details in the
Note to
Contributors.