
Hasegawa 1/48 Ki-100-koh 'Fastback'
| KIT #: | 9044 (Jt 44) |
| PRICE: | around $12 from a vendor, currently OOP |
| DECALS: | Two options |
| REVIEWER: | Scott Van Aken |
| NOTES: |
| HISTORY |
In 1944, the folks at Kawasaki had a problem with the Ki-61. While airframe construction was going well, engine production was lagging far behind. So much so that there were airframes all over the factory awaiting engines. With a war going on, this was not considered to be a good thing. There was also the need to upgrade the engines in the Ki-61, but frankly, there were not enough engines around that were small enough and powerful enough to fit the need. Actually, the only suitable engine with enough power was a large 1,500 hp Mitsubishi 14 cylinder, double-row radial.
 Deciding to give it a shot anyway, Kawasaki engineers went about
trying to adapt a 4 foot wide engine into a 2 foot 9inch wide Ki-61. Some
creative engineering and aerodynamic smoothing was applied and the engine was
finally fit in, the first prototype flying in February of 1945. Much to
everyone's delight, the aircraft that was produces was superior in almost every
way to the Ki-61. It was lighter, more maneuverable, had better climbing speed
and a higher ceiling. The only down side was that it was a few miles per hour
slower. No big deal when the plan was to use it to get to the B-29s that were
making themselves a major nuisance, what with bombing and all.
Deciding to give it a shot anyway, Kawasaki engineers went about
trying to adapt a 4 foot wide engine into a 2 foot 9inch wide Ki-61. Some
creative engineering and aerodynamic smoothing was applied and the engine was
finally fit in, the first prototype flying in February of 1945. Much to
everyone's delight, the aircraft that was produces was superior in almost every
way to the Ki-61. It was lighter, more maneuverable, had better climbing speed
and a higher ceiling. The only down side was that it was a few miles per hour
slower. No big deal when the plan was to use it to get to the B-29s that were
making themselves a major nuisance, what with bombing and all.
The superb handling and ease of flying gave even the most inexperienced pilots a chance against American fighters. In the hands of an expert, they were easily a match for anything the US could put against it. As was typical of late war projects, it was too little and too late. Nearly 400 were eventually built, over half of them modified Ki-61 airframes. Thankfully, one still exists in the UK and has been lovingly restored.
| THE KIT |
 This is pretty much what people buy
Hasegawa kits for. It has crisp engraved detailing, a nicely done cockpit
and promises of a rather trouble-free build. There are no options aside
from drop tanks, and the canopy is a single piece affair. No problem as it
is crystal clear. Decals are provided for the instrument panel should you
wish to use them, otherwise you can detail the raised instruments as you
see fit. You get pretty much the Ki-61 kit with the Ki-100 fuselage halves
replacing the Ki-61 versions in the appropriate sprues. You also get a new
sprue with dedicated Ki-100 parts. Means that you'll have a number of
pieces left over, including a canopy and prop so add those to your spares
box in case you need any of the
This is pretty much what people buy
Hasegawa kits for. It has crisp engraved detailing, a nicely done cockpit
and promises of a rather trouble-free build. There are no options aside
from drop tanks, and the canopy is a single piece affair. No problem as it
is crystal clear. Decals are provided for the instrument panel should you
wish to use them, otherwise you can detail the raised instruments as you
see fit. You get pretty much the Ki-61 kit with the Ki-100 fuselage halves
replacing the Ki-61 versions in the appropriate sprues. You also get a new
sprue with dedicated Ki-100 parts. Means that you'll have a number of
pieces left over, including a canopy and prop so add those to your spares
box in case you need any of the m
in a future Ki-61 build.
m
in a future Ki-61 build.
I should mention that the instructions are what you'd expect from Hasegawa and they have markings for two aircraft of the 59th Sentai. Though the sheet says Oct 1945, it had to be earlier than that. Sorry for the omission from the decals, I didn't scan them until after I'd used the instrument panel marking. Since this is a 1995 kit, the decals are typical of Hasegawa in that they are a bit thick, a bit transparent, and have reds that are a bit too bright. Setting solution use on these is always a crap shoot in terms of whether they'll work.
| CONSTRUCTION |
Not much in the way of sub assemblies
on this one, so I started by gluing together all the interior bits that
would be painted the same shade. This meant the seat, control stick and the
rudder pedals. There is a bulkhead that needs to be glued in place as well.
At this time, I also built up the area behind the seat, which includes the
head rest/armor. All of these are to be painted in a tan shade and so I
picked some US V ietnam Tan that I'd already had mixed. It looks the part.
Now, I should point out that it is highly likely that this aircraft was not
painted in this shade as examination of the lone extant Ki-100 at RAF Cosford during rebuild found a standard Kawasaki green color used for the
interior. However, that is a later Ki-100-Ib and not the early version that
was built up from excess Ki-61 airframes. With that in mind, I used the
'tan' color. At least, that's my story and I'm sticking to it!
ietnam Tan that I'd already had mixed. It looks the part.
Now, I should point out that it is highly likely that this aircraft was not
painted in this shade as examination of the lone extant Ki-100 at RAF Cosford during rebuild found a standard Kawasaki green color used for the
interior. However, that is a later Ki-100-Ib and not the early version that
was built up from excess Ki-61 airframes. With that in mind, I used the
'tan' color. At least, that's my story and I'm sticking to it!
Moving to the wings, I drilled out the holes for the drop tank pylons and then glued the upper and lower wing halves together. No surprises there. I also glued together the drop tanks at this time.
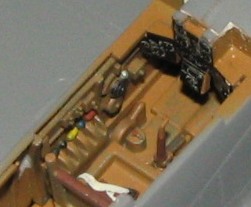 The instructions show some pretty
good color info for the interior and the details were dutifully painted. I
also installed a set of Eduard lap belts to add a bit of extra interest.
With all the bits properly in place, the cockpit was closed up. Next, the
fuselage was glued together and then the instrument panel put in place,
followed by the cockpit. I painted the engine with Alclad II's Dark
Aluminum and painted the crankcase cover dark grey. The engine was
installed into the fuselage along with the upper cowling. This was followed
by the front cowl. I left off the crankcase cover until later. Some filler
is always needed on my models, but this one didn't take as much as usual.
The instructions show some pretty
good color info for the interior and the details were dutifully painted. I
also installed a set of Eduard lap belts to add a bit of extra interest.
With all the bits properly in place, the cockpit was closed up. Next, the
fuselage was glued together and then the instrument panel put in place,
followed by the cockpit. I painted the engine with Alclad II's Dark
Aluminum and painted the crankcase cover dark grey. The engine was
installed into the fuselage along with the upper cowling. This was followed
by the front cowl. I left off the crankcase cover until later. Some filler
is always needed on my models, but this one didn't take as much as usual.
 The
tailplanes were then glued to the fuselage and on the wings the insert was
glued in place. This is needed as there is no lower radiator and all the
various mounting points need to be covered up. The wing was then glued to
the lower fuselage. This produced the worst of the joins on the kit as the
aft portion of the wing doesn't match up well with the fuselage. Several
coats of filler were required at this juncture. With that dry, the aft
cockpit section was snapped into place. This was a really tight fit and it
may not be a bad idea to put this in when the fuselage sections are glued
together to make sure all goes well. Regardless, it fit well. I then added
the gun sight, did some touchup painting in the cockpit and then glued on
the canopy, which I'd already masked. An excellent fit.
The
tailplanes were then glued to the fuselage and on the wings the insert was
glued in place. This is needed as there is no lower radiator and all the
various mounting points need to be covered up. The wing was then glued to
the lower fuselage. This produced the worst of the joins on the kit as the
aft portion of the wing doesn't match up well with the fuselage. Several
coats of filler were required at this juncture. With that dry, the aft
cockpit section was snapped into place. This was a really tight fit and it
may not be a bad idea to put this in when the fuselage sections are glued
together to make sure all goes well. Regardless, it fit well. I then added
the gun sight, did some touchup painting in the cockpit and then glued on
the canopy, which I'd already masked. An excellent fit.
While all this was drying, I attended to some smaller details. One was the assembly of the drop tanks, some careful work is needed on the top portions as this has a lot of detail. I also glued the prop to the spinner backing as they'd be painted the same color. Stuffing some tissue in the engine opening, I headed to the paint shop.
| COLORS & MARKINGS |
 Both
of the decal options had bare metal undersides, so I sprayed down a base
coat of gloss ADC Grey to give the Alclad II something to attach itself to. I
prefer using gloss enamels as they are somewhat thick and so cover a lot of
the small scratches made during sanding. Once fully dry, the entire
underside of the kit was painted with Alclad II Duraluminum. I then masked
off the wing spar and used Steel for this. Several panels were then painted
with Dark Aluminum and regular Aluminum to add some interest. Next, using
Colorcoats excellent enamels, I masked off the control surfaces and painted
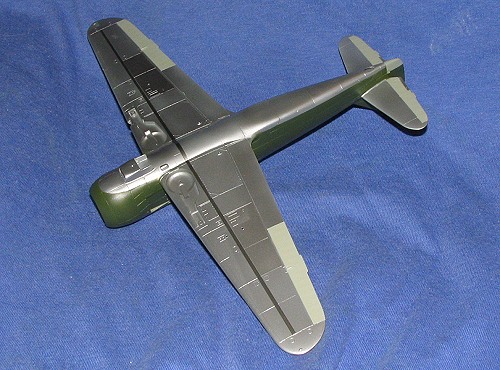
them Green-Grey. I next masked off the entire underside and painted the
upper surfaces with Colorcoats Kawasaki Army Green enamel. Looking at
photos of these planes, it seemed as if they were masked off and not
freehand painted. The gear doors, wheels, drop tanks, pitot tube, and
struts were also painted various metallic shades when doing the underside.
U
Both
of the decal options had bare metal undersides, so I sprayed down a base
coat of gloss ADC Grey to give the Alclad II something to attach itself to. I
prefer using gloss enamels as they are somewhat thick and so cover a lot of
the small scratches made during sanding. Once fully dry, the entire
underside of the kit was painted with Alclad II Duraluminum. I then masked
off the wing spar and used Steel for this. Several panels were then painted
with Dark Aluminum and regular Aluminum to add some interest. Next, using
Colorcoats excellent enamels, I masked off the control surfaces and painted
them Green-Grey. I next masked off the entire underside and painted the
upper surfaces with Colorcoats Kawasaki Army Green enamel. Looking at
photos of these planes, it seemed as if they were masked off and not
freehand painted. The gear doors, wheels, drop tanks, pitot tube, and
struts were also painted various metallic shades when doing the underside.
U sing Colorcoats Brown Primer, the prop and spinner backing were painted.
The spinner tip was painted white then yellow. After it dried, this was
masked and the back section of the spinner was painted with Brown Primer.
sing Colorcoats Brown Primer, the prop and spinner backing were painted.
The spinner tip was painted white then yellow. After it dried, this was
masked and the back section of the spinner was painted with Brown Primer.
Returning to the work bench, I painted the tires with Floquil Weathered Black lacquer. Then the struts were glued in place. The fit of the main gear is a bit loose and I found the tail gear strut to be rather weak, a problem I encountered with the Ki-61 I built many years ago. I fear that it will not last very long before breaking.
Now that I had the kit on its gear, it was given a gloss coat and then time for decals. Since I could not find any aftermarket markings for this plane in my collection, I used the kit decals. With a bit of apprehension, I might add. First I attached the yellow wing ID sections. These fit fairly well, but wrinkled near the wing roots. I did try both Solvaset and Microsol setting solutions and found both to work fairly well. Though the Microsol worked OK, it did not force the decals to snuggle into panel lines as well as the Solvaset, but being the weaker of the two, was the safer in terms of decal reaction. As feared, the somewhat transparent whites, reds and yellows not only caused the underside shades to bleed through, but also caused a more intense shade to appear when then wrinkled or overlapped. The worst of these was at the wing roots as previously mentioned and on the tail stripe. No amount of trimming or solvents could get these decals to conform to the base of the fin and this remains a major glitch in the markings. I can only assume that the model photo had these markings painted on. The rest went on well, though they do need to be trimmed to remove excessive clear carrier and they are visibly thick, even after clear coating.
| FINAL CONSTRUCTION |
 With the decals firmly in
place, I then attached all the rest of the bits. This included the wheels
(which are keyed), the gear doors, and engine crankcase cover. The wing
pylons don't fit flush and need to be sanded down to get a better fit. The
drop tanks were then added and the prop pushed into place. I then glued on
the radio mast and took the model to have a coat or two of matte clear
applied to the upper surfaces. Returning, I painted the radio mast, pushed
in the pitot tube (a very tight fit), and glued on the landing light cover,
using clear paint. The masking was then removed from the canopy, and the
exhaust stains added using pastels. Final painting included the black walk
areas on the wing root and the formation lights.
With the decals firmly in
place, I then attached all the rest of the bits. This included the wheels
(which are keyed), the gear doors, and engine crankcase cover. The wing
pylons don't fit flush and need to be sanded down to get a better fit. The
drop tanks were then added and the prop pushed into place. I then glued on
the radio mast and took the model to have a coat or two of matte clear
applied to the upper surfaces. Returning, I painted the radio mast, pushed
in the pitot tube (a very tight fit), and glued on the landing light cover,
using clear paint. The masking was then removed from the canopy, and the
exhaust stains added using pastels. Final painting included the black walk
areas on the wing root and the formation lights.
| CONCLUSIONS |
 I always enjoy building modern
Hasegawa kits. They are well engineered, have good fit, and offer few
surprises. Of course, they are not perfect and often require a bit of
trimming here and there as well as a dab of filler from time to time, but
are a real break if one has been doing a lot of short run or resin kits.
Probably their biggest weakness is the kit-supplied decals. This kit was
done in 1996 and by now, Hasegawa decals have generally improved (at least
the last new kit I did had great decals). This one adds to a blank space in
my Japanese Army fighters collection and is a kit that I can justly
recommend to almost all of you who.
I always enjoy building modern
Hasegawa kits. They are well engineered, have good fit, and offer few
surprises. Of course, they are not perfect and often require a bit of
trimming here and there as well as a dab of filler from time to time, but
are a real break if one has been doing a lot of short run or resin kits.
Probably their biggest weakness is the kit-supplied decals. This kit was
done in 1996 and by now, Hasegawa decals have generally improved (at least
the last new kit I did had great decals). This one adds to a blank space in
my Japanese Army fighters collection and is a kit that I can justly
recommend to almost all of you who.
June 2005
#1368 in a series
Copyright ModelingMadness.com. All rights reserved. no reproduction in part or in whole without express permission from the editor.
Kit courtesy of me and those kind vendors who offer their 'old' kits at a considerable discount from MSRP.
If you would like your product reviewed fairly and fairly quickly, please contact the editor or see other details in the Note to Contributors.