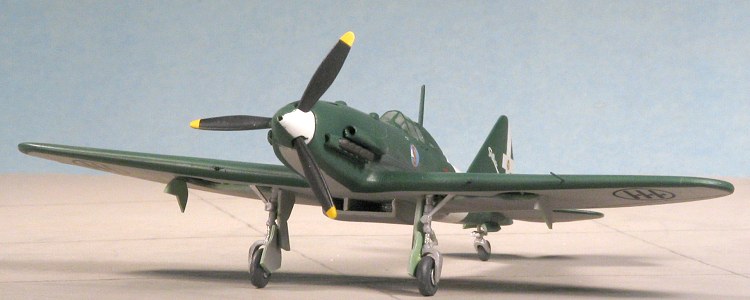
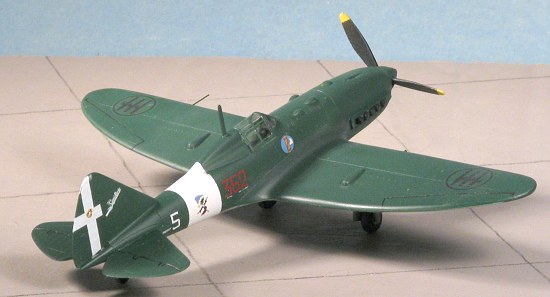
Pavla 1/72 Re.2005 'Sagittario'
| KIT #: | 72040 |
| PRICE: | $17.98 MSRP |
| DECALS: | Three options |
| REVIEWER: | Scott Van Aken |
| NOTES: | Multi-media kit with resin and vacuformed parts |
| BACKGROUND |
I'd like to direct your attention to the preview for more info on the history of this aircraft and a look at the parts as they come in the box.
| CONSTRUCTION |
 Having built a Pavla kit in the past,
I was well aware that this wasn't going to be the breeze that was suggested
by not having a lot of parts. With most short run kits, especially in the
beginnings of a companies development, there will be fit issues, trimming
that is required, and filling that must be done. It is all part of the
process of doing a short run kit, and having built a number of them has allowed
me to use those modeling skills that we develop over the years. They are
not kits to fear or kits to sneer at, as the vast majority of us build for
ourselves and rarely will our works see contest tables. Those who build for
contests will continually do the same subjects over and over again in their
quest for awards. The rest of us will have display shelves teeming with
interesting aircraft such as this Re.2005.
Having built a Pavla kit in the past,
I was well aware that this wasn't going to be the breeze that was suggested
by not having a lot of parts. With most short run kits, especially in the
beginnings of a companies development, there will be fit issues, trimming
that is required, and filling that must be done. It is all part of the
process of doing a short run kit, and having built a number of them has allowed
me to use those modeling skills that we develop over the years. They are
not kits to fear or kits to sneer at, as the vast majority of us build for
ourselves and rarely will our works see contest tables. Those who build for
contests will continually do the same subjects over and over again in their
quest for awards. The rest of us will have display shelves teeming with
interesting aircraft such as this Re.2005.
So on with the build after that brief
editorial! Step one is to remove the main parts from the sprues and sand
off the ejector towers. Those who are smart (and that doesn't include me)
will also sand on the inside back portions of the wing so that you have
something of a sharp trailing edge. I didn't and so I will have a chunky
looking wing. Next, the resin parts should be removed from their casting
blocks and sanded down. This is particularly true of the wheel wells as
they are too thick to fit
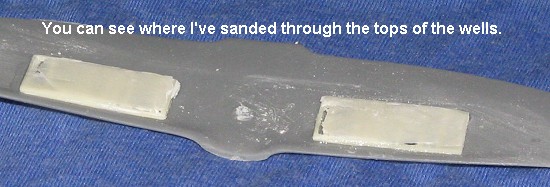 into
the wing as shown. I sanded the backs so thin that I broke through in a few
places. Not to worry as those will blend in to the upper side of the wing.
Test fitting showed them to still be too thick to get the wings closed.
This presented two options. One is to thin out the wing. The other is to
sand more on the 'open' end of the wells and that is the one that I chose.
into
the wing as shown. I sanded the backs so thin that I broke through in a few
places. Not to worry as those will blend in to the upper side of the wing.
Test fitting showed them to still be too thick to get the wings closed.
This presented two options. One is to thin out the wing. The other is to
sand more on the 'open' end of the wells and that is the one that I chose.
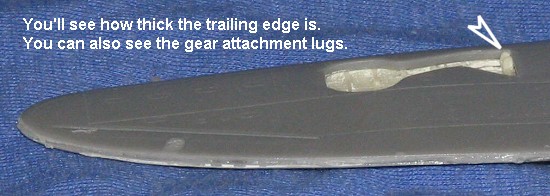
I then glued the wells into the wing,
making sure that the gear attachment points would be accessible and were
properly places. The little gear mounting lugs should be to the inside and
forward. I used super glue for this and did it in small sections so I could
be ensured of a relatively good fit. Then I glued the upper wings. Now
these wings may well need to be trimmed on the inside to fit the fuselage
as there seems to be flash on the root. However, I have messed myself up
big time removing
 what
I have thought to be flash in the past so I left it. I also glued the front
of the wing first and clamped it to be sure that it wouldn't pop loose
later. After a day's curing, I glued the rear of the wing. If you recall,
this was not thinned down and is not a pretty sight!
what
I have thought to be flash in the past so I left it. I also glued the front
of the wing first and clamped it to be sure that it wouldn't pop loose
later. After a day's curing, I glued the rear of the wing. If you recall,
this was not thinned down and is not a pretty sight!
Meanwhile, I went to work on the
interior. First step was to glue on the rudder bar. The plastic in this kit
is a bit on the brittle side so it is probably no surprise that despite my
care, I broke the rudder bar in half. However, I didn't lose the parts so
was able to glue them together on the cockpit floor piece. Then I glued in
the resin control stick. It seemed t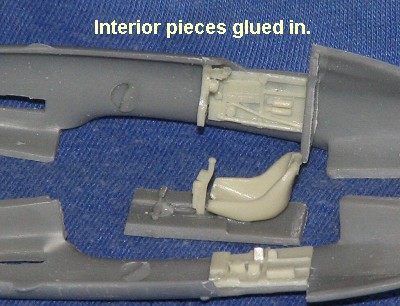 o me that the instructions showed in
backwards so I reversed it when gluing. I'll probably find my Re.2005
reference later and discover that I messed up! The other item glued in at
this time was the resin seat. I also glued in the two side panels, aligning
them with the back and top of the cockpit opening. The rear bulkhead was
glued to the fuselage half rather than the bottom of the floor as I felt it
would fit better. Then, I could just slide the floor in from the underside
when the halves were glued together. I also glued the instrument panel in
place, but did shave down the sides a bit as it was a touch too wide for
the fuselage halves to mate. This would prove to be a bit of a problem
later.
o me that the instructions showed in
backwards so I reversed it when gluing. I'll probably find my Re.2005
reference later and discover that I messed up! The other item glued in at
this time was the resin seat. I also glued in the two side panels, aligning
them with the back and top of the cockpit opening. The rear bulkhead was
glued to the fuselage half rather than the bottom of the floor as I felt it
would fit better. Then, I could just slide the floor in from the underside
when the halves were glued together. I also glued the instrument panel in
place, but did shave down the sides a bit as it was a touch too wide for
the fuselage halves to mate. This would prove to be a bit of a problem
later.
Before the fuselage halves were
joined, the interior bits were all painted Italian primer green, the
standard color for Italian aircraft. I used Aeromaster acrylics from what
little was left of my stash for this purpose. Once that dried, I decided to
test fit the floor section. Not unsurprisingly, it didn't fit. There were
two things getting in the way. One was that the seat was too wide. This was
somewhat solved by sanding down the seat sides and flattening out much of
the detail on the sidewalls so 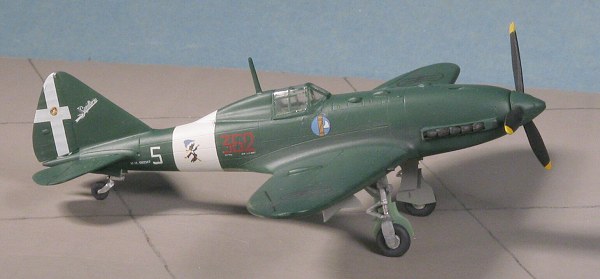 they didn't stick out so much. The other was
that the control stick was too far forward and so it hit the instrument
panel. Well, one option was to break it off and remount it closer to the
seat. The other was to sand on the boxes attached to the control until
there was enough room and that's what I did. It required a repaint of the
main bits and after that dried, the instrument panel and other control
boxes were painted flat black. The cylinders were done in red and I used
aluminum for some other bits. Belts were painted a buff color, all these
being Vallejo acrylics other than the aluminum, which was Metallizer.
they didn't stick out so much. The other was
that the control stick was too far forward and so it hit the instrument
panel. Well, one option was to break it off and remount it closer to the
seat. The other was to sand on the boxes attached to the control until
there was enough room and that's what I did. It required a repaint of the
main bits and after that dried, the instrument panel and other control
boxes were painted flat black. The cylinders were done in red and I used
aluminum for some other bits. Belts were painted a buff color, all these
being Vallejo acrylics other than the aluminum, which was Metallizer.
Then I slid the interior into place
and glued it. Then the fuselage halves came together with a liberal dousing
of glue. Usual gaps were filled and sanded. The next step was to attach the
wing. I figured that if I did this first and got it properly aligned with
the fuselage, I could then put on the tail feathers and not have everything
out of whack (as it usually is). Well, even after I did the usual trimming
(read that as hacking and slicing), the fit of the wing was horrible. In
the end, it took several floods of cement, three clamps and a large piece
of tape (to hold up a wing while the glue dried) to get the wing in
something like a proper alignment. Upon removing the clamps after a goodly
time for the glue to dry, I then liberally slathered on the filler to the
wing join areas. I also installed the nose cap at this time.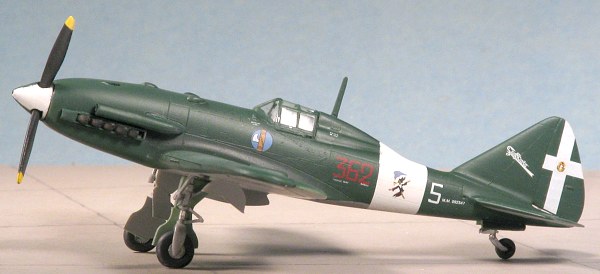
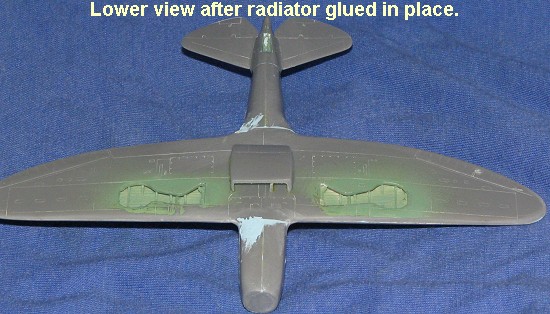
While all that filler was drying, the fin was glued in place. The fin root on the left side of the fuselage was higher and wider than the one on the right. O---K. Well, nothing that glue and filler won't fix so that was glued in place and carefully aligned with the position of the wings. Meanwhile, the prop had to be assembled. First thing was to fill the two large sink marks in the spinner. Then I started gluing on the prop blades. This kit uses an interesting method to do this. The center of the spinner back is a rather large tube. To this tube, the root of each blade is glued. This means that you really need to have the spinner there to check for proper alignment and so each blade was glued on separately and left to dry before being checked for alignment and then the next blade added. Tedious, but required. I also glued the various bits for the lower radiator bath into place. This includes both the oil and coolant radiator separated by a small bulkhead (which is too long and needs to be trimmed once in place).
 I
then sanded off the first round of filler on the wings and added filler to
the fin root area. A touch of additional filler was needed for the wing
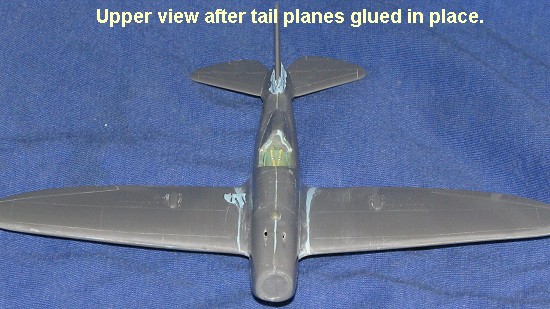
roots. The cowl gun openings were drilled out at this time. Tail planes
were cleaned up and glued in place. Each of these had an odd raised area on
the top of them almost as if the mold had been gouged with a thin, sharp
object. This raised area was easily sanded off. I
I
then sanded off the first round of filler on the wings and added filler to
the fin root area. A touch of additional filler was needed for the wing
roots. The cowl gun openings were drilled out at this time. Tail planes
were cleaned up and glued in place. Each of these had an odd raised area on
the top of them almost as if the mold had been gouged with a thin, sharp
object. This raised area was easily sanded off. I
 then
glued the radiator bath to the lower fuselage after a bit of sanding. Once
I had it on, I realized that the instructions had me install the small
inner partition on the wrong side as the exhaust doors scribed on the
bottom of the radiator bath were on the 'other' side of the plane. Two
options; sigh and leave as is or fill in the scribed line and re-scribe on
the other side. I chose the first option, at least for the time being while
I looked for a reference.
then
glued the radiator bath to the lower fuselage after a bit of sanding. Once
I had it on, I realized that the instructions had me install the small
inner partition on the wrong side as the exhaust doors scribed on the
bottom of the radiator bath were on the 'other' side of the plane. Two
options; sigh and leave as is or fill in the scribed line and re-scribe on
the other side. I chose the first option, at least for the time being while
I looked for a reference.
When the filler had dried, that was
then sanded off and the lost panel lines re-scribed. I found more areas
that needed filler on the wing leading edges and around the radiator
assembly. While that was drying, I cleaned up the landing gear and then cut
off the resin oleo scissors and glued them in place. The upper cowling has
several small 'bumps' that need to be installed. There are locator lines on
the cowling that show where they go and those were carefully glued in
place. I drilled out the gun ports on the leading edge of the wing in
anticipation for some t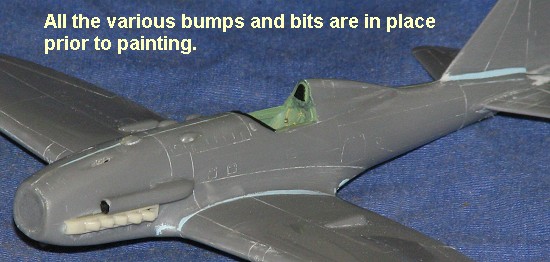 ubing installations. The large supercharger intake
was drilled out in the front and then glued into place. I also glued on the
resin exhaust. This is a very loose fit and so you do need to take care
when gluing them on. I found out after the super glue had dried that they
were too far forward! I also cut out one of the vacuformed canopies. It is
a bit too narrow as it comes off the backing, but fortunately, it will
stretch to fit with a bit of force!
ubing installations. The large supercharger intake
was drilled out in the front and then glued into place. I also glued on the
resin exhaust. This is a very loose fit and so you do need to take care
when gluing them on. I found out after the super glue had dried that they
were too far forward! I also cut out one of the vacuformed canopies. It is
a bit too narrow as it comes off the backing, but fortunately, it will
stretch to fit with a bit of force!
Next step was to start on some serious painting.
| COLORS & MARKINGS |
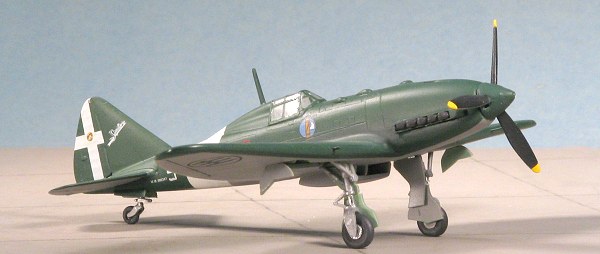
First thing was to do some detail stuff. That means that the landing gear and wheels got a nice coat of Alclad II Aluminum. Then, using Floquil Reefer White, a large section of the rear fuselage was painted in anticipation of masking it off for the fuselage band. I'd decided to do the R.A. variant as the type did see limited service prior to the Armistace. Not sure if they had any kills or not, but I still thought that it would be cooler looking than an ANR or German version.
 Using very thin strips of tape, I
masked off the white band area on the fuselage. Then I filled the wheel
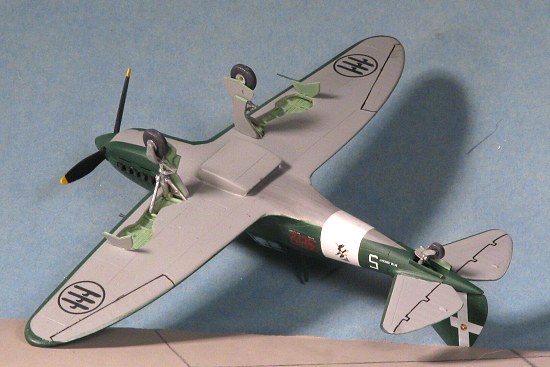
wells with damp tissue. Next step was to paint the underside and main gear
covers with what I call 'Italian Grey 1', using some of my remaining hoard
of Aeromaster Acrylic paint. When that was dry, I sprayed on some Future
(clear gloss acrylic). This was as much to help seal in the paint as for
anything else as masking will be needed in the next step and it is much
easier to mask a gloss or semi-gloss surface.
Using very thin strips of tape, I
masked off the white band area on the fuselage. Then I filled the wheel
wells with damp tissue. Next step was to paint the underside and main gear
covers with what I call 'Italian Grey 1', using some of my remaining hoard
of Aeromaster Acrylic paint. When that was dry, I sprayed on some Future
(clear gloss acrylic). This was as much to help seal in the paint as for
anything else as masking will be needed in the next step and it is much
easier to mask a gloss or semi-gloss surface.
Then the masking got underway. There was a need to free-cut several of the sections. I then glued on the radio mast and used a small piece of tubing for the pitot tube and glued it in place. For the rest of the paint, I again used some of my Aeromaster Acrylic paints, spraying it right from the bottle. This shade was 'Italian Green 2', a rather dark olive shade. Once it was dry, the airframe was again given a misting of Future. I then took off all the tape to check for runs, drips or errors. Not many, but a few into the white band. A bit of scraping and a bit more Future and it was time to finish up the aircraft.
| FINAL CONSTRUCTION |
 For this section, first thing was to
glue on the landing gear. I first wrapped the oleos with Chrome Bare Metal
Foil. Then I sanded the ends of the gear legs into smaller and flatter
sections to fit into the gear attachment points in the resin wells. A dab
of superglue got them in place. Next, there were two braces, one to the
front and one to the back of each gear leg that were glued in. I completed
the drilling of the wheel holes and glued those on the main gear. In the
back, the very nice, but very flimsy tail wheel leg had its attachment
points trimmed down and then glued it. I gently spread apart the wheel
forks and pushed in the tail wheel. I frankly don't think the tail wheel
strut will hold up for long as it will either break or soon collapse under
the weight of the model. Resin gear that isn't reinforced almost always
starts sagging in a relatively short time.
For this section, first thing was to
glue on the landing gear. I first wrapped the oleos with Chrome Bare Metal
Foil. Then I sanded the ends of the gear legs into smaller and flatter
sections to fit into the gear attachment points in the resin wells. A dab
of superglue got them in place. Next, there were two braces, one to the
front and one to the back of each gear leg that were glued in. I completed
the drilling of the wheel holes and glued those on the main gear. In the
back, the very nice, but very flimsy tail wheel leg had its attachment
points trimmed down and then glued it. I gently spread apart the wheel
forks and pushed in the tail wheel. I frankly don't think the tail wheel
strut will hold up for long as it will either break or soon collapse under
the weight of the model. Resin gear that isn't reinforced almost always
starts sagging in a relatively short time.
Now that it was on its legs, I started putting on the decals. These are by Tally Ho of the Czech Republic. They are fairly well printed though on some of the color parts mis-registration was seen. Fortunately, for this aircraft, markings were mostly monochromatic. The decals have large carrier areas that you may want to trim. I didn't and had little trouble. They are thin and I used Solvaset on them as the MicroSol didn't seem to have much effect. I also had one fold up on itself and it was the dickens to get it straight again. It ended up breaking into pieces and I had no choice but the piece it back again as I had no replacement.
With the decals on, it was time for
the gear doors. Here I had a problem that led to a bigger one. First off,
the doors are lightly scribed as to where to cut them. No problem. However,
one of my gear doors had a major molding problem that basically caused the
lower main gear door to be molded in two pieces with those pieces short
shot. I was able to glue the two halves together and repaint them, but they
are not at all as the other door. Then, when I came to attaching the doors,
I realized that 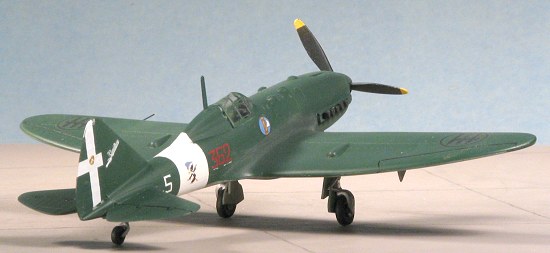 I'd put the landing gear on backwards. Instead of the open
wheel portion being on the inside, it was on the outside. This was not
good. I had two options. One was to ignore it and carry on, the other was
to remove the gear and put them in the proper place. By blowing off the
problem, the gear doors wouldn't look anything like right.
I'd put the landing gear on backwards. Instead of the open
wheel portion being on the inside, it was on the outside. This was not
good. I had two options. One was to ignore it and carry on, the other was
to remove the gear and put them in the proper place. By blowing off the
problem, the gear doors wouldn't look anything like right.
Fortunately, I generally don't scrape off the paint when I use superglue to attach pieces. This worked in my favor as I was able to take a small pair of needle nose pliers and gently rock the gear and attaching struts back and forth until the paint gave way. Nothing broke and I was able to reassemble the gear in the proper spots. WHEW! It's not pretty, but it is a heck of a lot better than the other alternative.
After the doors were on, I glued on the completed prop assembly, cut some plastic rod for the main guns and glued them in. A bit of touch up paint and I was ready for the flat coat. I sprayed on a bit of Tamiya Smoke for the exhaust, but on the dark green background, it is barely visible. Once the flat coat had dried, the masking was removed from the canopy. I added a bit of grey pastels to help make the exhaust more visible, outlined the control surfaces and that was it.
| CONCLUSIONS |
This now makes the second Pavla kit I've built. Neither has been particularly easy, but then neither has been particularly difficult. They both have many traits of short run kits and so have problems that need solving. However, for a lot of aircraft, this is the route that has to be taken. The end result (at least in my hands) won't win contests, but it will look quite nice on the shelves along with some of the other more unusual aircraft I've built thanks to companies like Pavla.
Review kit courtesy of my ability to find these things on sale.
December 2004
#1340 in a series
Copyright ModelingMadness.com. All rights reserved. No reproduction in any form without express permission from the editor.
If you would like your product reviewed fairly and fairly quickly, please contact the editor or see other details in the Note to Contributors.