| KIT #: | 4101 |
| PRICE: | $45.00 MSRP |
| DECALS: | Nine options |
| REVIEWER: | Scott Van Aken |
| NOTES: | Multimedia kit with resin and photo etched parts |
| HISTORY |
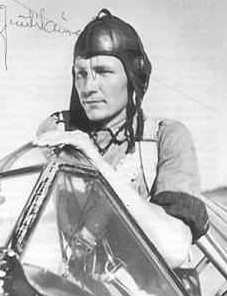
Following are excerpts from Ilmari Juutilainen's autobiography, Double Fighter Knight, translated by General Heikki Nikunen of the Finnish Air Force and Rear Admiral Paul Gillcrist (ret) of the U.S. Navy.
 "Clearly, the best fighter arriving during the temporary peace [between the
Russian invasion of Finland in 1939 and the German invasion of Russia in
1941] was the American designed Brewster 239 Buffalo. These were acquired
during the Winter War despite the U.S. law which prohibited the sale of war
material to the combatant countries. The loophole which permitted the
acquisition of the Brewster 239s was a clause in the law which permitted
the sale of 'rejected' equipment. It was 'arranged' that the U.S. Navy
rejected 44 Brewster Buffaloes which were then sold to Finland at a
'nominal price.'" (Only 43 F2As were released; Brewster shipped one
additional aircraft from parts on hand.) (10, from the prolog by Gen.
Nikunen)
"Clearly, the best fighter arriving during the temporary peace [between the
Russian invasion of Finland in 1939 and the German invasion of Russia in
1941] was the American designed Brewster 239 Buffalo. These were acquired
during the Winter War despite the U.S. law which prohibited the sale of war
material to the combatant countries. The loophole which permitted the
acquisition of the Brewster 239s was a clause in the law which permitted
the sale of 'rejected' equipment. It was 'arranged' that the U.S. Navy
rejected 44 Brewster Buffaloes which were then sold to Finland at a
'nominal price.'" (Only 43 F2As were released; Brewster shipped one
additional aircraft from parts on hand.) (10, from the prolog by Gen.
Nikunen)
During the Winter War, FAF fighter squadrons were equipped mostly with license-built, fixed-gear Fokker D.XXIs. By the time of the Continuation War, the Finns had acquired open-cockpit Fiat G.50 Freccias from Italy, Morane-Saulnier 406s from Vichy France, and war-booty export models of the Curtiss P-36 from Germany (captured in France), in addition to the Brewsters.
"Our Brewsters, contemporary fighters, were fat hustlers, just like bees. They had speed, agility and good weaponry too. In addition to that they also had protective armor behind the pilot's back and under his seat [installed by Finnish mechanics]. We were happy to take them anywhere to take on any opponent." (52)
 An FAF fighter formation consisted of eight planes in two divisions,
with two sections in each division. The forward division attacked. The rear
division flew at a higher altitude and "a little behind and off to one
side," going into combat only when the situation demanded. (That was the
theory. In fact, combat generally degenerated into the usual "furball.")
What's most astonishing about Sgt. Juutilainen's fighting style is the
extreme close range at which he preferred to fight: he regularly recalls
shooting at 50 yards, and speaks of following a MiG-3 plane close that his
Brewster was "drafting" on the slipstream. Even a Hawker Hurricane left him
undaunted:
An FAF fighter formation consisted of eight planes in two divisions,
with two sections in each division. The forward division attacked. The rear
division flew at a higher altitude and "a little behind and off to one
side," going into combat only when the situation demanded. (That was the
theory. In fact, combat generally degenerated into the usual "furball.")
What's most astonishing about Sgt. Juutilainen's fighting style is the
extreme close range at which he preferred to fight: he regularly recalls
shooting at 50 yards, and speaks of following a MiG-3 plane close that his
Brewster was "drafting" on the slipstream. Even a Hawker Hurricane left him
undaunted:
"I came in at high speed from above and behind and pulled the throttle back to idle.... The target grew in my gun sight. It was a very clean airplane and looked brand new. Now I was approaching the perfect firing range and looked around me one more time. No other enemies were in sight. The pipper on my sight was just slightly in front of the nose of the Hurricane and my glide angle was about ten degrees. Now I could count rivets on the target and the range was about thirty yards." (95)
In June 1942 Adolf Hitler visited Immola Air Base in a four- engined Focke Wulf Condor escorted by two Brewsters. His mustache, "Illu" recalls, was dark brown rather than the expected black.
 The Brewsters constantly changed operational bases, with each plane's
mechanic riding in the fuselage baggage compartment so that the planes
could be serviced the moment they arrived. They were seldom used against
Russian airfields, on the theory that the Russians could easily replace
aircraft; instead, the goal was to kill pilots in the air.
The Brewsters constantly changed operational bases, with each plane's
mechanic riding in the fuselage baggage compartment so that the planes
could be serviced the moment they arrived. They were seldom used against
Russian airfields, on the theory that the Russians could easily replace
aircraft; instead, the goal was to kill pilots in the air.
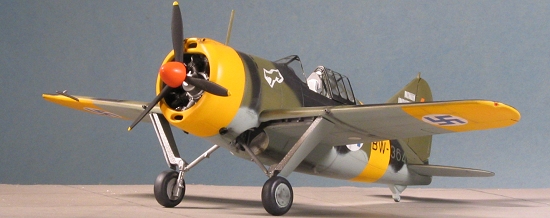
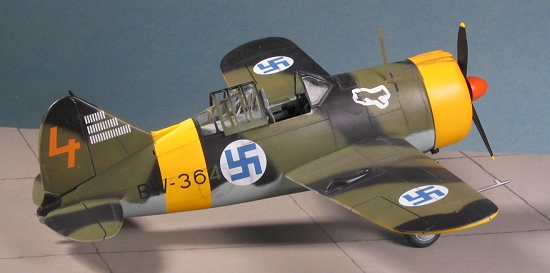
In February 1943, Illu's squadron remounted on Messerschmitt Bf-109s from Germany. This was fortunate, because the Russians were now flying more redoubtable aircraft including Spitfires, Mustangs, and Kittyhawks. The war ended for Finland in 1944, by which time Illu had earned two Mannerheim crosses (making him the "double knight" of the title) and was the FAF's top ace, credited with 94 air-to-air kills, including 36 on his pet Brewster, BW- 364.
| THE KIT |
Please visit the preview to see what comes in the box.
| CONSTRUCTION |
One thing I've learned from doing previous Classic Airframes kits is that it isn't a bad idea to basically follow the instructions. So that is what I did on this one. First step is to clean up all the resin. Well, all is a bit of an overstatement and really, only a teeny bit of trimming was actually needed. There are basically four resin parts; two wheel wells, an engine accessory section, and the gun sight. Only the engine accessory section needs to be sawn off the pour stub as the gun sight can be removed with a sharp knife blade.
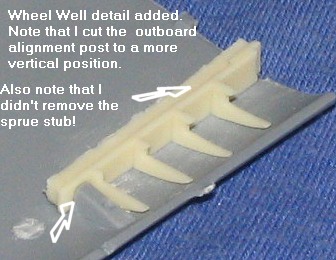 Being
a lazy sod, I glued the wheel well inserts without removing the pour stub.
Easy enough, but you do have to cut the plastic mounting block a bit as it
is not square. That done a bit of superglue and all was in place. Be sure
to leave the small notch on the inside of the wing clear as things will fit
into that. I also glued the window blanking plate to the l
Being
a lazy sod, I glued the wheel well inserts without removing the pour stub.
Easy enough, but you do have to cut the plastic mounting block a bit as it
is not square. That done a bit of superglue and all was in place. Be sure
to leave the small notch on the inside of the wing clear as things will fit
into that. I also glued the window blanking plate to the l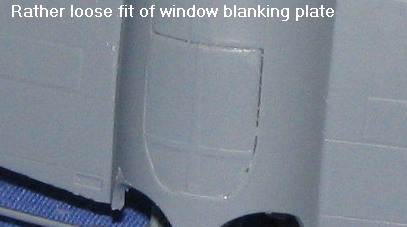 ower
wing. Fit here is odd. It is a tad too long, and a tad too narrow. Trim and
fill, I fear.
ower
wing. Fit here is odd. It is a tad too long, and a tad too narrow. Trim and
fill, I fear.
The next was a bit of a challenge.
The ammo cans, feed chutes, and some braces then go on the aft well
bulkhead. No real guidance is given to precisely where these fit, and
though I followed the instructions to the tee, I still got thing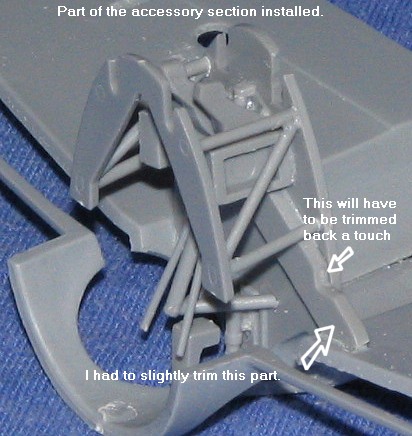 s
off a bit. This is followed by the rest of the bracing and part of the gear
retraction mechanism. I never did figure out where the 'legs' of part
D9, the retraction strut went and
ended off breaking one of them during the ensuing construction. I then
glued in the guns, noting that they did not fit perfectly against the ammo
feed chutes and would recommend getting all these bits ready to go and
gluing them in one move, rather than doing a bit at a time. This will keep
the glue from completely setting so you can adjust things as needed. On the
other hand, you won't see any of this stuff unless you stick your IPMS
laser powered probe-light into the wheel well so the choice is yours.
s
off a bit. This is followed by the rest of the bracing and part of the gear
retraction mechanism. I never did figure out where the 'legs' of part
D9, the retraction strut went and
ended off breaking one of them during the ensuing construction. I then
glued in the guns, noting that they did not fit perfectly against the ammo
feed chutes and would recommend getting all these bits ready to go and
gluing them in one move, rather than doing a bit at a time. This will keep
the glue from completely setting so you can adjust things as needed. On the
other hand, you won't see any of this stuff unless you stick your IPMS
laser powered probe-light into the wheel well so the choice is yours.
 This
assembly was glued to the lower wing as shown in the instructions. Then the
upper wings were attached. Part D5, the main brace, needs to be notched in
order to provide clearance for the wing to fit. The accompanying photo
shows just where this needs to be done. I also found that one wing fit very
well and the other did not. Thankfully, I'm one with filler and sandpaper
so it isn't a major problem.
This
assembly was glued to the lower wing as shown in the instructions. Then the
upper wings were attached. Part D5, the main brace, needs to be notched in
order to provide clearance for the wing to fit. The accompanying photo
shows just where this needs to be done. I also found that one wing fit very
well and the other did not. Thankfully, I'm one with filler and sandpaper
so it isn't a major problem.
The next step is to build up part of
the floor subassembly. The instructions show that you must cut part B-13 so
that when it is mated to D14 and the upper floor part, B6, things will be
even. I cut mine just aft of the lip and it was too short. I highly
recommend cutting it a bout
half way between the back of the lip and the edge. This may still make it
too short, but it won't be so bad. The foot rests glue atop this. This then
fits into the cockpit section along with floor plate D16 behind it. This
last part was a bit too narrow to fit on the lips on the inside of the
upper wing (don't cut those off as they are not mold stubs!) I then let all
this dry and hoped that things would fit in the end.
bout
half way between the back of the lip and the edge. This may still make it
too short, but it won't be so bad. The foot rests glue atop this. This then
fits into the cockpit section along with floor plate D16 behind it. This
last part was a bit too narrow to fit on the lips on the inside of the
upper wing (don't cut those off as they are not mold stubs!) I then let all
this dry and hoped that things would fit in the end.
I next moved on to the engine and
firewall. The engine is very nicely molded and I was surprised that
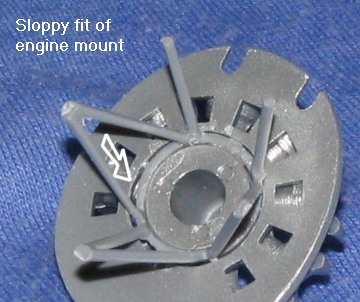 there
wasn't any pushrods for it in plastic or in etched brass. You can add them
if you want and that will add a lot to the look of the engine. The engine
mount (which was broken in the circular part on my kit), fits into the back
of the firewall and the engine then fits in the middle of all this. Though
the mount is keyed, the fit is very sloppy indeed, allowing this part
to be able to be spun around if you so wished! Regardless, glue does
wonders and I got all the parts cemented together. Don't forget that the
little 'nub' on the crankcase fits straight up or you'll be shooting off
engine cylinders!
there
wasn't any pushrods for it in plastic or in etched brass. You can add them
if you want and that will add a lot to the look of the engine. The engine
mount (which was broken in the circular part on my kit), fits into the back
of the firewall and the engine then fits in the middle of all this. Though
the mount is keyed, the fit is very sloppy indeed, allowing this part
to be able to be spun around if you so wished! Regardless, glue does
wonders and I got all the parts cemented together. Don't forget that the
little 'nub' on the crankcase fits straight up or you'll be shooting off
engine cylinders!
A bit of painting was required for
the next step. Initial delivery painting on the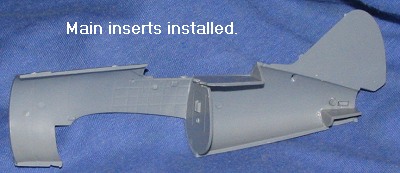 interior was aluminum with the upper section in black. These planes had the
interior redone in light grey (no specific color suggested) when they went
in for their first repainting. This being the case, and since the plane I'm
modeling was repainted in Finnish AF colors, I painted all the interior
bits light grey using ADC Grey (FS
interior was aluminum with the upper section in black. These planes had the
interior redone in light grey (no specific color suggested) when they went
in for their first repainting. This being the case, and since the plane I'm
modeling was repainted in Finnish AF colors, I painted all the interior
bits light grey using ADC Grey (FS
![]() 16473).
However, before that, I glued in the aft cockpit bulkhead, the upper rear
plate and the tail wheel well. The tail wheel well and all the gear well
sections were painted Aluminum using Alclad II. I then glued the engine
assembly to the wheel well section. Fit is only fair and to make sure I
didn't have too many problems later, I trapped this between the fuselage
halves while it dried.
16473).
However, before that, I glued in the aft cockpit bulkhead, the upper rear
plate and the tail wheel well. The tail wheel well and all the gear well
sections were painted Aluminum using Alclad II. I then glued the engine
assembly to the wheel well section. Fit is only fair and to make sure I
didn't have too many problems later, I trapped this between the fuselage
halves while it dried.
Instructions would have you glue the
right fuselage half to the wings and then glue in all the little bits to
the inter ior.
Well, I found it quite difficult to conceive gluing in all those teeny bits
in a confined space, so I glued in all the stuff before attaching
ior.
Well, I found it quite difficult to conceive gluing in all those teeny bits
in a confined space, so I glued in all the stuff before attaching
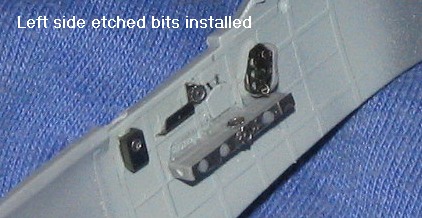 anything
to the wing assembly. There are some plastic bits and a lot of photo-etched
boxes that have to be bent and then installed. Small side consoles and
panels also go in the cockpit. There are instruments to be sandwiched
between photo-etched instrument panels and plastic backings. Exactly
where some of these things go is not easy to determine. It would have been
hugely helpuf to have a side drawing showing exactly the location of some
of these bits. The only firm mounting spots were some little slashes for
the side instrument panels! The rest required a bit of guesswork.
Eventually all was fit in place aside from the gun sight and seat, which I
decided to leave off until the later in construction. I used a detail brush
to paint the various boxes and bits flat black then dry-brushed the whole
works with light grey and silver.
anything
to the wing assembly. There are some plastic bits and a lot of photo-etched
boxes that have to be bent and then installed. Small side consoles and
panels also go in the cockpit. There are instruments to be sandwiched
between photo-etched instrument panels and plastic backings. Exactly
where some of these things go is not easy to determine. It would have been
hugely helpuf to have a side drawing showing exactly the location of some
of these bits. The only firm mounting spots were some little slashes for
the side instrument panels! The rest required a bit of guesswork.
Eventually all was fit in place aside from the gun sight and seat, which I
decided to leave off until the later in construction. I used a detail brush
to paint the various boxes and bits flat black then dry-brushed the whole
works with light grey and silver.
Then I joined the fuselage halves.
Fit wasn't Tamiya quality and I needed to use clamps to hold things toget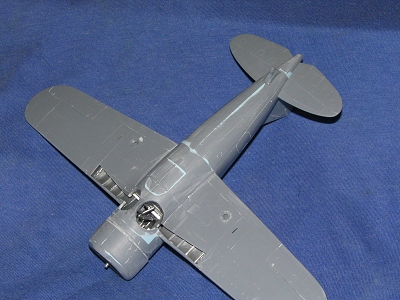 her
while the glue dried. At this time, I glued on the engine cowling front and
the tail cone. This latter part proved to be too small in circumference so
filler was used to bring it up to specs. In fact, I had to use a lot of
filler and sanding to get the fuselage into some semblance of shape.
Especially bad was the area where the forward wings joined the fuselage. As
you can see in the accompanying photo, there are little wedges of filler to
take care of the difference in circumference. I also overdid the sanding in
a few places (like the cowling), in my exuberance!
her
while the glue dried. At this time, I glued on the engine cowling front and
the tail cone. This latter part proved to be too small in circumference so
filler was used to bring it up to specs. In fact, I had to use a lot of
filler and sanding to get the fuselage into some semblance of shape.
Especially bad was the area where the forward wings joined the fuselage. As
you can see in the accompanying photo, there are little wedges of filler to
take care of the difference in circumference. I also overdid the sanding in
a few places (like the cowling), in my exuberance!
 The tailplanes were glued on and
filler used as needed. I also glued in the recommended tail wheel (you have
three on the sprues). The small fairings behind the gun openings were also
added as was the roll over bar. The upper section of this had some rather
large sink areas so those were filled and sanded. The bar structure was
then glued in place. I also glued in one of the landing lights and after
sanding it flush, used a bit of filler to make sure all the holes were
taken care of. The back section with roll brace was then painted with ADC
Grey. When dry, the seat was glued in.
The tailplanes were glued on and
filler used as needed. I also glued in the recommended tail wheel (you have
three on the sprues). The small fairings behind the gun openings were also
added as was the roll over bar. The upper section of this had some rather
large sink areas so those were filled and sanded. The bar structure was
then glued in place. I also glued in one of the landing lights and after
sanding it flush, used a bit of filler to make sure all the holes were
taken care of. The back section with roll brace was then painted with ADC
Grey. When dry, the seat was glued in.
Next the windscreen was masked and glued on. Fit was quite good. The aft canopy section required a tad bit of trimming to the airframe for a good fit, but it also fit very well. It too was masked prior to gluing in place, as was the sliding canopy section. Since this section would not fit in the closed position, I then filled the cockpit and wheel wells and cowling with tissue in preparation for some painting.
| COLORS & MARKINGS |
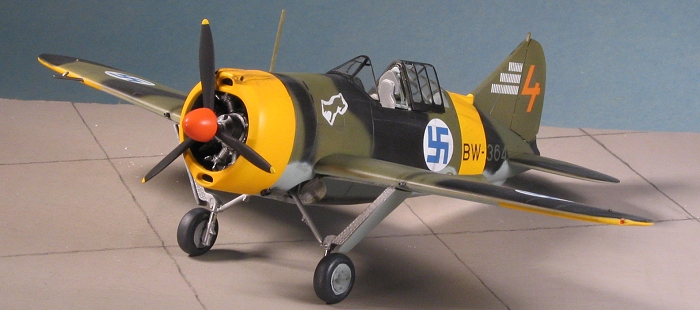
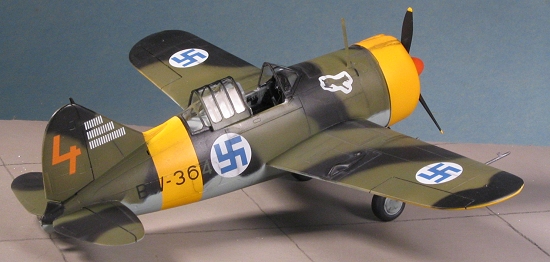
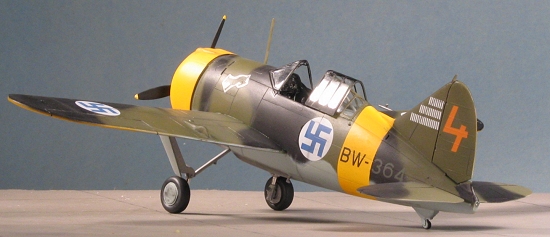
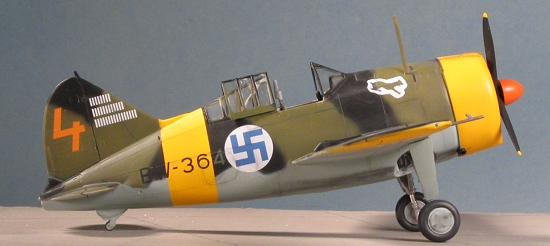
I've done a bunch of Finnish AF models in my time so the colors were not new to me. I still had some Aeromaster enamels in these shades in my stash. First, I painted the lower wing tips, the engine cowling and the section of fuselage behind the canopy with Floquil Reefer White. When it was dry, my Aeromaster Finnish ID Yellow was sprayed over these sections and then masked when dry. Next, the underside was painted in Light Blue. When dry, I masked off the lower section and then painted the upper portion of the kit with Finnish Olive. Then I looked at pictures of the plane and noticed that none of the camo lines were hard as shown in the painting guide. With this knowledge, the Black, using Floquil Engine Black, was painted free hand. I then removed the masking from the lower sections and painted over the hard line to give it a ragged look as well.
 The masking was removed and the
aircraft was given a couple of coats of gloss clear in preparation for
decals. First though, I had to get it on its landing gear. The gear on this
kit are quite sturdy. I started to cut the p.e. brake lines, but only
succeeded in cutting them in half. Oh well, wire would have been a better
choice! I then glued in the main gear. Two problem areas. One is that there
is no real good diagram on just how this fit into the inner wheel well. I
just glued them to bits in the middle of the circular opening and that was
that. Secondly, the outer well attachment points would give the landing
gear a bit of a rake. Well, this isn't how these gear are. I looked at a
lot of photos and it seems to me that they stick pretty much straight down,
so that is how mine sit.
The masking was removed and the
aircraft was given a couple of coats of gloss clear in preparation for
decals. First though, I had to get it on its landing gear. The gear on this
kit are quite sturdy. I started to cut the p.e. brake lines, but only
succeeded in cutting them in half. Oh well, wire would have been a better
choice! I then glued in the main gear. Two problem areas. One is that there
is no real good diagram on just how this fit into the inner wheel well. I
just glued them to bits in the middle of the circular opening and that was
that. Secondly, the outer well attachment points would give the landing
gear a bit of a rake. Well, this isn't how these gear are. I looked at a
lot of photos and it seems to me that they stick pretty much straight down,
so that is how mine sit.
While this was drying, I had glued the wheel halves together, sanded the seam, and painted the interior portion Aluminum and the outer part Light Blue before attacking the tires with Floquil Weathered Black. These wheels seem a bit too wide to me so you may want to sand them down a tad. I also had to drill out the backs with a #54 drill bit so they'd fit over the axle stubs.
 Moving to the decals, these are
really good. They are thin and fit quite well, even without using setting
solution, though I did use Microsol on them just to be sure. The yellow on
the lower wings did bleed through the white to some extent, but this is a
normal situation with white decals and brilliant colors.
Moving to the decals, these are
really good. They are thin and fit quite well, even without using setting
solution, though I did use Microsol on them just to be sure. The yellow on
the lower wings did bleed through the white to some extent, but this is a
normal situation with white decals and brilliant colors.
During the decal application, I discovered three things. One was that the rear fuselage band was too wide. Secondly, the small fin fillet is too large. If you look at photos of pilots leaning up against the tail of their Brewsters, you'll see how tiny this fillet really is. Third, I knew too much about Finnish camo for my own good and it appears that the Brewsters were left with the undersides in the original aluminum when first repainted. It wasn't until much later that the undersides were painted Light Blue. Well, there wasn't much I could do about it now as it was already painted and decaled. I filed that bit of info in the 'stupid things I've done' portion of my brain (which has to be nearing capacity by now). However, there was room to squeeze in a few more bits as I'll relate in the next section.
| FINAL CONSTRUCTION |
With the decals all on and looking
pretty good, the kit was given a matte clear coat using my usual mixture of
Future and Tamiya or Gunze flat base. With things nice a matte, I broke out
the drafting pen and highlighted the control surfaces. I also glued on the
exhaust stubs and then drilled them out before painting them Burnt Iron.
The masking was taken from the clear bits and the landing light was glued
in place. There are three small clear stubs that are supposed to fit into
the tail cone and 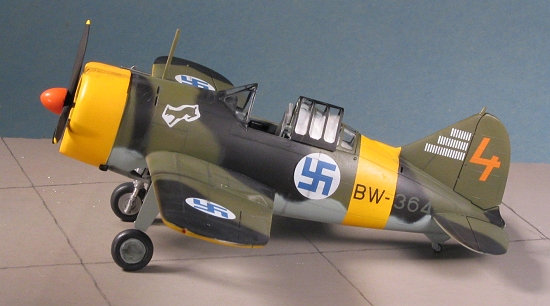 wing tips. After struggling to trim down the one for the
tail cone and eventually enlarging the hole to get it to fit, it was clear
(no pun intended) that the wing tip ones were just too big so I simply
painted the indentations the appropriate color.
wing tips. After struggling to trim down the one for the
tail cone and eventually enlarging the hole to get it to fit, it was clear
(no pun intended) that the wing tip ones were just too big so I simply
painted the indentations the appropriate color.
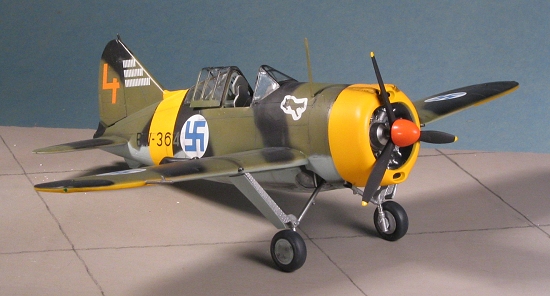
Other bits to be added were the prop, which was painted black with yellow tips, the wing guns, which were drilled out before installation, and the pitot tube. I also glued on the gear doors, but think they are too long so you may want to do some test fitting and trimming before attaching them. The prop spinner had been painted orange with no undercoat, using the Testors paint in the small 1/4 ounce bottles. It is a pretty good match for the rudder number color. I then glued it in place and it is obvious that the engine is not truly square in the cowling. I also glued on the forward radio mast, painting it with a brush when it was dry. The moveable canopy section was held in place with a dab of super glue. Looking around, I couldn't find my gun sight, so that did not get installed as I'd have wished. I also discovered that I forgot to install the DF loop antenna before gluing on the aft canopy section! Could this be the first onset of...oh, what is that ailment where you , you know, don't remember stuff????
The final thing was to break out the pastels. I used these for the panel lines and for the engine/gun exhaust. Not quite as obvious as pre-shading can be, but adequate to give the desired effect.
| CONCLUSIONS |
 I have to admit that I've never built a 1/48 Buffalo as I
really wanted to do a Finnish version and you couldn't do that with the kit
on the market. Thanks to Classic Airframes, we now have a pair of early
Buffalos. I made a bunch of goofs on this one and I hope you will have
taken notes so not as to repeat my errors. Overall, the it is well done,
and offers all the detail that you'd really need.
I have to admit that I've never built a 1/48 Buffalo as I
really wanted to do a Finnish version and you couldn't do that with the kit
on the market. Thanks to Classic Airframes, we now have a pair of early
Buffalos. I made a bunch of goofs on this one and I hope you will have
taken notes so not as to repeat my errors. Overall, the it is well done,
and offers all the detail that you'd really need.
Anyway, as usual, the kit looks very nice when it is done and looking back on things, it is one that I think most modelers will be able to handle without any real problems. It has a goodly mixture of p.e. and resin without going overboard on either. The detail level is such that you don't really need much else (though engine push rods would be nice). It is one that I can recommend anyone who is willing to step on to the next level and try something that will exercise a few of those modeling skills!
| REFERENCES |
Hävittäjä-Ässät, by Keskinen, Stenman, Niska, 1978, ISBN 951-9035-37-0
Double Fighter Knight, by Ilmari Juutilainen
July 2005
#1370 in a series
Copyright ModelingMadness.com. All rights reserved.
If you would like your product reviewed fairly and fairly quickly, please contact the editor or see other details in the Note to Contributors.