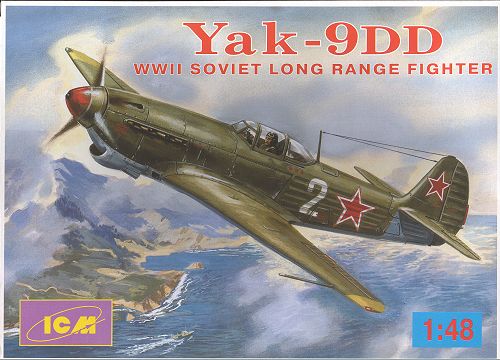
ICM 1/48 Yak-9DD
|
KIT # |
48013 |
|
PRICE: |
$13.98 |
|
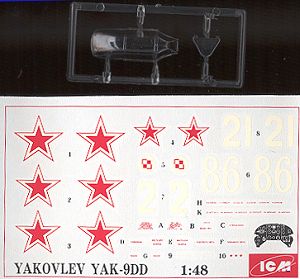
DECALS: |
3 aircraft, all VVS 1944/45 |
|
REVIEW & PHOTOS BY: |
|
|
NOTES: |
|
|
HISTORY |

Without a doubt, the finest Soviet fighters of the Great Patriotic War were those produced by Yakovlev. His initial Yak-1 and -7 fighters were tough aircraft that came into service in the summer of 1941, right when they were needed in the fight against the Germans. They possessed performance that, in the hands of a skilled pilot, was able to successfully combat the Messerschmitts of the Luftwaffe. Typical of all Russian aircraft, it was not the most refined aircraft in the skies, but was rugged, heavily armed, fast, and easy to maintain under grueling conditions.
A further refinement of the Yak-7 aircraft was the Yak-9. This aircraft was very similar but had a greater amount of metal in its construction. Specifically it used metal wing spars which allowed for higher wing loading and the installation of fuel tanks in the wings to increase range. The Yak-9T had a 37mm cannon in the nose and this required the cockpit to be placed further aft in the fuselage. The -9K had this weapon increased to 45 mm. The -9DD used this extra space for an additional fuel tank, making it the longest ranged of the Yak-9 fighters. While early Yak-9s had the cockpit in a more forward position, the aft position was made standard for all later Yak-9 versions. What is amazing about the long range of the -9DD is that the additional range was made possible without the extra drag of drop tanks. This extra range was in great demand for bomber escort during Allied 'shuttle bombing' missions.
|
THE KIT |
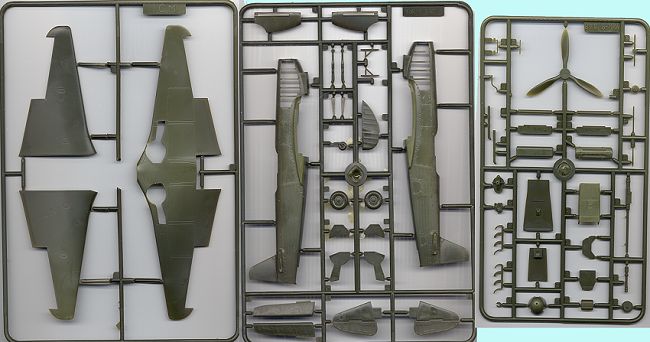
If you think you have seen these sprues before, you have. They are the same as in the Yak-9T and -9K kit. ICM's kit is molded in an olive drab plastic. Detail of the parts is superb, consisting of fine engraved lines and a very good representation of fabric surfaces on the aft fuselage and control surfaces. The kit has been engineered to place almost all the ejector pin marks in an unobtrusive place so you won't have to worry about removing them. There is almost no flash at all and seam lines are very small as well. There are a few sink marks, notably on the fuselage near the cockpit, the equipment rack, as well as on the horizontal stabilizers. These are in conjunction with very thick plastic areas and should be easy to fill. As with the other ICM kits I have, this one needs all the parts cleaned in warm, soapy water to remove the mold release agent. You should be cleaning all your kits so that the paint will stick properly anyway!
 One very nice detail is the inclusion of a complete engine. This is quite
welcome for those that like to do dioramas. The cockpit is complete with seat,
stick and pedals and there is detailing on the side walls of the fuselage as
well. The transparencies are a bit thick and offer just the closed canopy
option.
One very nice detail is the inclusion of a complete engine. This is quite
welcome for those that like to do dioramas. The cockpit is complete with seat,
stick and pedals and there is detailing on the side walls of the fuselage as
well. The transparencies are a bit thick and offer just the closed canopy
option.
The decal sheet offers three variations, one in overall grey, one in two greys and a final one in green and matte black. All have light blue undersides. The decals are very matte, similar to Revell of Germany decals, but easily read and in perfect register.
|
CONSTRUCTION |

First I started with the engine and the cockpit. The cockpit is basically a floor, seat, seat back, stick and rudder pedals. The stick and rudder pedals are very fragile and I broke the rudder pedals twice! I had thought about not building the engine, but looking at the instructions, it was apparent that this couldn't be done. This is due to the back part of the engine holding the breech for the gun. It seems there was no firewall (at least according to the kit) and so not only the breech, but the accessory section and back of the engine is visible from the cockpit. This would eliminate an need for a cockpit heater in the winter!
Once the seat and such was fitted to the floor, all the interior bits as well as the wheel wells and inside gear doors was painted a medium to dark grey from the Aeromaster range. Engine assembly was started, but dry fitting indicated that not only was it not visible from the interior, but with the engine panels on, it couldn't be seen. Though it is a locator for the exhaust, I would be using Moskit exhaust, and with these installed, the engine wouldn't fit. So into the parts box with the engine!
 The interior was further painted in black and aluminum as per kit
instructions. While that was drying, the engine covers were installed. First the
stringers in the fuselage nose were removed. Then I tried to get the covers to
fit in the space. It is an EXTREMELY tight fit. So tight was it that I had to do
some sanding and trimming to get it to fit properly. Liquid cement was used as a
lubricant for the final push to get the covers installed! Then it was time to
install the Moskit exhaust. I would have liked to have waited until the final
step, but they are designed to be installed from the inside. The kit openings
were too narrow and they had to be carefully enlarged. The exhaust look great,
but are very delicate. I have bent them a number of times just in regular
handling while doing construction. I only hope they do not break off!!
The interior was further painted in black and aluminum as per kit
instructions. While that was drying, the engine covers were installed. First the
stringers in the fuselage nose were removed. Then I tried to get the covers to
fit in the space. It is an EXTREMELY tight fit. So tight was it that I had to do
some sanding and trimming to get it to fit properly. Liquid cement was used as a
lubricant for the final push to get the covers installed! Then it was time to
install the Moskit exhaust. I would have liked to have waited until the final
step, but they are designed to be installed from the inside. The kit openings
were too narrow and they had to be carefully enlarged. The exhaust look great,
but are very delicate. I have bent them a number of times just in regular
handling while doing construction. I only hope they do not break off!!
Once those were installed, the instrument panel decal was applied to the instrument panel. Be advised that there is no white in the decal so you need to paint the panel white first. I didn't and had to leave the decal damp for several hours while the white paint dried. The decal is also not exactly the same shape so some touchup painting needs done. Then the interior bits were installed. Make sure you dry fit all the parts before gluing as it is possible to misinstall the cockpit floor! Once the floor, back shelf and instrument panel had been installed, the fuselage halves were glued together.
 There were a few areas that needed some filler and the flash around the front
of the nose oil cooler was removed. Then the wings were glued together and when
dry, the wingtip formation lights were cut out and replaced with bits of colored
sprue. These were then sanded down to match the wingtips. This is a real easy
thing to do and adds a lot to your kit.
There were a few areas that needed some filler and the flash around the front
of the nose oil cooler was removed. Then the wings were glued together and when
dry, the wingtip formation lights were cut out and replaced with bits of colored
sprue. These were then sanded down to match the wingtips. This is a real easy
thing to do and adds a lot to your kit.
While this was drying, I attached the tailplanes. This really helps when trying to line up the wings. There is a very deep sink mark on the right tailplane root that needs to be filled. While you are at it, fill the sink marks near the cockpit as well. Once the wings had dried, they were attached to the fuselage. It is a VERY tight fit and some trimming needed to be done to get a good fit. Once done, they were glued in place and the wings taped up to get some dihedral in them.
It was after the wings had dried, that I ran into a big problem. One wing had WAAAY too much dihedral. This meant that I had to cut the wing/fuselage join to release the wing and reposition it. It was not a pretty sight. Much filler was used to fix this little glitch. This was the expected self inflicted disaster that seems to plague every kit I build! I also needed filler on the underside of the wing/fuselage join on the back. Once all the filler was dry, sanded, reapplied (shrinkage, you know), and resanded, the under fuselage radiator was attached. This was a painless operation. Final wing thing was the attachment of the ailerons. They didn't fit well. This was as much a problem with the wing openings as anything. After sanding on both the wings and ailerons, an acceptable fit was managed and the ailerons were posed slightly askew. The rudder is also a separate item and fits very well in the straight ahead position.
Back in the cockpit, the gunsight, armored glass and canopy needed installed. First the gunsight. It is given as a straight rod which you are expected to bend into a U shape before installation in the cockpit. Well, this was a first for me. With much trepidation, I carefully bent back the arms on either side of the sight. To my amazement, it didn't break! Once in a general U shape, it was quickly glued in place. The instructions are less than helpful on this bit, not showing exactly HOW it fits in there, so I just plunked it in a spot that looks logical. The armored glass needs all the little 'pips' on the top and bottom removed so it will fit and it is glued to the shelf behind the seat. Finally, the cockpit canopy. This is a bit thick, not really clear and my example had a few air bubbles in it. Nevertheless, it was masked with scotch tape and glued in place using non-fogging superglue. The fit is quite good. After attachment of the antenna and pitot tube, it was off to the paint shop.
|
PAINT & DECALS |

First, I painted the wheel wells and insides of the gear covers a dark grey. Not sure why I bother painting the wheel wells as I rarely fill them with tissue and end up hand painting them, but there it is!! Anyhow, first the underside and outside of the gear doors were painted light blue from the Aeromaster enamel range. This paint is just great as it covers well and is very thin. A day or two of drying and the blue undersides of the tailplanes and the area around the nose was masked off and the upperside was painted using Testors flat black in a random pattern. The kit painting guide only gives one side view of this scheme so I had to wing it for the rest of the pattern. When that had dried, the final color, a dark green from the Aeromaster enamel range, was sprayed on. Then there was the usual back and forth touchup until the scheme was complete.
Then it was time to add on the landing gear so that I could then spray on the gloss clear. The main gear fit great, however there are no scissors over the oleos. Not sure if this is normal or not, but there it is. I broke the tail wheel strut when I tried to remove it from the sprue, so replaced it with a piece of paper clip. Next the main wheels and all the gear doors were attached and the kit sprayed clear gloss. Once that had dried, it was time for the decals.
I initially looked for an aftermarket set, but couldn't find any for the Yak-9DD. This pretty well left the kit decals. I used the scheme for a Polish Squadron in 1945. This is pretty devoid of any special markings other than the Polish AF insignia in a white circle on the nose. The kit decals have lots of film around each decal, which means they need to be trimmed very closely. They are also dead flat. I used the Microscale system to apply the decals and it worked just great. The decals fit well and snuggled down to gentle depressions with no problem at all. The white is very opaque and the decals are in register, which is a blessing.
Despite the flatness of the decals, a coating of acrylic matte clear was enough to even things out and they look just great. After this coating was applied, the canopy was unmasked and the antenna was attached using clear stretched sprue. Finally, the propeller and hub were glued in place using white glue. I tried to get the plastic snap ring to fit, but it broke when I trued to put it on the prop shaft. A bit of dirtying up with pastels and it was done.
|
CONCLUSIONS |

When I first started this kit, I had mixed expectations. It looked like a pretty easy build, but then again, this was the first kit of a new company. To compare it to Tamiya or Hasegawa wouldn't be fair as it just isn't yet in the same league or, for that matter the same price range. I feel it better to compare it to Monogram or Italeri. When making such a comparison, it turns out very well. Unlike Monogram, the interior detailing isn't as crisp, but the general fit is better. Comparing it to Italeri it, it is comparable. When one adds in the price of the kit, it looks even better.
Overall, I'd have to say that it is an excellent start. The fit is good, but not perfect. One will have to use those honed modeling skills to smooth things out. The detail level is also quite good, and the ability to have a full engine in the kit is a big plus. It would be nice if the clear bits were more transparent and an opening canopy would be nice. I was surprised at how well the decals worked. Even the red ones didn't disappear against the black background, as so often happens with even aftermarket ones.
Despite the rough edges, it does build into a very nice kit. The very reasonable retail price is an even bigger plus! Recommended.
|
REFERENCES |
Yakovley Aircraft since 1924, by Bill Gunston and Yefim Gordon, 1997,
Naval Institute Press
Yak Fighters in Action, #78, by Hans-Heiri Stapfer, 1986, Squadron/Signal
Publications
November 1999
Thanks to the nice folks at ICM USA for the review sample. You can find ICM kits at any of the better hobby shops.
Visit their site on the web.