Trumpeter 1/48 MiG-3 (early)
| KIT #: | 2830 |
| PRICE: | $24.95 MSRP |
| DECALS: | Three options |
| REVIEWER: | Scott Van Aken |
| NOTES: |
| HISTORY |
The MiG-3 was the first successful fighter in a long line of
aircraft from the design team of Mikoyan and Gurevich. It was designed as a high
altitude interceptor. A rather odd choice if you think about it. However, the
Soviet Union was convinced that hordes of
 high altitude strategic bombers were a
real possibility and so developed an aircraft to combat this perceived threat.
Very much like the MiG-25 was developed to combat the threat of a high altitude
supersonic bomber, the B-70. An aircraft that was never developed and so the
threat never materialized.
high altitude strategic bombers were a
real possibility and so developed an aircraft to combat this perceived threat.
Very much like the MiG-25 was developed to combat the threat of a high altitude
supersonic bomber, the B-70. An aircraft that was never developed and so the
threat never materialized.
Designed for speed and climbing abilities, the MiG-3 was first flown in early 1941. It was a proficient aircraft in the hands of a well trained pilot. Unfortunately, most of the air war during the Great Patriotic War was at low level, an area where the MiG-3 was at a distinct disadvantage. The Germans preferred to fight at lower altitudes as most bombing was of a tactical nature against troops and tanks and not strategic. Nevertheless, the MiG-3 was able to score some kills. With the realization that the high altitude threat wasn't there, production of the MiG-3 was curtailed in 1942 after only a relatively short production run. The type soldiered on in some of the backwaters of the war and by 1944 had pretty well disappeared from service.
| THE KIT |
We all knew it was just a matter of time before we'd see a small scale MiG-3 from Trumpeter. Their 1/32 scale kit sold well and so it seemed a natural. I doubt if we will see this in 1/72 from Trumpeter, thanks to the HobbyBoss snap kit, and that would be a pity.
The kit comes in Trumpeter's usual sturdy box with four poly bags holding five sprues. One of my polybags was not sealed, as if someone had replaced the sprue within (the wings). The clear parts are well done and clear enough for most tastes. It has a separate canopy from the windscreen and backlight. Detailing is quite good with crisply done engravings and rivet detail. Those who don't like the current crop of recesses rivet detailing probably won't like this, but to me, it doesn't look terribly overdone at all.
 The rest of the kit is equally as well detailed. There
were not sink areas or nasty ejector pin marks readily found and no flash. I
have to admit that I'm not that jazzed about the fabric control surface
detailing as it seems a bit stark for my tastes. However, I'm sure it is
accurate as it certainly looks convincing. I was going to say that the only real
option was for under wing rockets, but since the holes are already drilled, I
guess that option was taken away. I'd have rather had the holes filled and been
provided the opportunity to drill them out if I wanted wing rockets. As it is,
to do one without them will require filler and sanding.
The rest of the kit is equally as well detailed. There
were not sink areas or nasty ejector pin marks readily found and no flash. I
have to admit that I'm not that jazzed about the fabric control surface
detailing as it seems a bit stark for my tastes. However, I'm sure it is
accurate as it certainly looks convincing. I was going to say that the only real
option was for under wing rockets, but since the holes are already drilled, I
guess that option was taken away. I'd have rather had the holes filled and been
provided the opportunity to drill them out if I wanted wing rockets. As it is,
to do one without them will require filler and sanding.
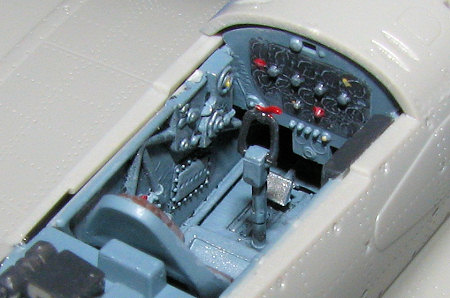
I was particularly impressed with the detail level on the inside consoles and the floor. While I'm sure that resin replacements will be around later to add even more depth, what the kit gives you is quite nice as it is. No harness is provided so you'll have the opportunity to add your own from photo etch or tape if you wish. A nice radio rack is provided for behind the seat, though little will be seen of it when you close the fuselage halves. The wing root intakes are inserts that have full intakes, so no worries about having edges to try to fix. The kit also provides separate flaps and ailerons, but I get the impression that these are designed to be cemented in the neutral position. The upper flap wells, for example, are rife with ejector pin marks and have no detail. Same for the inside of the separate flap pieces.
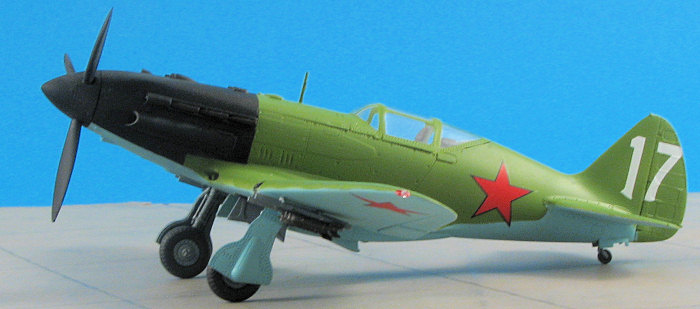
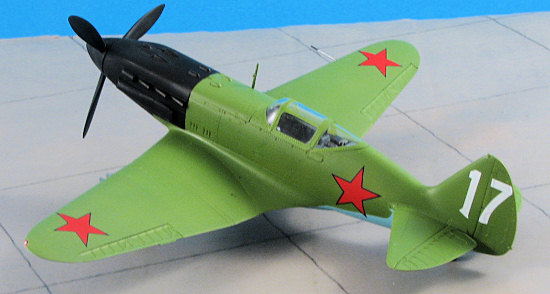
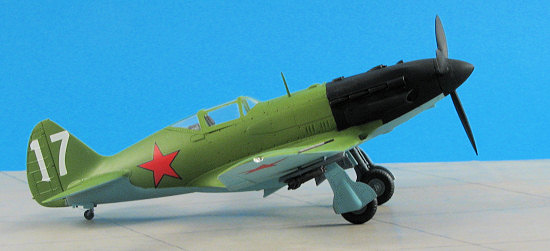
Instructions are standard Trumpeter with Gunze paint references and well drawn construction steps. There are markings for three planes. The box art plane is green upper, light blue lower and a black engine cowling. An all white one with the red forward spinner and arrow is another and the third is green upper and light blue lower with a yellow spinner. No unit information is given. As Trumpeter decals are not known as the best around, aren't you glad you bought those Aeromaster sheets you never used on your CA and ICM kits? The kit decals are well printed and glossy. You never know, these might actually work out well.
| CONSTRUCTION |
 This is not a complex kit. I started by gluing the
various interior bits together and then painted everything with Soviet Interior
Grey from the Colourcoats range. In fact, I used Colourcoats paints for just
about all the colors used in building this kit, aside from black.
This is not a complex kit. I started by gluing the
various interior bits together and then painted everything with Soviet Interior
Grey from the Colourcoats range. In fact, I used Colourcoats paints for just
about all the colors used in building this kit, aside from black.
I then assembled the wings. Once the outer panels were glued in place, I glued in the small wing root inlets. These are separate pieces and are so designed as to provide a single inlet without the problems of blending in upper and lower halves. They actually fit rather well.
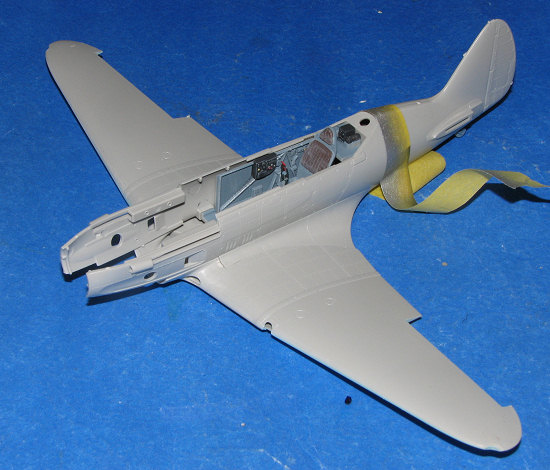 The
cockpit was detailed with various colors of paint, then given a black enamel
wash. I later drybrushed it with a light grey. The rear radio rack was glued in
place as was the cockpit and tail wheel to the left side of the fuselage. The
tail wheel piece is quite fragile and I broke mine when removing it from the
sprue. Fitting it in place was basically a case of dumping super glue into the
back once the fuselage halves were together. Not pretty, but it will hold. I
then test fit the wings to the fuselage and was delighted at how well it all fit
into place.
The
cockpit was detailed with various colors of paint, then given a black enamel
wash. I later drybrushed it with a light grey. The rear radio rack was glued in
place as was the cockpit and tail wheel to the left side of the fuselage. The
tail wheel piece is quite fragile and I broke mine when removing it from the
sprue. Fitting it in place was basically a case of dumping super glue into the
back once the fuselage halves were together. Not pretty, but it will hold. I
then test fit the wings to the fuselage and was delighted at how well it all fit
into place.
 Removing
the wings, I glued the instrument panel into place and then attached the upper
cowling piece once the guns were inserted. The openings for the guns need to be
enlarged, and frankly, they are not impressive. I'd recommend replacing the
barrels with fine tubing. The upper cowling is also a bit wider than the
fuselage and will need sanded down once it is dry if you wish. Soviet aircraft
were not exactly the cleanest and smoothest airplanes in the world and photos
show many panels that don't fit well. I then attached the wings and was
again, pleased with how well it all fit.
Removing
the wings, I glued the instrument panel into place and then attached the upper
cowling piece once the guns were inserted. The openings for the guns need to be
enlarged, and frankly, they are not impressive. I'd recommend replacing the
barrels with fine tubing. The upper cowling is also a bit wider than the
fuselage and will need sanded down once it is dry if you wish. Soviet aircraft
were not exactly the cleanest and smoothest airplanes in the world and photos
show many panels that don't fit well. I then attached the wings and was
again, pleased with how well it all fit.
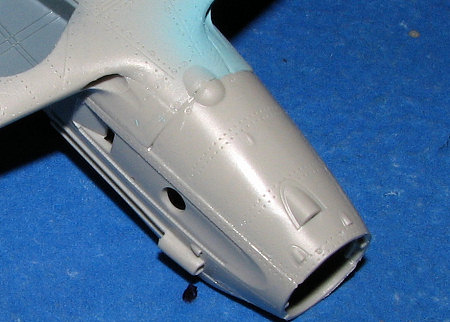 The
lower cowling is also separate, and in this case, is a bit smaller than the area
it is supposed to fit. The large opening in the front will hold the prop shaft
plate. After I'd used the usual putty on the nose area to clean it up, when I
installed the plate in that opening, it broke open all my filler. Might want to
put this in place first. I'd also recommend not installing the long intakes on
each side of the nose until after you have dealt with all the needed filler and
sanding as they will only get in the way. I left mine off until just before
painting and had no problems with the fit.
The
lower cowling is also separate, and in this case, is a bit smaller than the area
it is supposed to fit. The large opening in the front will hold the prop shaft
plate. After I'd used the usual putty on the nose area to clean it up, when I
installed the plate in that opening, it broke open all my filler. Might want to
put this in place first. I'd also recommend not installing the long intakes on
each side of the nose until after you have dealt with all the needed filler and
sanding as they will only get in the way. I left mine off until just before
painting and had no problems with the fit.
 Meanwhile, I assembled the lower radiator bath,
painting the inside with the dark grey and the radiator pieces in Alclad II
steel. This was then glued in place as were the tail planes. Fit here wasn't bad
though the gaps may be larger than some like. I also assembled the main gear to
the inner gear doors and set that aside to dry. The flaps were then added. The
inner ones have detail on the inside, but a huge hole where the wing/fuselage
meets above it. None of the flaps fit well and the forward section stands proud
of the surrounding wing. Perhaps sanding on the forward edge of the flap will
have it more level with the wing underside.
Meanwhile, I assembled the lower radiator bath,
painting the inside with the dark grey and the radiator pieces in Alclad II
steel. This was then glued in place as were the tail planes. Fit here wasn't bad
though the gaps may be larger than some like. I also assembled the main gear to
the inner gear doors and set that aside to dry. The flaps were then added. The
inner ones have detail on the inside, but a huge hole where the wing/fuselage
meets above it. None of the flaps fit well and the forward section stands proud
of the surrounding wing. Perhaps sanding on the forward edge of the flap will
have it more level with the wing underside.
I started to glue on the gun sight after painting it, when the instrument panel slid back towards the nose. After muttering some pleas to the modeling gods, I got a piece of tubing, stuck it through the hole in the nose and pushed the instrument panel back into place. Why these things are solid as a rock until everything is closed up is beyond me.
I did a bit of touch-up painting in the interior and masked off the clear bits while that all dried. These parts are very well molded, making it easy to cut out the tape. I glued on the front and rear sections and tacked the center piece in place. It was then off to the paint shop.
| COLORS & MARKINGS |
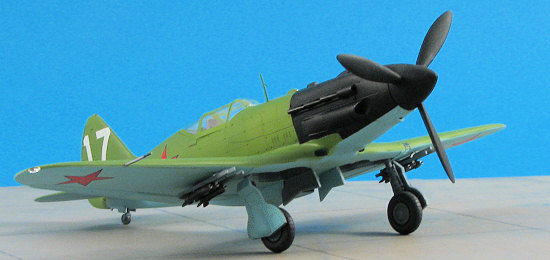
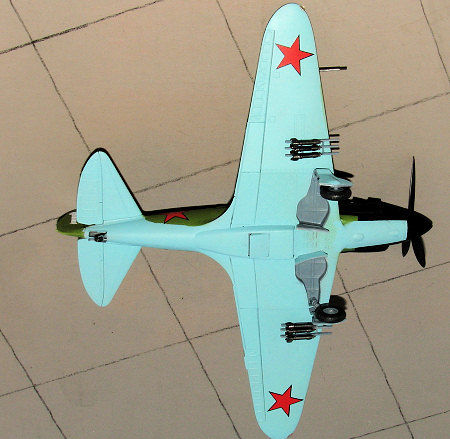
 I had decided to give the kit decals a go, and chose the box art plane. The underside was painted with AII
light blue and then masked while the upper surfaces were painted AII green.
I had decided to give the kit decals a go, and chose the box art plane. The underside was painted with AII
light blue and then masked while the upper surfaces were painted AII green.
I then brought the kit back to the bench and glued on the landing gear. I also attached the lower wing stars from the decal sheet. No clear gloss, just wanted to see how they'd react to Solvaset. Well, I couldn't be more pleased. They settled down nicely and when I put a matte clear over them, no silvering. Even snuggled right down over the detailing on the rudder. I had suspected that Trumpeter decals had improved since building the Hobby Boss Mirage (Trumpeter and Hobby Boss are owned by the same company), and I couldn't be more pleased with them. I would like to think that all this fuss over Trumpeter decals may well be a thing of the past. Those who complain about them in newer kits may want to actually give them a try before dismissing them out of hand.
Anyway, there isn't much to the markings aside from stars and aircraft number and I did put them over a matte finish. The numbers are not hooked together as it seems but are separate and the decals are quite thin. The entire airframe was clear coated with a matte acrylic to seal in the decals and give a more uniform sheen to the model. No decal silvering was noticed.
With the decals in place, I masked and painted the nose and prop assembly with matte black. The exhaust got a coat of Alclad II 'jet exhaust'.
| FINAL CONSTRUCTION |
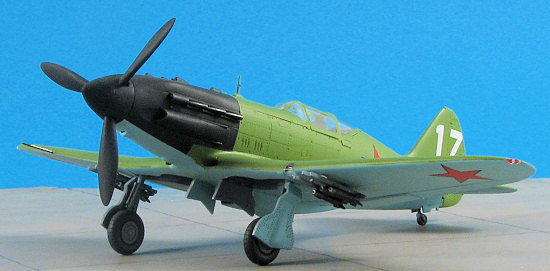
 I'd already painted the rocket rails with dark grey and
after assembling the rockets, they were given a coat of Alclad II 'Steel'. The
radio mast was glued in place as was the pitot tube. I then glued on the prop
(as the shaft was too small in diameter for the hole in which it fit), then the
exhaust. These had to have the mounts thinned down to fit into the slots. The
rocket rails were glued in place, followed by the rockets. This is quite fiddly
and took considerable time to get things properly aligned.
I'd already painted the rocket rails with dark grey and
after assembling the rockets, they were given a coat of Alclad II 'Steel'. The
radio mast was glued in place as was the pitot tube. I then glued on the prop
(as the shaft was too small in diameter for the hole in which it fit), then the
exhaust. These had to have the mounts thinned down to fit into the slots. The
rocket rails were glued in place, followed by the rockets. This is quite fiddly
and took considerable time to get things properly aligned.
The last bits to add were the pitot tube, landing light cover and the wing tip lights. These clear bits were attached using clear paint. The tip lights didn't fit as well as I'd have liked and in hindsight, I should have glued them on when initially doing the wings. Then I could have sanded them down to provide a proper fit. I pulled the masking from the clear bits and that was it.
| CONCLUSIONS |
I have to say that I found this to be a delightful kit to build. It provided little in the way of construction hassles, is nicely detailed and has excellent decals. I guess one really couldn't ask much more than that.
Thanks to 'store credit' on consignment kit sales for this one as I really wanted to build it.
October 2007
#1490 in a series
Copyright ModelingMadness.com. All rights reserved. No reproduction in part or in whole without express permission from the editor.
If you would like your product reviewed fairly and fairly quickly, please contact the editor or see other details in the Note to Contributors.