Valom 1/72 Polikarpov TIS
|
KIT # |
72003 |
|
PRICE: |
$35.98 SRP |
|
DECALS: |
Insignia |
|
REVIEWER: |
|
|
NOTES: |
Short run with vac canopy, etched fret & resin |
|
BACKGROUND |
For a history of the type and a look at what comes in the
box, please visit the preview.
|
CONSTRUCTION |
Allow me to succumb to the minions of mediocrity and
start with the cockpit on this one! Now I have to confess that I had some
trouble in this regard. You see, the drawings don't exactly jive with the
actual parts. There is some confusion on my part as to exactly where all
the bits are supposed to fit. This starts with the instrument panel part,
which is too wide to fit atop the two small parts that project from the
cockpit floor. They will fit astride them and that is what I did. Then I
glued on the back bulkhead. The drawing intimates that it is supposed to
fit just behind the back seater's position
 as shown by markings on the
floor part. However, that will put the pilot too far back. Putting the
aft bulkhead on the back part of the floor will place the pilot right
about the correct place in the cockpit, but will then make the instrument
panel a bit on the close side and not leave room for the rudder pedals.
It also gives the guy in back a HUGE amount of extra room. It would be
most helpful to have had a drawing that shows the interior in position,
or at least to have some sort of positive alignment tabs to properly
position the interior instead of having it 'float around' and the builder
having to guess. Anyway, once the interior was completed, I painted it
using Colourcoat's new VVS WUC Metal Primer, which is a bluish grey. I
then picked out some detail in the sidewalls using black.
as shown by markings on the
floor part. However, that will put the pilot too far back. Putting the
aft bulkhead on the back part of the floor will place the pilot right
about the correct place in the cockpit, but will then make the instrument
panel a bit on the close side and not leave room for the rudder pedals.
It also gives the guy in back a HUGE amount of extra room. It would be
most helpful to have had a drawing that shows the interior in position,
or at least to have some sort of positive alignment tabs to properly
position the interior instead of having it 'float around' and the builder
having to guess. Anyway, once the interior was completed, I painted it
using Colourcoat's new VVS WUC Metal Primer, which is a bluish grey. I
then picked out some detail in the sidewalls using black.
Once the interior was in place, I glued the fuselage halves together. It wasn't without some grunt work as the nose section didn't want to seem to work that well. I actually think that the instrument panel was causing my fit problems and probably from being too far forward. Clamps and superglue came to the rescue to fix this situation.
While all that was going on, I turned my attention to the
wings and engine nacelles. First things I did was to glue the wings
together. The trailing edges are rather thick and you may well want to
shave them down. As usual, I needed filler on all the joins, but thanks
to the softish plastic, this wasn't much of a chore. Then I glued the
etched radiator screens to the backing and installed them as well as the
forward wheel well bulkheads into the nacelle halves. There are upper
wheel well inserts as  well,
but I left those off until after I had glued the nacelle halves together.
This also required the use of clamps while the glue dried. Getting the
radiator grille in place was not an easy task as the mounting tabs are
vague at best. I also found that the nacelles were not the same and one
side had a huge difference in height on one side. It may be that
one side was short shot, making it higher or it could be that the one
side was molded too high, but you do need to be aware of it as you can see in the
accompanying image.
well,
but I left those off until after I had glued the nacelle halves together.
This also required the use of clamps while the glue dried. Getting the
radiator grille in place was not an easy task as the mounting tabs are
vague at best. I also found that the nacelles were not the same and one
side had a huge difference in height on one side. It may be that
one side was short shot, making it higher or it could be that the one
side was molded too high, but you do need to be aware of it as you can see in the
accompanying image.
Once the nacelles had been glued together and were really dry, I then installed the upper wheel well inserts. There is lots of room to get these installed and it will deform the nacelles in width a bit, but no worries as it works quite well. After that was done, the usual filler and panel line rescribing was done. I did not install the prop or landing gear at this time as I'd have broken them both during the rest of construction.
Once the nacelles were cleaned up, they were glued to the wings. Fit here is not that great and it took several applications of filler to correct everything. I used thick superglue to help take care of the large gap caused by the rear nacelle situation. Eventually, it all was done and smoothed out to an acceptable level.
 Returning to the fuselage, it was filled and smoothed
out. Then I cut out and attached the canopy. A nice part of this canopy
is that it includes the surrounding sheet metal, making it much easier to
fair into the rest of the fuselage. I like this trait and prefer it over
the usual method. I used odorless superglue to attach it and wasn't
stingy in its use, applying accelerator to keep things in position. I
almost immediately sanded it down as to give the glue a chance to totally
cure would have added to the work load. Filler was then used to take care
of any holes and other inconsistencies.
Returning to the fuselage, it was filled and smoothed
out. Then I cut out and attached the canopy. A nice part of this canopy
is that it includes the surrounding sheet metal, making it much easier to
fair into the rest of the fuselage. I like this trait and prefer it over
the usual method. I used odorless superglue to attach it and wasn't
stingy in its use, applying accelerator to keep things in position. I
almost immediately sanded it down as to give the glue a chance to totally
cure would have added to the work load. Filler was then used to take care
of any holes and other inconsistencies.
Now I could start adding more airframe bits. The first were the tailplanes. Fit here was pretty good and only a touch of filler was used. I had to make sure that there was a bit of dihedral was in them and the drawing on the instructions was a big help in this area. Then the fins were added, with no problems and no filler needed. These are straight up and down. I'm not sure if it is normal, but mine were a bit pigeon-toed, though it isn't that noticeable.
Then it is time for the wings. They are butt joins and so I used quite a bit of glue to make sure they fit well. As expected, there were gaps, but some filler and sanding took care of that. In fact, I overdid one area and there is a bit of a trough where my enthusiasm got the best of the plastic!
 Now I had pretty much a complete airframe. It was time
for the lower nose transparencies. These are not the easiest to install
and after much frustration, I sort of went overboard. I slathered the
area with non-fogging superglue and then installed the clear bits,
covering every gap with more superglue. After hitting it with
accelerator, I then sanded everything. Once it was smooth, I polished the
clear bits, only to discover that I got too much superglue on them. There
were large areas of it on the inside, not exactly where I could get to
it. Oh well, it is just something I'll chalk up to experience!
Now I had pretty much a complete airframe. It was time
for the lower nose transparencies. These are not the easiest to install
and after much frustration, I sort of went overboard. I slathered the
area with non-fogging superglue and then installed the clear bits,
covering every gap with more superglue. After hitting it with
accelerator, I then sanded everything. Once it was smooth, I polished the
clear bits, only to discover that I got too much superglue on them. There
were large areas of it on the inside, not exactly where I could get to
it. Oh well, it is just something I'll chalk up to experience!
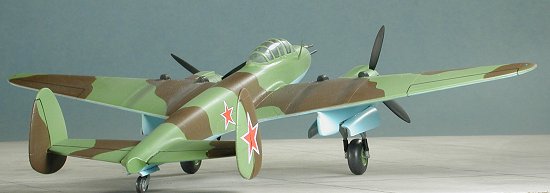
With the airframe together, I decided to do the exhausts at this time. Well, I have to tell you that there are parts in the kit that don't exactly match what is shown on the instructions, and these are some of them. There are supposed to be tubular exhaust that come out of the engine cowlings, go straight back and then curve upward to disappear into the leading edge of the wing. They then come out of the leading edge up higher and then curve back.
Well, the lower bits look more like a sharpened pencil and have NO curve to the back section. The 'eraser' part of the lower exhaust points forward and the pointed bit to the hole in the lower wing. The upper part is a bit better, but it is a half circle and not tubular at all. Not to say it looks horrible, as it is quite acceptable, but many modelers will want to replace this. The box art is no help as it shows something like ejector stub exhaust! There is also a carb intake atop each engine nacelle. This is quite flat so it doesn't fit the curved surface too well. I needed filler to blend things in.
All the clear bits were masked and tissue put into the wheel wells as I got ready to paint it.
|
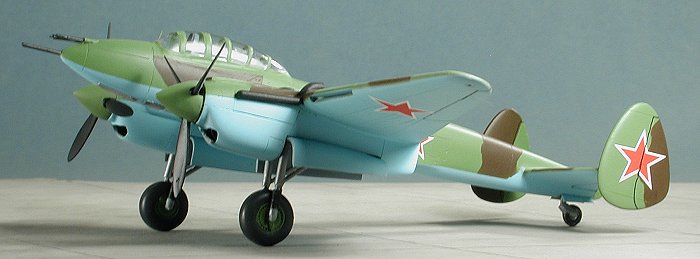
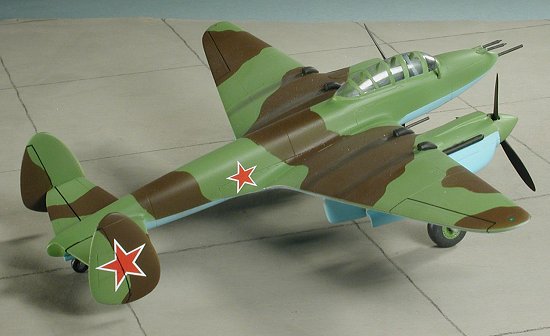
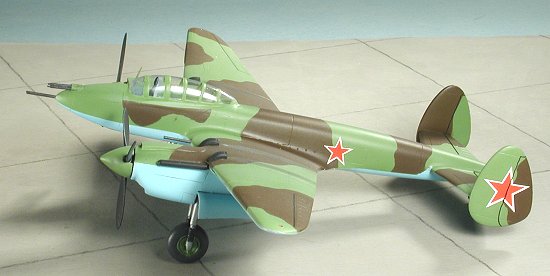
COLORS AND MARKINGS |
This kit gave me an opportunity to try the ColourCoat's new line of VVS paints. I'm particularly pleased with this line as the colors are, for the most part, semi-gloss and not matte so it is possible to put decals directly on the paint without the need for a gloss clear, if you are willing to give it a go.
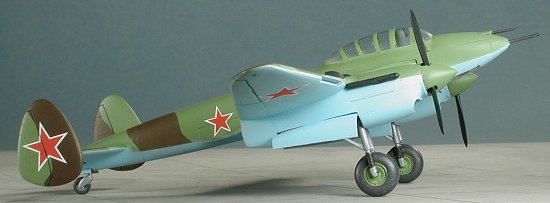 This
particular aircraft was built and initially flew in 1941 so the chances
of it being painted with the AMT paints is unlikely. For that reason,
(and because I couldn't find my AMT-4 Olive Green paint; I found it just
minutes after finishing the kit..) I used the AII colors instead. I
started with the underside blue, which really is a bright blue color and
not the greyish tinted colors I'd used previously on VVS aircraft. With
that dry, I masked off the blue parts and then sprayed the upper surface
in the Green shade. This is also a pretty bright color that is similar to
late ware Luftwaffe light green. This was then masked and I used the Dark
Brown. ColourCoat paint needs at least 12 hours to fully cure so these
paints are not for the speed builder. I basically gave each coat a day,
just to be sure. I had thought about free-handing the camo, but many of
the Soviet camouflage schemes were amazingly tight and, in my opinion,
in 1/72 this is best duplicated by masking.
This
particular aircraft was built and initially flew in 1941 so the chances
of it being painted with the AMT paints is unlikely. For that reason,
(and because I couldn't find my AMT-4 Olive Green paint; I found it just
minutes after finishing the kit..) I used the AII colors instead. I
started with the underside blue, which really is a bright blue color and
not the greyish tinted colors I'd used previously on VVS aircraft. With
that dry, I masked off the blue parts and then sprayed the upper surface
in the Green shade. This is also a pretty bright color that is similar to
late ware Luftwaffe light green. This was then masked and I used the Dark
Brown. ColourCoat paint needs at least 12 hours to fully cure so these
paints are not for the speed builder. I basically gave each coat a day,
just to be sure. I had thought about free-handing the camo, but many of
the Soviet camouflage schemes were amazingly tight and, in my opinion,
in 1/72 this is best duplicated by masking.
Though there was a bit more work to do before adding the
decals, I'll just say that the decals are very thin, went on quite well
and needed no setting solution to properly snuggle down into the panel
lines. I did have a teeny
registration glitch with the fuselage decals, but no real problem. I also
followed the kit instructions about putting these on, in case you think
that the placement is a touch odd.
did have a teeny
registration glitch with the fuselage decals, but no real problem. I also
followed the kit instructions about putting these on, in case you think
that the placement is a touch odd.
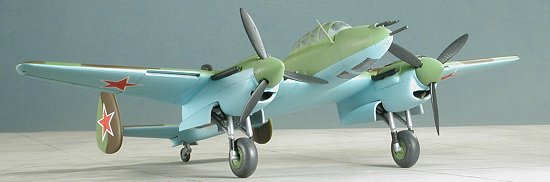
At this time, I assembled the landing gear. The tail wheel wasn't a problem, though I did have to drill out the mounting hole to be larger and a bit more aft as the well insert had been placed too far forward. The main gear is a challenge. You have a resin wheel, two side struts and a rear retraction strut/brace. The area just above the oleo boots is thin and weak so one has to be very careful. The mounting holes in the wheel well are too small and need drilled out. Even then, they seem a bit too narrow as it was not possible to get a perfectly straight pair of gear legs. The other option would be to narrow the wheels. Fitting the wheel retraction strut is not difficult, but since its mount blocks the wheel cutout in the well, one wonders just how this whole arrangement would actually work. I used superglue on all the attachment points to make things as sturdy as I could.
With all the landing gear in place, the aircraft returned to the paint area where it was given a matte coat using my usual Future/flat base mixture.
|
FINAL ASSEMBLY |
As one would expect, there were still a few more bits to add on. First, I drilled out holes for the inner wing cannon. These barrels are very long and look a bit odd, to say the least so I inserted them in farther than the instructions showed. They are supposed to be butt fitted to the leading edges, but by drilling the holes for them, they are jutting out about half their original length. I also drilled a hole in the nose tip for the very thick pitot tube.
 The upper
cowl guns were glued in place as was the radio mast (which was difficult
to accurately locate as the instructions were pretty vague about it) and
all these 'stick' thingies were painted. Gear doors were next. A butt
join on them all and though they took a while to get into the proper
position, no problems were encountered. The last parts were the props.
I'd already painted the spinners with AII Green to get that ready. The
prop blades are separate and fit into a resin hub. The design of this hub
is very good. The blades fit into it very well and it only needed a touch
of superglue to fix them in place. Of all the separate blade/hub
arrangements I've encountered in short run kits, this is the best. The
spinner was glued on where it touched and then the prop assemblies were
pressed into the holes in the front of the engine nacelles.
The upper
cowl guns were glued in place as was the radio mast (which was difficult
to accurately locate as the instructions were pretty vague about it) and
all these 'stick' thingies were painted. Gear doors were next. A butt
join on them all and though they took a while to get into the proper
position, no problems were encountered. The last parts were the props.
I'd already painted the spinners with AII Green to get that ready. The
prop blades are separate and fit into a resin hub. The design of this hub
is very good. The blades fit into it very well and it only needed a touch
of superglue to fix them in place. Of all the separate blade/hub
arrangements I've encountered in short run kits, this is the best. The
spinner was glued on where it touched and then the prop assemblies were
pressed into the holes in the front of the engine nacelles.
I removed the masking from the clear bits, shuddered when I looked at the lower ones, added pastels exhaust stains and that was it.
|
CONCLUSIONS |
Easy? Not really. Insurmountable challenges? Nope. Impossible to build? Not at all. It is a very nice model that just requires some effort and the use of those modeling skills that we've been honing over the years. The final result is actually very nice, despite my poor efforts on it. I can thank Valom and all the other short run kit makers out there for providing us with something a bit different from the usual mass of Mustangs, Spitfires, F-16s and the like.
January 2004
#1301 in a series
Copyright ModelingMadness.com. All rights reserved. No reproduction in part or in whole without express permission from the editor.
If you would like your product reviewed fairly and fairly quickly, please contact the editor or see other details in the Note to Contributors.
Back to the Previews Index Page 2016