
| KIT #: | 8461 |
| PRICE: | $ |
| DECALS: | One option |
| REVIEWER: | Scott Van Aken |
| NOTES: | Weekend Edition |
| HISTORY |
By 1943, the La-5 had become a mainstay of the Soviet Air Force, yet both
its head designer, Semyon Lavochkin, as well as the engineers at TsAGI ("Central
Aerohydrodynamics Institute") felt that it could be improved upon. The LaGG-1
had been designed at a time when it was considered necessary to conserve
strategic materials such as aircraft alloys, and had a structure built almost
entirely of plywood. With Soviet strategists now confident that supplies of
these alloys were unlikely to become a problem, Lavochkin began replacing large
parts of the airframe (including the wing spars) with alloy components. Various
other streamlining changes were made as well, increasing performance further.
The prototype, internally designated La-120 by
 Lavochkin, flew in November, and
was quickly put into production, entering service the following spring.
Lavochkin, flew in November, and
was quickly put into production, entering service the following spring.
The La-7 earned itself a superb combat record by the end of the war, and was flown by the top two Soviet aces of the conflict, one of which was Ivan Nikitovich Kozhedub. Turning a full circle took 19-21 seconds. The aircraft was also used as a test bed to explore advanced propulsion systems, including a tail-mounted liquid-fuelled rocket engine (La-7R), two under-wing pulsejets (La-7D), and two under-wing ramjets (La-7S). None of these variants proved worth pursuing, and turbojet technology quickly overtook them.
The La-7 was the only Soviet fighter to shoot down a Messerschmitt Me-262, by Ivan Nikitovich Kozhedub on one occasion over Germany on February 15, 1945.
Two La-7s from the PLAAF successfully shot down a Cathay Pacific airliner off the coast of Hainan Island in 23 July 1954.
Total production of the La-7 amounted to 5,753 aircraft, including a number of La-7UTI trainers. Those aircraft still in service after the end of the war were given the NATO reporting name Fin. The follow-up model, La-9 despite its outward similarity was a complete reworking of the design.
| THE KIT |
One of the best ideas Eduard ever had was to develop the 'weekend special' line of kits. These are bare bones kits with no photo-etch or resin and just a single markings option. There is not even a separate color and painting guide for the overall airframe, that being shown on the box art and the sides of the box is considered enough.
The two main sprues are very nicely molded and show just how
simple a kit the La-7 actually is. The lack of alignment pins and
 sockets on all
but the major pieces, keeps
away any problems with sink areas and the ejector pin marks are limited to some
small stubs on the inside of the wings, tail planes and fuselage. These will be
hidden once the kit is built.
sockets on all
but the major pieces, keeps
away any problems with sink areas and the ejector pin marks are limited to some
small stubs on the inside of the wings, tail planes and fuselage. These will be
hidden once the kit is built.
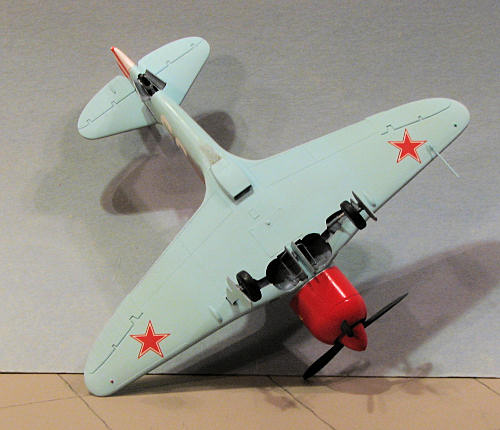
The cockpit is equally basic with a seat, stick, pedals and some sidewall detail bits. Interestingly, the first step in the construction is the wheel well bulkhead and oil cooler inlets. The prop has separate blades that are keyed and thanks to the large cooling fan, no engine is required, cutting back on painting time. A three piece canopy is given, though there is no indication that this is designed to be able to be left open.
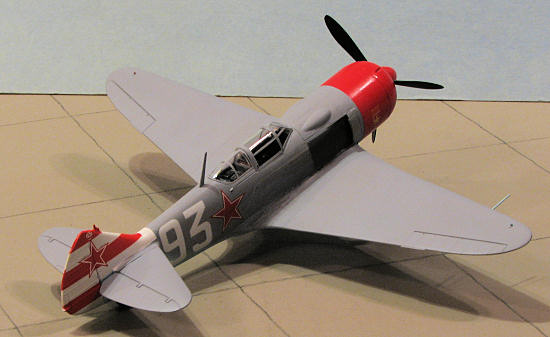
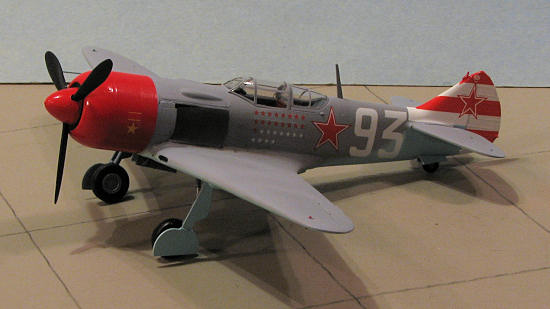
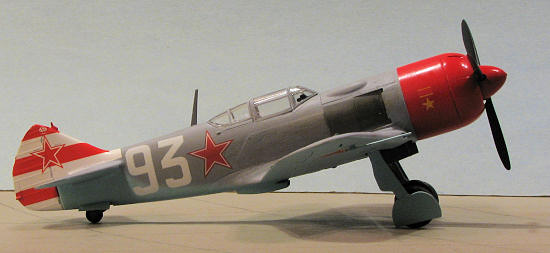
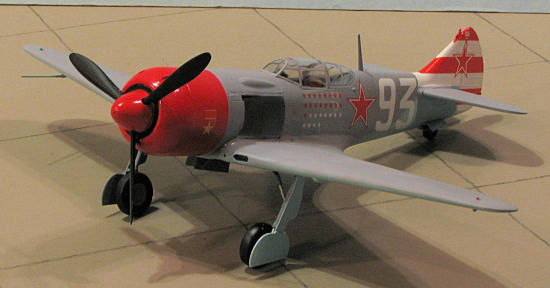
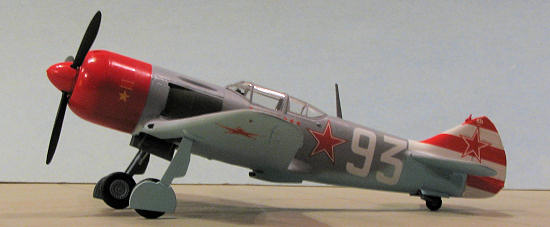
Instructions are well illustrated on a single folded sheet. All color data is with Gunze paints, a bit of a bummer for Americans now that this paint is no longer being imported. Fortunately, the AMT colors are provided in some cases so you can use alternate paints. The decal markings option is for the very late war aircraft of Col. S.F. Dolgushin, commander of the 156 GIAP. This plane has a full red nose and a red/white striped fin/rudder. This plane has no upper wing insignia and is AMT-11 grey upper with AMT-7 undersides, so no fancy camouflage scheme. Decals are well printed and include a decal for the instruments.| CONSTRUCTION |
When I first started this kit, it was on a Friday evening after supper. I was going to see if this kit could be build in a weekend.
 Deciding
to be totally conventional on this, I started with the cockpit, by gluing
together all the pieces that were to be painted the same color. This is not one
of Eduard's newer kits and it shows by the general lack of positive locators for
many of the parts. Getting the set attached to the armor plating and that
plating properly positioned takes a bit of time to get right. The control stick
attachment hole needed to be drilled out as did the small indentations on the
upper instrument panel for the gun charging handles. The two radio boxes fit on
the shelf without any real fuss. All these parts as well as the inside of the
gear doors and wheel wells were painted using White Ensign's excellent enamals.
A quick note on these is that they do not like glues at all, shriveling up when
glue comes in contact so one has to be very careful when attaching pieces to be
sure they are paint free and that the glue stays away from the dried paint.
Deciding
to be totally conventional on this, I started with the cockpit, by gluing
together all the pieces that were to be painted the same color. This is not one
of Eduard's newer kits and it shows by the general lack of positive locators for
many of the parts. Getting the set attached to the armor plating and that
plating properly positioned takes a bit of time to get right. The control stick
attachment hole needed to be drilled out as did the small indentations on the
upper instrument panel for the gun charging handles. The two radio boxes fit on
the shelf without any real fuss. All these parts as well as the inside of the
gear doors and wheel wells were painted using White Ensign's excellent enamals.
A quick note on these is that they do not like glues at all, shriveling up when
glue comes in contact so one has to be very careful when attaching pieces to be
sure they are paint free and that the glue stays away from the dried paint.
Into the lower wing goes an aft bulkhead and two cooler ducts. There
are two small items that fit into the wheel well, but do not fit well with the
one near the cooler ducting being an especially poor fit. Once these parts
are installed, then the upper wing can be glued on. The upper wing includes the
floor of the cockpit. On the underside of the wing is the oil cooler radiator
assembly. As the opening is so tiny, one can easily forego any painting inside
it and that is what I did. I installed the radiator, then the cooler housing
then the intake ducting. I used filler to take care of any seams. On that
subject, I've been unable to get Tamiya's standard filler as I guess they have
stopped making or importing it. Instead, I'm using Mr Dissolved Putty, which is
like a very thick Mr. Surfacer. It fills gaps well, dries quickly and doesn't
seem to shrink like standard
 filler. It is
not, however, good for large gaps or gouges, taking several applications to
fill. None of those latter glitches were present on this kit so no worries. I
left these parts to dry overnight.
filler. It is
not, however, good for large gaps or gouges, taking several applications to
fill. None of those latter glitches were present on this kit so no worries. I
left these parts to dry overnight.
With the interior bits painted, and dry enough, I attached the instrument panel decal, did some detail painting of the seat, radio boxes and some small sidewall pieces. Then the various subassemblies were glued in place and, trapping the tail wheel between the halves, the fuselage halves were cemented together. During this, I also glued in the forward bulkhead, the engine cooling fan piece, and the instrument panel. Fit on all this was not bad, though one does have to constantly adjust things as the locators are minimal or non-existant. During this time, I also glued the horizontal stabilizers together and then broke out the filler and applied it to all the seams on the fuselage, wings and stabs, leaving it to dry for several hours.
Once that was done, I sanded down the seams and glued the wings to
the fuselage. Fit here was not bad, but there was some overhang of the fuselage
to wing join on the upper side. This was attacked with more filler. Meanwhile, I
also glued the wheel halves together and did some prep work on the props.
Naturally, one of the prop tips broke away while I was removing it from the
sprue so that was reshaped and is shorter than the rest. The spinner and backing
were removed from the sprue and after clean up, were tacked together for
painting. I also took this opportunity to install the 'exhaust' piece,
which basically is a flat, curved piece with oval exhaust ports embossed on it,
and glued the cover piece in place. One needs to be sure that these parts are
sanded free of  sprue
nibs or they won't fit. The wheels, which had been glued together, filled and
sanded, were painted. First with the Colourcoats VVS Interior Grey, then with
Floquil Engine Black. The wheel has a nice raised rim, making brush painting a
snap.
sprue
nibs or they won't fit. The wheels, which had been glued together, filled and
sanded, were painted. First with the Colourcoats VVS Interior Grey, then with
Floquil Engine Black. The wheel has a nice raised rim, making brush painting a
snap.
A quick trip to the paint booth applied white to the forward fuselage, the prop spinner and that tail section. I used Testors Gloss White enamel thinned with lacquer thinner and it was dry to the touch in a few hours. While there, I painted the underside of the tail planes as well as most of the wing undersurfaces, outer gear doors and much of the fuselage with White Ensign's Colourcoats enamel, also thinned with lacquer thinner. Unlike the Testors paint, this did not shorten dry time and so I was resigned to it taking 12-18 hours to be dry enough to no be tacky to the touch. The image of all the bits shows how much I had done in about 24 hours from the start of cementing.
| COLORS & MARKINGS |
Still wanting to think I could finish in the time provided, I next masked off that white tail and painted the nose and spinner with Testors Guards Red enamel, also thinned with lacquer. After waiting for it to dry, I started masking the clear bits using Tamiya Tape. This was no problem and actually went quite smoothly, thanks to a brand new scalpel blade.
 Back
at the kit, I masked off the red and glued in the gun sight. When it was dry, I
glued in the three clear pieces. The thickness of the canopy means it cannot be
posed open. Then the area behind the exhaust was painted with Alclad II Steel
and then masked when dry. I then painted the upper surface as well as the upper
horizontal tail planes with White Ensign Colourcoats AMT-11 Grey. The airframe
was set aside to dry and I attached the props to the spinner backing plate.
There are no alignment pins in the props so one just has to put them on at the
same angle and hope for the best. When dry, the spinner was glued in place. I
also took the opportunity to attach the oleo scissors to the already painted
main gear.
Back
at the kit, I masked off the red and glued in the gun sight. When it was dry, I
glued in the three clear pieces. The thickness of the canopy means it cannot be
posed open. Then the area behind the exhaust was painted with Alclad II Steel
and then masked when dry. I then painted the upper surface as well as the upper
horizontal tail planes with White Ensign Colourcoats AMT-11 Grey. The airframe
was set aside to dry and I attached the props to the spinner backing plate.
There are no alignment pins in the props so one just has to put them on at the
same angle and hope for the best. When dry, the spinner was glued in place. I
also took the opportunity to attach the oleo scissors to the already painted
main gear.
By this time, it was apparent that the slow drying of the Colourcoats paint as well as waiting for standard glues and fillers to dry was to mean that this wasn't going to be done in a weekend. Perhaps using fast drying paint and superglue for cement and fillers would have meant success, but for those of us who use time tested materials, it wasn't going to happen.
| FINAL CONSTRUCTION |
Come Monday, I started to glue on the landing gear. This was the
first area where I was less than thrilled with the kit. Again, if I'd used
superglue, perhaps the problems wouldn't have occurred. The attachment point
for the main gear is flimsy and there is none for the retraction struts.
These latter pieces fit in general locations on the gear and wheel well. The
axles are also way too
 thin for
the wheels and both of mine snapped once I got the wheels on. It took
considerable time to get this all straight and even then not all was
perfectly aligned. I did have to use super glue to get a strong enough hold.
The same thing for the inner gear doors. The attachment areas are tiny and
normal glue just doesn't hold well. Tail wheel doors fit fairly well, but
are not the exact shape of the opening to which they are attached.
thin for
the wheels and both of mine snapped once I got the wheels on. It took
considerable time to get this all straight and even then not all was
perfectly aligned. I did have to use super glue to get a strong enough hold.
The same thing for the inner gear doors. The attachment areas are tiny and
normal glue just doesn't hold well. Tail wheel doors fit fairly well, but
are not the exact shape of the opening to which they are attached.
At this time, the kit was sprayed with Future gloss acrylic in preparation for decals. This provided the next hurdle. You see, the decals are well done with each marking dutifully numbered. However, Eduard does not show where all the data markings go. One can easily notice where the main ones are place, but a part of the sheet are data markings and without a guide, one has no real idea where these go. I left them all off. On the earlier Weekend Special Yak-3, these decal ID numbers were clearly shown on the box art.
The majority of the large markings gave me no trouble, but the tail markings were very difficult to get in place properly. The two main problems were that they were not long enough so the stripes didn't meet in the front for the middle batch, and the decals did not react well to any setting solution, making them a problem to conform around the tail. In fact, the first application of Microsol caused the decals to curl up! Fortunately, these decals are tough and I was able to uncurl them and eventually get them to fit. For that, I used Solvaset, which wasn't perfect, but did help a lot. I also had a touch of silvering. The gaps in the red tail stripes were painted over with Testors Italian Red, which is a bit on the orange side and matches the rather light red of the Eduard decals. To be honest, I was going to use aftermarket decals on this kit, but discovered that I didn't have any so used the kit supplied ones instead.
 Once
the decals were finally on and dry, a matte clear using Future and either Tamiya
or Gunze flat base, a mixture I've been using for nearly 20 years, was applied.
I left the nose and tail somewhat gloss as I figured they would have been on the
real aircraft. In fact, this late in the war, the entire airframe may well have
been waxed and polished for speed, as camouflage was obviously not a concern.
Once
the decals were finally on and dry, a matte clear using Future and either Tamiya
or Gunze flat base, a mixture I've been using for nearly 20 years, was applied.
I left the nose and tail somewhat gloss as I figured they would have been on the
real aircraft. In fact, this late in the war, the entire airframe may well have
been waxed and polished for speed, as camouflage was obviously not a concern.
The last bits were the pitot tube, antenna mast and prop, after painting formation lights and using some Tamiya Weatherine pastels for the exhaust. Being the CO's bird, this one was probably in superb shape compared to most of the line birds. Still, the exhaust will stain things so having it pristine would have been a but much.
| CONCLUSIONS |
Despite my personal problems building this kit, it is an excellent value for the money. Having these older Eduard kits at such an inexpensive price is a real boon to a modeler on a budget. I'd personally replace the decals with aftermarket and will warn you that much care is needed in some parts of construction, but overall, it is a fine kit and one that I can well recommend to you.
Oh yes, I put the finishing touches on the model on Thursday AM, so while not a true weekend build, it was fairly quick.
| REFERENCES |
November 2008
Copyright ModelingMadness.com. All rights reserved. No reproduction in part or
in whole without express permission from the editor
If you would like your product reviewed fairly and fairly quickly, please
contact
the editor or see other details in the
Note to
Contributors.