 Kit Number:1003
 Modelart 1/72 Berezniak-Isaev BI-1
Kit Number:1003
Price: I paid $3.00 at a swap meet
Decals : One aircraft
Date of Review: 27 December, 1996
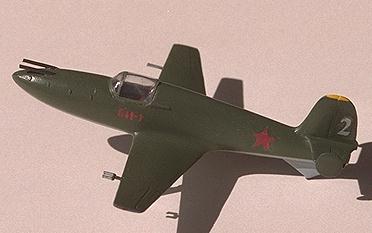
The Berenziak-Isaev BI-1 (also seen printed as BH-1) was the Soviet's first 'successful' point defense rocket powered fighter. Several were built and flown with differing degrees of success. They were powered by a 1,100 lb thrust bi-fuel rocket motor. The aircraft underwent trials in 1942 after being successfully flown as a glider in September 1941. The first rocket powered flight was on May 15, 1942 and subsequent flights showed an endurance of 8 to 15 minutes. In a quest for more endurance, a new three chambered rocket was developed, but it proved complicated and unreliable. After several accidents and the death of a test pilot, the requirements for a point defense fighter were dropped in favor of more conventional aircraft.
The Modelart kit consists of 21 pieces including a 'clear' canopy. It is typical Eastern European kit with large gates, brittle plastic and a barely adequate instruction sheet, half of which was copied from a Frog kit giving hints and tips on gluing and painting. With the instructions in Russian, little is learned of the aircraft or assembly sequence. Anyway, the kit is not that difficult to assemble since there are so few parts. The interior consists of a floor and a seat. Lots of room for detailing, but the less than distortion-free canopy will make most efforts beyond a stick and instrument panel a waste of time. The parts had little flash (surprise), but there was a large number of injector plugs on the inside that needed cleaned up. The fuselage halves in my kit were warped so had to be glued a bit at a time after sanding the halves for an acceptable fit.
The wings are a single piece but need to have a roof installed in the wheel wells to prevent seeing through the canopy. You will also need to carve the wings and/or fuselage to get a decent fit. The horizontal stabilizer is notched to fit over the fin (the rudder is separate), but the notch is way too small and major surgery is required for a fit. After these items have been fitted, it is time to apply several coats of putty to smooth things out. No need to worry about losing detail as, except for the engraved detail of control surfaces, there is little other than raised detail for the nose access panel and underwing flaps. Once the putty is sanded to an acceptable standard, it is time for the rudder. But wait, it is quite a bit thinner than the fin to which it is attached! At this point, you can either thin the fin, or attach the rudder anyway. I did the latter. Fit is OK.
Last airframe part to be attached are the finlets and underfuselage strake/tailwheel. The finlets are supposed to be round and will get that way after some downsizing and sanding. There are no less than six gates for each of these tiny finlets! The underfuselage strake/tailwheel is a simple fit that required little putty. Next is the canopy. On my version, the canopy was about 1/8" too short for the opening. I fit it to the rear and filled in the offending space in the front with putty. Next are the nose guns (which look way too big), the wing pitot tubes and the undercarriage. The undercarriage is a simple job with Tiny wheels and strange looking gear doors.
Once completed, the aircraft was painted with Gunze RLM 65 on the underside and Tamiya JAAF green upper surfaces. The nice thing about Russian aircraft of this time is that there is no standardization in colors so anything close will do. The kit was then sprayed with Future to give a gloss surface for the decals. The decals are typical Russian--too thick with poor stick. Unfortunately, the size of the stars is very small for this tiny (3 3/4" x 3 3/4") kit so I had to use those in the kit. After the decals had dried, I sprayed a semi-matte top coat on it, peeled off the tape over the canopy and there it is!
This is the smallest kit in my collection (the BD-5 is gone) so should not be much of a problem finding space for it. In fact, I will put it next to my Me-163 to show the difference in size of the two. This has gotten me on a quest for other kits of rocket fighters of WWII.
Russian 1/72 BH-1 rocket fighter, construction notes
1 Dec '96
Got this kit from an auction on the Internet. It is rather crudely made and also is a very small kit. So far, I have assembled the very sparse interior, painted it and assembled the fuselage. The wings have also been assembled. Now they have been puttied and are drying awaiting sanding. With so few parts to the kit, I image that it will be completed rather quickly. One thing I have noted is that the wing/fuselage join is not going to be done quickly. There are major fit problems (the wing root is a different shape than the fuselage placement area) that will require a lot of filler and sanding.
7 Dec '96
This little kit is becoming quite a challenge. I have managed to get the wing to fit albeit with a lot of cutting and hacking on both the wing and fuselage. So far, there have been three separate applications of putty to get the fuselage and wing to look good. The horizontal tail has a cut out that fits around the fin that is way too small and so more cutting and hacking were needed to get this to fit. The second putty application in this area is ready for sanding. This is a tiny kit that is smaller than my Huma Me-209V1.
14 Dec '96.
This week I have attached the finlets on the horizontal stabilizers and the under fuselage fin/tail wheel. I have also been test fitting the canopy prior to attachment and have found it shorter than the hole it must fill. Now I have to decide where to put the filler; in the front or the back.
21 Dec 96
Well, I put the filler in the front as it was less hassle. I have attached all the exterior bits (guns,pitot tube) and masked the canopy with tape. Now all I have to do is primer and paint. My next batch of kits will all be Hasegawa, Tamiya or AMT as I owe myself some easy kits!
27 Dec 96
Hooray!! I have finished it. Really it was a simple matter of the finishing touches (Paint, fiddly bits and decals). I used Gunze RLM 65 for the underside and Tamiya JNAF green (lightened up) for the upper surface color. After that dried, I sprayed on Future floor way for a gloss surface for the decals. After that dried, I attached the landing gear, doors and wheels. I had to use kit decals as this tiny (3 3/4" x 3 3/4") kit required equally small Russian stars and I had none small enough in my spares box. They are typically Russian decals; brittle, thick, a bit fuzzy, and tough to get to stick. I was semi-successful. Once they were dry, I over-coated the entire kit with a clear semi-matte, removed the tape from the canopy and viola!, a very small kit. I have it placed beside my Me-163 for comparison of rocket fighters and the 163 is a giant in comparison!
For a kit with only 21 parts (and you use them all), it was rather time consuming and required a number of modelling skills. Still, I am glad to have built it as I'm sure few others have one on their shelves.
Recommended for everyone. It will allow you to use your skills or to develop some.
Copyright ModelingMadness.com. All rights reserved
Back to Reviews Page 2020