Hobbycraft 1/48 YP-59 Airacomet
|
KIT # |
HC 1438 |
|
PRICE: |
$28.00 |
|
DECALS: |
Four aircraft |
|
REVIEWER: |
|
|
NOTES: |
Cutting Edge 48438 cockpit set used |
|
BACKGROUND |
|
CONSTRUCTION |
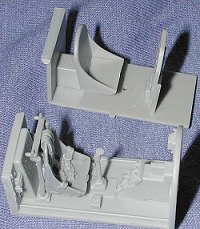 Since I was using
an aftermarket cockpit on this kit, that is where construction began. Cutting
Edge has produced a very nice replacement that was released in concert with the
kit (must have gotten a test shot). The grey resin cuts rather easily and in no
time the bits were off the resin blocks and cleaned up. The inner fuselage wall
detail has to be removed before the resin sidewalls can be installed. Make sure
that you remember when installing these walls that the tub section slots between
the resin walls and the placement guides that you leave on the fuselage. I
didn't and ended up having to trim my tub to get it to fit properly. My own
fault for not reading the instructions carefully. For those who want to
know why one would spend nearly 2/3rds the price of the kit on an aftermarket
cockpit set, look at the image comparing the kit and Cutting Edge one. The
difference is like night and day. The Cutting Edge one doesn't even have the
instrument panel installed! I did have to use the kit control stick as none is
provided in the set.
Since I was using
an aftermarket cockpit on this kit, that is where construction began. Cutting
Edge has produced a very nice replacement that was released in concert with the
kit (must have gotten a test shot). The grey resin cuts rather easily and in no
time the bits were off the resin blocks and cleaned up. The inner fuselage wall
detail has to be removed before the resin sidewalls can be installed. Make sure
that you remember when installing these walls that the tub section slots between
the resin walls and the placement guides that you leave on the fuselage. I
didn't and ended up having to trim my tub to get it to fit properly. My own
fault for not reading the instructions carefully. For those who want to
know why one would spend nearly 2/3rds the price of the kit on an aftermarket
cockpit set, look at the image comparing the kit and Cutting Edge one. The
difference is like night and day. The Cutting Edge one doesn't even have the
instrument panel installed! I did have to use the kit control stick as none is
provided in the set.
 Moving on to the
rest of the kit, I decided to glue the wings together. The fit is not too bad.
I'd recommend removing the alignment pins as they really don't seem to help that
much. I also sanded the mating surfaces as there was a teeny bit
Moving on to the
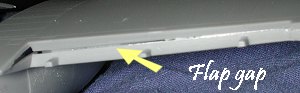
rest of the kit, I decided to glue the wings together. The fit is not too bad.
I'd recommend removing the alignment pins as they really don't seem to help that
much. I also sanded the mating surfaces as there was a teeny bit
 of flash on
them that kept the parts from mating perfectly. As Tom Cleaver mentioned in his
review of the P-59A, you need to sand on the top of the wheel wells to get the
wings to mate perfectly on the inboard section of the flap. I did not as it doesn't seem to make a whole lot of
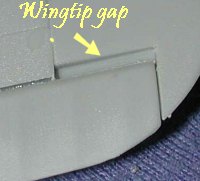
difference when the flap is installed. You may not like having that gap so
sanding the wheel well is the only way. At this time, I also installed the lower
aft engine housing. The instructions would have you glue in the exhaust pipes at
this time, but I left those off until the end. My luck, they'll fall inside! You
do need to slightly 'squeeze the housing part to conform with the lower wing a
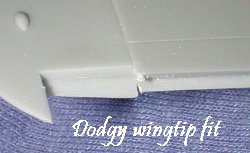
bit. I used a clamp until the glue had dried. Going outboard once that was dry,
the wing tips were installed. Some trimming of the hole was needed so they'd be
more centered on the tip. As you can see, the aileron attachment point is
different between the wing and the tip.
of flash on
them that kept the parts from mating perfectly. As Tom Cleaver mentioned in his
review of the P-59A, you need to sand on the top of the wheel wells to get the
wings to mate perfectly on the inboard section of the flap. I did not as it doesn't seem to make a whole lot of
difference when the flap is installed. You may not like having that gap so
sanding the wheel well is the only way. At this time, I also installed the lower
aft engine housing. The instructions would have you glue in the exhaust pipes at
this time, but I left those off until the end. My luck, they'll fall inside! You
do need to slightly 'squeeze the housing part to conform with the lower wing a
bit. I used a clamp until the glue had dried. Going outboard once that was dry,
the wing tips were installed. Some trimming of the hole was needed so they'd be
more centered on the tip. As you can see, the aileron attachment point is
different between the wing and the tip.
 Well,
how to fix it. Well, the only way I can see is to glue on a section of card. The
reason is that when the aileron is placed in the slot, there is a definite gap.
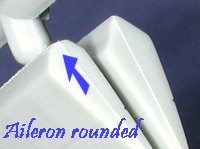
I don't think that is part of the airplane. When it comes to the aileron, that
will need a touch of work as well. For it, the part that fits into the groove
along the trailing edge of the wing is too pointed. By simply sanding it down,
the fit is improved a great deal. Takes about two minutes. You can see the
result of sanding in the image to the left and as to how well it fits in the
image to the right (except for the gap area, of course). Though I have not
tested the flap, I'd be willing to bet that it suffers from the same thing.
Well,
how to fix it. Well, the only way I can see is to glue on a section of card. The
reason is that when the aileron is placed in the slot, there is a definite gap.
I don't think that is part of the airplane. When it comes to the aileron, that
will need a touch of work as well. For it, the part that fits into the groove
along the trailing edge of the wing is too pointed. By simply sanding it down,
the fit is improved a great deal. Takes about two minutes. You can see the
result of sanding in the image to the left and as to how well it fits in the
image to the right (except for the gap area, of course). Though I have not
tested the flap, I'd be willing to bet that it suffers from the same thing.
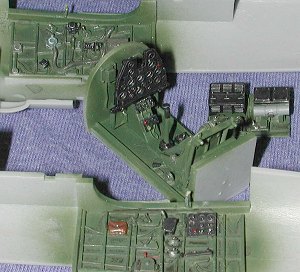 At this time, I took the interior parts that I'd put together
and painted them FS 34092 Medium Green as my buddy Tom suggested that it is the
closest off the shelf paint to 'Bell Interior Green'. The instrument panel face
was sanded from the back until the holes opened up (and it is nearly as thin as
a piece of etched brass). This and the backing were painted flat black. Then the
instrument dials were attached to the back of the face using clear paint. The
back of the dials were painted white and before the paint dried, the instrument
backs section was attached. Since there is no stress on these bits, the paint
should be enough to hold everything together. Best of all, no superglue
disasters!
At this time, I took the interior parts that I'd put together
and painted them FS 34092 Medium Green as my buddy Tom suggested that it is the
closest off the shelf paint to 'Bell Interior Green'. The instrument panel face
was sanded from the back until the holes opened up (and it is nearly as thin as
a piece of etched brass). This and the backing were painted flat black. Then the
instrument dials were attached to the back of the face using clear paint. The
back of the dials were painted white and before the paint dried, the instrument
backs section was attached. Since there is no stress on these bits, the paint
should be enough to hold everything together. Best of all, no superglue
disasters!
Once the bits were all dry and the appropriate wash and drybrushing was done, the interior was glued in place. Since I had foregone reading the instructions, I had some fiddling to do in order to get it to fit properly. A bit of trimming of the lower sidewalls was necessary, but that was my fault. No gun sight was installed as only a few of the YP-59As were armed and this one wasn't going to be one of them.
With the interior installed, the forward fuselage half was glued
together. Before gluing it, I added a LOT of weight to the nose to keep it from
being a tail sitter. It feels as if I may have overdone it, but better safe than
sorry as one  cannot put in more
later. Forward fuselage was a bit of a fussy fit, but that was again, due to the
interior. I used a touch of superglue on a few areas to ensure proper alignment.
I then glued the tail section to the forward. Not sure if it is along a panel
line or not, but in my opinion, it doesn't matter as the join is a bit large so
will need filler anyway.
cannot put in more
later. Forward fuselage was a bit of a fussy fit, but that was again, due to the
interior. I used a touch of superglue on a few areas to ensure proper alignment.
I then glued the tail section to the forward. Not sure if it is along a panel
line or not, but in my opinion, it doesn't matter as the join is a bit large so
will need filler anyway.
Returning to the wings, I glued in a small tab of plastic card
to fill in the gap that I found earlier. Once in it was in and dry, filler and
sanding took care of things and it doesn't look too horrendous. I then added the
little intake plates to the side of the forward fuselage. Had I not known that
they 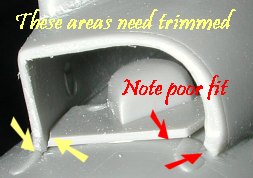 were to be added, I'd have missed them as the instructions sort of overlook
them. I mean, they show them, but
that's about it. As Tom Cleaver found out, they are flat and do not conform to
the fuselage. I think Hobbycraft realized that as the lower attachment pin is
twice the length of the upper. Looking at pictures, it seems as if Hobbycraft
needed to keep the fuselage straight until after the lower intake section. Take
a peek at the ones posted with this article and you'll see what I mean. I did find that I had to trim the forward upper
corner of this piece to get the
were to be added, I'd have missed them as the instructions sort of overlook
them. I mean, they show them, but
that's about it. As Tom Cleaver found out, they are flat and do not conform to
the fuselage. I think Hobbycraft realized that as the lower attachment pin is
twice the length of the upper. Looking at pictures, it seems as if Hobbycraft
needed to keep the fuselage straight until after the lower intake section. Take
a peek at the ones posted with this article and you'll see what I mean. I did find that I had to trim the forward upper
corner of this piece to get the 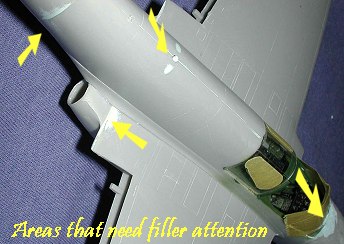 wing to fit. I also found that the upper intake
part had to be slightly trimmed as well to get it to slot in properly. The lower
intake misses the spot on the fuselage where it is to fit by quite a bit as you
can see from the image. The wing fits very tightly, but once done, only the
lower fuselage may need any filler. Really, not bad at all.
wing to fit. I also found that the upper intake
part had to be slightly trimmed as well to get it to slot in properly. The lower
intake misses the spot on the fuselage where it is to fit by quite a bit as you
can see from the image. The wing fits very tightly, but once done, only the
lower fuselage may need any filler. Really, not bad at all.
It was at this time that I noticed that the interior was in a bit crooked. My luck! The rollover bar was glued in place as per the CE instructions and the back bulkhead seam filled and sanded smooth. The tailplanes were then attached and any filler needed was applied at this time.
Once the filler was dry, the airframe was sanded down as smooth
as I could get it. I'll not fib to you, I used filler on most all the seams. I
know folks who can build without using filler, but I think they are giving me a
line. I use filler all the time! I should mention at this time that the upper
 wing to fuselage area above the exhaust left a rather big gap. I used some
plastic card to fill the gap and sanded that smooth before attaching the wing to
the fuselage.
wing to fuselage area above the exhaust left a rather big gap. I used some
plastic card to fill the gap and sanded that smooth before attaching the wing to
the fuselage.
The next step was to glue on some clear bits. The first was the
nose cap. I glued an MV lens to a piece of card and stuck it in the nose as a
landing light. It probably won't look that great, but something is better than
nothing. The landing light cover was masked and the nose glued on. I then went
to the cockpit. Nearly forgot to glue on the 'rollover plate' on the roll over
bar. Did that and painted it to match the interior. The radio section was
basically pushed into place as it is a very tight fit. Then the windscreen
section was glued in. It appears that I must have flattened out the area right
in front of it as there was a demonstrable difference in contours between the
nose and the windscreen. I also noticed that the windscreen was a bit narrow. I
glued in the windscreen and puttied up the area in front of it to be smoothed
out later. Once the rollover plate was dry, the back clear bit was glued in
after it was masked. I also masked the canopy at this time. I should also
mention that the framework for all the clear parts is
 engraved and not raised.
This makes it MUCH easier to mask as there is a trench for your knife blade to
follow when cutting through the tape. A great idea and one I seriously hope
catches on.
engraved and not raised.
This makes it MUCH easier to mask as there is a trench for your knife blade to
follow when cutting through the tape. A great idea and one I seriously hope
catches on.
With the canopy on and smoothed out, my attention was turned to the control surfaces. These are fabric with the fabric a bit over-accentuated, in my opinion. I also found that the ailerons were a trifle thicker than the wing as they got to the wing tip. The fit of the ailerons and flaps was less than optimal. Though they finally were coerced into fitting with coarse sanding sticks, they still are not what I'd have hoped for. The elevators were no trouble at all. Having these items separate was done only to allow the same basic airframe to be used for the P-59B with its metal control surfaces. As has been pointed out in other reviews, the P-59s control stick was spring loaded to the center so there would be no displacement of these surfaces. I could not even find photos of the flaps lowered so go ahead and glue them all in the neutral position. I then rescribed as many of the obliterated panel lines as I could in preparation for paint.
|
CAMOUFLAGE |
 With all that finally done, it was time to add some paint. The canopy was tacked
in place and the first thing painted were the wheel wells and inside gear doors.
All the experten have mentioned that Bell used primer colors that were not the
norm so I used US Interior Green for the wheel wells and inner gear doors. The
canopy area was sprayed with the FS 34092 interior color. The wheel wells were
masked as appropriate and Neutral Grey was sprayed on the lower surfaces. I then
took a short time out to drill the hole on the fin tip for the pitot tube and
glued the radio mast
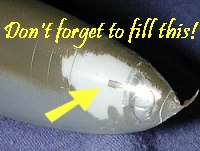
into place. When dry, the upper surface of OD was sprayed on. I then returned to
the workbench to add some more bits prior to the gloss coat and decals. It was
at this time that I looked in the instructions and saw that I forgot to fill in
an area on the nose. Nothing to do but fill it with superglue, hit it with
accelerator, sand it smooth and repaint it. Should also take the time to mention
that I used acrylics for all of the exterior
With all that finally done, it was time to add some paint. The canopy was tacked
in place and the first thing painted were the wheel wells and inside gear doors.
All the experten have mentioned that Bell used primer colors that were not the
norm so I used US Interior Green for the wheel wells and inner gear doors. The
canopy area was sprayed with the FS 34092 interior color. The wheel wells were
masked as appropriate and Neutral Grey was sprayed on the lower surfaces. I then
took a short time out to drill the hole on the fin tip for the pitot tube and
glued the radio mast
into place. When dry, the upper surface of OD was sprayed on. I then returned to
the workbench to add some more bits prior to the gloss coat and decals. It was
at this time that I looked in the instructions and saw that I forgot to fill in
an area on the nose. Nothing to do but fill it with superglue, hit it with
accelerator, sand it smooth and repaint it. Should also take the time to mention
that I used acrylics for all of the exterior
 colors as well as the wheel wells.
Back at the bench, I removed the masking from the wheel wells and started on the landing gear. I found a color photo of a YP-59 and the gear struts sure looked like OD to me so I painted them and the wheels this color. The tires are actual rubber, which I generally don't like. The mold line was sanded off (a much harder task than with a plastic or resin one) and they were put on the wheels. The main tires fit well but the nose one is too narrow and very loose. I tried some superglue, but I know it won't last.
|
FINAL CONSTRUCTION |
The nose gear was glued in place after the oleo was wrapped with Chrome Bare
Metal Foil. Make sure that the oleo scissors is to the front. There are also
very small mounting holes for this so don't get it backwards. Like the main
gear, the retraction strut has no positive locator. The nose gear doors are
curved but must fit onto a flat surface. I don't know who designs these things,
but like the main gear doors on a P-38, they are a real pain to fit. I
eventually removed the center door attachment point in order to get all to fit
with any success. The nose gear wheel was a real struggle to get in place. You
may want to sand it down to where it is thinner. It has no detail on it and will
not only make fitting it easier, but will make the nose tire look a bit more
normal. Main gear wheels were glued with no problems. I did not make any
adjustments to the gear length on this kit and you can see that the tail sits
quite high. Most photos show
the plane with a nose high attitude which would require you to either
lengthen the nose gear strut, shorten the main gear struts or both.
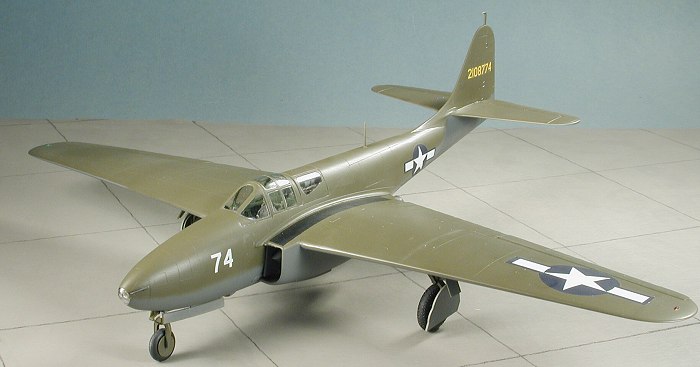
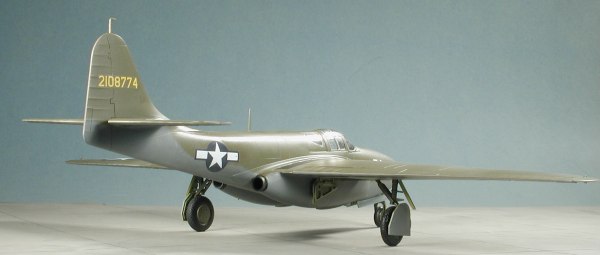
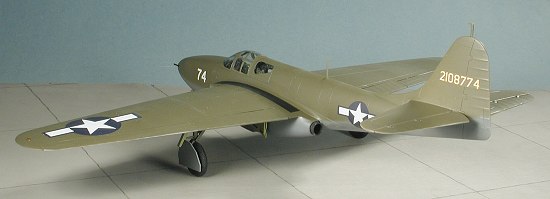
MARKINGS Anyway, I finally settled
on 774 and applied the serial and white nose letters as shown in the photo. It
seems to me as if the 74 letters are a bit smaller than in the photo, but no
worries as most won't spot the difference and it does add a bit to the model. I
should mention that the Hobbycraft decals are as good as any aftermarket decals
I've ever used and while they probably would have snuggled down fine by
themselves, I added a bit of Microset to them.
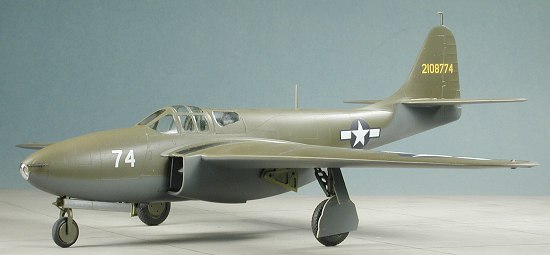
When they were dry, I sprayed a matte coat on the entire airframe to seal
things in. I also added the small fin tip pitot tube and drilled a hole in the
nose for the gun. I didn't like the plastic rods that were supplied in the kit
so used a small section of thin-walled tubing. The masking was removed to see
what damage I'd done to the underlying clear bits! I then did very minimal
pastel work to the plane as they seemed to be relatively clean. As you can see
from the color photo, there wasn't much contrast between the two colors on them
once the upper surface OD had started to fade. Fresh OD provided a good
contrast. Finally, the exhaust were installed and the wing tip lights were
painted. 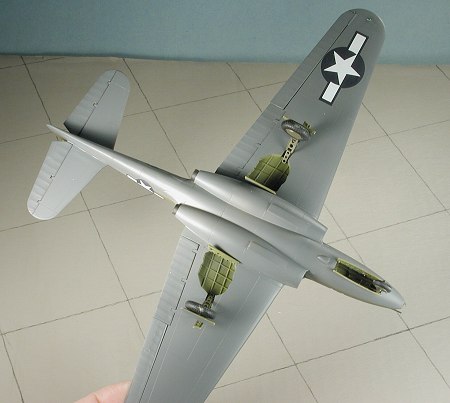 I glued the gear doors to the main landing gear. It seems to me that the
mounting holes are a bit off center and angled a bit, but I glued them the way
they showed. There is an upper door attachment point that is way too long so it
was trimmed off. I glued the main gear in place then attached the upper gear
door. It fits at an angle, similar to the one on a Mig-21. Not sure if it is
right, but it is on there. The inner doors fit well. I then attached the gear
retraction strut and glued it in place. There is no positive locator for this on
the gear or in the wheel well.
I glued the gear doors to the main landing gear. It seems to me that the
mounting holes are a bit off center and angled a bit, but I glued them the way
they showed. There is an upper door attachment point that is way too long so it
was trimmed off. I glued the main gear in place then attached the upper gear
door. It fits at an angle, similar to the one on a Mig-21. Not sure if it is
right, but it is on there. The inner doors fit well. I then attached the gear
retraction strut and glued it in place. There is no positive locator for this on
the gear or in the wheel well.
 With nearly all the bits on, the model was given a coat of clear gloss
acrylic (Future, in this case) in preparation for decals. The USAAF YP-59s were
universally boring with little in the way of any neat markings. Basically your
insignia and serial. I chose the "74" markings for this one. Several reasons.
When I looked up some references on the aircraft, it seems as if all the photos
of serials 2108775 and later had the squared off tails and wings as in the
P-59B. The only photos I could find of the planes with the yellow "Bell
Aircraft" logo on the nose where those converted to two seat trainers with the
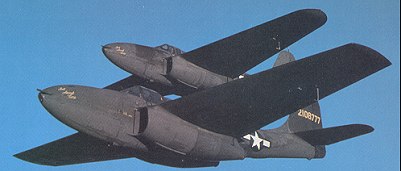
extra cockpit in the front and the one shown here. This photo of the other US YP-59
on the sheet, 777, shows it to
have the squared off wings and perhaps the tail as well, though there is no
lower fuselage strake as on the P-59Bs I could not identify the other aircraft
in the picture.
With nearly all the bits on, the model was given a coat of clear gloss
acrylic (Future, in this case) in preparation for decals. The USAAF YP-59s were
universally boring with little in the way of any neat markings. Basically your
insignia and serial. I chose the "74" markings for this one. Several reasons.
When I looked up some references on the aircraft, it seems as if all the photos
of serials 2108775 and later had the squared off tails and wings as in the
P-59B. The only photos I could find of the planes with the yellow "Bell
Aircraft" logo on the nose where those converted to two seat trainers with the
extra cockpit in the front and the one shown here. This photo of the other US YP-59
on the sheet, 777, shows it to
have the squared off wings and perhaps the tail as well, though there is no
lower fuselage strake as on the P-59Bs I could not identify the other aircraft
in the picture.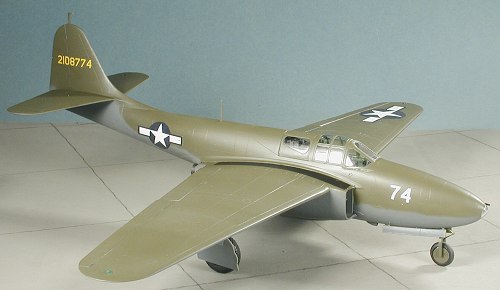 Now I'm not so stupid as to make blanket statements based on just two
references, but it seems that either many of the YP-59As were modified or that
they were not photographed very much in their original condition. I could only
verify the photo of 2108774, and that one was armed with at least one gun, which
the instructions didn't point out. (Back to the bench on this one). As you can
see, research is a bit of a bugaboo when it comes to building kits.
Now I'm not so stupid as to make blanket statements based on just two
references, but it seems that either many of the YP-59As were modified or that
they were not photographed very much in their original condition. I could only
verify the photo of 2108774, and that one was armed with at least one gun, which
the instructions didn't point out. (Back to the bench on this one). As you can
see, research is a bit of a bugaboo when it comes to building kits. 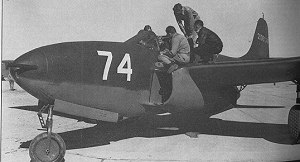
|
CONCLUSIONS |
Despite the minor problems with the kit, I'm really jazzed about having this very important aircraft finally kitted. To make things even better, it is not a difficult build. I started this kit on a Friday and had it finished by the morning of the following Thursday. That is less than a week, a definite speed build for me! The kit desperately needs a cockpit set so save the bucks and get one for it. Having this one under my belt, I now know what needs to be done to the P-59B kit that will undoubtedly be gracing my work bench in the future. My appreciation to Hobbycraft for having the foresight to produce this kit.
April 2003
#1264 in a series
|
REFERENCES |
Airacomet , Pace, Wings 17/5, October 1987
Bell Aircraft since 1935, Alain Pelletier, Putnam, 1992
Coppyright ModelingMadness.com. All rights reserved. No reproduction in part or in whole without express permission from the editor.
If you would like your product reviewed fairly and fairly quickly, please contact the editor or see other details in the Note to Contributors.