| KIT #: | AA- 2038 |
| PRICE: | $49.00 |
| DECALS: | One option |
| REVIEWER: | Scott Van Aken |
| NOTES: | Resin with vac canopy. |
| HISTORY |
If you have seen
the movie 'Aviator' about Howard Hughes, you'll recall the scene near the
end of the movie where he is testifying before a committee. In it, he is
accused of w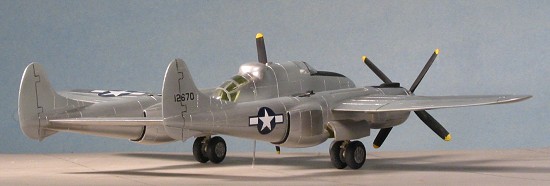 ar profiteering to
the tune of some 30-40 million dollars that he took from the Government and
yet never produced any production ready aircraft. He readily admitted it
and then went on to name several other companies who in total took several
billions of dollars and provided no ready weapons systems. One of them was
Lockheed and one of their project aircraft was the XP-58 'Chain Lightning'.
ar profiteering to
the tune of some 30-40 million dollars that he took from the Government and
yet never produced any production ready aircraft. He readily admitted it
and then went on to name several other companies who in total took several
billions of dollars and provided no ready weapons systems. One of them was
Lockheed and one of their project aircraft was the XP-58 'Chain Lightning'.
Please visit the preview for a look at the kit and a brief history.
| CONSTRUCTION |
First thing to do with kits like this
is give it a good inspection for molding glitches. This one had more than
usual in terms of air bubbles and other defects. However, they were not
difficult to take care of and were mostly on a few of t he larger parts. The
really large air bubbles that would be visible on the engine intakes were
filled with epoxy putty. I use Apoxie Sculpt as it is a paste-like
material, easy to work with and does a good job. There were all sorts of
surface indentations as if someone had taken a small blunt object and
tapped on the the surface of the resin before it had totally cooled. These were initially filled with epoxy putty, but this putty likes to have a
rather large area to work with and doesn't do such a hot job on hairline
cracks or shallow depressions. If the putty didn't work, I tried superglue
and finally, standard model filler. I also had a really large blob of resin
in one of the intakes that I eventually had to grind out with a motor tool.
he larger parts. The
really large air bubbles that would be visible on the engine intakes were
filled with epoxy putty. I use Apoxie Sculpt as it is a paste-like
material, easy to work with and does a good job. There were all sorts of
surface indentations as if someone had taken a small blunt object and
tapped on the the surface of the resin before it had totally cooled. These were initially filled with epoxy putty, but this putty likes to have a
rather large area to work with and doesn't do such a hot job on hairline
cracks or shallow depressions. If the putty didn't work, I tried superglue
and finally, standard model filler. I also had a really large blob of resin
in one of the intakes that I eventually had to grind out with a motor tool.
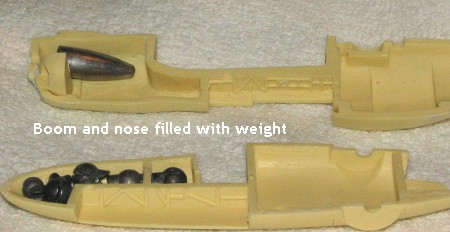
 This is a large aircraft so it
was very much like building two kits at one time. After initial clean-up
(and this means sanding the mating surfaces as well as removing the
roughness of all the outside parts), I taped all the bits together to see
what I'd need in terms of weight. A tail sitter it will be without weight
so I put a bunch in the nose and some in each of the engine nacelles. That
was enough to take care of the situation, but I do fear what that weight
will do to the long, skinny nose gear. I'll give it 5-6 months before it
sags and needs replaced with metal rod. I'd do it now, but when I do a
review kit, I generally do it as close to OOB as I can. For prototype kits,
if it actually flew, I use the kit decals. If it didn't or was a paper
project, I do a 'what if' set of markings.
This is a large aircraft so it
was very much like building two kits at one time. After initial clean-up
(and this means sanding the mating surfaces as well as removing the
roughness of all the outside parts), I taped all the bits together to see
what I'd need in terms of weight. A tail sitter it will be without weight
so I put a bunch in the nose and some in each of the engine nacelles. That
was enough to take care of the situation, but I do fear what that weight
will do to the long, skinny nose gear. I'll give it 5-6 months before it
sags and needs replaced with metal rod. I'd do it now, but when I do a
review kit, I generally do it as close to OOB as I can. For prototype kits,
if it actually flew, I use the kit decals. If it didn't or was a paper
project, I do a 'what if' set of markings.
Well, getting down the building.
First thing I did was take care of the mold glitches as well as I could.
The vast majority of these were on the boom halves so I originally used
some epoxy putty to take care of the big-uns. When dry, this was sanded and
shaped as well as I could. The next step was to get the intakes in place. I
had to do some carving on these as well to get
 a
proper fit and while it isn't seamless, it did work out rather well. After
putting some weight into the boom noses and also into the nose section of
the center fuselage, I glued the boom halves together. The rear slots into
the opposing fuselage half quite well making it a much stronger bond. Once
the halves were together, the inevitable sanding and filling started.
Overall, I ended up doing four sessions to take care of as many of the
problem areas as I could.
a
proper fit and while it isn't seamless, it did work out rather well. After
putting some weight into the boom noses and also into the nose section of
the center fuselage, I glued the boom halves together. The rear slots into
the opposing fuselage half quite well making it a much stronger bond. Once
the halves were together, the inevitable sanding and filling started.
Overall, I ended up doing four sessions to take care of as many of the
problem areas as I could.
Meanwhile, I got the fuselage sections together with minimal fuss. These parts were particularly clean with only a few tiny pinholes in the nose. The next step for me was to attach the wings to the fuselage center section. This would allow me to be sure that they were properly aligned before attaching the booms. Took a bit of care in this step as it would be quite easy to get things all a kilter. Setting it aside to dry, the tail booms were glued to the horizontal stabilizer. Here I once again was quite deliberate in how I glued this, doing one side at a time and making sure things were as well aligned as they could be.
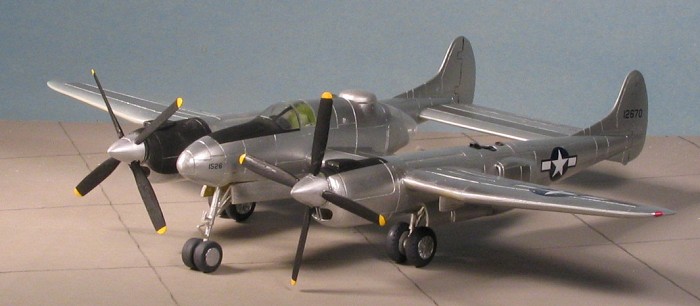
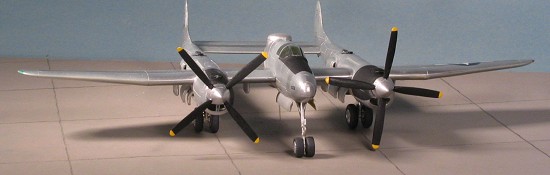
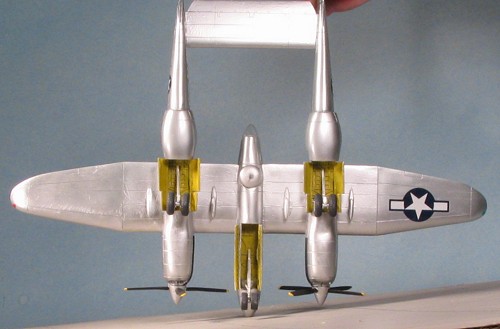
 With
those parts dry, I test fit the two major sections together. I was quite
happy to see that things mated u
With
those parts dry, I test fit the two major sections together. I was quite
happy to see that things mated u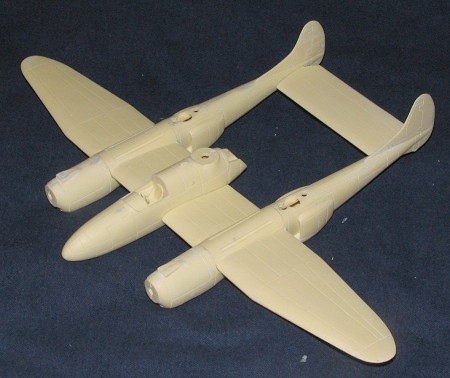 p
well. With that confirmation, I applied the super glue and used what little
'wiggle time' I had to get things into proper position. Fit was quite good,
though I should mention that there will be a bit of a gap on the bottom if
the upper boom/wing mating surface is flush. Nothing you can't fill, but
you should be aware of it. I then put filler on the mating surfaces and
while that dried, spent some quality time with some of the other bits of
the kit. Here are a couple of images right after the wing/boom join was
made and before I applied filler to those joins.
p
well. With that confirmation, I applied the super glue and used what little
'wiggle time' I had to get things into proper position. Fit was quite good,
though I should mention that there will be a bit of a gap on the bottom if
the upper boom/wing mating surface is flush. Nothing you can't fill, but
you should be aware of it. I then put filler on the mating surfaces and
while that dried, spent some quality time with some of the other bits of
the kit. Here are a couple of images right after the wing/boom join was
made and before I applied filler to those joins.
After a few coats of filler, I
attached the clear bits. I have to tell you that these gave me fits. They
required a ton of trimming to properly fit and even then I wasn't that
happy with them. I used quite a bit of filler over several
 applications to
get the transparencies to properly smooth out. To say that this took a few
weeks wouldn't be that much of an exaggeration as there are times when a
build gets to me so I set it aside for a few days or really slow down on
working on it. When it gets really bad, it ends up been a kit that takes
months/years to finish.
applications to
get the transparencies to properly smooth out. To say that this took a few
weeks wouldn't be that much of an exaggeration as there are times when a
build gets to me so I set it aside for a few days or really slow down on
working on it. When it gets really bad, it ends up been a kit that takes
months/years to finish.
With the clear bits on and polished out as best I could after all that sanding, I masked it to the best of my abilities. Turning it over, I glued in the landing gear and the landing gear supports. These provide good stiffness and should keep things upright for quite some time. It was after than that I realized that all that weight was for naught as it was a major tail sitter! I then headed to the paint shop.
| COLORS & MARKINGS |
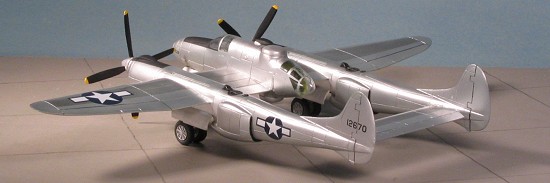
Since this was to be yet another bare
metal model, I first gave it a complete overcoat of a gloss enamel,
choosing some left over ADC Grey for this project. When dry, I started
spraying on some Alclad II polished aluminum. This went on well with
several coats required, but showed up a lot of problem areas. One is that I
needed to do some more seam filling. The other is that the wing's surface
is a mess. It really needs to be completely sanded smooth as there are what
look like stress lines and areas which seem to have raised lines of 'stuff'
on them. At this time, I really didn't feel much like stripping off all the
paint and 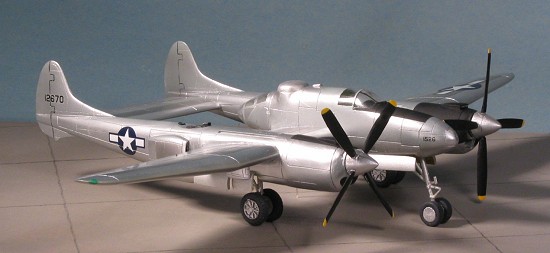 tackling this so I left it as it was. Much of this was because I
still had more to go. For instance, I filled in the various lines for the
guns on the turrets and installed those. I also installed the drop tank
racks on the lower surface, something I'd forgotten to do earlier.
tackling this so I left it as it was. Much of this was because I
still had more to go. For instance, I filled in the various lines for the
guns on the turrets and installed those. I also installed the drop tank
racks on the lower surface, something I'd forgotten to do earlier.
This gave me a chance to tackle the seams that needed the additional work. It also allowed me to build up the props. Most of the blades needed just a bit of cleanup, but a few were pretty warped. It was like the surface was sort of washboard and it took sanding and filler to bring them close to the norm. I then cleaned up the spinners as much as I could. The mold shifted on these and they ended up being more oval than round. An additional glitch came through when I realized they were drilled for three blades instead of four!
This brought work to another screeching halt while I fumed about this for a while. A few weeks later, I decided to go ahead and fill two of the wrong holes with plastic rod and try to drill new ones to make it a four bladed prop. I'm not good at this and made a bit of a mess of things. Nevertheless, I finally got it finished with four blades per spinner.
Back at the rest of the model, I attached the gear doors and painted the wheels. I got as much done as I was willing to do with the rest of the airframe and finished painting everything with Polished Aluminum. I then masked off a few sections and painted them dark aluminum. The wheel wells were painted yellow chromate primer using Testors enamels in the small bottles. I did some touchup painting on the metallic surface using Humbrol's two aluminum paints. These were actually brushed on and don't look bad at all, providing even more surface difference. The black anti-glare panel areas were masked and painted.
Decals were the P-59 sheet and some serial/nose numbers provided that were specific to the XP-58. I had no trouble with these decals. They stuck well, though they did not conform to the panel lines as they really are a bit too thick. Even setting solutions were not able to help very much.
| FINAL CONSTRUCTION |
I need to back up a bit. Really, there were not too many other things to
do with this kit. All that was left to install were the props, wheels and
turbochargers. These turbochargers fit into sections in the booms. Were I
smart, I'd have installed these
 when I glued the booms together. However,
we all know about me and smart. In order to get these items to fit, I had
to do a lot of trimming with both the mounting area and the small exhaust
area. Both of these were smaller than the part that had to fit in there. I
did all the trimming and dry fitting before I started to paint the kit as I
wanted no real shockers when I installed these pieces. They were painted
'Burnt Iron' and the installation near the completion of the build was
without trauma.
when I glued the booms together. However,
we all know about me and smart. In order to get these items to fit, I had
to do a lot of trimming with both the mounting area and the small exhaust
area. Both of these were smaller than the part that had to fit in there. I
did all the trimming and dry fitting before I started to paint the kit as I
wanted no real shockers when I installed these pieces. They were painted
'Burnt Iron' and the installation near the completion of the build was
without trauma.
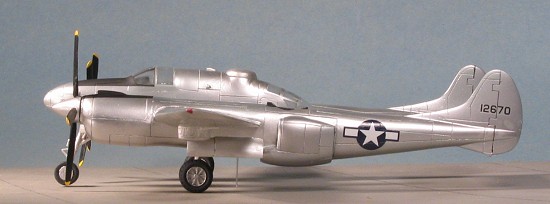
The wheels were a simple glue on exercise. It seems to me that the nose wheels are too wide, but trying to narrow them may well be more work than it is worth. I still had to figure out what I was going to do about the tail-sitting situation. Eventually, I drilled a hole right through the middle of the lower turret and installed a piece of clear plastic rod. This is far enough behind the main wheels to provide support and while it may not last long and need replaced with something more permanent (like a metal rod), it holds up the rear just fine. I also removed the masking and picked off a few pieces of sticky. Considering the masking had been on for over a month, not bad. The final job was to install the props and while they do not fit as nice as I'd like (thanks to their somewhat small diameter and somewhat oval shape, they turned out better than I'd thought they would.
I did a tad bit of touch-up painting and hurried off to take pictures before I broke something!
| CONCLUSIONS |
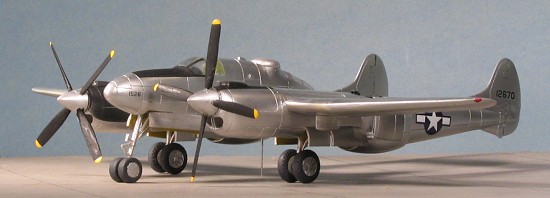 Not all kits
are a piece of cake and this was one of them. There were some hurdles to
overcome, some thought that had to be given to some aspects of the
construction, but now that it is finished, I'm glad I went through all
that. This won't be a show model, but it does fill a gap in my US fighters
collection so I'm quite pleased that I finished it. It is most unusual and
is the sort of subject that I and many others enjoy building.
Not all kits
are a piece of cake and this was one of them. There were some hurdles to
overcome, some thought that had to be given to some aspects of the
construction, but now that it is finished, I'm glad I went through all
that. This won't be a show model, but it does fill a gap in my US fighters
collection so I'm quite pleased that I finished it. It is most unusual and
is the sort of subject that I and many others enjoy building.
September 2005
#1379 in a series
Copyright ModelingMadness.com. All rights reserved. No reproduction in part or in whole without express permission from the editor.
If you would like your product reviewed fairly and fairly quickly, please contact the editor or see other details in the Note to Contributors.