|
KIT: |
MPM 1/72 XP-55 Ascender |
|
KIT # |
72135 |
|
PRICE: |
$14.98 |
|
DECALS: |
See review |
|
REVIEW & |
|
|
NOTES: |
Multimedia short run kit |
|
HISTORY |
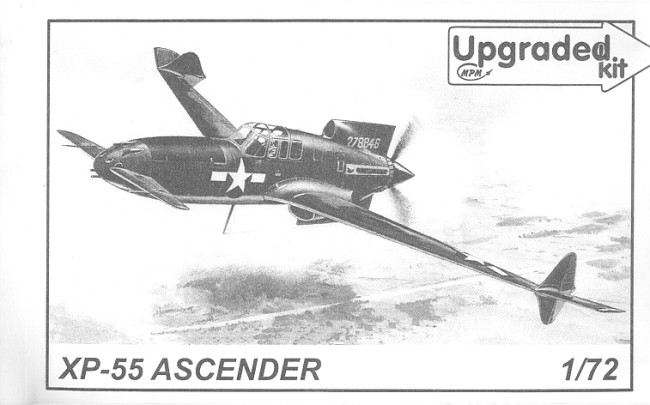
I'm going to take the easy way out regarding the history of this plane and refer you to Tom Cleaver's review of the 1/48 kit to get that information. There is little that I could add to it anyway.
|
THE KIT |
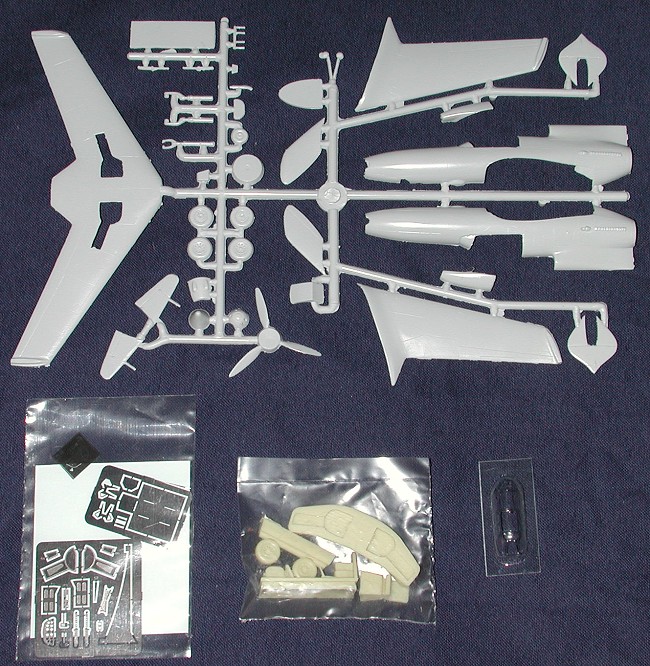
The XP-55 was one of MPM's initial offerings back when the box was marked as being made in Bohemia vice the Czech Republic! Frankly, those early MPM kits were a real challenge to build as the company was just learning how to do short run kits. Much to MPM's credit, some of these early kits are being reissued as upgraded versions. What is upgraded about them is that they have included a number of resin parts to replace some of the plastic or etched metal one. The basic kit itself is unchanged and if you compare this kit with the Blenheim IV previewed earlier, you can see how far the company has come in a few short years. This advance is most noticed in the size of the sprue gates where the sprue meets the plastic.
So let's see how this mold has fared. Other than the thick gates and a touch of flash, it has held up quite well. I would recommend a razor saw for removing parts in order to prevent breaking any of the parts, especially the thinner ones. The semi-soft light grey plastic is finely engraved and the large pieces; fuselage, wings, prop, have some rather hefty ejector pin stubs that will need sanded down. You may also want to accentuate the control surfaces a bit more as well as they are not much deeper than the surrounding panel lines.
As with the original kit, you get a couple of etched brass frets. One is for the nose wheel well and the other for gear doors, ventral strake and miscellaneous bits like rudder pedals, instrument panel and the like. The new resin bits are for the cockpit, which is MUCH improved over the basically flat floor that was offered before, a seat, the wheel wells, and new main wheels. The canopy is vacuformed and you only get one, so don't make any mistakes. I will say, though, that getting a replacement from MPM takes no more than a letter or e-mail.
 The major part of
the instruction sheet is unchanged from the original and is four pages. Two of
them are for a six step construction sequence, one for a history and one for
decals and painting. No color information is given for anything other than the
external colors. As part of the upgrade, a new insert has been added for the
installation of the resin bits. This sheet has a full color callout for the
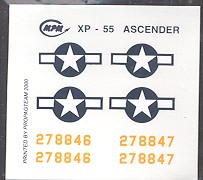
interior, wheel wells and the wheels. Decals are by Propagteam. The sheet itself
is quite small and offers markings for both prototypes. Basically the planes
carried insignia and serial numbers, and were painted olive drab on the upper
surfaces and neutral grey on the underside. Rather boring.
The major part of
the instruction sheet is unchanged from the original and is four pages. Two of
them are for a six step construction sequence, one for a history and one for
decals and painting. No color information is given for anything other than the
external colors. As part of the upgrade, a new insert has been added for the
installation of the resin bits. This sheet has a full color callout for the
interior, wheel wells and the wheels. Decals are by Propagteam. The sheet itself
is quite small and offers markings for both prototypes. Basically the planes
carried insignia and serial numbers, and were painted olive drab on the upper
surfaces and neutral grey on the underside. Rather boring.
Overall, the kit should not be that difficult a build. Sure, you will undoubtedly use more of your skills on this than on a Tamiya kit, but that is to be expected from a short run kit. Besides, the subject of the model is what makes these kits so interesting to build. Where else will you find prototype aircraft like this in injected plastic. I for one, thank MPM for producing these prototypes. Now for some other interesting US aircraft like the XP-56 or the XP-83!
Review copy courtesy of
If you would like your product reviewed fairly and quickly by a site that has over 1,500 visits a day, please contact me or see other details in the Note to Contributors.