| KIT #: | C 12 |
| PRICE: | $4.00 from an auction |
| DECALS: | Two options |
| REVIEWER: | Scott Van Aken |
| NOTES: |
| HISTORY |
 -3 and -5. It was not unusual to find -3 bits on -5s and vice
versa, though from what I've read, there are two things that are distinctive
in the -5. One is the wing rocket stubs. The other is a windscreen without a
central frame above the forward piece.
-3 and -5. It was not unusual to find -3 bits on -5s and vice
versa, though from what I've read, there are two things that are distinctive
in the -5. One is the wing rocket stubs. The other is a windscreen without a
central frame above the forward piece. | THE KIT |
 This kit was initially released in 1980,
but it seems older than that due to its raised panel line detail and rather
barren cockpit. It
can be built as either a -3 or a -5. To do a -3 one will have to do a bit of
cutting for the rear quarter windows. There are also some small bulges for
just before the exhaust outlet that was prevalent on -3s and some early -5s.
The kit also comes with two canopies. Both are one piece with one being for
a -3 and the other the later style for the -5. Unfortunately, though the
bagged kit I bought was still sealed, there was no evidence of the clear
bits. Fortunately, my friend Kevin had parted an Academy kit and was able to
help with clear bits. I also ordered a Falcon set that included these, just
in case the Academy bits did not fit.
This kit was initially released in 1980,
but it seems older than that due to its raised panel line detail and rather
barren cockpit. It
can be built as either a -3 or a -5. To do a -3 one will have to do a bit of
cutting for the rear quarter windows. There are also some small bulges for
just before the exhaust outlet that was prevalent on -3s and some early -5s.
The kit also comes with two canopies. Both are one piece with one being for
a -3 and the other the later style for the -5. Unfortunately, though the
bagged kit I bought was still sealed, there was no evidence of the clear
bits. Fortunately, my friend Kevin had parted an Academy kit and was able to
help with clear bits. I also ordered a Falcon set that included these, just
in case the Academy bits did not fit.
Cockpit is quite basic with seat, stick rear bulkhead and instrument panel. These fit onto a tub section. Decals are provided for instruments. Not real fond of dark blue plastic, but apparently Hasegawa felt it would reduce painting issues.
The rest is standard stuff. One piece lower
wing with separate upper halves. Single piece tailplanes, a fairly nice
engine, one piece cowling and a nice prop that doesn't have a prop shaft so
glues onto the front of the engine. Landing gear are nicely done and there
is nice main gear well detail, though I
 imagine it is spurious. The only
thing under the fuselage is a drop tank. It would have been nice to have
bomb racks and rocket stubs for a proper -5, but there it is.
imagine it is spurious. The only
thing under the fuselage is a drop tank. It would have been nice to have
bomb racks and rocket stubs for a proper -5, but there it is.
Instructions are mostly Japanese with generic paint information. Two markings options are included. One is a 'cat mouth' -3 from VF-27 aboard the USS Princeton in mid 1944. This plane has the tricolor paint scheme. The other is a late war -5 from VF-24 aboard the USS Santee in overall gloss sea blue. This has white fin/upper rudder and white upper starboard wing with yellow bands around the wing and fuselage. Decals are ancient with the whites in off-white. I don't doubt they will still work, despite their age, though one really needs to soak these in hot water.
| CONSTRUCTION |
For some reason, I have a real fondness for these older kits. Probably
because they are pretty fiddle-free. In this case, I built up the cockpit and
painted everything an interior green using Nakajima Interior Green as I had it
mixed up for an other projects. OK, shoot me; it is undoubtedly the wrong shade.
Decals were placed as required and they did not fall apart when removed from the
sheet. I used 1mm tape f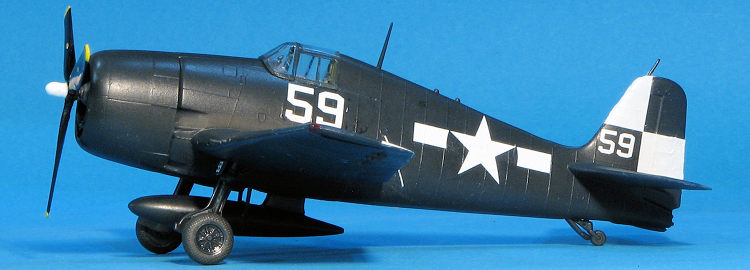 or a seat harness. Then I closed the fuselage halves. I
also assembled the upper and lower wing bits. Hasegawa molds the guns into the
wing so it is a bit of a paint to sand down the leading edge.
or a seat harness. Then I closed the fuselage halves. I
also assembled the upper and lower wing bits. Hasegawa molds the guns into the
wing so it is a bit of a paint to sand down the leading edge.
After that, I attached the wing. It is a perfect join. Nice to build a kit where the wing fits so well. Tailplanes were next. These are keyed so you won't get them crossed. During this time I checked to see if the Academy windscreen would fit. Looks like it though it may be a tad wide. The engine was painted and dry brushed then glued into the cowling. The cowling was attached. It takes a bit of fiddling around to get it properly aligned, but is worth the effort.
With the airframe pretty well complete, I installed the Academy clear parts after first masking them. I have to tell you that it was not easy as at this time, I have one eye that is nearsighted and one that is farsighted, making any sort of detail work difficult, even under magnification. With that done it was time to fill the cowling with tissue and head for the paint shop.
| COLORS & MARKINGS |
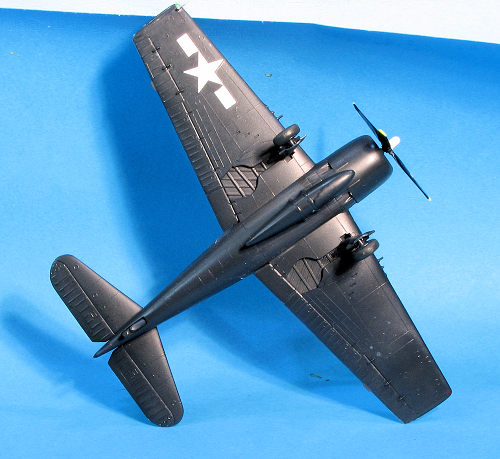 Since this is a
-5, that pretty much means overall gloss sea blue. The nice thing about this
scheme is that EVERYTHING is this color. Gear legs, wheels, wheel wells and drop
tank. Now to be fair, it would not be impossible to see these planes with
aluminum struts or wheels or even white wheels as none of these items changed
over the life of the airplane and replacement parts may well not have been gloss
sea blue. However, I am first and foremost a lazy modeler so took the easy way
out. I used Testors enamels for this and one thing I know about gloss paints is
they can take a while to fully cure. This was no exception, even when thinned
with lacquer thinner.
Since this is a
-5, that pretty much means overall gloss sea blue. The nice thing about this
scheme is that EVERYTHING is this color. Gear legs, wheels, wheel wells and drop
tank. Now to be fair, it would not be impossible to see these planes with
aluminum struts or wheels or even white wheels as none of these items changed
over the life of the airplane and replacement parts may well not have been gloss
sea blue. However, I am first and foremost a lazy modeler so took the easy way
out. I used Testors enamels for this and one thing I know about gloss paints is
they can take a while to fully cure. This was no exception, even when thinned
with lacquer thinner.
While that was curing all the way, I cleaned up the seams on the wheels and landing gear bits. Hasegawa wheels have these ejector pin marks on the inside tires that is nearly impossible to cleanly remove. I recommend aftermarket wheels for this. I didn't use them as I didn't have any. As a note, these are exactly the same wheels as used on the F4U. I repainted the struts, used liquid chrome for the oleos and installed the gear. The tail gear managed to have the small strut break, but few will notice it. Once on its gear, I applied the decals.
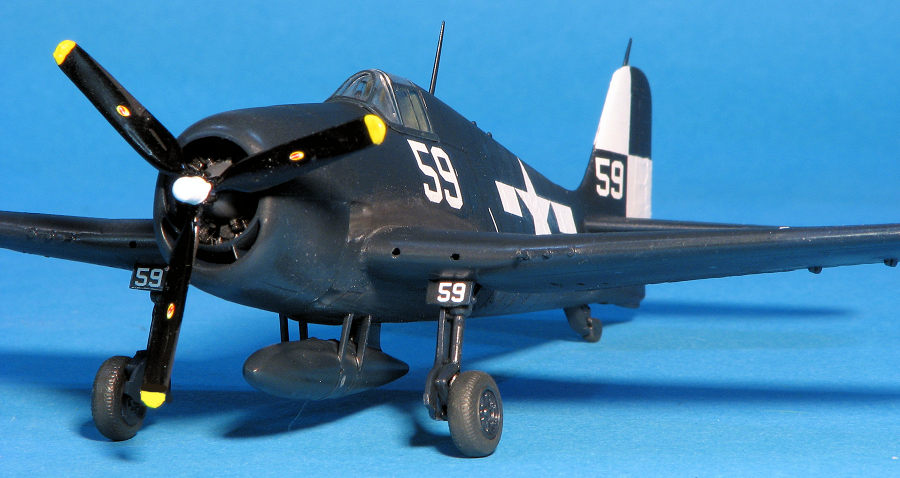
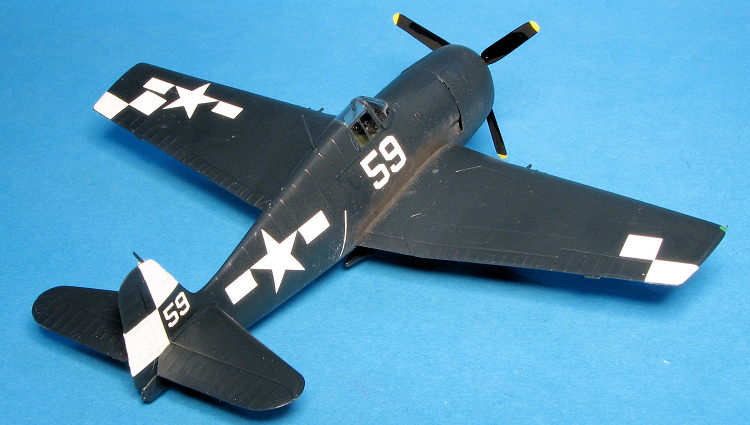
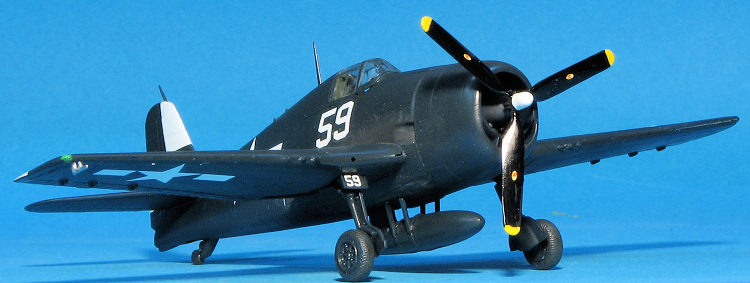
For this build, I used SuperScale 72-802 that has markings for
four Hellcats, two of them -5s. I was inspired by a recen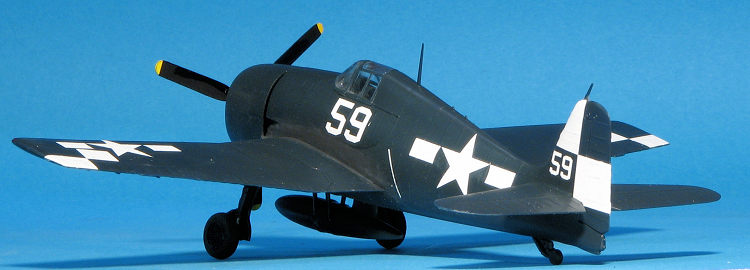 t
reader's builds to do one of the geometric pattern planes and so in this case it
was a VF-17 plane from the USS Hornet in February 1945. Decals went on without
any issues and I used both Microsol and Mr Mark Softer to get them to snuggle
down. Once those were on, the wheels were installed as were the gear doors,
radio mast, drop tank, and pitot.
t
reader's builds to do one of the geometric pattern planes and so in this case it
was a VF-17 plane from the USS Hornet in February 1945. Decals went on without
any issues and I used both Microsol and Mr Mark Softer to get them to snuggle
down. Once those were on, the wheels were installed as were the gear doors,
radio mast, drop tank, and pitot.
The last things to do were to remove the masking to check for paint creeping, paint the guns and formation lights, add a bit of exhaust stain and then glue on the prop.
| CONCLUSIONS |
For many of us, this is an old favorite, While I'm not a huge Hellcat fan, this is not the first Hasegawa 1/72 version I've done. They go together well and while are a bit Spartan when it comes to the cockpit, makes for a very nice model when done.
7 July 2017
Copyright ModelingMadness.com If you would like your product reviewed fairly and fairly quickly, please
contact
the editor or see other details in the
Note to
Contributors. Back to the Main Page
Back to the Review
Index Page
Back to the Previews Index Page