
| HISTORY |
Hasegawa 1/72 F4F-4 Wildcat
| KIT #: | 51324 (AP24) |
| PRICE: | $5.00 from a vendor |
| DECALS: | Two Options |
| REVIEWER: | Scott Van Aken |
| NOTES: | Base Kit |
| HISTORY |
The stubby little Grumman Wildcat is the epitome of the
US Navy's fighter force in the first year of the Pacific War. An aircraft that
was built to withstand the rigors of carrier operations, yet have enough
firepower to handle enemy aircraft, the Wildcat was the initial loser in a
competition to build the Navy's first monoplane, retractable landing gear
fighter aircraft. The winner was the less than sterling Brewster F2A Buffalo. As
mediocre an aircraft as was the Buffalo, it did provide the needed operational
experience with the type . Though it was a disaster against the Japanese with
both US and Commonwealth forces, the Finns used the type with much success
against the Soviets in 1940 and later.
. Though it was a disaster against the Japanese with
both US and Commonwealth forces, the Finns used the type with much success
against the Soviets in 1940 and later.
The initial production F4F-3 Wildcat had fixed wings and four machine guns. This was later replaced by the folding wing F4F-4 with six machine guns. The folding wings allowed more aircraft to be carried on ships, but added weight that affected the performance. Most pilots did not like the additional two guns as it not only meant more weight, but fewer rounds per gun and so a shorter firing time.
Regardless, the Wildcat soldiered on with smaller carriers once replaced by the Hellcat and was in production until late in the war. The type rapidly disappeared once the war was concluded.
| THE KIT |
This boxing is dated 1994 and I believe this is the base boxing. The engraved panel lines are all one could ask for and this version has options for a pair of under wing fuel tanks that were sometimes carried by this aircraft.
The kit
provides a nice, if rather basic cockpit that includes a seat, stick and an
instrument panel on which one puts a decal. This is probably the weakest area of
the kit. The floor is solid, which is non-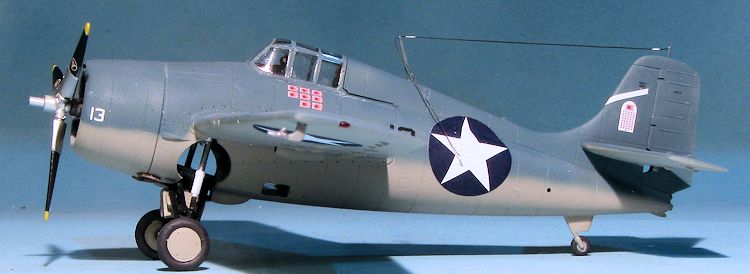 prototypical.
It should be just a pair of troughs for the feet as there were
windows in the belly for the pilot to look through when landing.
prototypical.
It should be just a pair of troughs for the feet as there were
windows in the belly for the pilot to look through when landing.
The wheel well is also somewhat devoid of detail. On a real Wildcat, one could see the engine accessory compartment and the chain drive for the landing gear operating system. None of that is present in the kit, though aftermarket will take care of this and the cockpit situation. The canopy is a single piece so must be cut to display any cockpit detailing you do.
The rest of the kit is well done and despite the number of kits produced from these molds, this kit is still crisply done without a lot of problems with ejector pin marks or sink areas.
Instructions are well done with the usual Gunze paint references. Markings are provided for two aircraft. Both are painted in the Blue-Grey over Light Grey scheme. The box art plane is from VF-9 operating during Operation Torch, the invasion of North Africa. The other is from VF-6 as operating from the USS Enterprise in early 1941 as it has the red and white rudder stripes and red centers to the insignia. Decals are nicely done with separate red dots. The whites and yellows are a bit transparent so I'd suggest more opaque aftermarket insignia, especially if you do the Operation Torch plane.
| CONSTRUCTION |
 This is actually only the
second 1/72 Hasegawa Wildcat that I've built. The previous build was their
'Yellow Wings' boxing which came with Aeromaster decals. In that kit. I put in a
resin cockpit and used a vac canopy. Not so with this one as I felt I should do
it pretty much out of the box.
This is actually only the
second 1/72 Hasegawa Wildcat that I've built. The previous build was their
'Yellow Wings' boxing which came with Aeromaster decals. In that kit. I put in a
resin cockpit and used a vac canopy. Not so with this one as I felt I should do
it pretty much out of the box.
The first step is pretty standard and that consisted of building up the cockpit with its seat, stick and instrument panel. This was all painted interior green with black side consoles and a decal on the instrument panel. I used some masking tape to put in a harness. I also built up the wings. I chose not to open the holes for the drop tanks, but did open the hole for the pitot tube. The one molded on is not appropriate for the -4 so was sanded down as noted in the instructions.
The two ending cylinder pieces
were painted black and then drybrushed silver. This was glued to one fuselage
half and the completed cockpit to the other. The small windows were then glued
in. Contest 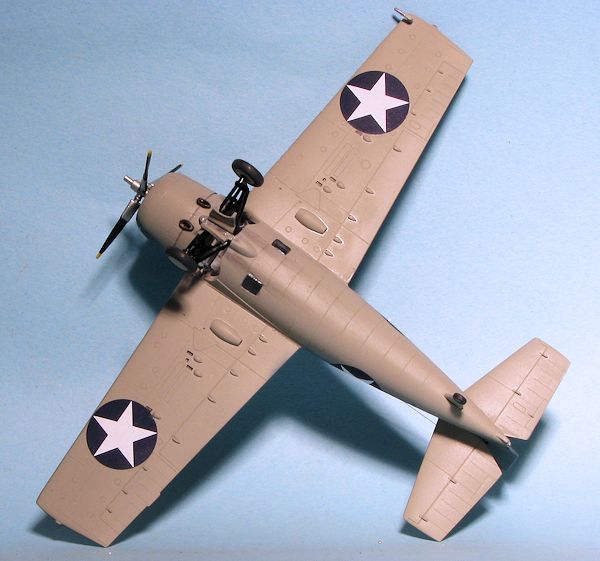 modelers will want to paint the underside of the cockpit interior
green so the flashlights won't be peering upon bare plastic. Note that the wheel
well on these planes was painted white, despite there being little to see in
there.
modelers will want to paint the underside of the cockpit interior
green so the flashlights won't be peering upon bare plastic. Note that the wheel
well on these planes was painted white, despite there being little to see in
there.
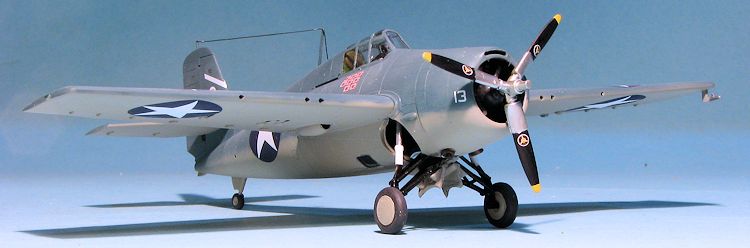
I then cleaned up the landing gear and the prop and painted those items. The longer landing gear pieces will be white on top and black on the lower sections. Note that after I'd built the kit, I read that the wheel well and upper strut were painted 'Grumman Grey', which is apparently a very light grey shade of some sort. The fuselage halves were then glued together.
Next, the wings and tailplanes were glued in place. The fit is excellent and only a teeny bit of filler has been used and that was some superglue where sanding showed a seam. The forward cowling was installed, the canopy masked and installed, the wheel wells and engine opening filled with tissue and I headed for the paint shop.
| COLORS & MARKINGS |
For this kit, I chose an early war scheme from Starfighter Decals 72-114, Early Wildcats part 3. You can find the review in the decal archives. There are four -4 Wildcats from 1942, all in blue-grey over light grey. I started asking for suggestions in paints and during this evolution, found a couple of tinlets of Colourcoats for these shades. The light grey was painted first, then the tailplane undersides masked and the upper blue-grey hand sprayed. I have seen this demarcation line masked and really, the NAVAIR painting instructions call for the upper and lower colors to blend, so no hard line will be accurate, though it may be easy.
 The paint dries very quickly
thanks to using lacquer thinner, but I gave each coat a day. During this I
painted the wheels and the prop. The instructions state that the prop cuffs and
center section were not painted black but left unpainted. I found period photos
showing both, so it seems it is your choice. I chose not to as it was different.
The paint dries very quickly
thanks to using lacquer thinner, but I gave each coat a day. During this I
painted the wheels and the prop. The instructions state that the prop cuffs and
center section were not painted black but left unpainted. I found period photos
showing both, so it seems it is your choice. I chose not to as it was different.
Meanwhile, the landing gear was assembled. This is three pieces and while it looks complex, assembly is actually quite easy. Once on its gear, I added the decals. I decided on the plane flown by Machinist Mate 1st/class Donald Runyon. He was one of the last cadre of enlisted pilots before the Navy felt that only officers had the skill to fly planes. He flew this Wildcat as part of VF6 off USS Enterprise in 1942. Later commissioned, he ended the war with 11 victories and retired as a commander in 1955.
The decals worked very well, even considering I did not gloss coat the airframe first. I used Mr Mark Softer for the setting solution. The decal placement instructions make no mention of the additional upper wing numbers, though they are included. It also does not state whether the score was on both sides or not, though I put them there anyway.
 Once the
decals were on, I attached the wheels, gear door and exhaust. The airframe was
then sprayed with a matte clear and things like the formation lights were then
painted. A radio long wire was added with EZ Line, the masking removed from the
clear bits and the prop installed. When rigging the radio antenna, a small post
has to be installed half way up the side of the fuselage around the second frame
line from the back of the wing. I used some .008 wire for the fuselage feed-in.
Unfortunately, some glue wicked into the line on the upper post and so there is
a non-prototypical curve in it. Some exhaust staining with pastels and that was
it. As a bit of a commentary, I have often wondered why so many modelers will do
such a nice job building and weathering a kit only to leave off things like
painting formation lights or rigging antenna wire. It seems to me that a model
is actually incomplete without these additions. Sure, I'm guilty of not always
adding antennas, but I also feel they are an integral part of a complete model.
Like ducks, your pinons may vary.
Once the
decals were on, I attached the wheels, gear door and exhaust. The airframe was
then sprayed with a matte clear and things like the formation lights were then
painted. A radio long wire was added with EZ Line, the masking removed from the
clear bits and the prop installed. When rigging the radio antenna, a small post
has to be installed half way up the side of the fuselage around the second frame
line from the back of the wing. I used some .008 wire for the fuselage feed-in.
Unfortunately, some glue wicked into the line on the upper post and so there is
a non-prototypical curve in it. Some exhaust staining with pastels and that was
it. As a bit of a commentary, I have often wondered why so many modelers will do
such a nice job building and weathering a kit only to leave off things like
painting formation lights or rigging antenna wire. It seems to me that a model
is actually incomplete without these additions. Sure, I'm guilty of not always
adding antennas, but I also feel they are an integral part of a complete model.
Like ducks, your pinons may vary.
| CONCLUSIONS |
I deliberately chose to build this kit right from the box, save the decals. The kit went together very well. It is not fiddly, did not take very long to build. It really does need a resin cockpit/wheel well as both areas are very Spartan. There are actually quite a number of very nice decal sheets out for this kit. I would choose this over the Academy kit with its odd curved cockpit opening area. Despite what it lacks, I think it is still the most detailed F4F in this scale and if you like the type, pick up one, or two and get the resin cockpit/wheel well for it.
September 2015
If you would like your product reviewed fairly and quickly, please contact me or see other details in the Note to Contributors.