Anigrand Craftworks 1/72 Platt LePage XR-1/1A
| KIT #: | AA-2062 |
| PRICE: | $41.00 SRP |
| DECALS: | Two options |
| REVIEWER: | Scott Van Aken |
| NOTES: | Short run resin with vacuformed clear parts. |
| HISTORY |
In 1937, two engineers, Laurence LePage and Havilland Platt traveled to Germany to view the Focke-Agielis FA-61 tandem-rotor helicopter. There they obtained an option to build this helicopter in the US, but deteriorating conditions between the US and Germany prevented the deal from going through.
 After their return to the US,
they formed Platt LePage Aircraft Company and started to develop their own
tandem rotor design, the PL-1. This new aircraft interested the USAAF, which
advised them to enter a military helicopter competition. The PL-1 was redesigned
to meet military requirements and was given the new rotary wing category's first
designation, XR-1.
After their return to the US,
they formed Platt LePage Aircraft Company and started to develop their own
tandem rotor design, the PL-1. This new aircraft interested the USAAF, which
advised them to enter a military helicopter competition. The PL-1 was redesigned
to meet military requirements and was given the new rotary wing category's first
designation, XR-1.
First flight of the XR-1 was in 1941. Control system problems caused numerous delays. Modifications were made and a second prototype, the XR-1A was built. However, in 1955 the Sikorsky R-4 was named the winner of the competition. The USAAF cancelled all contracts with Platt LePage, with resulted in the closing of the company. Platt LePage subsequently sold their design to McDonnell, resulting in the XHJD-1 Whirlaway.
| THE KIT |
Packaged in their usual very sturdy box and molded in the usual tan resin, the kit is also compartmentalized in a thicker than usual plastic package. This packaging puts all the smaller bits in separate honeycombs from the bigger bits, keeping them from being broken during transit.
 The kit itself looks to be cleaner than the norm with
only one air pocket noticed in the rudder trailing edge, though when I held this
part and the horizontal stabilizer to the light, it was like looking at a cola
frozen in time with a myriad air bubbles just waiting for oversanding. I didn't see any other
glitches in the parts I left in the bag either. I would hope this means that QA
is improving. Since most of this aircraft is fabric covered, there is little in
the way of panel lines. The two large outrigger assemblies are nicely done and
include pegs that fit into holes in the fuselage for a positive alignment. The
rotor heads are convincing to all but the big-time rotor-head and there is room
for additional bits if one has the references. The blades are well formed as
well. A rather complex set of vacuformed bits are provided (again, only one set)
as the entire nose of this aircraft is clear. You are provided with both nose
transparencies for the XR-1 and the updated XR-1A so you have a choice of which
one to do.
The kit itself looks to be cleaner than the norm with
only one air pocket noticed in the rudder trailing edge, though when I held this
part and the horizontal stabilizer to the light, it was like looking at a cola
frozen in time with a myriad air bubbles just waiting for oversanding. I didn't see any other
glitches in the parts I left in the bag either. I would hope this means that QA
is improving. Since most of this aircraft is fabric covered, there is little in
the way of panel lines. The two large outrigger assemblies are nicely done and
include pegs that fit into holes in the fuselage for a positive alignment. The
rotor heads are convincing to all but the big-time rotor-head and there is room
for additional bits if one has the references. The blades are well formed as
well. A rather complex set of vacuformed bits are provided (again, only one set)
as the entire nose of this aircraft is clear. You are provided with both nose
transparencies for the XR-1 and the updated XR-1A so you have a choice of which
one to do.
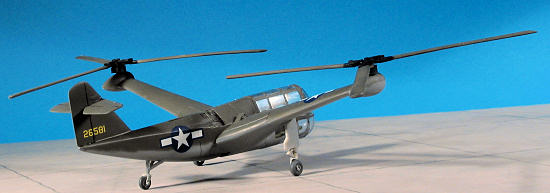
Instructions are the norm with a short history, parts list and exploded view on one side and decal/painting guide on the other. Both of these are in OD over Neutral Grey. A common sheet with insignia is provided with serials on two smaller sheets. Anigrand decals are a bit thicker than the norm, but stick quite well and will eventually succumb to strong setting solutions, though it may take several applications!
| CONSTRUCTION |
First step was to clean up the parts. This meant making
sure the mating surfaces wouldn't cause any problems. This time, I decided to do
some major construction prior to cleaning up all the mold seams. Naturally, I
test fit all the pieces more than one time to be sure that there would be no
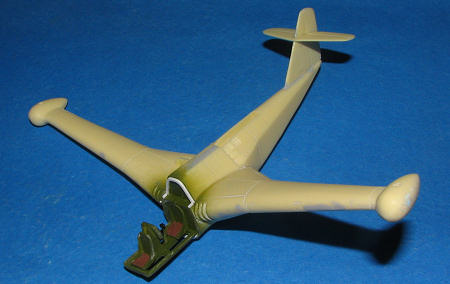
surprises. The fuselage halves fit quite well and so those were cemented
together. Then the outriggers/wings were carefully cleaned up on the join and
they were glued. The fit here was really
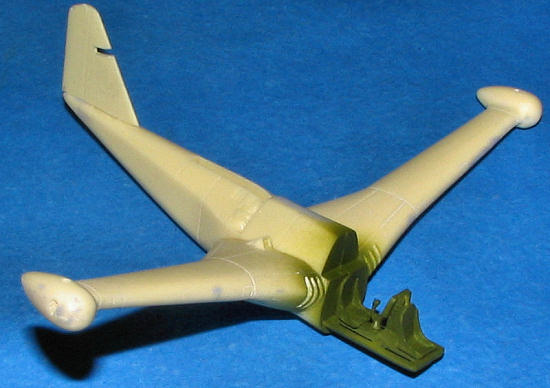 very good. The alignment pins were a
big help and though there were some small gaps, it wasn't a major undertaking.
One very nice thing about this helo is that it has a tail wheel so no need to
worry about where to put nose weight!
very good. The alignment pins were a
big help and though there were some small gaps, it wasn't a major undertaking.
One very nice thing about this helo is that it has a tail wheel so no need to
worry about where to put nose weight!
I then glued on the interior floor, followed by the seats and instrument panel. There is a slot in the rear bulkhead for the floor to sit and makes attachment quite easy. The interior was then painted US Interior Green and the consoles had black instrument faces. At this time, I noticed that the outrigger pods had large holes in them and so I checked the instructions to see if they were supposed to be there (vents or something). Nope, they were large air pockets so I filled them and smoothed out the area.
Next, the tail planes were installed. These fit at an
angle and are somewhat thinner than the slot into which they fit. Glue and
filler took care of the gaps.
At this time, I decided to tackle the canopy before adding anything else. Assembling three sections of vacuformed canopy to each other is not an easy task. Especially for the vac canopy challenged. Thinking things over, I decided to install sections of Evergreen strip to the bulkhead so that the canopy would have something with some area to attach itself to. The thin square section was easy to bend to shape and when I was pretty happy with it, I cemented it in place.
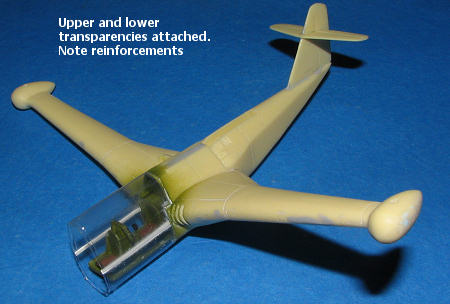 I
also trimmed the upper canopy section to fit as well as I could and added some
thin flat strip to the lower section. The bottom canopy section will eventually
fit onto this piece to mate the two together. However, I concentrated on getting
the top piece to fit first. This took quite a bit of fiddling and delayed the
build quite a bit while working on it a tiny bit at a time. I eventually
superglued the upper piece in place then worked on the lower section. Naturally,
the canopy pieces are a bit oversized so I had to trim the lower part a bit more
than I'd have liked. While doing this, I kept testing to see that the front
piece would still fit as I didn't want that part to be too big. No easy way to
reduce a bubble shape. Eventually, I got the lower part the right
I
also trimmed the upper canopy section to fit as well as I could and added some
thin flat strip to the lower section. The bottom canopy section will eventually
fit onto this piece to mate the two together. However, I concentrated on getting
the top piece to fit first. This took quite a bit of fiddling and delayed the
build quite a bit while working on it a tiny bit at a time. I eventually
superglued the upper piece in place then worked on the lower section. Naturally,
the canopy pieces are a bit oversized so I had to trim the lower part a bit more
than I'd have liked. While doing this, I kept testing to see that the front
piece would still fit as I didn't want that part to be too big. No easy way to
reduce a bubble shape. Eventually, I got the lower part the right
 shape
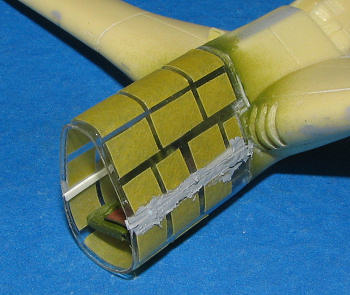
and cemented it in place, again, using super glue. I put filler on the seam and
tried to smooth things out. Made a mess is what it did and I'm not sure it was
much of an improvement. I was about to attach the nose piece and realized I'd
not painted the plastic strips on the inside. DOH! I did the best I could to get
the
shape
and cemented it in place, again, using super glue. I put filler on the seam and
tried to smooth things out. Made a mess is what it did and I'm not sure it was
much of an improvement. I was about to attach the nose piece and realized I'd
not painted the plastic strips on the inside. DOH! I did the best I could to get
the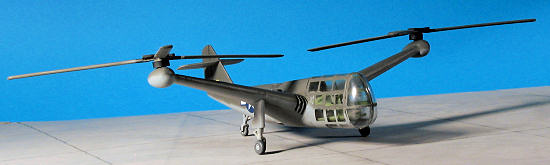 m , but fear I made a bit more of
a mess of things. After trimming and masking the nose section, I tacked it in
place at the top and bottom with a dab of super glue and then filled the rest in
with white glue.
m , but fear I made a bit more of
a mess of things. After trimming and masking the nose section, I tacked it in
place at the top and bottom with a dab of super glue and then filled the rest in
with white glue.
With that done, I glued on all three of the landing gear. You have to carefully trim on the main gear legs to get them to fit properly. The tail gear has a couple of braces to help out and the wheel is molded on the gear leg making it a bit more sturdy than it would normally be. There are two exhaust (but perhaps they are intakes); one for the XR-1 and the other for the XR-1A (which is this aircraft). The XR-1A has an odd wedge shaped part that I'm not really sure how it works, but it was glued in place as shown on the exploded view.
 My
attention then turned to the rotors. First I laid out the blades as three are
right handed and three are left handed. Someone at Anigrand can't count as I had
four blades facing one way and two the other! The fix is easy, but I shouldn't
have to make it. To fit the blades into the hubs all the way, a section of the
upper angle shaped piece needs to be removed. About half the thickness will do
it and it just takes a few slices with a
My
attention then turned to the rotors. First I laid out the blades as three are
right handed and three are left handed. Someone at Anigrand can't count as I had
four blades facing one way and two the other! The fix is easy, but I shouldn't
have to make it. To fit the blades into the hubs all the way, a section of the
upper angle shaped piece needs to be removed. About half the thickness will do
it and it just takes a few slices with a
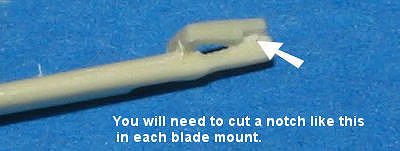
 scalpel to do it. After getting all of
one set of blades done, I attached the two good blades to the other hub. For the
third blade, I first cut a small notch in the angled section on the upper side.
Then I removed the angled section completely. The blade root was cleaned up and
then flipped over and installed to match the others. It was then a simple matter
to glue the angled bit in place. On another blade I cut too much and nipped the
end off a piece. A section of card was all it took to repair things.
scalpel to do it. After getting all of
one set of blades done, I attached the two good blades to the other hub. For the
third blade, I first cut a small notch in the angled section on the upper side.
Then I removed the angled section completely. The blade root was cleaned up and
then flipped over and installed to match the others. It was then a simple matter
to glue the angled bit in place. On another blade I cut too much and nipped the
end off a piece. A section of card was all it took to repair things.
All of the above took about a month as this is one of those kits where you get to a hang up and then it is best to either go very slowly to get past it, or step away from it for a few days. The canopy section caused me quite a bit of concern about how to best handle things, and while I think that the results are not bad, I went very slowly on it, doing a bit then setting it aside while I worked on other kits before coming back to the next step. I'm sure some of you would just work through, but I don't seem to be wired like that. The good news is that the kit didn't join the slowly growing pile of stuff not worked on for years. Now that all was together and the clear bits masked, it was time for paint.
| COLORS & MARKINGS |
 I used Model Master enamels for this as I have a lot of
them and the colors are pretty basic. First was to spray the entire canopy
section with US Interior Green so that is what you'd see when looking inside.
When that dried, I sprayed the entire underside with Neutral Grey. Masking off
some of the areas to prevent overspray, the upper surface of the airframe and
both sides of the rotor blades were painted Olive Drab with the hubs in black.
As the aircraft wasn't in combat, I used the fresh OD rather than the faded
shade. At least that is my excuse and I'm sticking to it. I could have used
other phrases of the lazy like "it was the CO's plane so kept in immaculate
condition" or "the Navy always kept its planes in tip top shape", or "these
planes were always thoroughly cleaned after every mission", or any of a number
of other excuses. I got a million of them. Actually, I generally don't like
ratty-looking planes, no matter how accurate, and prefer to model them with only
minor weathering.
I used Model Master enamels for this as I have a lot of
them and the colors are pretty basic. First was to spray the entire canopy
section with US Interior Green so that is what you'd see when looking inside.
When that dried, I sprayed the entire underside with Neutral Grey. Masking off
some of the areas to prevent overspray, the upper surface of the airframe and
both sides of the rotor blades were painted Olive Drab with the hubs in black.
As the aircraft wasn't in combat, I used the fresh OD rather than the faded
shade. At least that is my excuse and I'm sticking to it. I could have used
other phrases of the lazy like "it was the CO's plane so kept in immaculate
condition" or "the Navy always kept its planes in tip top shape", or "these
planes were always thoroughly cleaned after every mission", or any of a number
of other excuses. I got a million of them. Actually, I generally don't like
ratty-looking planes, no matter how accurate, and prefer to model them with only
minor weathering.
| FINAL CONSTRUCTION |
With all the bits painted, there was little left to do
but put a coat of gloss clear on it in preparation for decals. I used what came
with the kit and found they went on with no trouble, though refused to conform
to the panel lines. When dry, a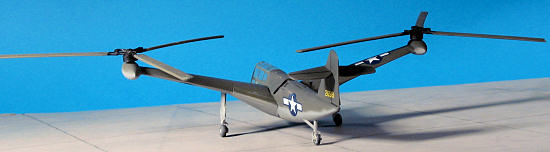 fingernail was enough to get them to conform. I then drilled out the
wheels with a #53 drill bit, glued on the wheels and did some detail painting of
the exhaust, tail wheel, and a bit of touchup. Once I was happy with that
cemented the blade assemblies in place. The kit instructions show which goes on
which side. I then sprayed clear matte on the model using the Vallejo clear
matte acrylic which I just squeezed into the bottom of my airbrush to use. Then
I removed the masking from the clear bits. As I'd feared, I had smudged a number
of windows trying to get paint on the inside brace. We live and learn. A bit of
pastel for the exhaust and I was done.
fingernail was enough to get them to conform. I then drilled out the
wheels with a #53 drill bit, glued on the wheels and did some detail painting of
the exhaust, tail wheel, and a bit of touchup. Once I was happy with that
cemented the blade assemblies in place. The kit instructions show which goes on
which side. I then sprayed clear matte on the model using the Vallejo clear
matte acrylic which I just squeezed into the bottom of my airbrush to use. Then
I removed the masking from the clear bits. As I'd feared, I had smudged a number
of windows trying to get paint on the inside brace. We live and learn. A bit of
pastel for the exhaust and I was done.
| CONCLUSIONS |
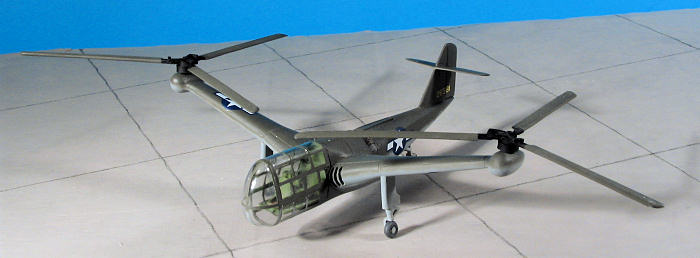
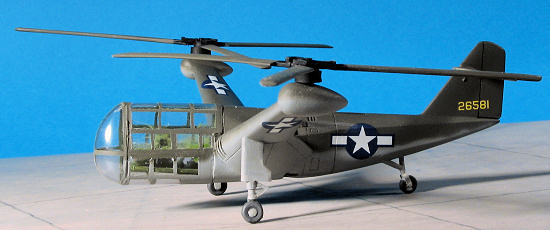
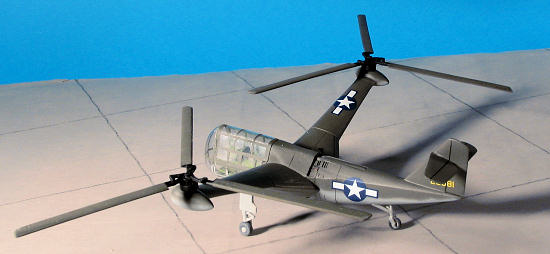
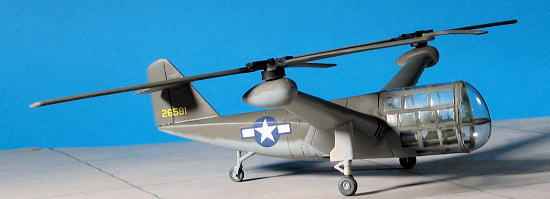
Well, despite not having the clear bits turn out as well as I'd like, the overall model isn't bad. I'd droop the rotor blades a bit more on the next one as they are too horizontal, but if you consider that this one wasn't the easiest in the world, I'm pretty happy with the way it turned out. I had a chance to try a few new things and didn't do too badly on them. If you are into early helos, I doubt if you'll find a better place to find some of these early birds.
October 2006
Copyright ModelingMadness.com. All rights reserved. No reproduction without express permission from the editor.
If you would like your product reviewed fairly and fairly quickly, please contact the editor or see other details in the Note to Contributors.