
Anigrand 1/72 Republic XP-69
| KIT #: | AA-2069 |
| PRICE: | $44.00 |
| DECALS: | One option |
| REVIEWER: | Scott Van Aken |
| NOTES: | Resin kit with vacuformed canopy. |
| HISTORY |
One of the more interesting aircraft power plants under
development during WWII was the Wright R-2160 42 cylinder, 2,500 hp engine. A
large diameter contra-rotating prop was planned to deliver this mass of power.
The Republic XP-69 was designed around this large engine and in July 1941,
two examples were ordered. A 3/4 scale mockup wa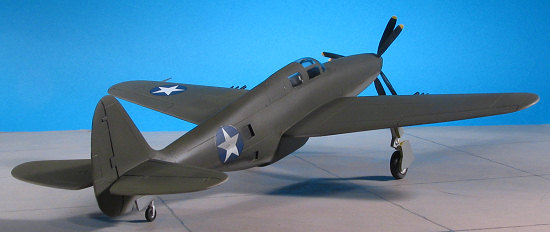 s
inspected in June of 1942 by by May 1943, it was felt that the XP-72 would fill
the requirements and so further development of the XP-69 was cancelled before a
prototype was built.
s
inspected in June of 1942 by by May 1943, it was felt that the XP-72 would fill
the requirements and so further development of the XP-69 was cancelled before a
prototype was built.
One major change from the mock-up was to have been the inclusion of a 'bubble' canopy for better vision. There would have been a large intake below the wing with armament set at 2 .50 cal machine guns and a single 37mm cannon in each wing. It was estimated that a speed of 450 mph would be reached at 35,000 feet and it would take the aircraft 20 minutes to reach that altitude. With a fuel capacity of 700 gallons, range was hoped to be 1,800 miles.
This kit is of the version shown in the mock-up.
| THE KIT |
Upon opening the sturdy cardboard box, one finds the usual compartmentalized bag containing the kit parts. I found this particular kit to be one of the better molded Anigrand kits with little in the way of pinholes and other resin glitches. The wings, horizontal stabs and fin/rudder/aft fuselage are all a single casting. There are alignment pin holes in the wing roots for the wings and in the fin for the horizontal stabs. Unfortunately, the resin pins on the stabs are almost non-existent, appearing to either be short shot or broken away. Nonetheless, it is a nice thought.
The cockpit is Spartan with but a set and a control
column. Apparently the XP-69 was to be flown like a P-38 and one has a wheel in
place of the standard stick. The resin landing gear are quite sturdy and should
hold up  to the weight of the kit.
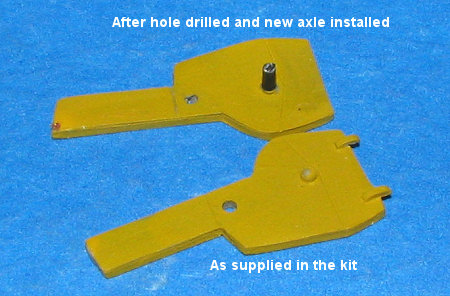
An unusual feature is that the gear legs attach to the gear door and a bit down
on the door is a stub axle for the wheel. Whether by design or just a short
shot, these stubs are so short that there is no way you can attach a wheel to
it. You'll need to make axles for it out of plastic rod or some other material.
I suggest drilling out the old one, inserting the new axle and then filling the
hole in the gear door. Wheels seem a bit generic, but should work well.
to the weight of the kit.
An unusual feature is that the gear legs attach to the gear door and a bit down
on the door is a stub axle for the wheel. Whether by design or just a short
shot, these stubs are so short that there is no way you can attach a wheel to
it. You'll need to make axles for it out of plastic rod or some other material.
I suggest drilling out the old one, inserting the new axle and then filling the
hole in the gear door. Wheels seem a bit generic, but should work well.
The kit has a contra-rotating prop. The blades are molded in left and right hand though I'm not sure which goes where (as in front and rear). A second set of props is provided so that you can make an XP-54 kit into the XP-68, which is apparently only differed by the engine/prop from the prototype XP-54. It is nice to have this included and adds some extra value to the kit. The single vac canopy is Anigrand's usual quality. It seems that the frame lines on this one are more distinct than in the past, though I'd still like them to be proud of the surface to make it easier to mask. The builder will have to make the gun barrels and pitot tube from the resin rod sections provided. I'd replace them with plastic or metal tubing.
The instructions differ somewhat from earlier versions with one side of the sheet containing the exploded view and parts listing. The other has the markings guide a photo of the mock-up and historical section. A set of generic insignia is provided, which is more than adequate for this aircraft.
| CONSTRUCTION |
 I know you have heard it before, but the best way to
deal with resin kits is to first clean up all the major parts. In this case, not
much was needed aside from the usual pinholes in the wing tips and trailing
edges of the stabs and rudder. Then, not that many at all. This is one of the
cleanest Anigrand kits I've seen in this respect in a long time. While the
filler was drying, I painted the interior with Testors US Interior Green enamel
and also painted the black instrument panel section. You know, these kits would
really benefit from a decal instrument panel and decal seat belts. Anigrand
could do a whole sheet of belts and cut off what is needed for each kit. Same
for the instrument panels. I'm not sure if these articles are read by them, but
it would be a very nice touch and cost nearly nothing extra.
I know you have heard it before, but the best way to
deal with resin kits is to first clean up all the major parts. In this case, not
much was needed aside from the usual pinholes in the wing tips and trailing
edges of the stabs and rudder. Then, not that many at all. This is one of the
cleanest Anigrand kits I've seen in this respect in a long time. While the
filler was drying, I painted the interior with Testors US Interior Green enamel
and also painted the black instrument panel section. You know, these kits would
really benefit from a decal instrument panel and decal seat belts. Anigrand
could do a whole sheet of belts and cut off what is needed for each kit. Same
for the instrument panels. I'm not sure if these articles are read by them, but
it would be a very nice touch and cost nearly nothing extra.
Once the main pieces were cleaned up and the holes
filled and sanded, I glued the fuselage halves together. Not needing nose weight
is nice. I basically started with the upper front and got that area all aligned
and cemented together. Then the rest of it was easy to do. I used super glue and
allowed the excess to ooze out the seam. This helped to lessen the amount of
filler used later. The separate tail section needs to have the mounting lug
trimmed down as it is too large. Fit is excellent and again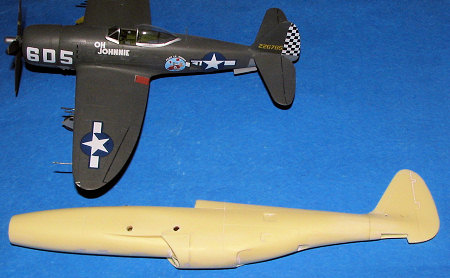 ,
the oozing super glue helped to fill in some pin holes on the aft fuselage
mating surface. I also glued on the lower intake piece. This is a tad too large
as it sticks out a bit from the rest of the fuselage. Once that was glued on and
filler applied around it, I sanded it down to where it was flush with the rest
of the fuselage. Took very little time to do. Just for fun, I took a photo of
this kit's fuselage along with a Tamiya 1/72 P-47, itself not a small plane. The
XP-69 would have been huge.
,
the oozing super glue helped to fill in some pin holes on the aft fuselage
mating surface. I also glued on the lower intake piece. This is a tad too large
as it sticks out a bit from the rest of the fuselage. Once that was glued on and
filler applied around it, I sanded it down to where it was flush with the rest
of the fuselage. Took very little time to do. Just for fun, I took a photo of
this kit's fuselage along with a Tamiya 1/72 P-47, itself not a small plane. The
XP-69 would have been huge.
Next, I attached the wings. I was very pleasantly
surprised by the excellent fit of these. They seemed to have the correct
dihedral  built into the molding and in no time, they were on. Filler was used on
some of the seams, but then, I do that on all kits and only used Mr. Surfacer
500 as a filler. The tail planes were next. Despite the little stubs for pins,
they did fit into the holes. Like the wings, these are handed to get the right
angle. They fit very well and I was very surprised at how short a time it took
to get a complete basic airframe. All during this I was applying second coats of
filler if needed so I could fill in all the gaps. Mr Surfacer is great stuff,
but very thin and not good at all for major gaps. So far, I'd found none.
built into the molding and in no time, they were on. Filler was used on
some of the seams, but then, I do that on all kits and only used Mr. Surfacer
500 as a filler. The tail planes were next. Despite the little stubs for pins,
they did fit into the holes. Like the wings, these are handed to get the right
angle. They fit very well and I was very surprised at how short a time it took
to get a complete basic airframe. All during this I was applying second coats of
filler if needed so I could fill in all the gaps. Mr Surfacer is great stuff,
but very thin and not good at all for major gaps. So far, I'd found none.
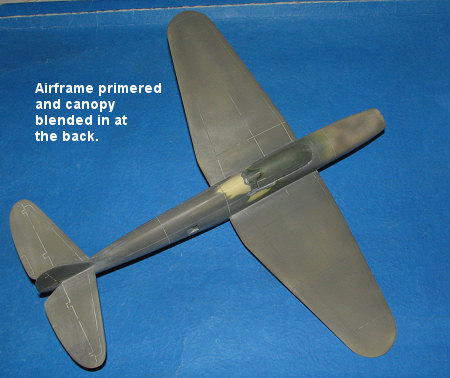
Next, the cockpit had its various bits added in and I started on the (to me) laborious job of trimming the canopy to fit. Though I did hose it up a bit, I finally got it to where it would fit. The little ledges on the inside are a great help in getting these things properly in place and were I not such a klutz at these, it would have been perfect. I used several applications of white glue followed by some Mr. Surfacer 500 to blend things in. At this time, it was decided to do the paint shop thing.
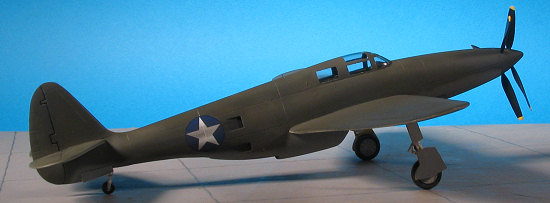
| COLORS & MARKINGS |
 OD
and Neutral Grey. Doesn't get much easier than that. I first painted US Interior
Green over the outside of the canopy, which showed a few more areas that needed
fixed, but I waited until the model had an overall coat of Alclad II primer.
This stuff seems to stick a bit better to resin than others I've tried. My
bottle seemed to want to put the primer on rather coarse and left the surface
feeling gritty. The only cure was an overall sanding with 1000 grit paper to
remove that grit. This showed up a few areas I'd missed so back with the filler
and sanding to take care of them.
OD
and Neutral Grey. Doesn't get much easier than that. I first painted US Interior
Green over the outside of the canopy, which showed a few more areas that needed
fixed, but I waited until the model had an overall coat of Alclad II primer.
This stuff seems to stick a bit better to resin than others I've tried. My
bottle seemed to want to put the primer on rather coarse and left the surface
feeling gritty. The only cure was an overall sanding with 1000 grit paper to
remove that grit. This showed up a few areas I'd missed so back with the filler
and sanding to take care of them.
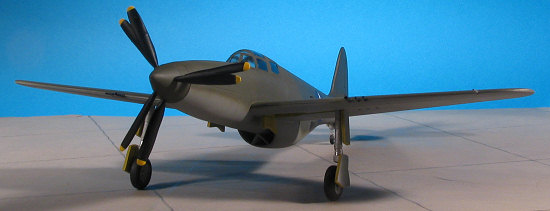
Then the lower surface was painted first. When dry, the
 underside of the tail planes was
masked and the upper OD was painted on. Then back to the underside shade to take
care of any overspray. The shell ejector chutes and exhaust areas were then
blackened with a drafting pen as were the control surface panel lines. A coat of
Future clear gloss acrylic was sprayed where the decals would go.
underside of the tail planes was
masked and the upper OD was painted on. Then back to the underside shade to take
care of any overspray. The shell ejector chutes and exhaust areas were then
blackened with a drafting pen as were the control surface panel lines. A coat of
Future clear gloss acrylic was sprayed where the decals would go.
When dry, the decals were placed on. Basically four insignia as that is all that is supplied. I may add tail number at a later date, but for now, it is OOB. The kit decals are fine but do not want to snuggle down into any of the panel lines. I've run into this with them before and even Solvaset does nothing, so I used nothing on them. The decals are a teeny bit transparent at the outer edge where the white undercoat does not reach. Makes the insignia look like it has a dark blue surround to it. You may want to use aftermarket if this is an issue.
| FINAL BITS |
I took the model back to the bench to handle the
landing gear and props and guns. First, the wheel wells and inside of the gear
covers were painted with yellow zinc chromate. I use the stuff in the small
Testors bottles, and brush paint it on (GASP!). I also had to tend to the axles
(or lack thereof). This was relatively painless, but you do need a set of drill
bits larger than #61. I picked a piece of plastic rod
 from
my ancient and dwindling supply of Contrail rod ($1.98 price tag) that pretty
well matched the hole in the wheel. Then matched it with a drill bit. With much
care, I slowly drilled into the gear door until it was deep enough to hold the
rod. Then the rod was superglued in place and trimmed down while test fitting
the wheel to be sure it didn't stick out too much. Actually takes longer to type
about it than to do it.
from
my ancient and dwindling supply of Contrail rod ($1.98 price tag) that pretty
well matched the hole in the wheel. Then matched it with a drill bit. With much
care, I slowly drilled into the gear door until it was deep enough to hold the
rod. Then the rod was superglued in place and trimmed down while test fitting
the wheel to be sure it didn't stick out too much. Actually takes longer to type
about it than to do it.
Next, the upper gear leg was attached to the hole in
the gear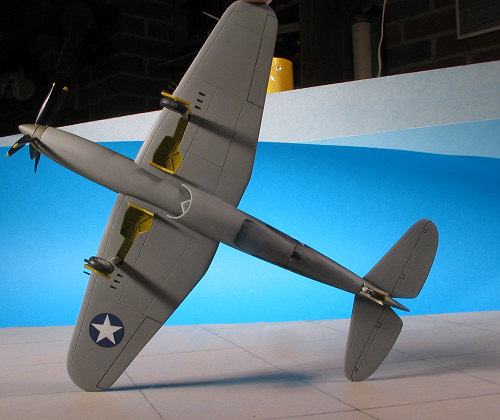 door. I suggest cutting
the door sections first as it makes it easier. I then filled the resultant hole
with superglue, sanding it down and repainted the outer gear door (again, using
a brush). In the wing, there are no gear attachment points. I need these things
so matched the small tab on the top of the gear leg to a drill bit, and once
again, carefully drilled a hole. I also had to trim down the pin on the top of
the gear and much test fitting was involved.
door. I suggest cutting
the door sections first as it makes it easier. I then filled the resultant hole
with superglue, sanding it down and repainted the outer gear door (again, using
a brush). In the wing, there are no gear attachment points. I need these things
so matched the small tab on the top of the gear leg to a drill bit, and once
again, carefully drilled a hole. I also had to trim down the pin on the top of
the gear and much test fitting was involved.
Then the wheels were glued on and when dry, the main and tail gear were cemented in place along with their doors. The tail gear doors are a teensy bit shorter than the gap, but shouldn't cause any distress. I also took some artistic license and cut the upper main door panel. Shows it attached to the center bit in the instructions, but just looked too odd to me so, since there was a demarcation line, I cut it. I also suggest cutting these doors using the outside lines as they don't exactly match the inner door marks.
OK, so the landing gear situation was done. On to the guns and pitot tube. These were made from stainless steel or Contrail tubing. I used the Contrail stuff for the larger 37mm cannon barrels. All the holes had to be drilled out a bit more and then the guns were pressed into place. This was followed by an application of clear paint to hold them in. This works better for me than using superglue when there is no stress on the part. It just flows into the join better and any stuff 'spilled' doesn't result in a lump that needs sanded down.
 Finally,
the prop was assembled. Looking at the blades, it was obvious that they were
molded differently in terms of pitch. Looking at various images of
contra-rotating props, I determined the that back set went clockwise when
looking at it from the front and went from there. These then were glued on and
painted. These blades also need quite a bit of cleaning up to remove mold seams.
I probably didn't get them all. The prop was then tacked into place using a dab
of superglue. A coat of matte clear acrylic ( I used Vallejo this time) was
sprayed to lock things in and flatten out the area around the decals.
Unfortunately, there was some silvering around the edges. A bit of pastel
exhaust, the tape was removed from the canopy and the guns painted with
Gunmetal. That was it.
Finally,
the prop was assembled. Looking at the blades, it was obvious that they were
molded differently in terms of pitch. Looking at various images of
contra-rotating props, I determined the that back set went clockwise when
looking at it from the front and went from there. These then were glued on and
painted. These blades also need quite a bit of cleaning up to remove mold seams.
I probably didn't get them all. The prop was then tacked into place using a dab
of superglue. A coat of matte clear acrylic ( I used Vallejo this time) was
sprayed to lock things in and flatten out the area around the decals.
Unfortunately, there was some silvering around the edges. A bit of pastel
exhaust, the tape was removed from the canopy and the guns painted with
Gunmetal. That was it.
| CONCLUSIONS |
 This is
one of the nicest Anigrand kits I've ever done. The construction was relatively
painless and I really liked how the wings and tail planes were molded so that I
would get such a nice fit. I think the kit would really benefit from generic
harness and instrument panel decals and perhaps this is something that Anigrand
might consider for future releases. It makes into a fairly large airplane that
somewhat dwarfs the C-12 kit I build previously. It would make a perfect
introductory kit into the genre.
This is
one of the nicest Anigrand kits I've ever done. The construction was relatively
painless and I really liked how the wings and tail planes were molded so that I
would get such a nice fit. I think the kit would really benefit from generic
harness and instrument panel decals and perhaps this is something that Anigrand
might consider for future releases. It makes into a fairly large airplane that
somewhat dwarfs the C-12 kit I build previously. It would make a perfect
introductory kit into the genre.
| REFERENCES |
US Fighters: Army - Air Force, 1925 to 1980s. Lloyd S. Jones, 1975, Aero Publishers
December 2006
#1446 in a series
Copyright ModelingMadness.com. All rights reserved. No reproduction in part or in whole without express permission from the editor.
If you would like your product reviewed fairly and quickly, please contact the editor or see other details in the Note to Contributors.