| KIT #: | 61086 |
| PRICE: | $10.00 on the clearance table |
| DECALS: | Two options |
| REVIEWER: | Scott Van Aken |
| NOTES: |
| HISTORY |
The
Republic P-47 Thunderbolt
was the largest, heaviest, and most expensive fighter aircraft in history to be
powered by a single piston engine.It was heavily armed with eight .50-caliber
machine guns, four per wing. When fully loaded, the P-47 weighed up to eight
tons, and in the fighter-bomber ground-attack
 roles could
carry five-inch rockets or a significant bomb load of 2,500 pounds; over half
the weight the B-17 bomber could carry on long-range missions (although the B-17
had a far greater range). The P-47, based on the powerful Pratt & Whitney R-2800
Double Wasp engine, was to be very effective as a short-to-medium range escort
fighter in high-altitude air-to-air combat and, when unleashed as a
fighter-bomber, proved especially adept at ground attack in both the World War
II European and Pacific Theaters.
roles could
carry five-inch rockets or a significant bomb load of 2,500 pounds; over half
the weight the B-17 bomber could carry on long-range missions (although the B-17
had a far greater range). The P-47, based on the powerful Pratt & Whitney R-2800
Double Wasp engine, was to be very effective as a short-to-medium range escort
fighter in high-altitude air-to-air combat and, when unleashed as a
fighter-bomber, proved especially adept at ground attack in both the World War
II European and Pacific Theaters.
The P-47 was one of the main United States Army Air Forces (USAAF) fighters of World War II, and served with other Allied air forces, notably those of France, Britain, and Russia. Mexican and Brazilian squadrons fighting alongside the U.S. were equipped with the P-47.
The armored cockpit was roomy inside, comfortable for the pilot, and offered good visibility. A modern-day U.S. ground-attack aircraft, the Fairchild Republic A-10 Thunderbolt II, takes its name from the P-47.
| THE KIT |
Molded in their somewhat hard medium grey plastic, Tamiya's kit of the P-47D comes with all the bits needed to do a variety of different razorback versions, starting with the D-11 variant, the first to have the 'cut away' lower cowl flaps. Earlier versions can be done by either adding some plastic card or buying an aftermarket cowl flap piece.
The kit comes with a nicely appointed
cockpit, complete with a decal for the raised detail instrument
 panel. There
is good sidewall detail and the seat is properly done with a separate frame.
A nice addition by Tamiya is a seat belt decal, something I wish all model
companies provided for their plane kits.
panel. There
is good sidewall detail and the seat is properly done with a separate frame.
A nice addition by Tamiya is a seat belt decal, something I wish all model
companies provided for their plane kits.
A hefty wing spar is provided to ensure proper wing alignment and the engine face has a choice of two magneto designs, one for each decal option. The prop is held in place by a poly cap hidden inside the crancase cover. Optional open or closed cowl flaps are provided. Also optional are open or closed waste gate pieces for the side of the rear fuselage. Tamiya has provided alternate insignia to take care of this feature.
There is a separate insert for the front of the wings and this will hold the eight separate gun barrels provided in the kit. Landing gear are well done with a choice of spoked or covered wheels for the main wheel. Another choice is raised or lowered flaps. Interestingly, when I researched this, I found that most photos of wartime P-47s had the flaps raised, yet most photos of post-war planes had them lowered. The kit offers three different props, a Hamilton Standard, Curtiss-Electric paddle blade and Curtiss-Electric 'pointy tip' version. A pilot is included to fill the seat if one so wishes.
I like that the pylons for this aircraft are separate as early razor backs did not have them. Armament consists of rocket launcher tubes, 500 lb bombs or one can install a pair of paper 108 gallon tanks. A flattish centerline drop tank is also included. The canopy and windscreen are separate and while it only shows it closed, it can be posed open if one wishes.
 Instructions are typical Tamiya offering only
Tamiya color references. Markings are for two OD over Neutral Grey planes.
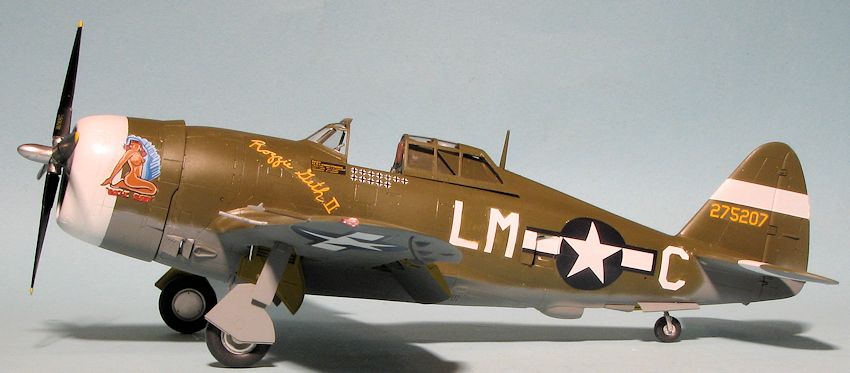
One is the box art aircraft with the 61st FS/56 FG in March of 1944. The
other is with the 63rd FS/56 FG, also in March of 1944. Both are flown by
aces. The white tail stripes are included as is an extensive data suite. The
decals are nicely printed and work with some setting solutions.
Instructions are typical Tamiya offering only
Tamiya color references. Markings are for two OD over Neutral Grey planes.
One is the box art aircraft with the 61st FS/56 FG in March of 1944. The
other is with the 63rd FS/56 FG, also in March of 1944. Both are flown by
aces. The white tail stripes are included as is an extensive data suite. The
decals are nicely printed and work with some setting solutions.
| CONSTRUCTION |
As this is the first 1/48 Tamiya P-47 I've built, I thought that following the instructions might not be a bad idea. In that regard, there was a lot of painting to do. I chose a darkish green for the cockpit itself and painted wheel wells and inner gear doors and some other bits with yellow chromate. Then, using the instructions as a guide, the interior bits were picked out with various colors. I gave it all a dry-brushing with white before starting to assemble the cockpit pieces. I like that Tamiya provides a decal seat harness, though I'm sure that etched belts will look nicer.
The kit provides decals for the instruments as well though
they pretty well disappear when placed on a black panel. Several options are
given for gun sights but only one is shown in the instructions. I undoubtedly
used the wrong one for the plane I'm doing! The cockpit tub does go together
well with the parts having positive locators, something that Tamiya is known for
providing.
the wrong one for the plane I'm doing! The cockpit tub does go together
well with the parts having positive locators, something that Tamiya is known for
providing.
Next was to place several inserts in the fuselage as well as the large wing spar piece. I had some difficulty getting the cockpit tub in place and one has to lift up on the turbocharger gate piece to get the fuselage halves together. The wing spars were a particularly tight fit. Then all the fuselage seams got the super glue treatment so there would be no sink lines later.
I then installed the tail planes and then after gluing the wing halves together, installed the gun barrel insert. This latter piece fit fairly well, but not perfectly. The wings were then slid into place, and thanks to the wing spars, fit very well. I next masked off and installed the cockpit canopy bits, snapping the canopy itself into place, hoping to be able to get it free at the end of the build for an open cockpit.
The engine was painted up and installed using what I hoped were the proper magneto heads! The tail gear assembly was installed and it was then time for painting.
| COLORS & MARKINGS |
I chose to do a D-11 from an old Aeromaster sheet. This was for the first P-47 pilot to get six victories in a single mission. His plane was pretty standard stuff with a white forward cowling and white tail stripes. I had to paint the forward cowling white and did so using Tamiya X-2 paint. This was later masked off and the engine installed. Once it was glued to the fuselage, I filled the opening with tissue and painted the underside Neutral Grey before masking areas of that and painting the rest of the airframe with Olive Drab. I used Model Master Enamels for these shades. I also painted the landing gear in OD as a forum member mentioned that this was the standard color for the Thunderbolt landing gear. This is when the first disaster occurred.
Somehow, my feline companions found the drying landing gear
and made off with them. After searching I found one, but needed two. Thankfully,
Scale Aircraft Conversions came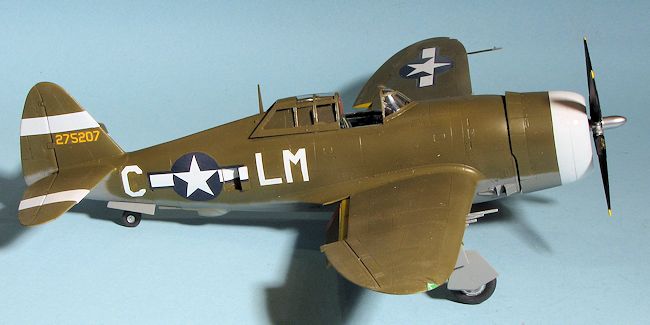 to the rescue with set 48050, which is designed
for the Tamiya kit. Now it meant that one gear would not have the oleo scissor
that was attached to the missing ones, but better than nothing. That was painted
up and installed and is a perfect fit.
to the rescue with set 48050, which is designed
for the Tamiya kit. Now it meant that one gear would not have the oleo scissor
that was attached to the missing ones, but better than nothing. That was painted
up and installed and is a perfect fit.
Next I gave the kit a coat of clear gloss and started on the decals. I decided to use Aeromaster decals 48-786 for this scheme. As mentioned it had the plane of Fred Christiansen, the first 8th AF pilot to shoot down 6 planes in a single mission. I started with the fuselage insignia. I found that the aftermarket sheet markings were a bit large when it came to the area around the open fuselage doors so trimmed that decal and put a kit decal on the other side. I then noticed that the Aeromaster decal did not snuggle down. In fact, none of the various setting solutions from Microscale, Champ, Mr. Mark Softer, or Solvaset did a damn thing. Eventually, I got on all the appropriate markings and realized I had real issues with silvering. I should have put them in a puddle of Future, but have had difficulty getting those puddles to flatten out along with the rest of the airframe so did not. I eventually had to paint all the areas I could reach with a brush to remove the silvering as it was pretty extensive. These decals were printed in Mexico and I was so disgusted with them that I tossed the rest of the sheet into the trash. Now I could easily have removed the offending decals and put on another set as I surely have a lot of OD/Neutral Grey D-11 Thunderbolt decals, but I really wanted to do this one so stuck with it.
With the decals on and the silvering painted out as best I could, I gave it another clear coat and decided to move along.
| CONSTRUCTION CONTINUES |
Next step was to install the wheels. The SAC
gear will not totally fit the Tamiya wheels. You see, the SAC leg is the
correct diameter for the hole in the wheel, but most of the axle has to go
into the wheel hub insert, which is smaller. I simply drilled out the insert
before installing the combo. The tail wheel
 was glued in place as well. I
then started attaching the gear doors. These fit well with no real issues. I
did have difficulty getting the inner gear door retraction strut pieces in
place as it is in an awkward position. The masking was removed from the
clear bits and the canopy popped out and replaced in the open position using
matte clear paint to hold it in place. I also glued on the flaps. These can
be built either up or down. Interestingly, when I did a web search for
images, I found just about all the WWII photos with the flaps up and nearly
all the post war images with the flaps down. Now I'm not sure if the should
be all OD or show the primer, but I went with the latter. It is an easy
enough thing to repaint if I find out later this wasn't the way it was.
was glued in place as well. I
then started attaching the gear doors. These fit well with no real issues. I
did have difficulty getting the inner gear door retraction strut pieces in
place as it is in an awkward position. The masking was removed from the
clear bits and the canopy popped out and replaced in the open position using
matte clear paint to hold it in place. I also glued on the flaps. These can
be built either up or down. Interestingly, when I did a web search for
images, I found just about all the WWII photos with the flaps up and nearly
all the post war images with the flaps down. Now I'm not sure if the should
be all OD or show the primer, but I went with the latter. It is an easy
enough thing to repaint if I find out later this wasn't the way it was.
The kit was missing several of the gun barrels so I used a Quickboost set. These barrels, while for the Tamiya kit, are all different lengths (the kit ones are all the same length and the hole depth is different) so only the longest one actually fits as it is. The others had to be carefully inserted just so far. Again, I used matte clear paint to hold them in place. A mirror was placed atop the windscreen, the pitot tube installed along with the clear bits for the landing light and tip lights. The prop was pushed in place and that was it. BTW, I forgot to attach the centerline tank when I took the photos. It will be installed soon.
| CONCLUSIONS |
This is a very nice kit, but many of you knew that already. The glitches I suffered had nothing to do with the kit, but with missing parts and the decals. It is odd that it has taken me this long to build a 1/48 Tamiya P-47, but I can see where I need to do another one in the near future. It is a kit that I know you'll enjoy and I can see why these are all over the place at contests.
| REFERENCES |
http://en.wikipedia.org/wiki/P-47
October 2013
Thanks to Scale Aircraft Conversions for the metal landing gear. You can find this kit at your favorite hobby shop or on-line retailer.
If you would like your product reviewed fairly and fairly quickly, please contact the editor or see other details in the Note to Contributors.